Hola queridos Hivers.
Hola queridos Hivers.
Hello, dear Hivers.
🔸 Espero estén pasando un lindo domingo, en esta oportunidad compartiré con ustedes una publicación tutorial, que servirá de guía para enseñarles a quitar fondos a las imágenes de su preferencia, es algo muy básico pero que muchos desconocen, quitar el fondo a las imágenes, permite personalizar y lograr que las imágenes que empleen en sus post, sean más atractivas.
🔸 I hope you're having a nice Sunday, in this opportunity I'll share with you a tutorial publication, which will serve as a guide to teach you how to remove backgrounds to the images of your preference, it's something very basic but that many people don't know, removing the background to the images, allows you to customize and make the images you use in your posts, more attractive.

Se sorprenderán con lo sencillo que es quitar el fondo de las imágenes, además para realizar este proceso se usará Paint 3D, es una función con la que cuentan todos los windows, ya no tendrás escusas para personalizar sus post, te dará más libertad de edición.
They will be surprised with how easy it is to remove the background of the images, in addition to this process will use Paint 3D, is a function that all windows have, you will no longer have excuses to customize their posts, give you more freedom to edit.


(Esta es la imagen que usaré) || (This is the image I will use).
(Esta es la imagen que usaré) || (This is the image I will use).



◾️ Lo primero que deben hacer es abrir Paint 3D, den click en (Menú), luego en (Insertar) y seleccionen la imagen que necesiten quitarle el fondo.
◾️ The first thing you need to do is open Paint 3D, click on (Menu), then on (Insert) and select the image you need to remove the background.

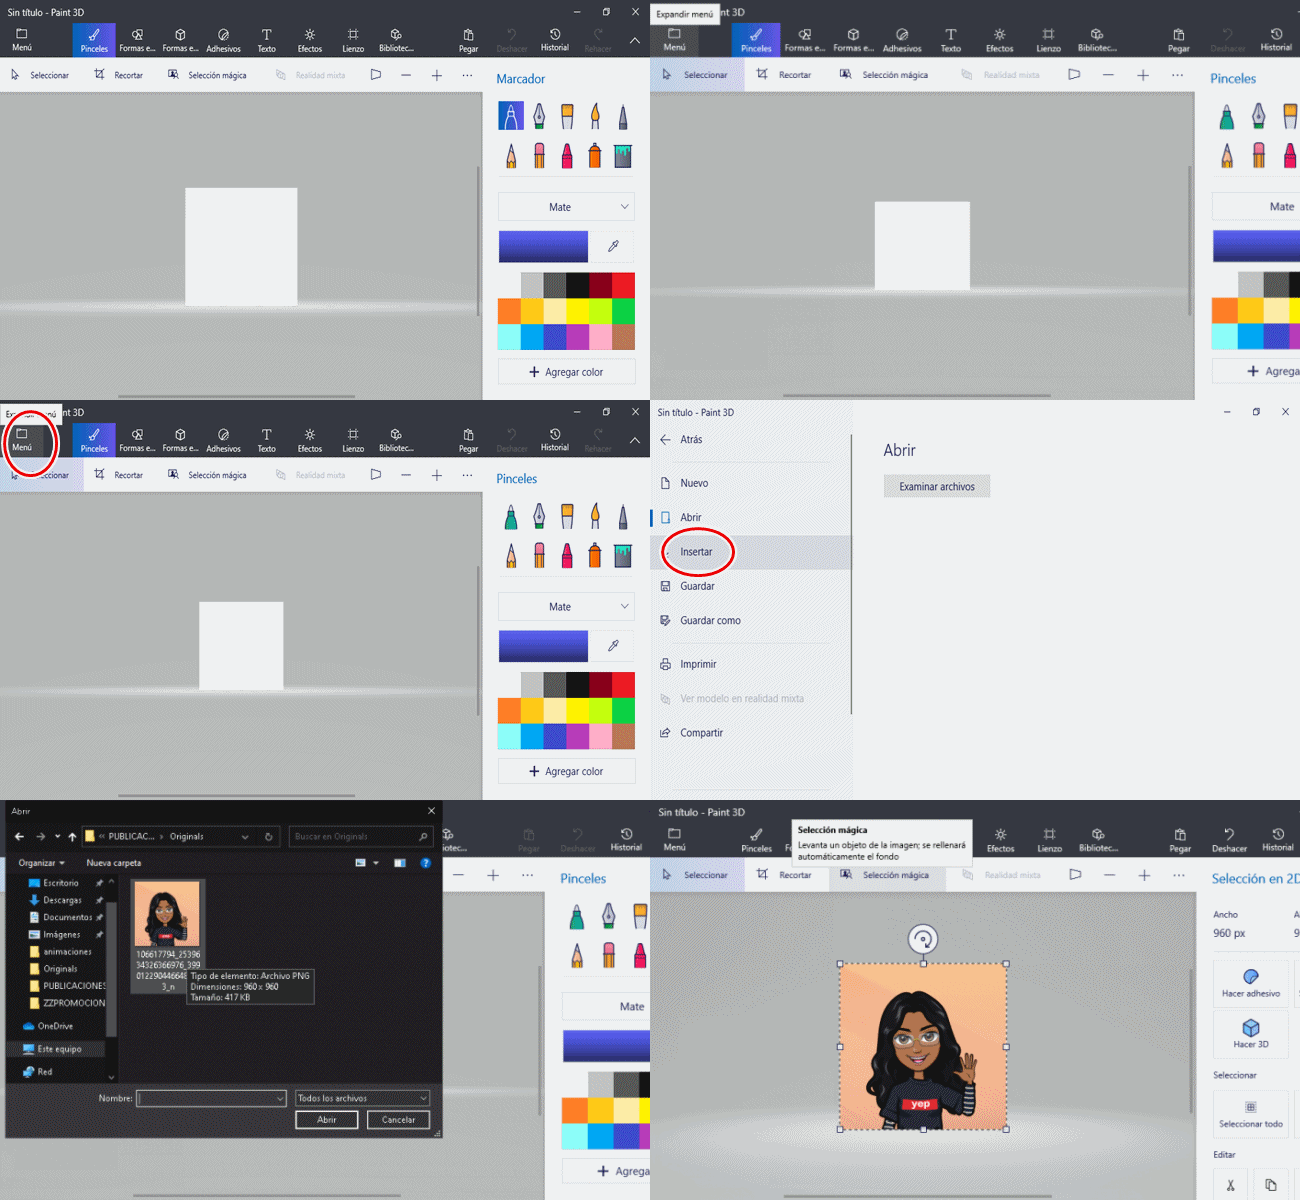

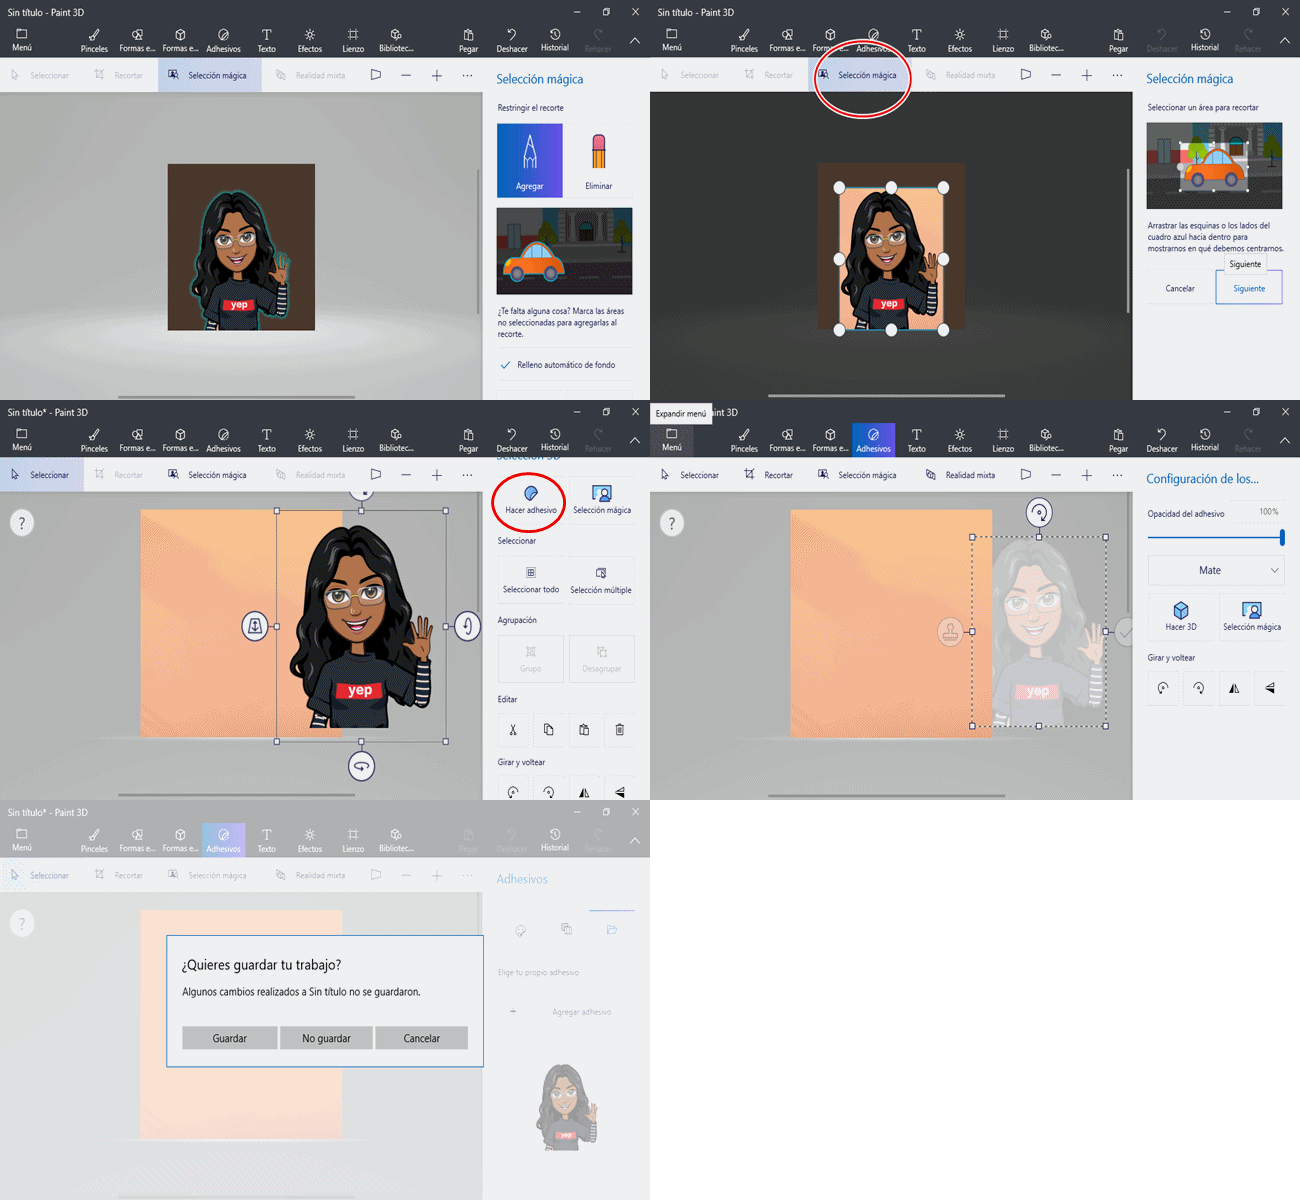
◾️ Una vez seleccionada la imagen, den click en (Selección mágica), reduzcan lo más que puedan la imagen para que se elimine el exceso, luego le dan click en siguiente (Si reducen demasiado y se elimina más de lo que querían, pueden trazar líneas en las partes que quieren recuperar, es cuestión de paciencia).
◾️ Once the image is selected, click on (Magic selection), reduce the image as much as you can so that the excess is removed, then click on next (If you reduce too much and remove more than you want, you can draw lines in the parts you want to recover, it's a matter of patience).

◾️ Den click en (Hacer adhesivo), luego en (Menú), seguido de ello den click en nuevo, y pueden o no guardar el adhesivo.
◾️ Click on (Make Sticker), then on (Menu), followed by clicking on new, and you may or may not save the sticker.


◾️ En este punto sólo restará colocar el fondo transparente, para ello den click en el (Adhesivo que han creado), luego click en recortar, y eliminan el excedente, activen la opción de (Lienzo transparente), luego click en (Menu) y guarden su imagen.
◾️ At this point you only need to place the transparent background, to do this click on (Sticker you have created), then click on crop, and remove the excess, activate the option of (Transparent Canvas), then click on (Menu) and save your image.

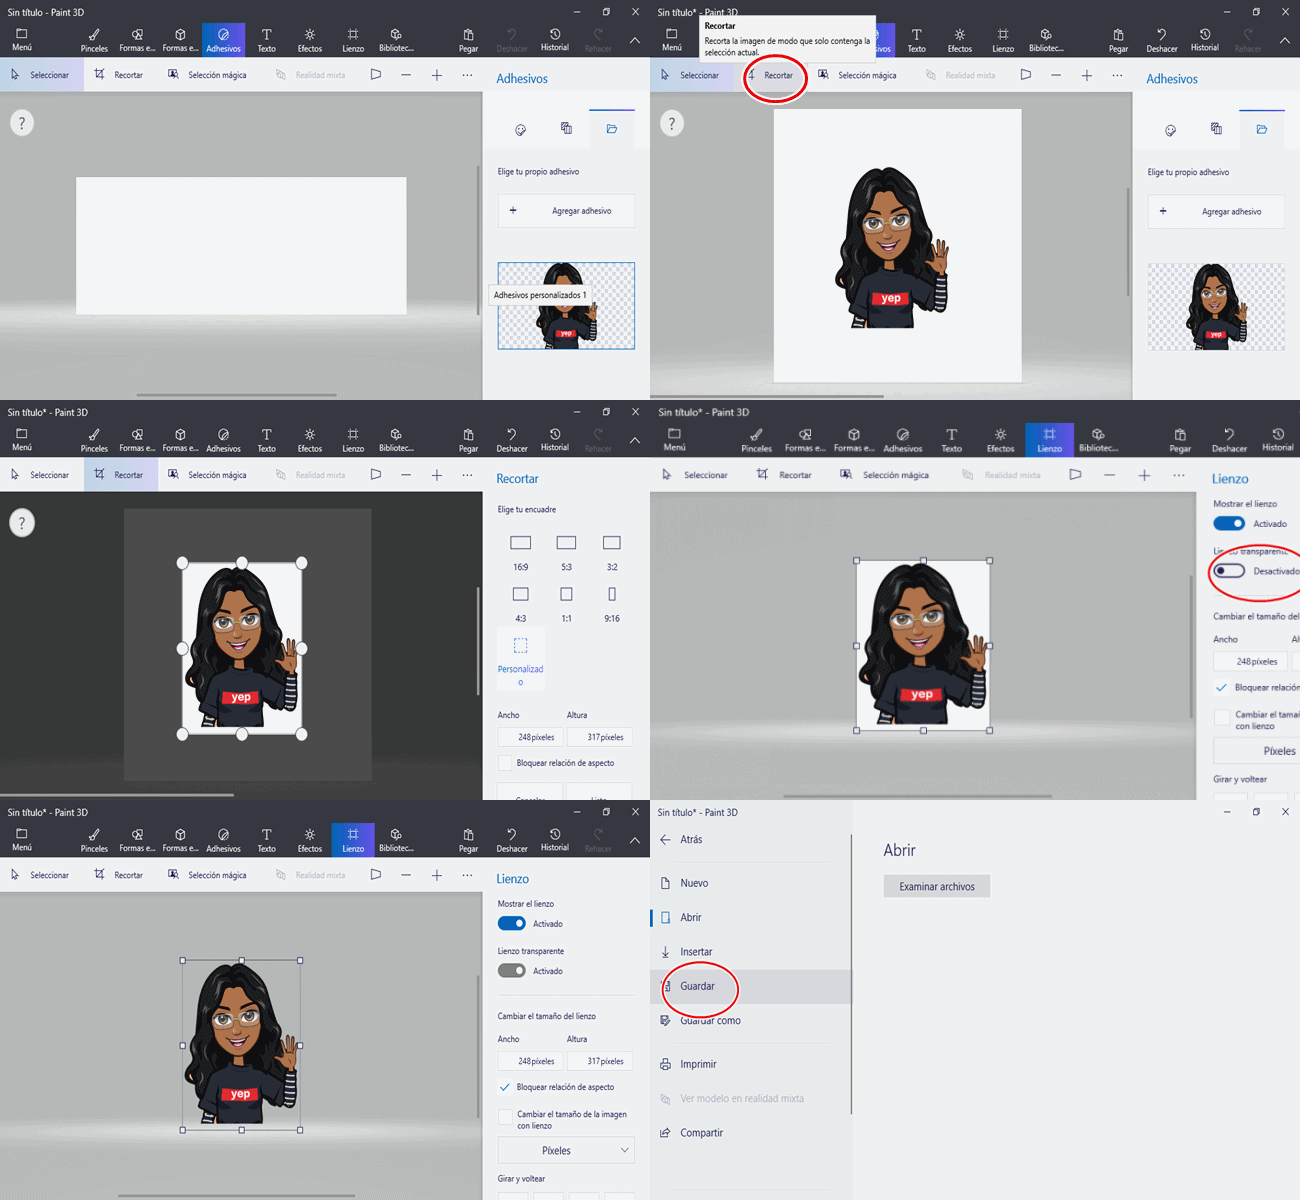

¡Es todo! Simples paso para lograr quitar el fondo de las imágenes || That's it! Simple step to remove the background from the images.
¡Es todo! Simples paso para lograr quitar el fondo de las imágenes || That's it! Simple step to remove the background from the images.



Ahora puedo emplear esta imagen para colocarla sobre el fondo de mi preferencia || I can now use this image to place it on the background of my choice.


La diversidad de imágenes que podrán crear es infinita, espero les sirva este pequeño tutorial.
The diversity of images you will be able to create is infinite, I hope this little tutorial will help you.


PUBLICACIONES RECIENTES || RECENT PUBLICATIONS:
1 ¡Reciclaje Creativo Challenge! || Creative Recycling Challenge!
2 #ChallengeAccepted Sororidad y Empoderamiento en un reto (Mi inspiración es mi familia) || Sorority and Empowerment in a challenge (My inspiration is my family)
3 Aprende a realizar un juguete con una botella plástica (PERINOLA PANAL DE ABEJAS) || Learn how to make a toy with a plastic bottle (BEE PANEL PERINOLA)
4 [ESP][ENG] My Five for #thriveonhive by @jennyzer


Imágenes tomadas desde mi Alcatel One Touch Idol 4 / Images taken from my Alcatel One Touch Idol 4.
Gifs realizados desde PhotoScape / Gifs made from PhotoScape.
No tengo ese programa, pero si que se ve fácil. Gracias por compartir :)
Wow es raro, ese programa viene con la mayoria de los windows, igualmente gracias por comentar.
Buen tutorial y muy util ❤🐦saludos
Pienso que esto le brinda mayor diversidad de edición a los creadores, gracias por comentar 🐻💙
Gracias por compartir siempre buen contenido.
No es nada lo hago encantada, gracias a ti por comentar.
¡Qué estupendo!
Lo intentaré en estos días, amiga.
Espero te sea de utilidad amigo, gracias por siempre apoyar.
Excelente tutorial. Seguí tus pasos y logré mi imagen 😄👏🏻👏🏻👏🏻 Gracias!!
Que bueno, por ese motivo realizo este tipo de publicaciones, me alegra que te sirva. Gracias por comentar.
Muchas gracias por el apoyo @mitag2398
Congratulations @jennyzer! You have completed the following achievement on the Hive blockchain and have been rewarded with new badge(s) :
You can view your badges on your board And compare to others on the Ranking
If you no longer want to receive notifications, reply to this comment with the word
STOPDo not miss the last post from @hivebuzz:
Thank you for your support!
You're welcome @jennyzer 🙂👍❤️
Support us back and vote for our witness.
You will get one more badge and more powerful upvotes from us on your posts with your next notifications.
Que bueno que te sea util, por eso quise realizar esta publicacion, gracias por comentar.