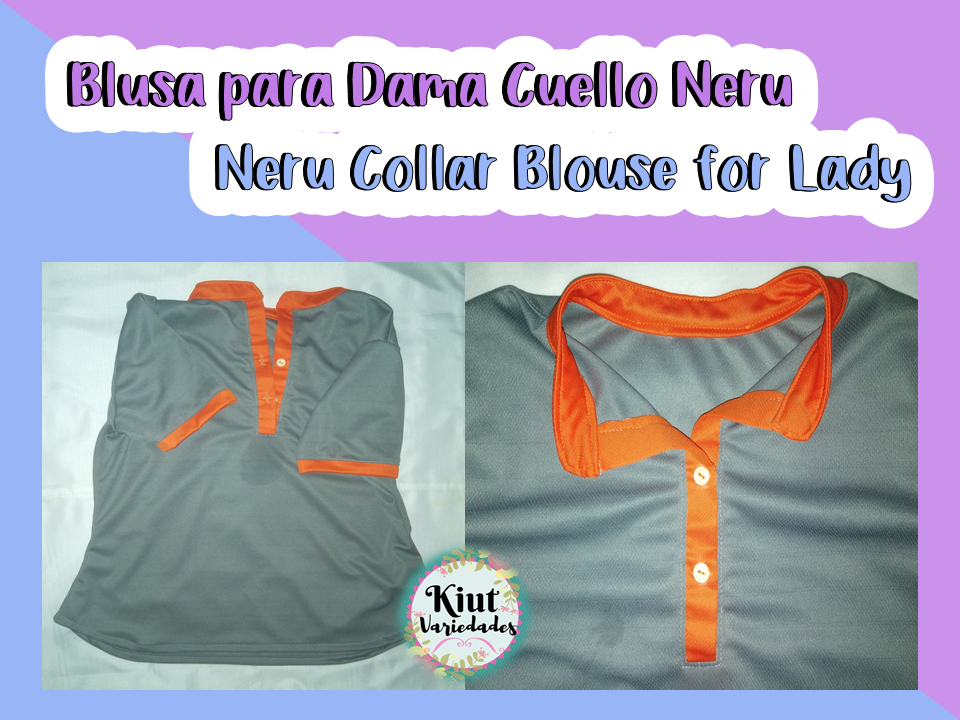
¡¡Hola usuarios de Hive!! ✨ ✨, el día de hoy te estaré enseñando a realizar un segundo modelo de blusa para dama 👏👩, nuevamente partiendo de los patrones básicos que aprendimos a realizar anteriormente 😉, y es que esta vez trabajaremos con un cuello Neru o Militar, súper sencillo de hacer y que da mucha elegancia a las prendas 💕.
Hello Hive users!! ✨ ✨, today I will be teaching you how to make a second model of blouse for women 👏👩, again starting from the basic patterns that we learned to do previously 😉, and this time we will work with a Neru or Military collar, super simple to make and that gives a lot elegance to the garments 💕.

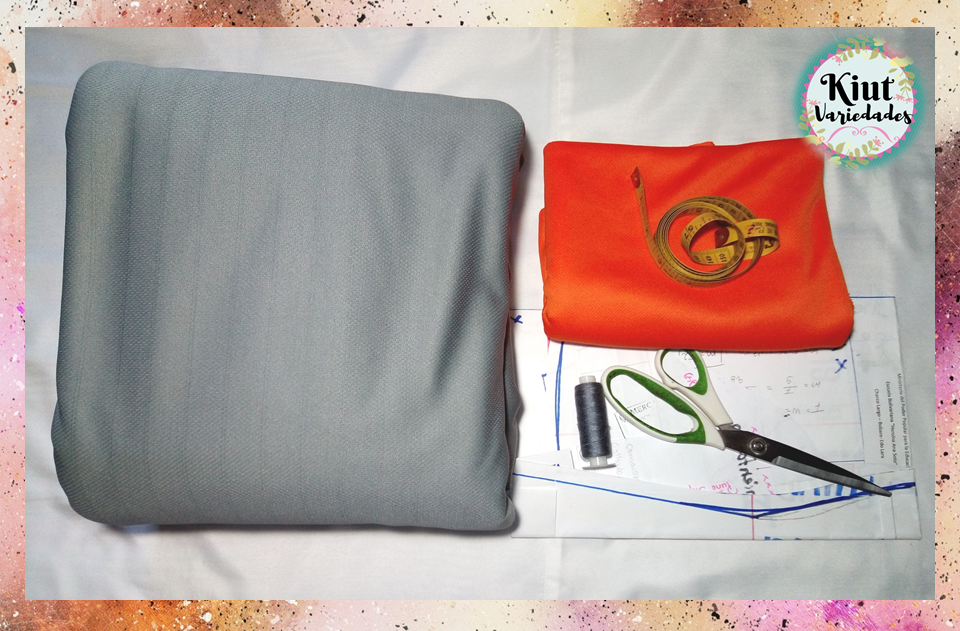
🧵 MATERIALES || MATERIALS 🧵
- Tela elástica para blusa (Cotton Licra, Jersey Berska, Microdurazno, Atlética, entre otras).
- Entretela.
- Botones.
- Patrones.
- Tijera y cinta métrica.
- Hilo y máquina de coser o aguja.
- Elastic fabric for blouse (Cotton Lycra, Jersey Berska, Micropeach, Athletic, among others).
- Interlining.
- Buttons.
- Patterns.
- Scissors and tape measure.
- Thread and sewing machine or needle.
🧵 MANOS A LA OBRA || LET’S DO IT 🧵
🧵 PARTE I: PATRÓN DE CUELLO || PART I: NECK PATTERN 🧵
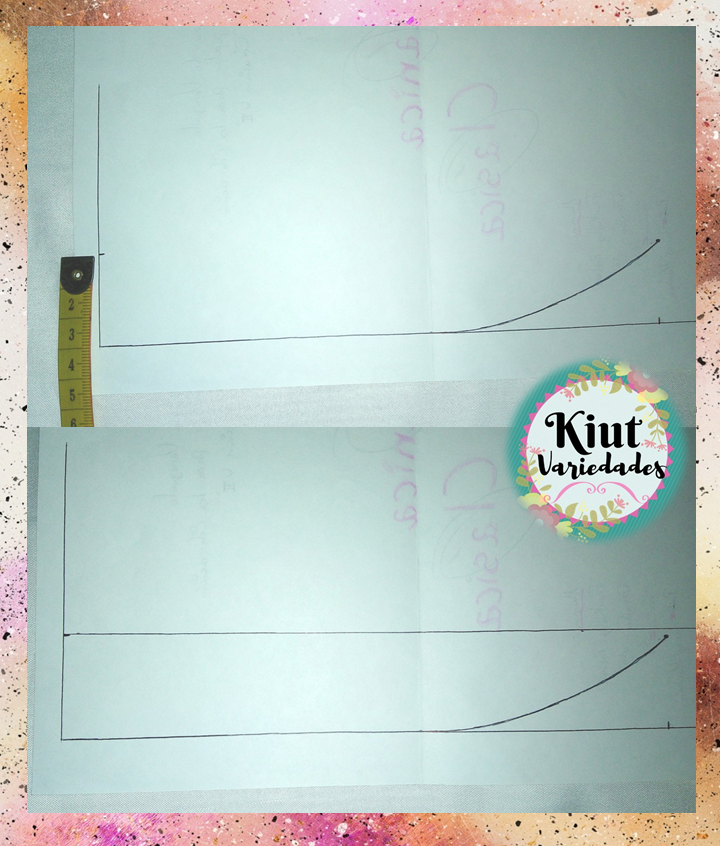
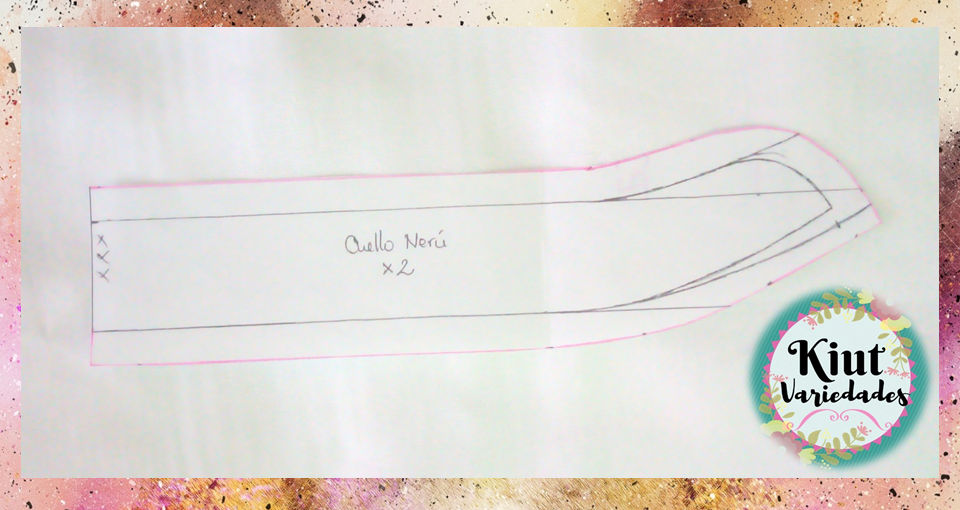
Para realizar el patrón de cuello comenzamos midiendo el escote delantero y espalda en el patrón y a dicha medida le sumaremos 1 cm. Realizamos en papel un ángulo recto y desde la esquina hacia la derecha haremos una marca con la medida que acabamos de tomar, desde esa marca hacia arriba mediremos 3 cm y uniremos con una curva suave a la línea de abajo.
To make the neck pattern we start by measuring the front and back neckline in the pattern and to this measure we will add 1 cm. We make a right angle on paper and from the corner to the right we will make a mark with the measurement we have just taken, from that mark up we will measure 3 cm and join with a smooth curve to the line below.
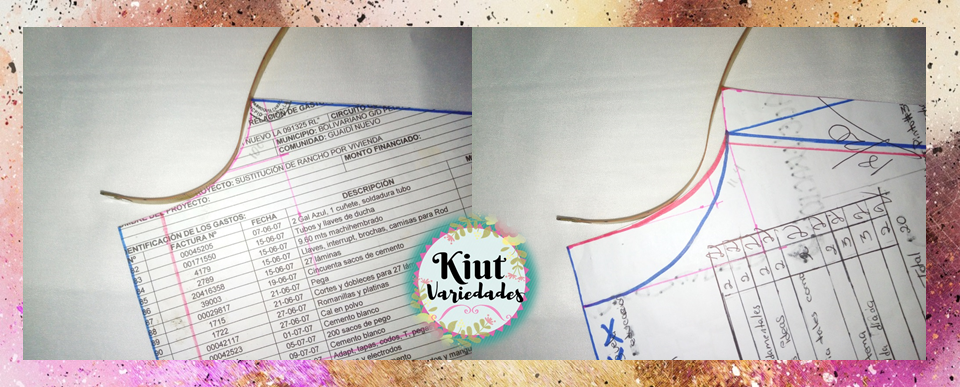
Desde la esquina hacia arriba mediremos 3 cm y escuadraremos esa marca, desde el extremo de la curva que realizamos en el paso anterior, volveremos a medir 3 cm hacia arriba y unimos esta marca con curva suave a la línea que acabamos de hacer.
From the corner up we will measure 3 cm and we will square that mark, from the end of the curve that we made in the previous step, we will again measure 3 cm up and we will join this mark with a smooth curve to the line that we just made.
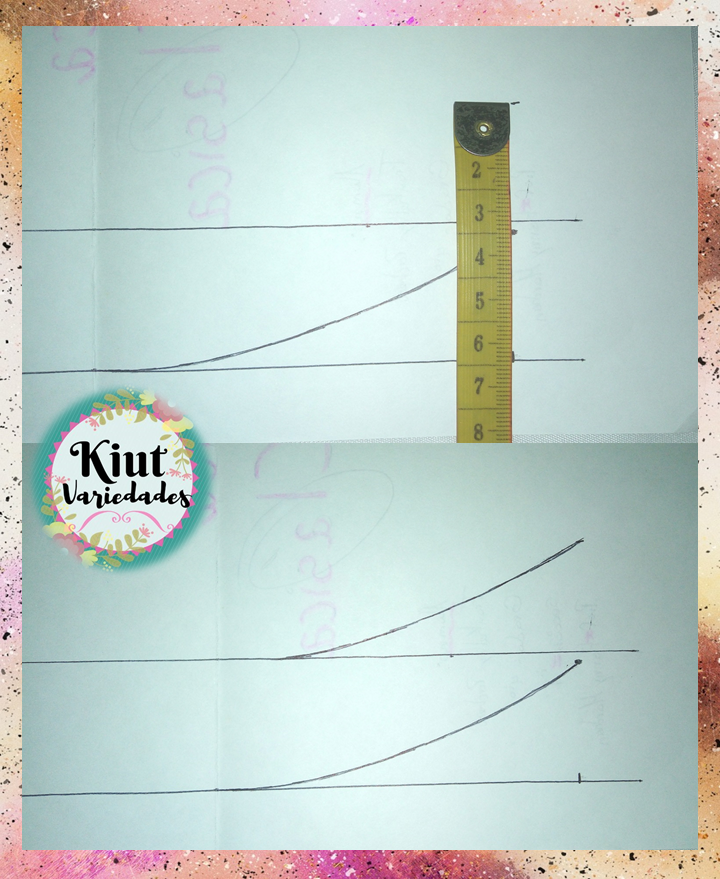
Revisamos que en la parte inferior efectivamente tenga la medida del contorno de cuello, y volvemos a subir 0,5 cm con una nueva curva. Unimos a la línea de arriba con una curva más cerrada.
We check that the lower part actually has the measurement of the neck contour, and we go back up 0.5 cm with a new curve. We join the line above with a tighter curve.
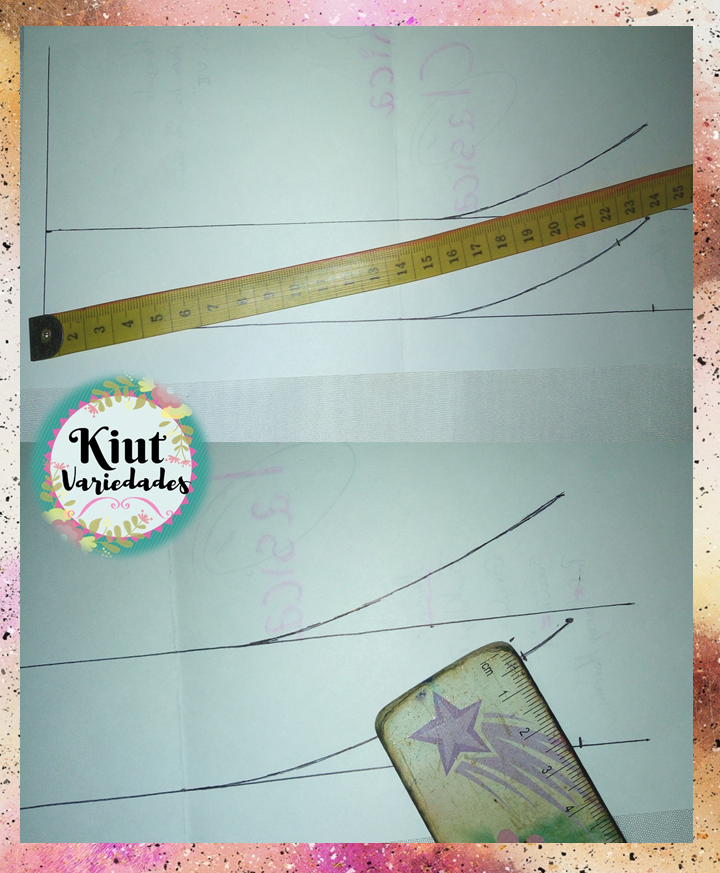
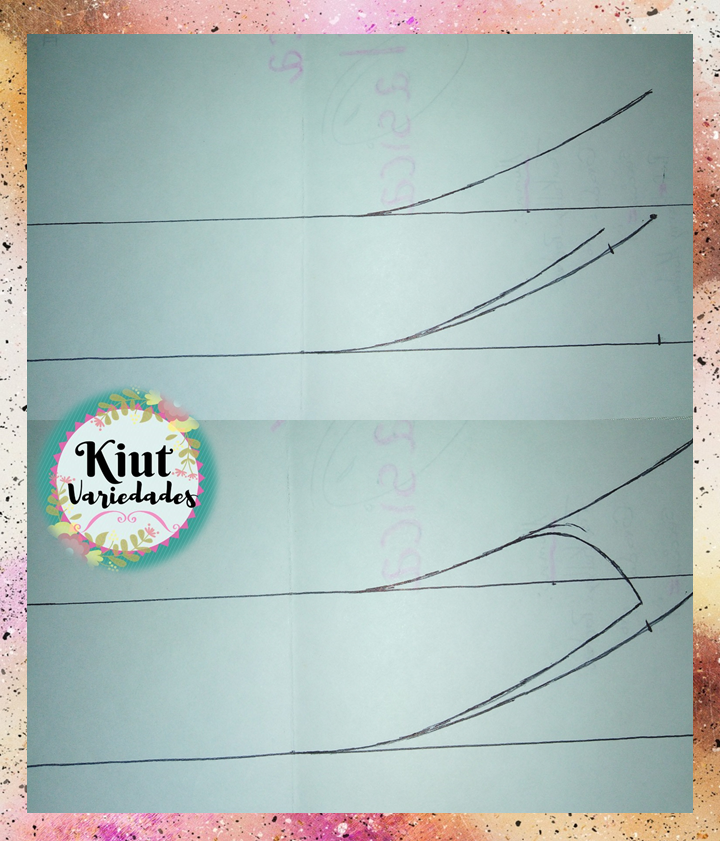
Añadimos márgenes de costura y recortamos.
We add seam allowances and trim. This pattern is cut 2 times on the fabric.
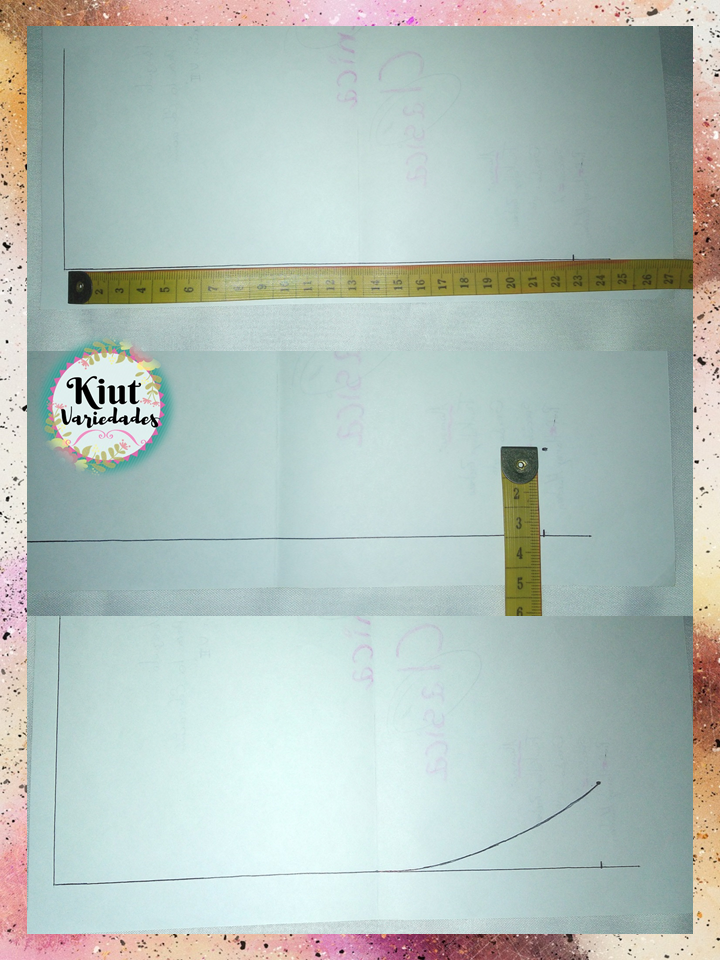
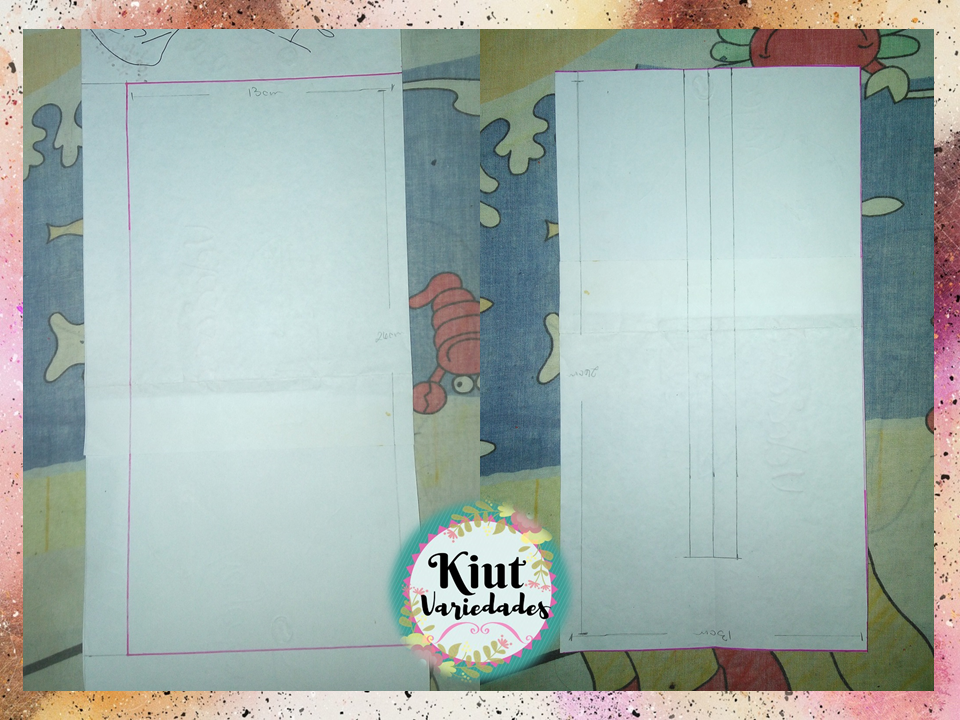
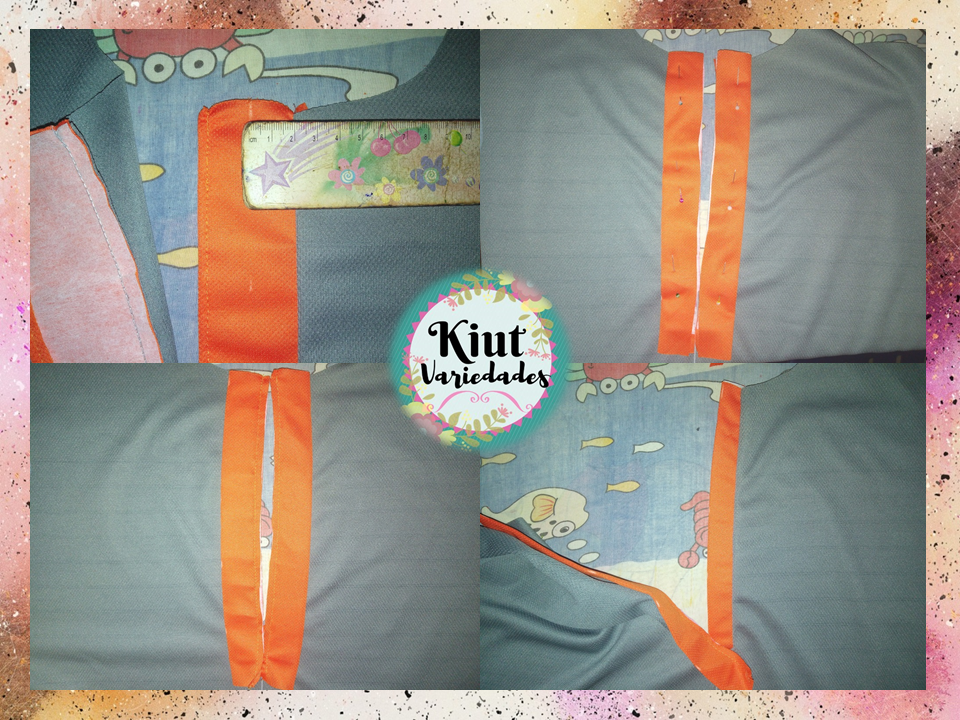
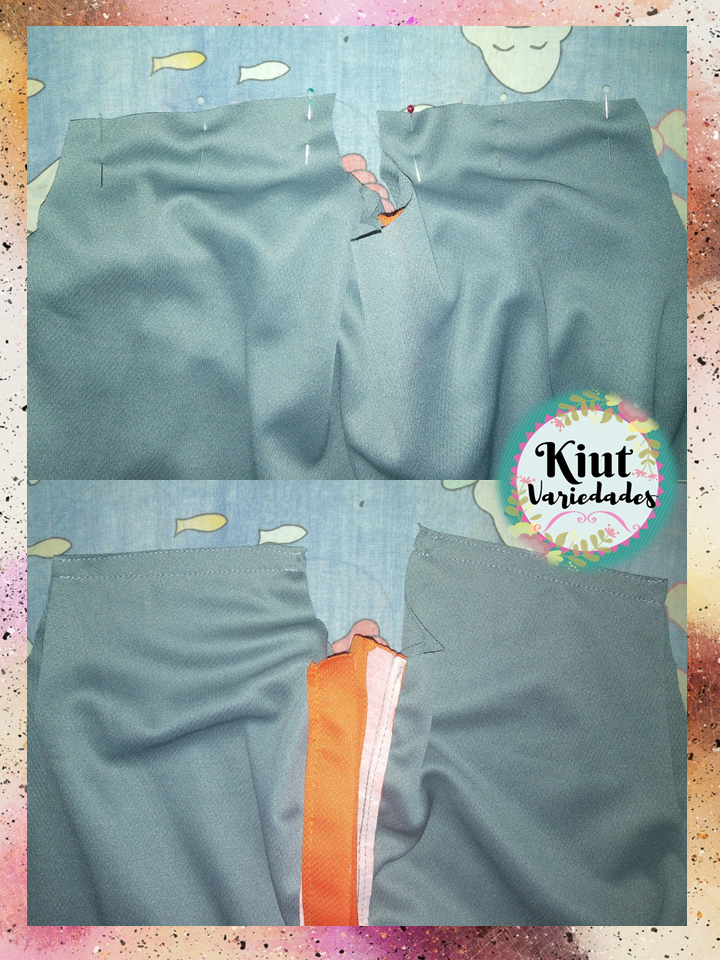
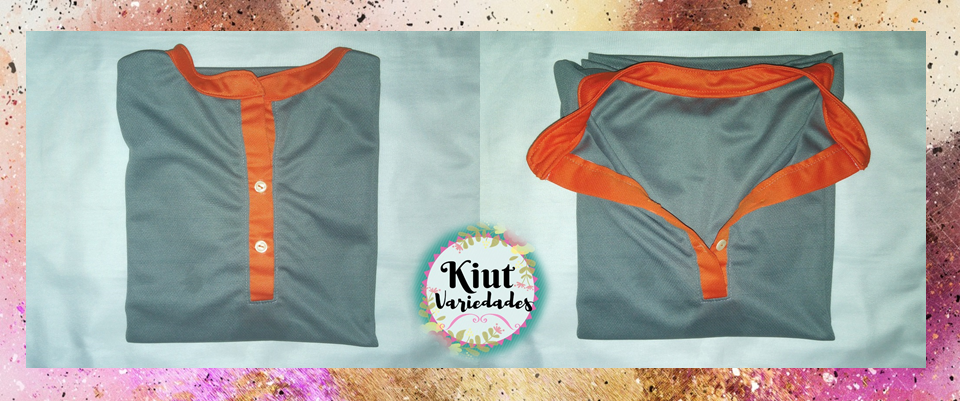
Esta blusa también llevara una abertura estilo chemise, por lo que, trazaremos en papel un rectángulo que tenga 13 cm de ancho por 26 cm de largo, y dibujaremos en el centro un rectángulo que tenga 2 cm de ancho por 22 cm de largo.
This blouse will also have a chemise-style opening, so we will draw on paper a rectangle that is 13 cm wide by 26 cm long, and we will draw in the center a rectangle that is 2 cm wide by 22 cm long. This pattern is cut out 2 times, one piece on fabric and another on interlining.
🧵 PARTE II: CONFECCIÓN || PART II: MAKING 🧵
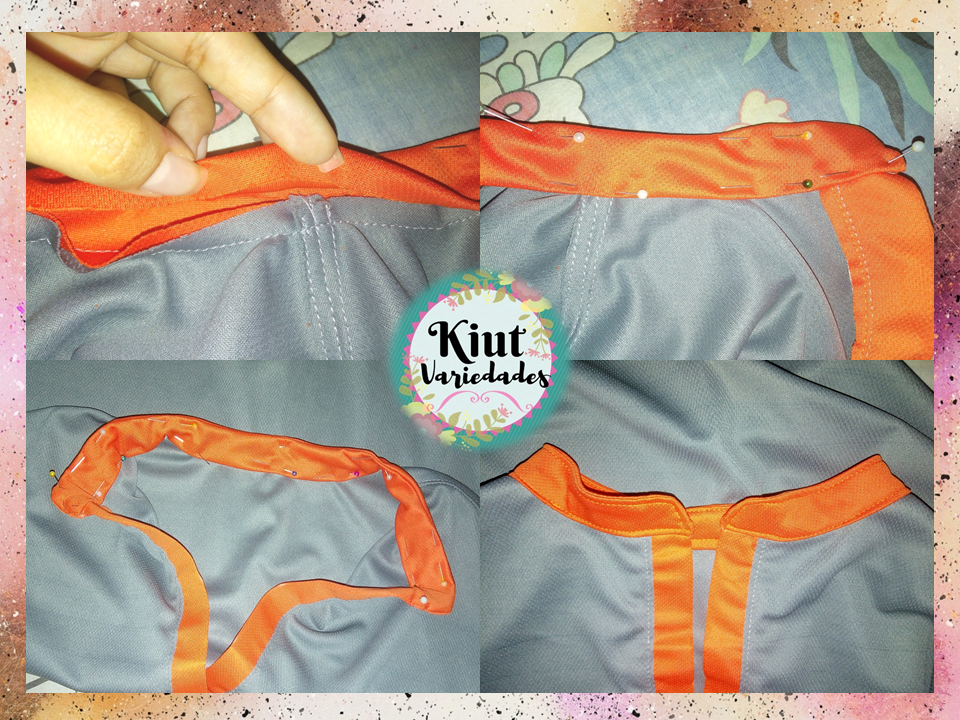
Con las piezas cortadas, comenzamos cosiendo la abertura de la blusa y lo haremos de la misma forma que lo hicimos con la Chemise de Hombre. Marcamos el centro de la pieza delantera, y encima de esta pieza colocaremos la aletilla, que debe estar entretelada, y cosemos por las líneas laterales del rectángulo que esta dibujado dentro.
With the cut pieces, we start by sewing the opening of the blouse and we will do it in the same way as we did with the Men's Chemise. We mark the center of the front piece, and on top of this piece we will place the winglet, which must be interwoven, and sew along the side lines of the rectangle that is drawn inside.
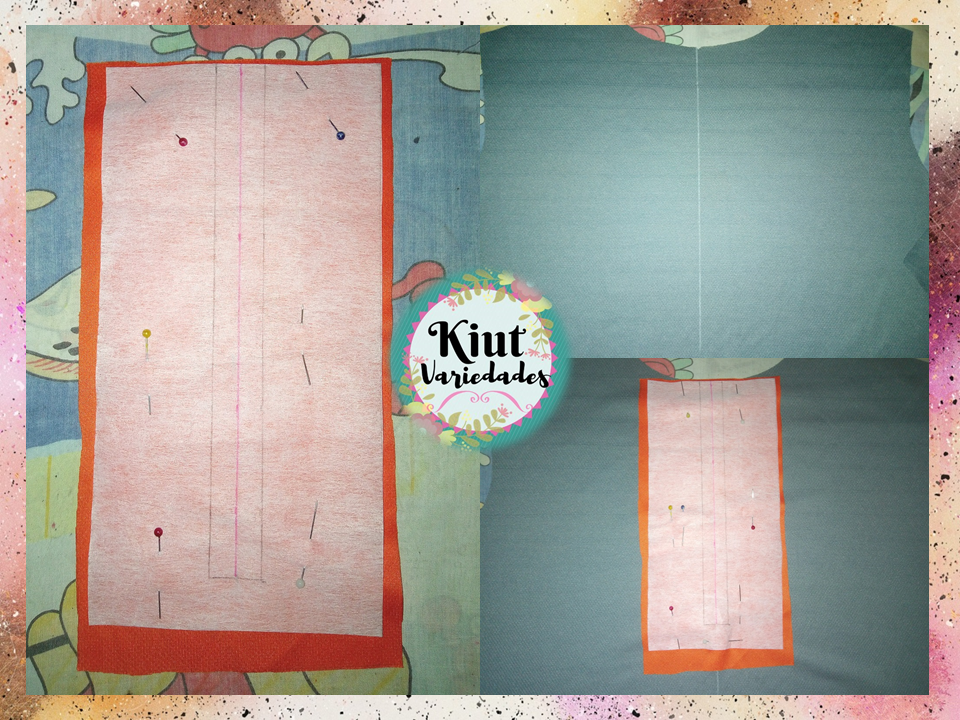
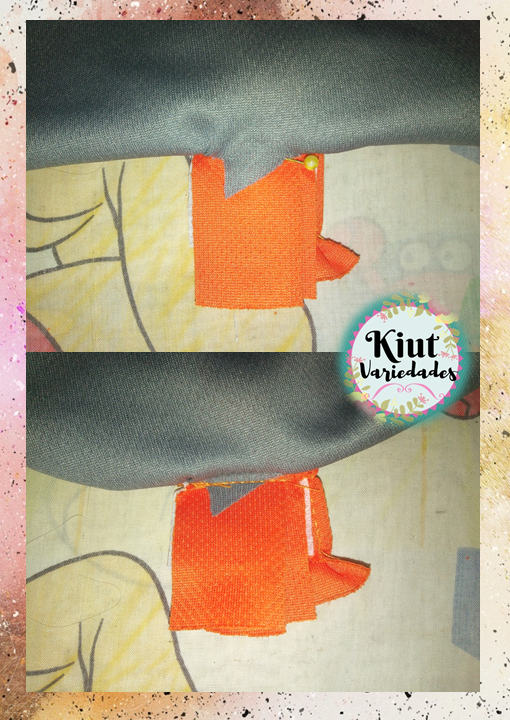
Una vez cosido cortaremos por el medio hasta 2 cm antes de llegar al final de las costuras, y cortamos en diagonal, formando un triángulo, y terminamos de cortar la aletilla (solo la aletilla).
Once sewn we will cut in the middle up to 2 cm before reaching the end of the seams, and we cut diagonally, forming a triangle, and we finish cutting the winglet (only the winglet).
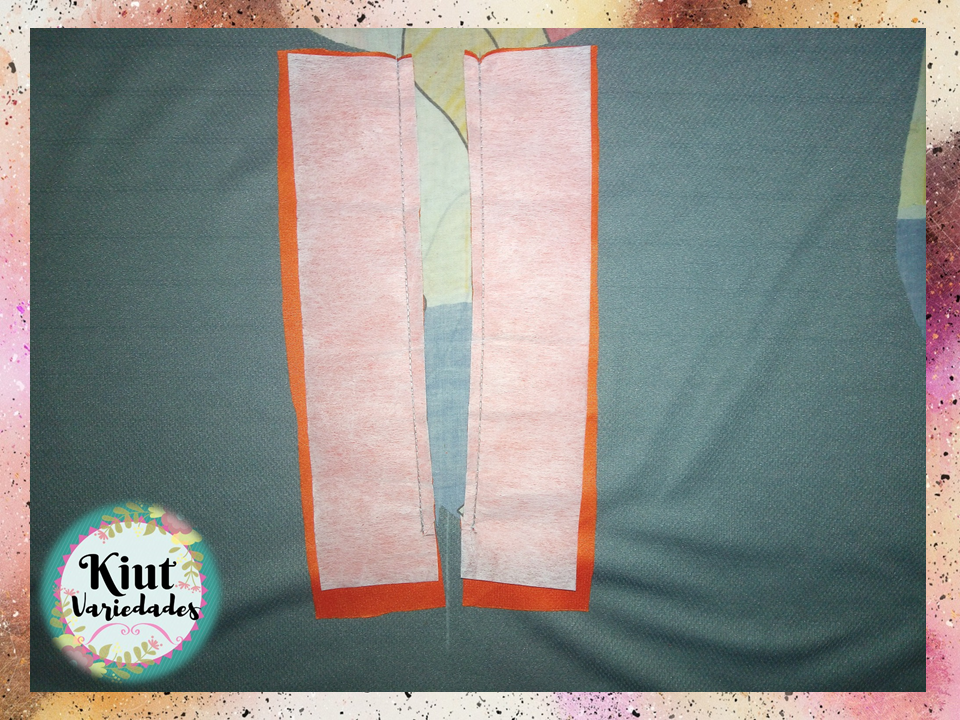
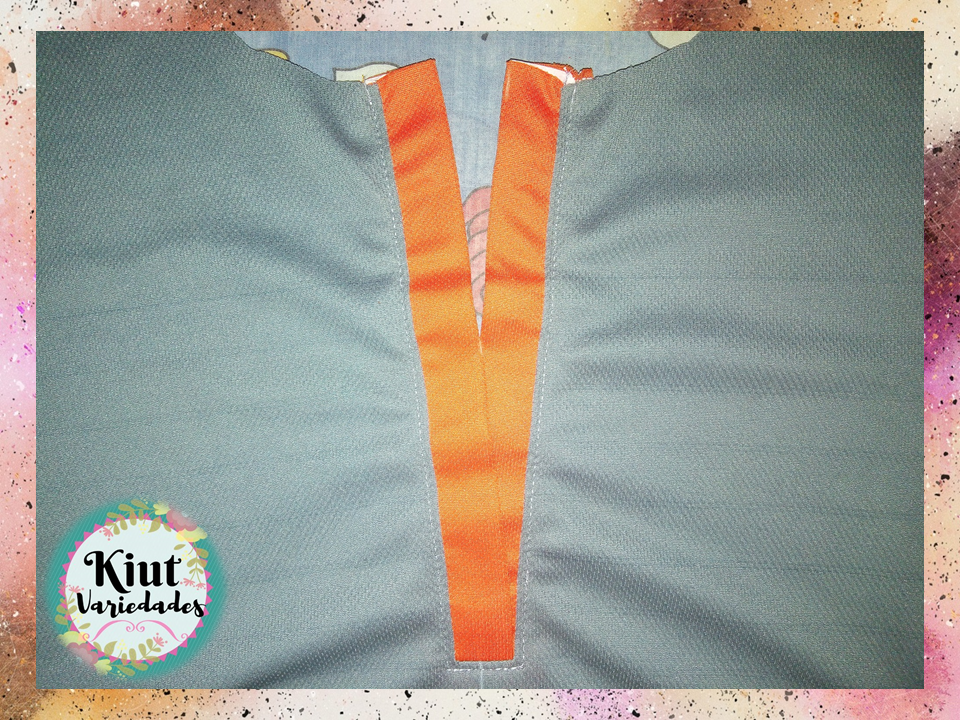
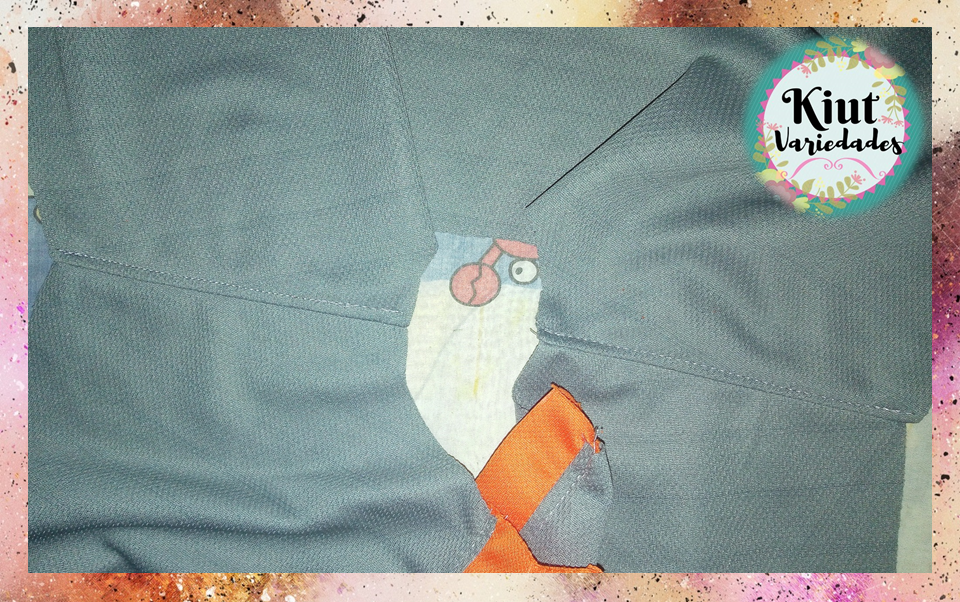
Marcamos 2 cm desde la costura y hacemos unas marcas pues por allí vamos a doblar, una vez doblada ambas aletillas, las coseremos por el lateral que está abierto, para cerrarlas en su totalidad. Luego las volteamos e introducimos dentro de la abertura, primero la derecha y luego la izquierda.
We mark 2 cm from the seam and make some marks because there we are going to fold, once both fins are folded, we will sew them on the side that is open, to close them completely. Then we turn them over and introduce them into the opening, first the right and then the left.
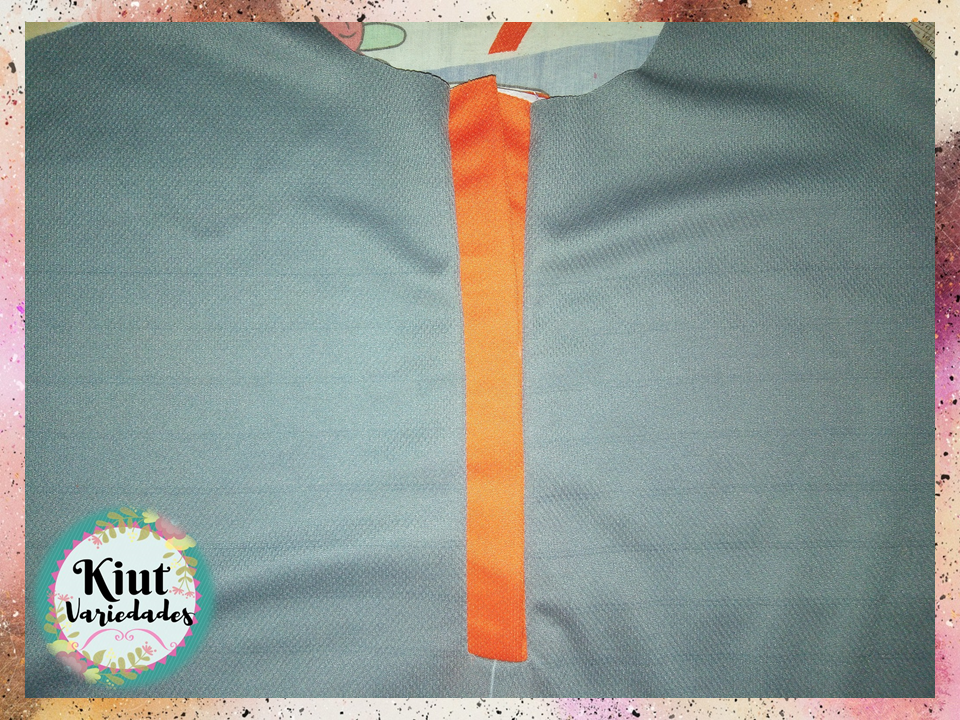
Las sujetamos con un alfiler, y cosemos en la parte inferior interna, para sujetarlas. Finalmente hacemos una costura externa de asentamiento por toda la orilla, para dar el acabado final.
We fasten them with a pin, and sew on the inner bottom, to hold them. Finally we make an external settlement seam along the entire shore, to give the final finish.
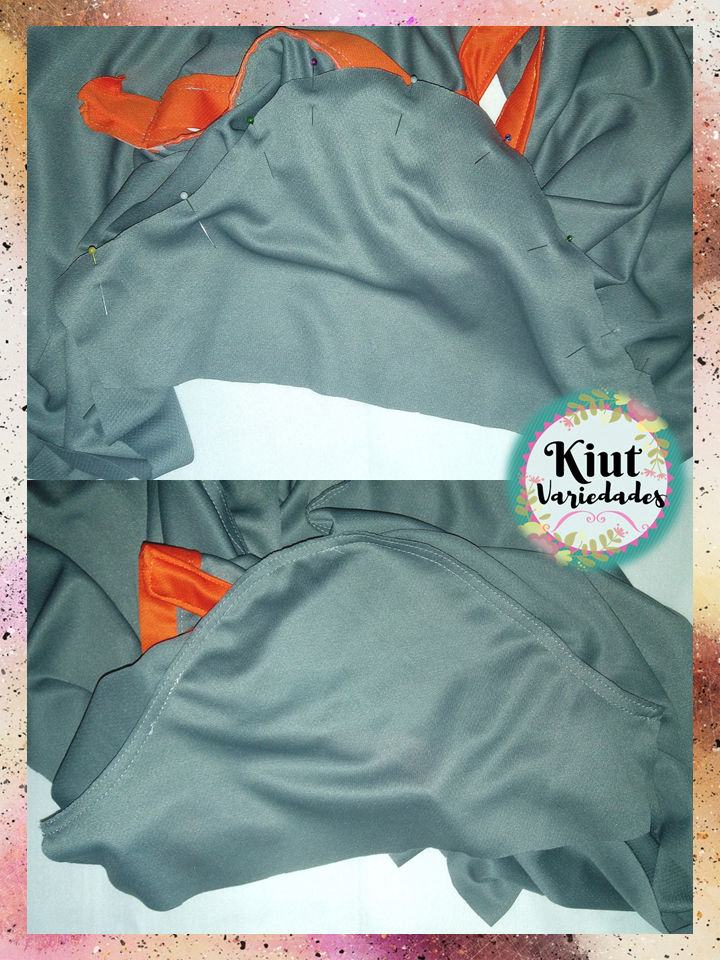
Unimos las piezas delantera y espalda por lo hombros, y después realizamos una costura de asentamiento para reforzar y dar mejor acabado.
We join the front and back pieces at the shoulders, and then we make a settlement seam to reinforce and give a better finish.
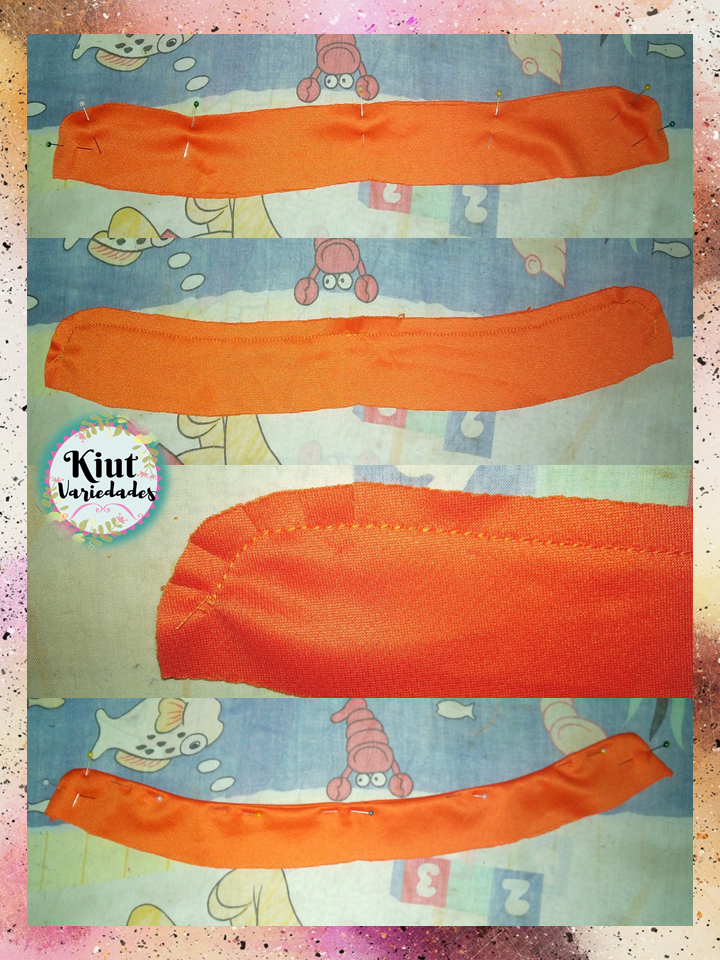
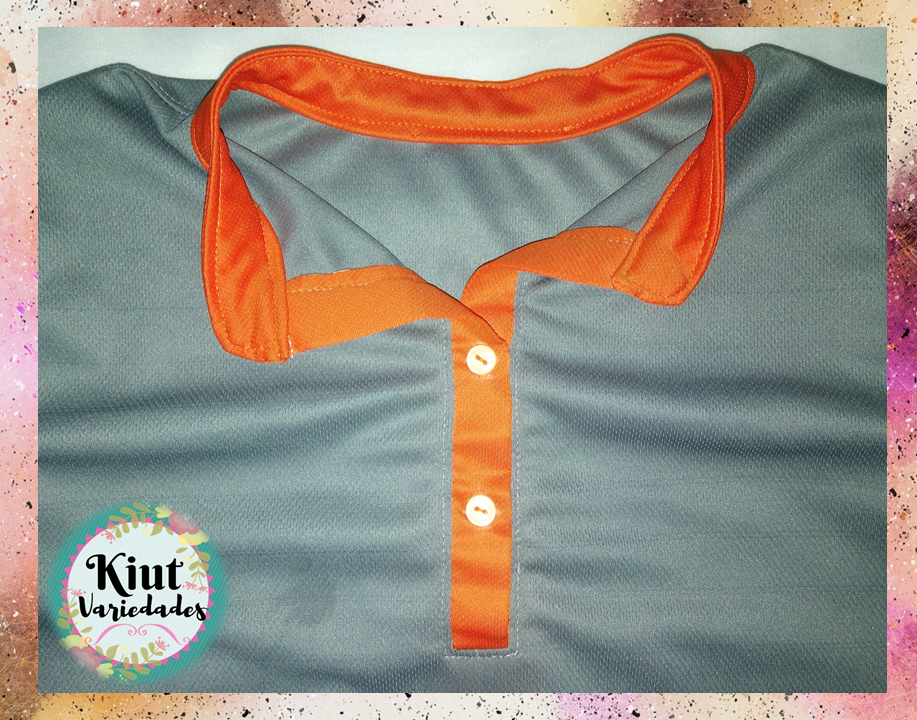
Ahora nos pasamos al cuello, cosemos las dos piezas del cuello por todo el contorno, menos por la parte inferior, dejamos sin coser aproximadamente 3 cm al inicio y final del contorno. Hacemos pequeños cortes en la curva, luego volteamos.
Now we go to the neck, we sew the two pieces of the neck around the contour, except for the bottom, we leave about 3 cm without sewing at the beginning and end of the contour. We make small cuts in the curve, then we flip.
Ubicamos el centro del cuello y el centro del escote de la espalda, y comenzamos a unir con alfileres por allí, de extremo a extremo, y coseremos uniendo solo una capa de tela del cuello.
We locate the center of the neck and the center of the neckline of the back, and begin to join with pins there, from end to end, and we will sew by joining only one layer of fabric from the neck.
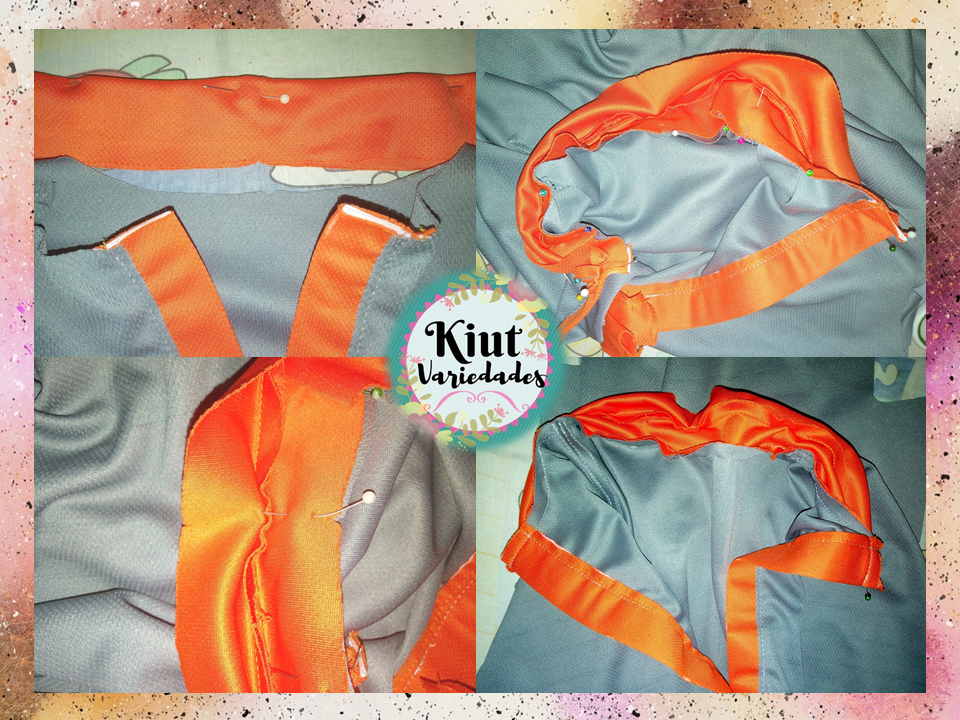
Ahora volteamos, y con la otra capa de tela del cuello, vamos a cubrir la costura que acabamos de realizar, cosemos todo el contorno incluyendo la orilla del cuello.
Now we turn, and with the other layer of fabric from the neck, we are going to cover the seam that we have just made, we sew the entire contour including the edge of the neck.
Cosemos las mangas, como habitualmente lo hacemos, y luego cosemos el costado, haciendo coincidir perfectamente la costura de la sisa.
We sew the sleeves, as we usually do, and then we sew the side, matching the armhole seam perfectly.
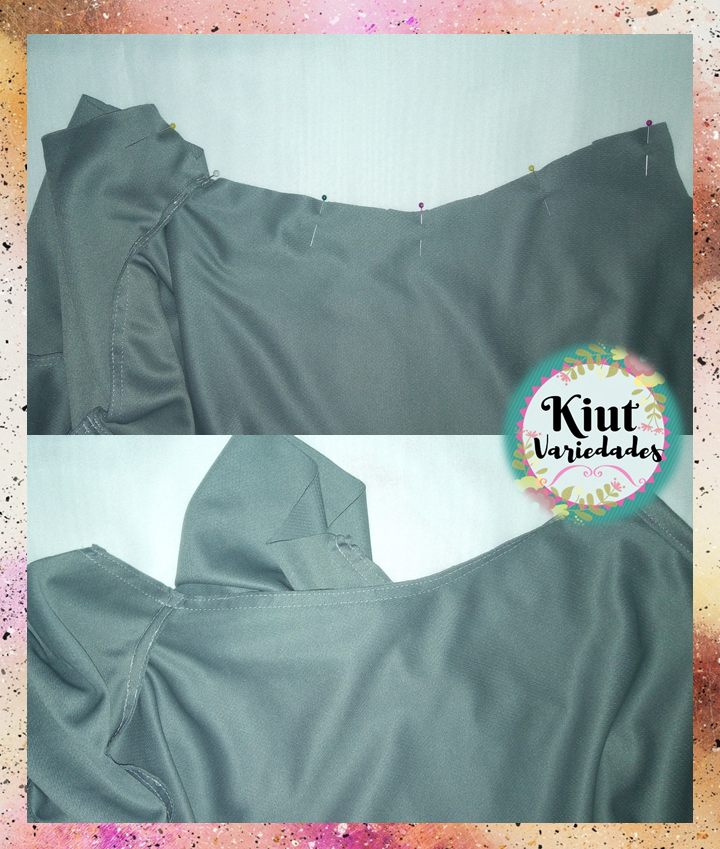
Esta blusa al igual que la de la publicación anterior, también llevara puños, por lo que los coseremos para formar un círculo y luego cosemos a la manga. Si no quieres añadirle puños, solo haces un ruedo.
This blouse, like the one in the previous publication, will also have cuffs, so we will sew them to form a circle and then sew to the sleeve. If you don't want to add cuffs, just make a hem.

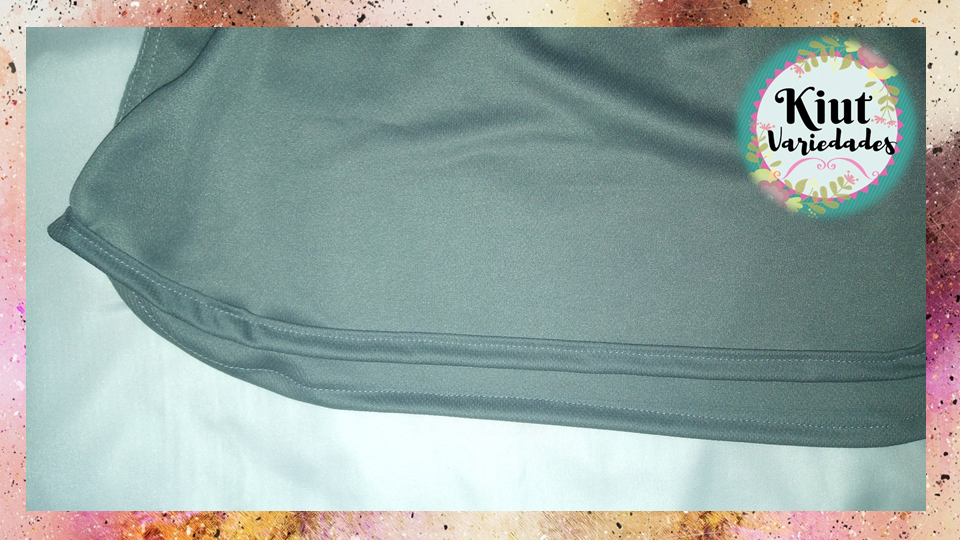
Finalmente hacemos el ruedo y cosemos los ojales y botones de la blusa.
Finally we make the hem and sew the buttonholes and buttons of the blouse.

Te invitamos igual que siempre a que intentes este proyecto por tu cuenta y nos cuentes en los comentarios 👇 como es tu experiencia, además te exhortamos a que si lo deseas comiences a emprender tu propio negocio y este proyecto puede ser el inicio.
As always, we invite you to try this project on your own and tell us in the comments 👇 as is your experience, we also urge you to start your own business if you wish and this project can be the beginning.

Síguenos en todas nuestras redes sociales… || Follow us on all our social networks ...
Facebook:KiutVariedades
Instagram:@Kiut_variedades
Twitter:@Kiut_variedades
!discovery 10
This post was shared and voted inside the discord by the curators team of discovery-it
Join our community! hive-193212
Discovery-it is also a Witness, vote for us here
Delegate to us for passive income. Check our 80% fee-back Program
Hola @kiutvariedades te quedo súper linda esa blusa... Me encanta
Muchisimas gracias 😘 me contenta mucho que te guste
Muy bonito trabajo, admiro a las personas que como tú trabajan la costura, gracias por compartir este tutorial.
Muchisimas gracias a ti por leerlo 💕
Excelente, siempre me ha gustado ese tipo de cuello :)
Es un cuello muy bonito, y realmente es mas fácil de hacer de lo que puede parecer 😄
Thank you for sharing this amazing post on HIVE!
Your content got selected & you just received a little thank you via an upvote from our non-profit curation initiative!
You will be featured in one of our recurring curation compilations and on our pinterest boards! Both are aiming to offer you a stage to widen your audience within and outside of the DIY scene of hive.
Join the official DIYHub community on HIVE and show us more of your amazing work and feel free to connect with us and other DIYers via our discord server: https://discord.io/diyhub!
If you want to support our goal to motivate other DIY/art/music/homesteading/... creators just delegate to us and earn 100% of your curation rewards!
Stay creative & hive on!