
¿Eres nuevo en Hive y no sabes cómo mejorar el maquetado de tus publicaciones? Con mucho gusto te daré algunos tips que te salvarán la vida y te harán rendir tu tiempo. ¡acompáñame!
Are you new to Hive and don't know how to improve the layout of your publications? I will gladly give you some tips that will save your life and make you give up your time. Come along!

Ahora bien, quiero mostrar algunos tips que me han facilitado la estructura de mis publicaciones, la mayoría de veces trabajo desde mi teléfono celular por lo que me da mayor dificultad a la hora de maquetar correctamente.
Debo confesar que no sabía el uso de las plantillas, ciertamente en algún momento leí de ellas, pero inocentemente pensé que ya estaban prediseñadas de nada más rellenar ¿Qué loco verdad? En mi búsqueda exhaustiva por todo el portal confirmé lo que ya había pensado ¡Debo diseñar mis propias plantillas! Entonces, si eres nuev@ presta mucha atención.
Now, I want to show some tips that have facilitated the structure of my publications, most of the times I work from my cell phone so it gives me more difficulty when it comes to layout correctly.
I must confess that I didn't know the use of the templates, certainly at some point I read about them, but I innocently thought they were already pre-designed from nothing else to fill in. In my exhaustive search throughout the portal I confirmed what I had already thought. I must design my own templates! So, if you are new, pay close attention.
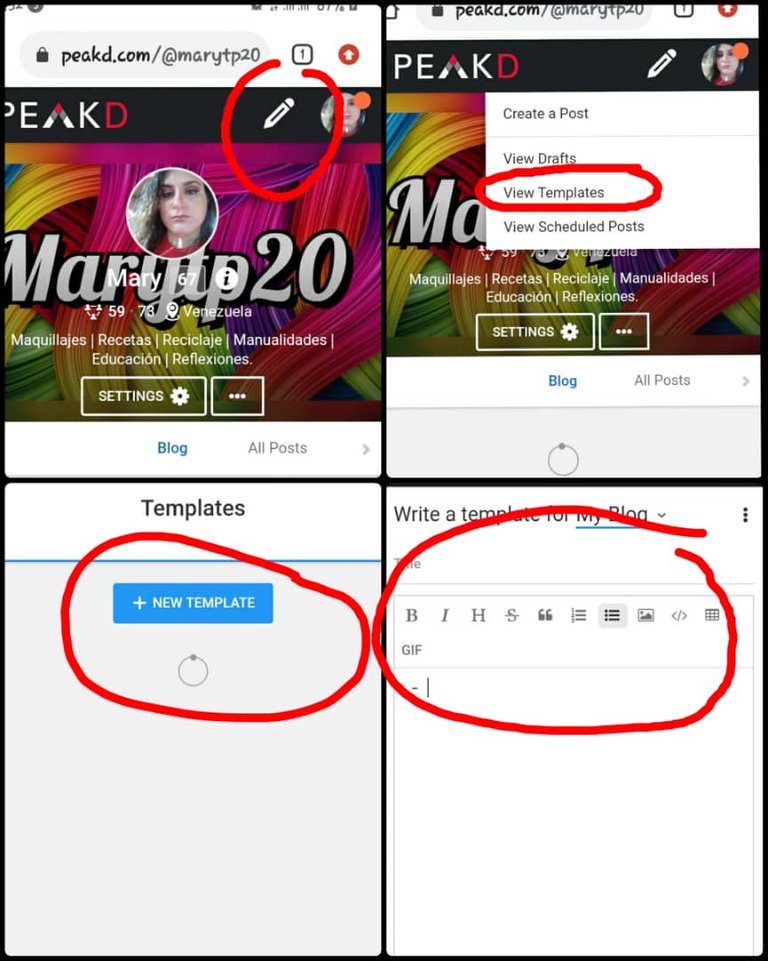
PASO 1:
Debemos irnos a la parte superior (donde está el lápiz) y seleccionar la opción VER PLANTILLAS, al cargar correctamente podemos darnos cuenta que hay mas opciones, entre todas nos dirigimos a NUEVA PLANTILLA, inmediatamente visualizamos lo que será nuestro editor en PeaKD. Allí podemos encontrar opciones para: Letras en negritas, cursiva y de mayor tamaño, subrayar el texto, alinear a izquierda, centrado y derecha, uso correcto de citas, viñetas tanto de puntos como numéricas, agregar imágenes guardadas en el computador o dispositivo móvil. Entre otras. Es buena idea que si quieres tener mayor dominio del editor y obtener mejores resultados en maquetar debes practicar acá un par de veces o las que consideres necesarias. (ver imágenes)
STEP 1:
We must go to the top (left where the pencil is) and select the option VIEW TEMPLATES, when loading correctly we can realize that there are more options, among all we go to NEW TEMPLATE, immediately we visualize what will be our editor in PeaKD. There we can find options for: Bold, italic and bigger letters, underline the text, align left, center and right, correct use of quotations, bullets both of points and numbers, add images saved in the computer or mobile device. Among others. It is a good idea that if you want to have more control of the editor and get better results in layout you should practice here a couple of times or as you consider necessary. (see images)
PASO 2:
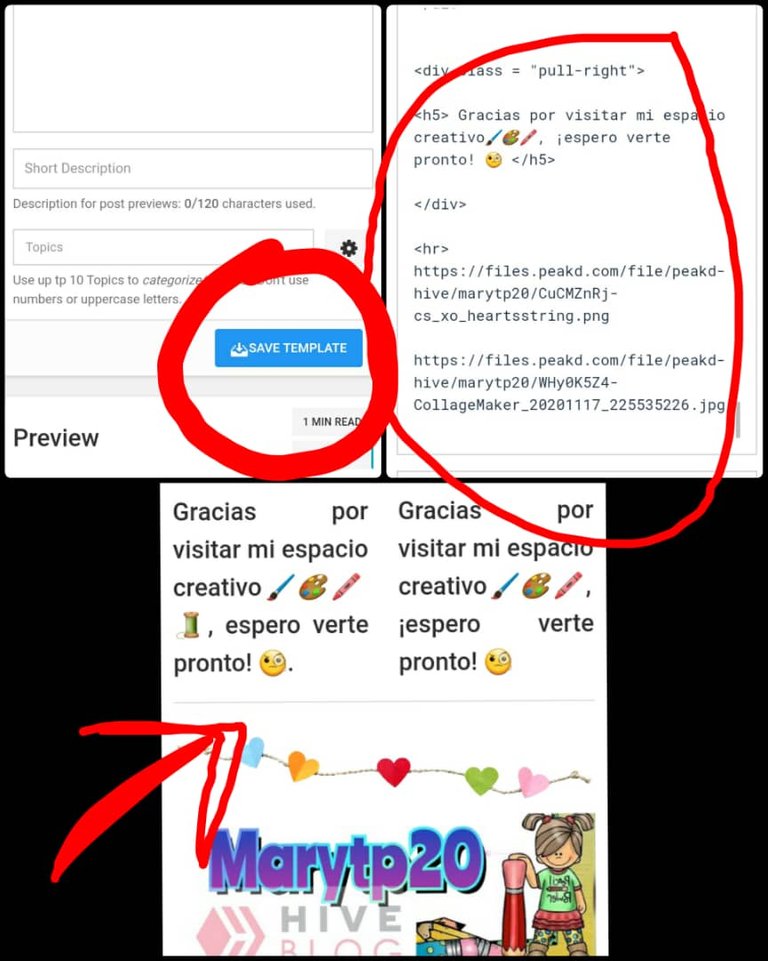
Después de tener tu plantilla lista, es NECESARIO que presiones GUARDAR PLANTILLA para que quede el respetivo registro.
OBSERVACIÓN: Puedes diseñar todas las plantillas que creas conveniente, incluso hasta las más sencillas, también si consideras necesario puedes adjuntar los separadores de párrafos, banner o cualquier otra información que va al inicio o final de la publicación. Al momento de querer usar una plantilla solo debes darle en la parte inferior donde dice CREAR PUBLICACIÓN. Ver ejemplo.
STEP 2:
After having your template ready, it is NECESSARY that you press SAVE TEMPLATE to keep the respective record.
NOTE: You can design all the templates that you think convenient, even the simplest ones, also if you consider necessary you can attach the paragraph separators, banner or any other information that goes to the beginning or end of the publication. When you want to use a template, you only have to click on the bottom where it says CREATE PUBLICATION. See example.
Tuve la oportunidad de diseñar 3 platillas que si son de tu agrado puedes usar en tus publicaciones, todas las he puesto en práctica recientemente en diversos temas.
PLANTILLA 1:
Es la que uso cuando deseo el texto en dos columnas, además me divide en los dos idiomas de preferencia (ESPAÑOL-INGLES). Puedes, trabajar tranquilamente ente formato, agregar fotos, separadores y todo lo que desees.
TABLE 1:
This is the one I use when I want the text in two columns, also it divides me in the two languages of preference (SPANISH-ENGLISH). You can work calmly in the format, add photos, separators and everything you want.
<.div class="text-justify".>
<.div class="pull-left".>
.### <center.> Spanish <./center.>
AQUI ESCRIBEN
<./div>
<.div class="pull-right">
.### <center.> English <./center>
AQUI ESCRIBEN
<./div>
.---.
PLANTILLA 2 :
Son las que utilizo frecuentemente, mas que todo para temas instruccionales o donde deba explicar detalladamente cada paso a ejecutar, el orden es necesario para que se vean visualmente atractivas tus publicaciones. Te recuerdo que puedes agregar tus separadores y banner personalizados.
TABLE 2 :
These are the ones I use frequently, mostly for instructional topics or where I must explain in detail each step to be executed, the order is necessary to make your publications visually attractive. I remind you that you can add your personalized dividers and banners.
2
 )
)
<.center>FOTO DE PORTADA</center.>
SEPARADOR DE BIENVENIDA
<.br>
.# <.center> Español <./center>
IMAGEN SEPARADOR
TEXTO INTRODUCCION ESP
<./div>
<.div class = "text-justify">
<.div class = "pull-left">
.# <.center> Inglés <./center>
<.br>
IMAGEN SEPARADOR
TEXTO INTRODUCCION ING
<./div>
<.hr>
<.center>
<.h4>¿De qué se trata?-What is it about? <./h4>
<./center>
FOTO
<.div class = "text-justify">TEXTO<./div>
.___
<.centro>
FOTO MATERIALES
<.br/>
<.hr>
<.center>
FOTOGRAFIA
<./center>
<.div class="pull-left">
TEXTO ESPAÑOL
<./div>
<.div class="pull-right">
TEXTO EN INGLES
<./div>
<.center>
FOTOGRAFIA
<./center>
<.div class="pull-left">
TEXTO ESPAÑOL
<./div>
<.div class="pull-right">
TEXTO EN INGLES
<./div>
<.center>
FOTOGRAFIA
<./center>
<.div class="pull-left">
TEXTO ESPAÑOL
<./div>
<.div class="pull-right">
TEXTO EN INGLES
<./div>
OBSERVACIÓN: Deben borrar absolutamente todos los puntos que están agregados, se los coloqué para que se pudiera visualizar la plantilla.
OBSERVATION: You must delete absolutely all the points that are added, I placed them so that the template could be visualized.
¡Espero haya sido de tu ayuda, hasta una proxima publicación!
I hope it has been of your help, until a next publication!
Todas las imagenes son de mi propiedad
utilicé traductor Deepl vensión gratuita
Congratulations, @marytp20 Your Post Got 100% Boost By @hiveupme Curator.
"Delegate To @hiveupme Curation Project & Earn 95% Curation Rewards"
Contact Us : CORE / VAULT Token Discord Channel or Join Us : UPMELINK Web Site
gracias por compartir tus conocimientos.
Es un gusto hacerlo. Espero te sirva.
Excelente.
Ideal para todos los que estamos iniciando.
Me cuesta mucho avanzar, ningún comando me funciona. Me han dicho que se debe a que utilizo un teléfono para redactar.
He intentado con los comandos que han publicado varios HIVERS, pero sin éxito.
Muchísimas gracias @marytp20 por compartirnos todos tus conocimientos. Te felicito. Has progresado aceleradamente y eres muy solidaria.
Éxitos amiga virtual.
😉🤗👏👍😁
Excelente! Un repaso de código HTML. Felicidades Mary excelente!
Estaba buscando los códigos para el doble encolumnado para publicar en forma bilingue los posts. Gracias por compartir esta información @marytp20. Saludos.