Hola, gente de #Gems aquí estoy de nuevo reportandome está vez con un contenido diferente a lo que he hecho antes ya que el post de hoy se enfoca en ayudar a todos a mejorar el maquetado de los mismos o agregarle detalles a las publicaciones para que sean más agradables a la vista.
Como cualquier Hiver, yo siempre quiero mejorar mi redacción y maquetado cada día más y para eso me valgo de todos los recursos que me hagan sentir cómoda y que permitan a los lectores entender lo que escribo y que disfruten de la organización del post. Uno de estos recursos son los "separadores" que normalmente utilizó para subdividir los subtítulos de un tema y que la lectura sea estéticamente placentera. Como sabrán yo uso un celular modelo J3 (Samsung) que no será el más avanzado pero me ha permitido crear considero posts aceptables.
La herramienta que específicamente me permite crear desde mis portadas, banners y separadores es: PicsArt. Siempre coloco esta aplicación como el medio principal para la creación y edición de las imágenes de mis posts y luego de que mis amigos me pidieran que hiciera un tutorial sobre eso decidí pues ¿por qué no? Ya que si me ayuda tanto a mi también puede ayudar a los demás.
¡Empecemos!
Hello, people of #Gems here I am again reporting this time with a different content than what I have done before since today's post is focused on helping everyone to improve their layout or add details to the publications to make them more pleasing to the eye.
Like any Hiver, I always want to improve my writing and layout every day and for that I use all the resources that make me feel comfortable and allow readers to understand what I write and enjoy the organization of the post. One of these resources are the "separators" that I usually use to subdivide the subtitles of a topic and make the reading aesthetically pleasing. As you may know I use a cell phone model J3 (Samsung) which may not be the most advanced but it has allowed me to create I consider acceptable posts.
The tool that specifically allows me to create from my covers, banners and separators is: PicsArt. I always put this application as the main way to create and edit the images of my posts and after my friends asked me to make a tutorial about it I decided why not? because if it helps me so much it can also help others.
Let's get started!
Como hago mis separadores con PicsArt
Yo uso normalmente dos tipos de separadores: a) Degradados y b) con diseño. Los primeros son más rápidos de hacer pero los segundos son más bonitos así que haré un tutorial para ambos.
a) Degradados:
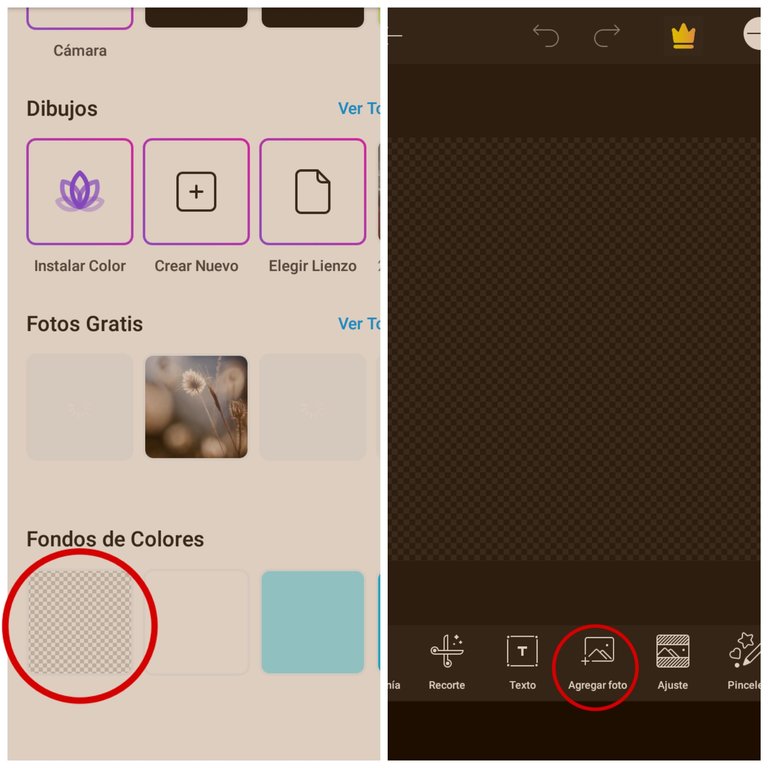
- Primero hay que abrir la herramienta de PicsArt y darle al icono de más (+) que aparece en el inicio.
- Se nos desplegarán imágenes de nuestra galería, sugerencias para plantillas, fondos y colores que podemos usar. Nosotros elegiremos el fondo transparente que ven ahí.
How I make my separators with PicsArt
I normally use two types of separators: a) gradient and b) patterned. The former are quicker to make but the latter are prettier so I'll make a tutorial for both.
a) Gradients:
- First you have to open the PicsArt tool and click on the plus icon (+) that appears at the top.
- It will display images from our gallery, suggestions for templates, backgrounds and colors that we can use. We will choose the transparent background you see there.

- Una vez seleccionado el fondo, seleccionaremos la opción de "Agregar Texto" y solo escribiremos una barra recta como pueden observar.
- Ajustaremos la barra a los bordes del fondo transparente y le daremos a "color"
- Once the background is selected, select the "Add Text" option and just write a straight bar as you can see.
- We will adjust the bar to the edges of the transparent background and hit "color".
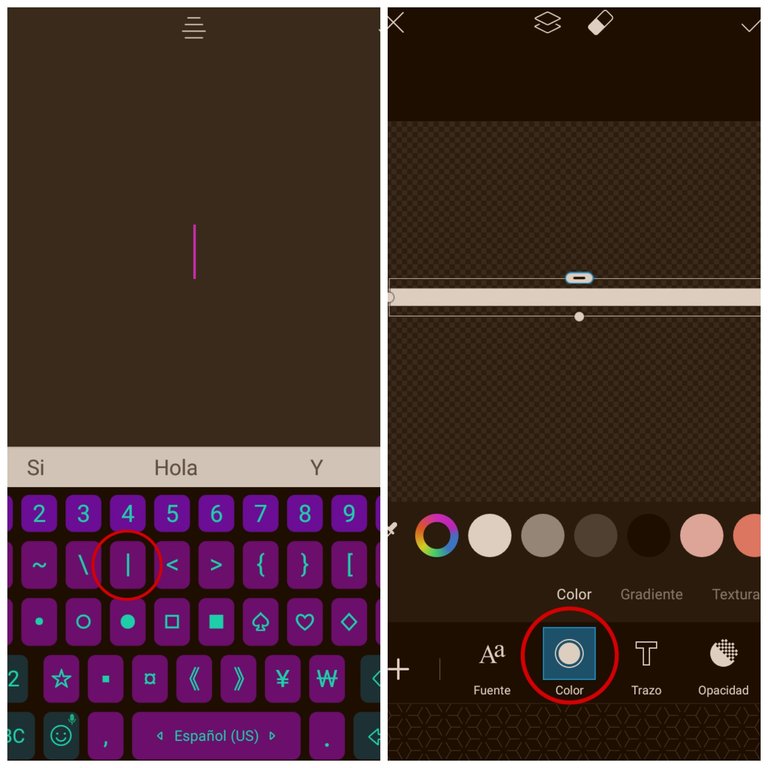
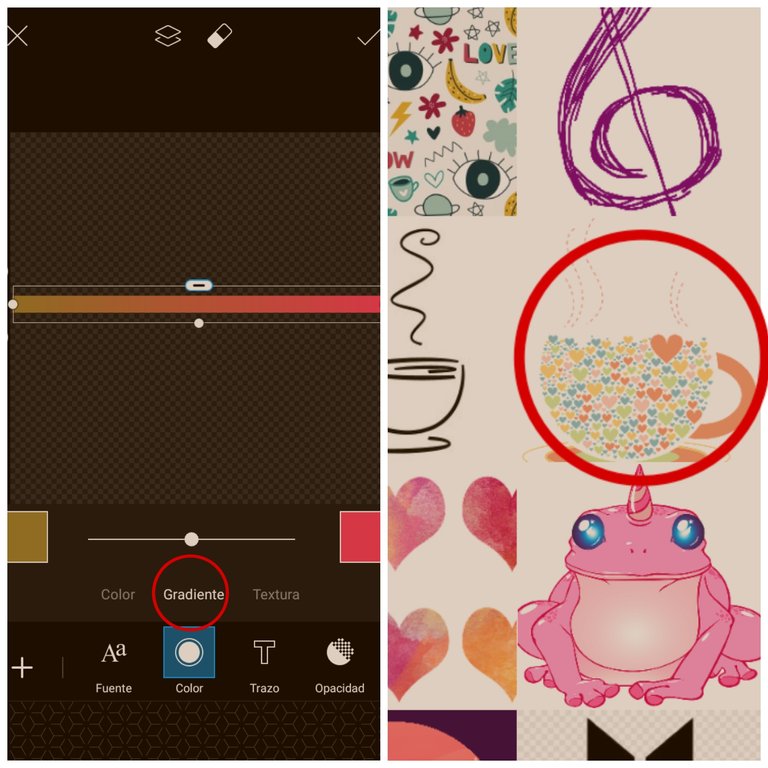
- Presionaremos la opción de "gradiente" y elegiremos en los cuadros de los lados los colores que queremos que hagan el degrade de nuestro separador.
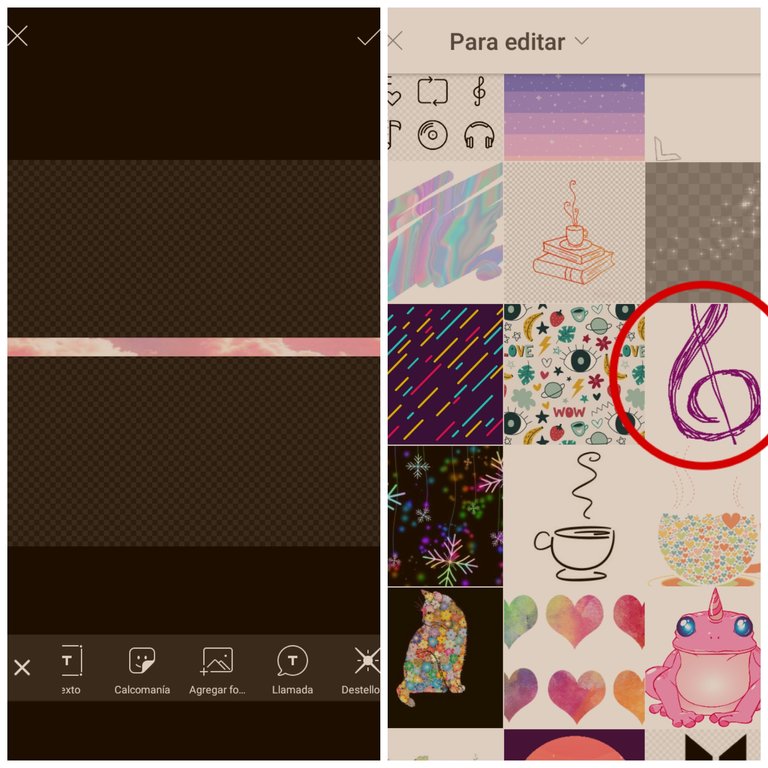
- Luego le daremos a "Agregar foto" y elegiremos el adorno png o los detalles que más nos gusten y los ajustaremos al separador para que el tamaño coincida.
- Click on the "Gradient" option and choose the colors we want to make the gradient of our separator in the boxes on the sides.
- Then we will hit "Add photo" and choose the png ornament or the details that we like and adjust them to the separator so that the size matches.
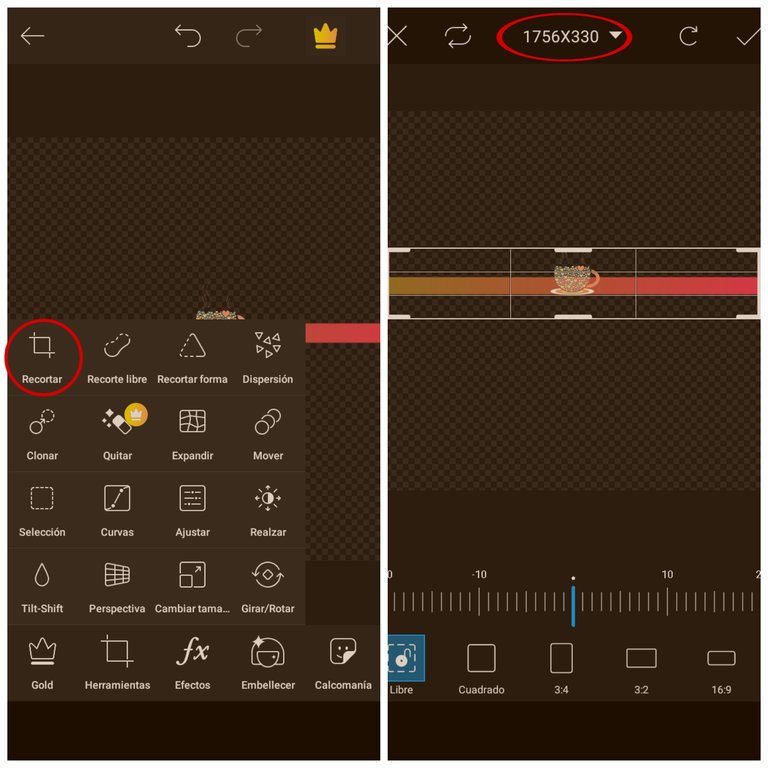
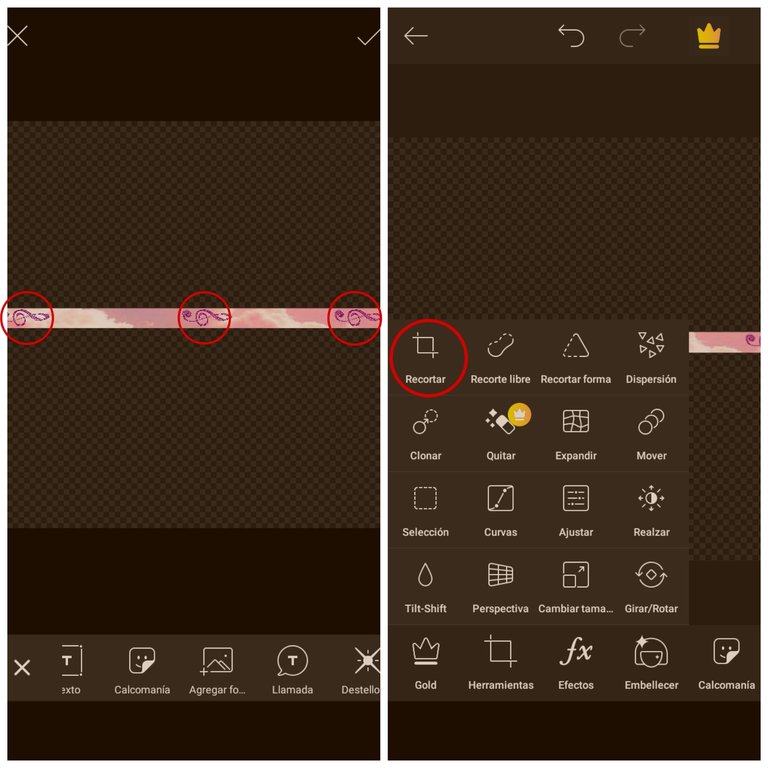
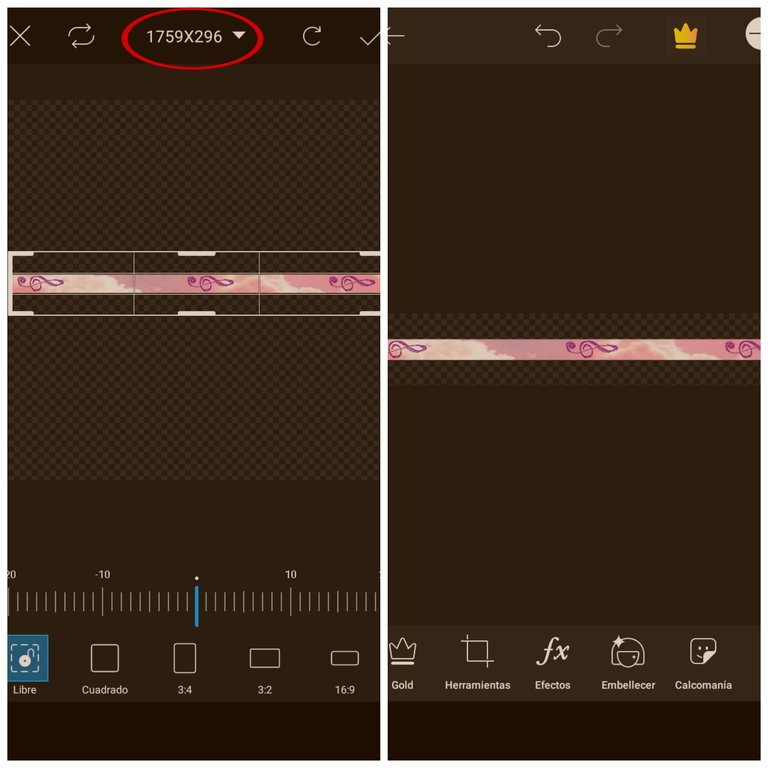
- Una vez satisfechos con el diseño final presionamos en "recortar" y ajustamos el tamaño (1750 x 300 aproximadamente).
- Recortamos, debería quedarnos más o menos como luce en la foto. Le damos a la flecha superior derecha y guardamos nuestro archivo en la galería.
- Once we are satisfied with the final design we click on "crop" and adjust the size (1750 x 300 approximately).
- Crop, it should be more or less as it looks in the picture. We hit the top right arrow and save our file in the gallery.
¡Y listo! Este es nuestro separador en gradiente con un bonito adorno en el centro, podemos combinar los colores con la portada o el tema del post.
And that's it! This is our gradient divider with a nice ornament in the center, we can match the colors with the cover or the theme of the post.

b) Con diseño:
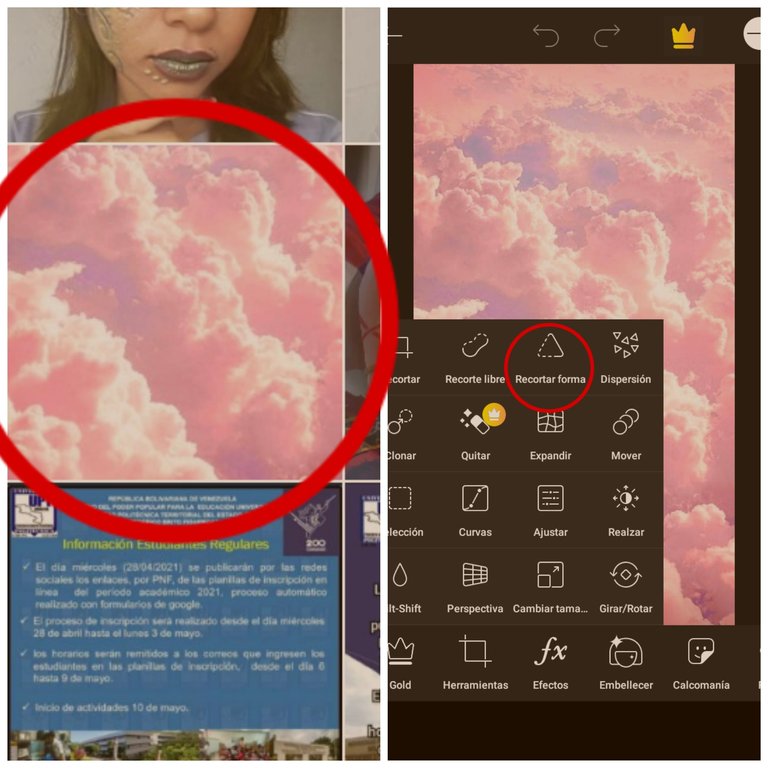
- Para empezar debemos elegir de nuestra galería o las sugerencias de fondos de la aplicación, alguna imagen con detalles que sea de nuestra preferencia.
- Luego iremos a la opción de Herramientas y seleccionaremos "Recortar forma".
b) With design:
- To start we must choose from our gallery or the background suggestions of the application, some image with details of our preference.
- Then we will go to the Tools option and select "Crop shape".
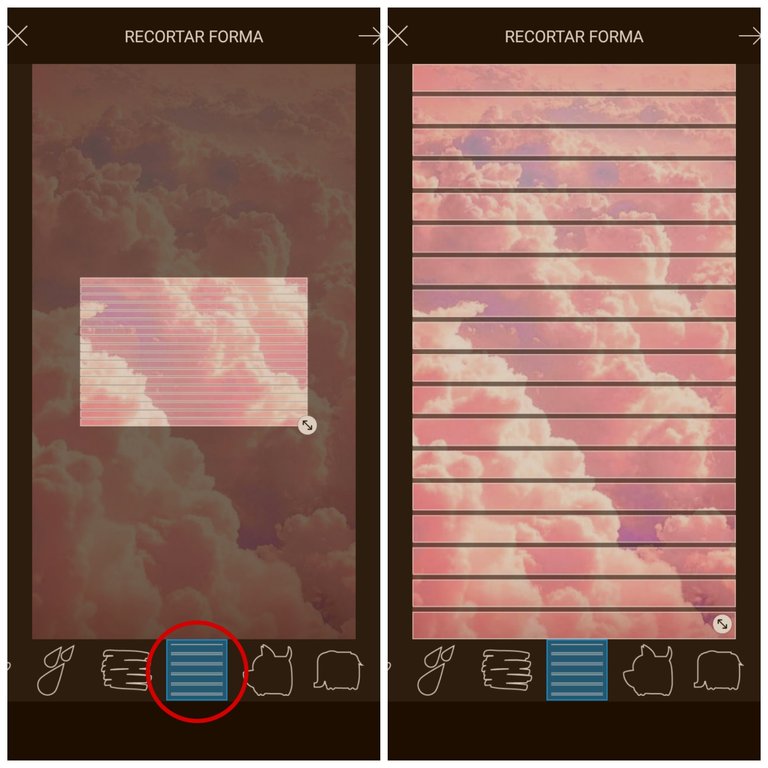
- Lo siguiente será explorar entre las diferentes formas de recorte hasta encontrar estas multiples barras y las seleccionaremos.
- Las ajustaremos de manera que cubran toda la imagen que elegimos anteriormente.
- Next we will browse through the different crop shapes until we find these multiple bars and select them.
- We'll adjust them so that they cover the entire image we chose earlier.
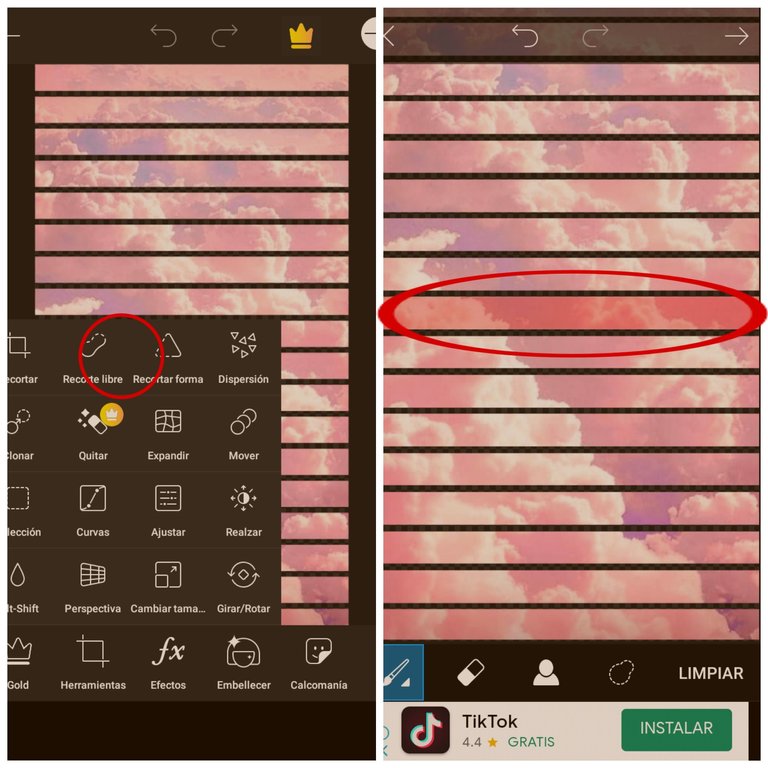
- Luego, usaremos la opción de "Recorte libre" que funciona con una especie de pincel donde lo que sea que rellenes con el mismo es lo que no se va a recortar.
- Rellenaremos solo una de las barras que se crearon usando el patrón anterior.
- Then, we will use the "Free Crop" option that works with a kind of brush where whatever you fill with it is what will not be cropped.
- We'll fill in just one of the bars that were created using the previous pattern.
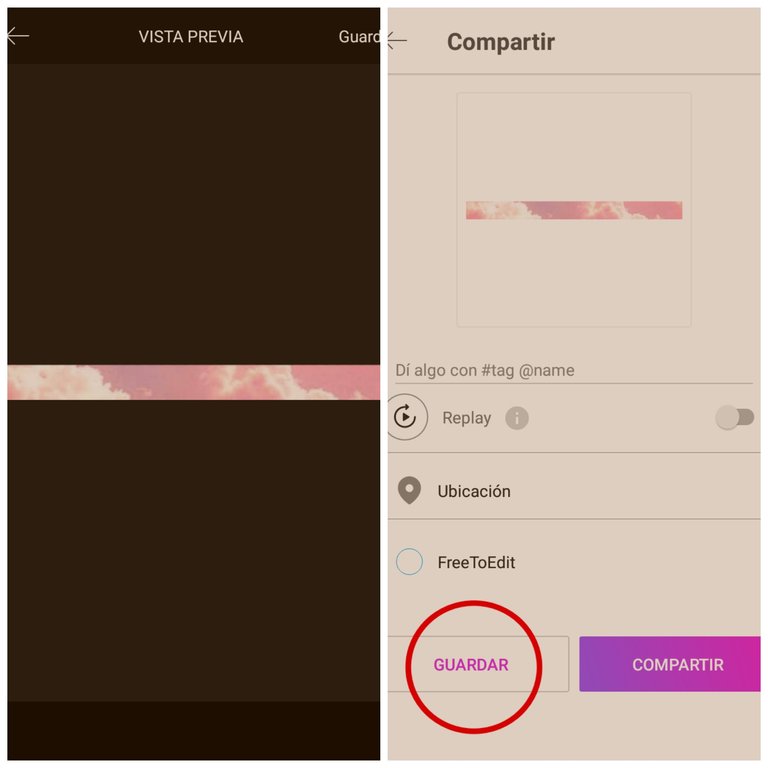
- Nos aseguraremos de que el recorte quede lo más limpio posible.
- Guardamos la imagen en nuestra galería.
- We will make sure that the crop is as clean as possible.
- We save the image in our gallery.
- Abrimos una nueva edición y esta vez elegiremos el fondo transparente de los fondos de colores.
- Usamos la opción de "Agregar foto" y elegimos la barra que habíamos guardado en la galería anteriormente.
- We open a new edition and this time we will choose the transparent background from the colored backgrounds.
- We use the "Add photo" option and choose the bar we had saved in the gallery earlier.
- La ajustamos de manera que llegue casi a los bordes del fondo transparente y agregamos otra foto de la galería usando otra vez la opción de "Agregar foto".
- Elegimos el png o detalle que queremos para adornar el separador.
- We adjust it so that it almost reaches the edges of the transparent background and add another photo from the gallery using again the "Add photo" option.
- We choose the png or detail we want to decorate the separator.
- Ajustamos el tamaño del adorno como mejor nos parezca.
- Seleccionamos "recortar", esto se hace para que el resto del fondo transparente no interfiera a la hora de colocar el separador en el post.
- We adjust the size of the ornament as we see fit.
- We select "crop", this is done so that the rest of the transparent background does not interfere when placing the separator in the post.
- Ajustamos el tamaño de recorte entre 1750 x 300 aproximadamente.
- Nos quedará como se puede notar en la foto. Guardamos está imagen final en la galería del teléfono de nuevo.
- We adjust the cropping size between 1750 x 300 approximately.
- It will be as you can see in the picture. We save this final image in the phone gallery again.
Y aquí está el resultado final
And here's the final result

Ya tenemos un lindo separador con detalles que podemos combinar con el tema de nuestra publicación o hacerlo neutro para usarlo en varias publicaciones.
We already have a nice divider with details that we can combine with the theme of our publication or make it neutral to use it in several publications.
Despedida
Espero que les haya gustado este pequeño tutorial, haganme saber si ya conocían este truco para hacer separadores simples y que les pareció. Esto es algo que a mi me ayuda mucho y a mis amigos también debido a que muchos de nosotros nos valemos del celular para redactar en Hive por eso debemos aprovechar al máximo las aplicaciones de edición tan completas como lo son PicsArt o Canva, por lo que espero que ustedes también saquen provecho de este tutorial.
Experimenten con los diseños, agreguen su toque personal y sobre todo, sean creativos no tengan miedo de probar herramientas nuevas o nuevos conceptos.
¡Nos vemos pronto!
Goodbye
I hope you liked this little tutorial, let me know if you already knew this trick to make simple separators and what you thought. This is something that helps me a lot and my friends too because many of us use the cell phone to write in Hive so we must make the most of editing applications as complete as they are PicsArt or Canva, so I hope you also take advantage of this tutorial.
Experiment with the designs, add your personal touch and above all, be creative, don't be afraid to try new tools or new concepts.
See you soon!

~Yoha
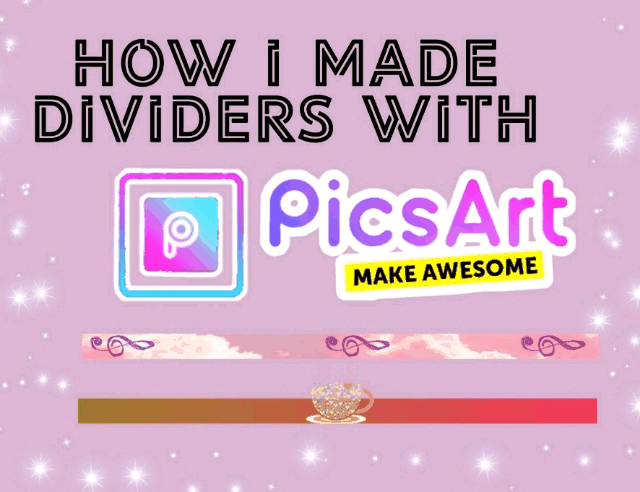
Portada y separadores hechos con/ Cover and dividers made with: PicsArt* (Android)
Collages hechos con/ Collages made with: PicsArt (Android)
Fotos son capturas de pantalla hechos con mi celular J3/ Photos are screenshots made with my phone J3: