.jpeg)

Español
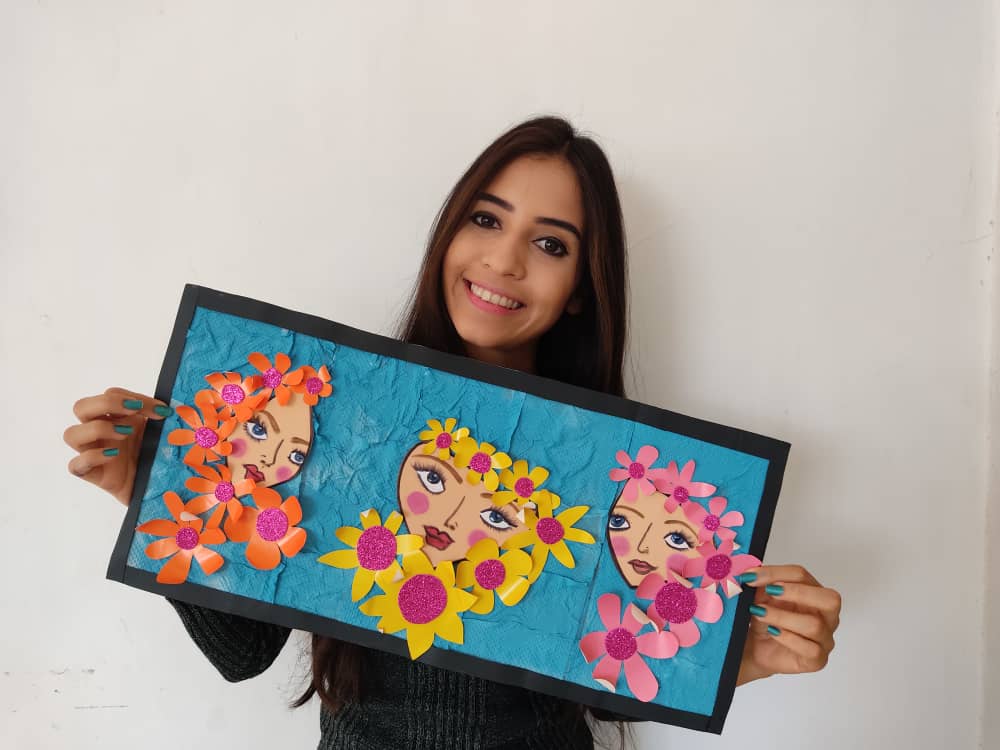
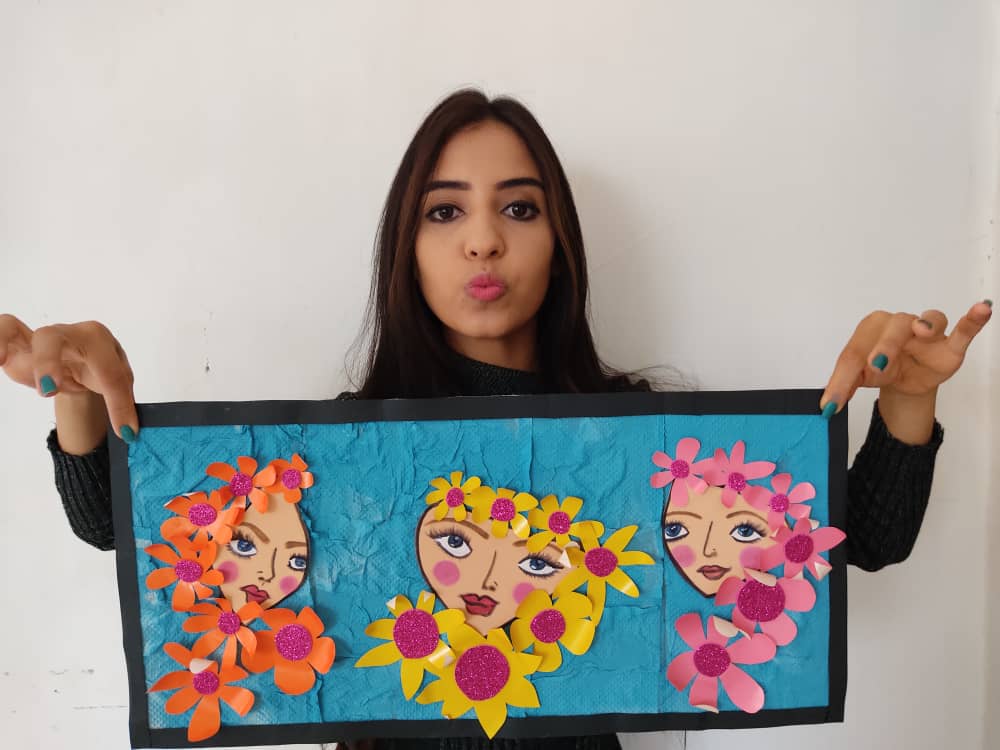
Hola queridos amigos ❤️ El día de hoy les traigo nuevo y divertido paso a paso donde les mostrare como realizar un hermosa, creativo y autentico cuadro de tres hermosas damas con flores a su alrededor, hecho con materiales muy económicos y fáciles de conseguir, así que manos a la obra, es hora de convertir estos materiales tan sencillos en una hermosa y sobre todo original obra de arte. Recuerden que el secreto de cumplir todo lo que nos proponemos es hacer las cosas con amor. Además es una idea perfecta para pasar un rato agradable con nuestros pequeños en casa e incentivarlos, ya que, pueden ir, de a poco, desarrollando su ingenio y acercándose un poco más al trabajo artístico.
English
Hello dear friends❤️Today I bring you new and fun step by step where I will show you how to make a beautiful, creative and authentic painting of three beautiful ladies with flowers around them, made with very cheap materials and easy to get, so let's get to work, it is time to turn these simple materials into a beautiful and above all original work of art. Remember that the secret of fulfilling everything that we propose is to do things with love. It is also a perfect idea to spend a pleasant time with our little ones at home and encourage them, since they can go, little by little, developing their ingenuity and getting a little closer to artistic work.
¿Qué están esperando?
Utilizar estos hermosos materiales para transformarlos en un hermoso cuadro es una idea muy original, perfecta y económica para decorar nuestras paredes favoritas. Antes de comenzar no olvidemos lavarnos nuestras manos.
What are they waiting for?
Using these beautiful materials to transform them into a beautiful painting is a very original, perfect, and cheap idea to decorate our favorite walls. Before we start, let's not forget to wash our hands.
[Materiales | Materials]
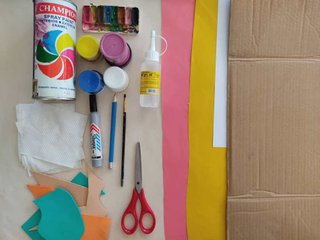
Para hacer este hermoso cuadro necesitaremos:
- Moldes.
- Foami o goma eva.
- Papel higiénico.
- Cartulina negra.
- Lápiz.
- Tijera.
- Pincel o brocha.
- Papel lustrillo.
- Pinturas.
- Marcador de punta fina.
- Pegamento o silicón.
To make this beautiful painting we will need:
- Molds.
- Foami or rubber eva.
- Toilet paper.
- Black cardboard.
- Pencil.
- Scissors.
- Brush or brush.
- Glossy paper.
- Paintings.
- Fine tip marker.
- Glue or silicone.
Procedimiento (paso a paso)
Process (step by step)
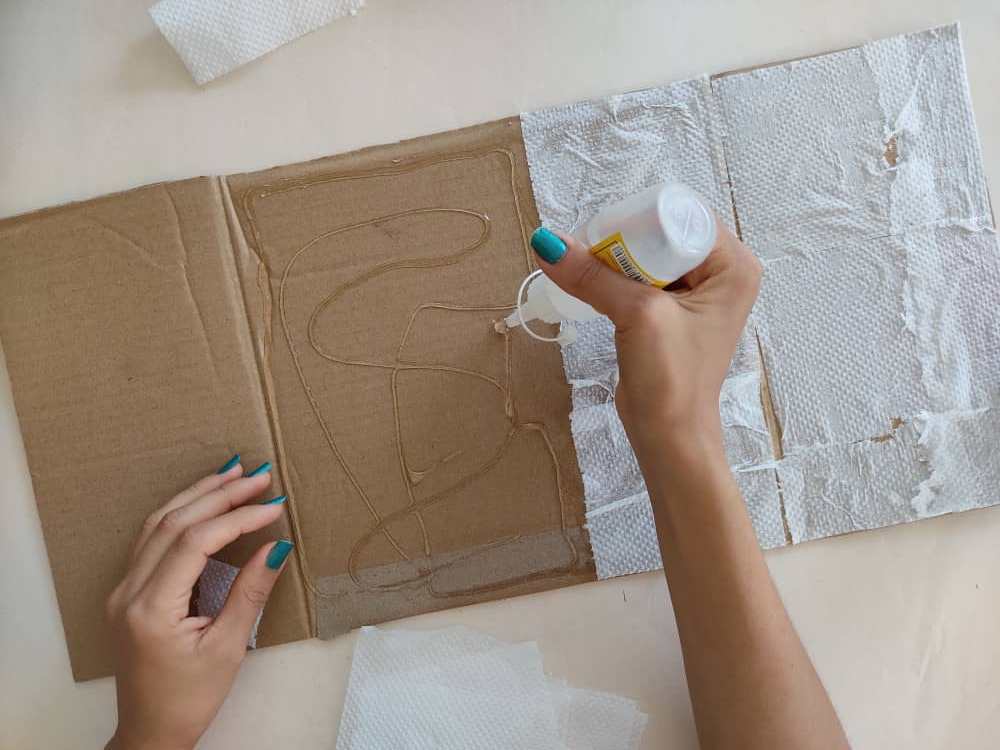
Primero, fabricamos una base de cartón para nuestro cuadro de 60cm x 24cm, y seguidamente, aplicamos pegamento o silicón líquido la superficie del cartón, para distribuir bien este pegamento utilizamos una pequeña brocha o pincel en desuso, y como el pegamento se seca rápidamente, debemos ir colocando el papel higiénico inmediatamente. Si queremos o para darle un poco de textura al papel, utilizamos nuestro dedo para darle un poco de forma y que nuestra base tenga un acabado rugoso.
First, we make a cardboard base for our 60cm x 24cm box, and then we apply glue or liquid silicone to the cardboard surface, to distribute this glue well we use a small brush or a disused brush, and since the glue dries quickly, we must place the toilet paper immediately. If we want or to give a little texture to the paper, we use our finger to give it a little shape and that our base has a rough finish.
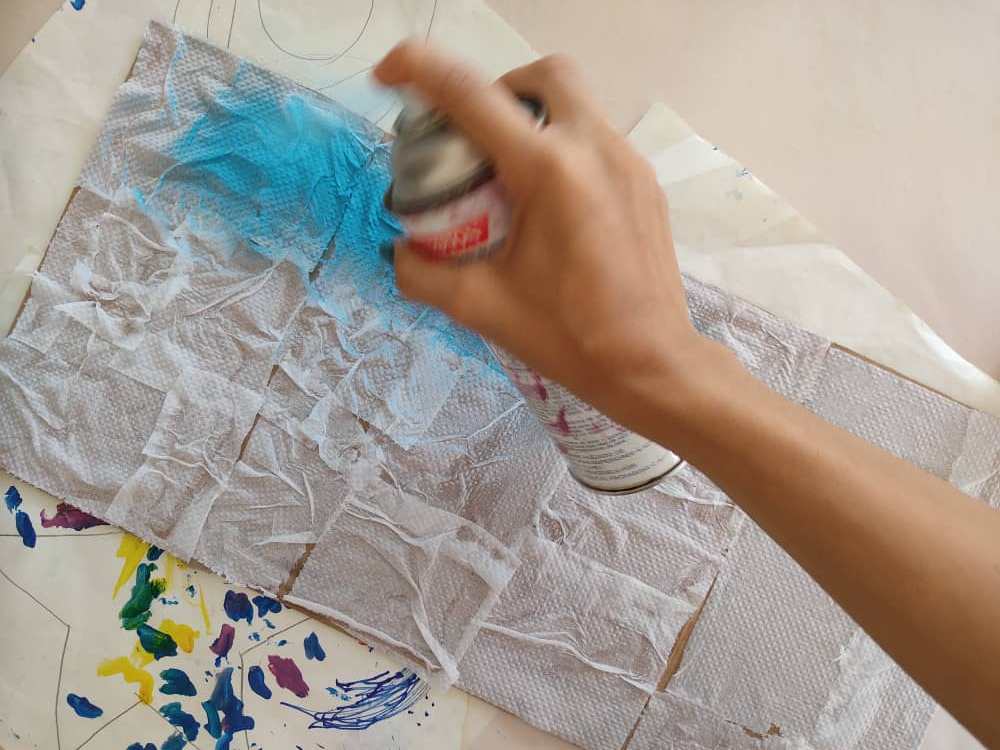
Una vez que el cartón este totalmente cubierto de papel higiénico, lo pintamos con un hermoso color que sea bastante llamativo, en este caso decidí pintarlo de color azul cielo, es mi favorito, y ojo podemos utilizar cualquier tipo de pintura no es obligatorio usar el pintura acrílica o en espray, y si utilizamos este tipo de pintura no olvidemos colocarnos una mascarilla, y un papel reciclable debajo de cartón lo suficientemente grande para que cubra la mesa y evitar manchas en nuestra mesa de trabajo. Dejamos secar durante 15 minutos.
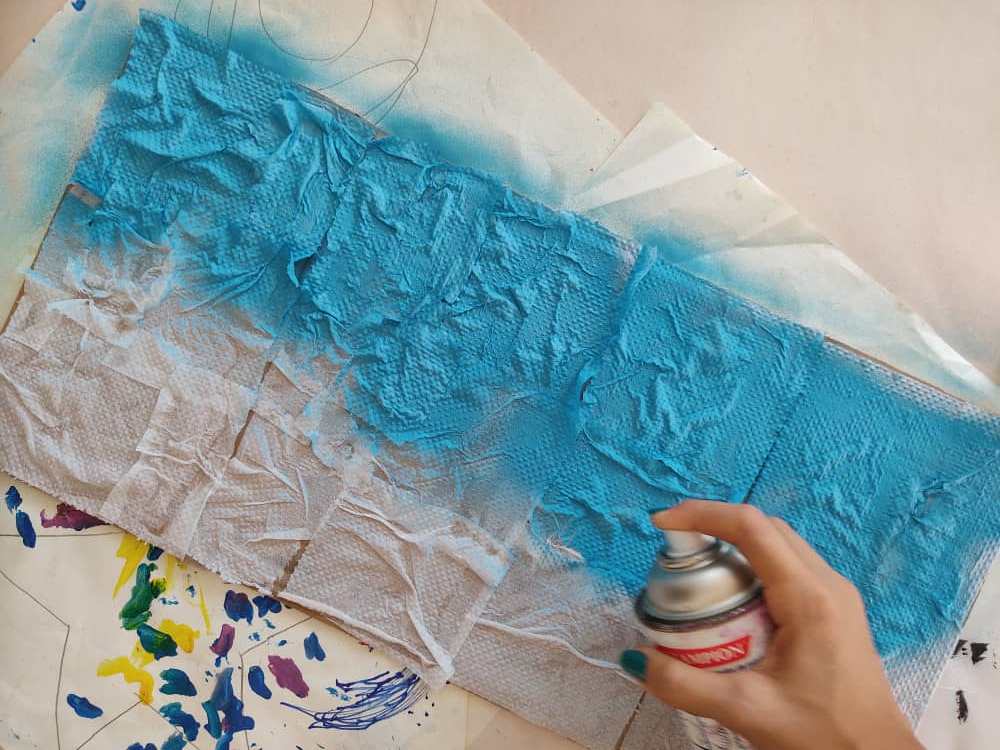
Once the cardboard is completely covered with toilet paper, we paint it with a beautiful color that is quite striking, in this case, I decided to paint it in sky blue, it is my favorite, and eye we can use any type of paint it is not mandatory to use the acrylic or spray paint, and if we use this type of paint do not forget to put on a mask, and a recyclable paper under cardboard large enough to cover the table and avoid stains on our work table. Let it dry for 15 minutes.
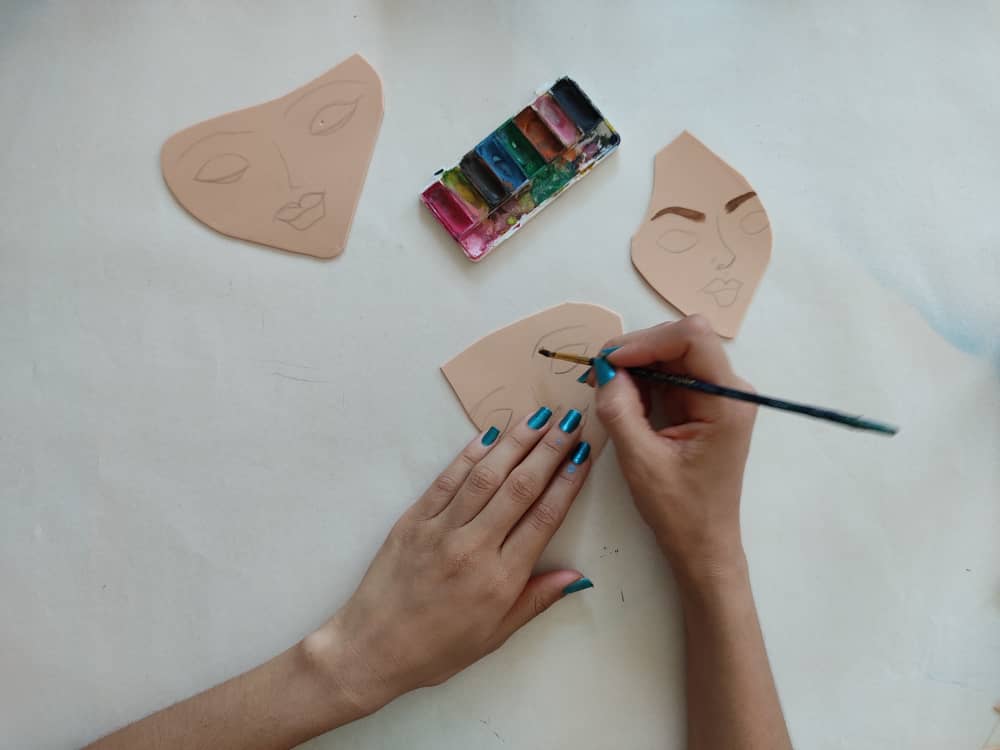
Ahora, diseñamos tres (3) lindas rostros de mujer en retazos de foami de color piel, sin importar, si su forma no está perfecta, mientras más diferente sea. Recuerden siempre marcar primero con líneas muy claras, y aplicar la pintura con mucho amor.
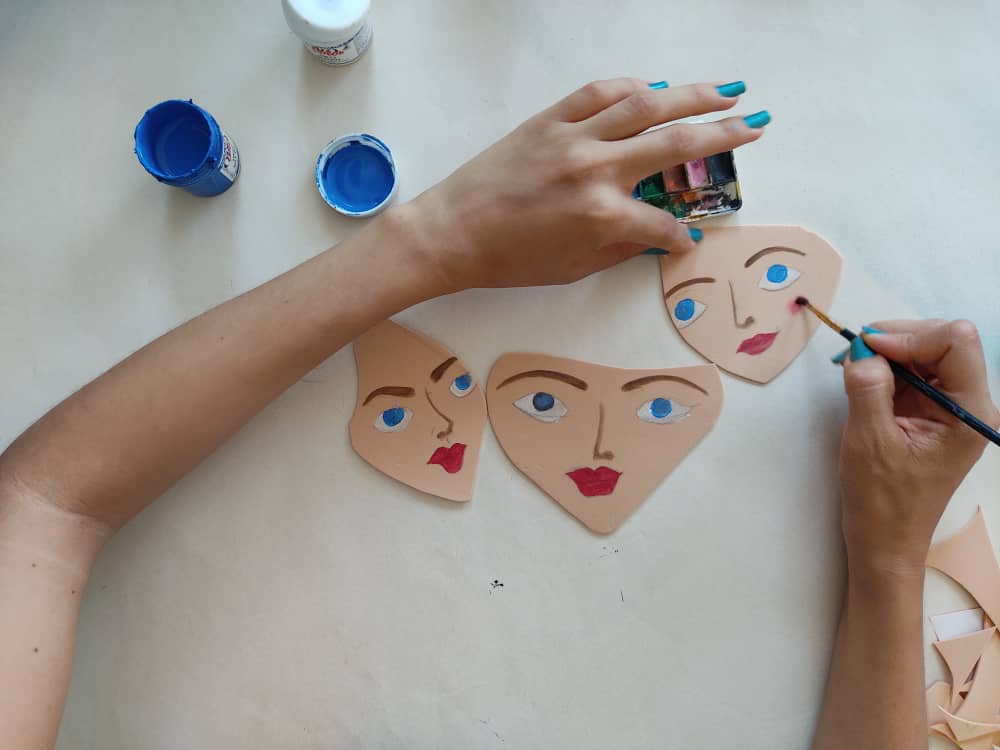
Now, we design three (3) pretty faces of women in patches of skin-colored foamy, regardless of whether their shape is not perfect, the more different it is. Remember to always mark first with very clear lines, and apply the paint with much love.
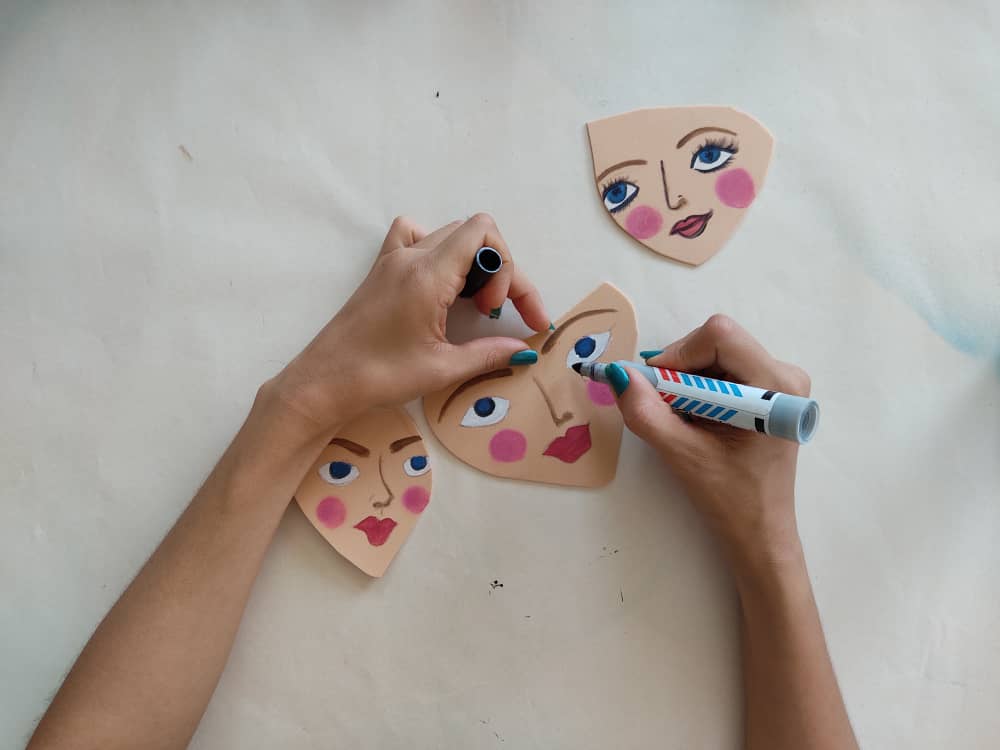
Luego, remarcamos las pestañas y bordes de los lindos rostros, utilizando un marcador de punta fina. Este paso hará que nuestro dibujo resalte y luzca mucho mejor.
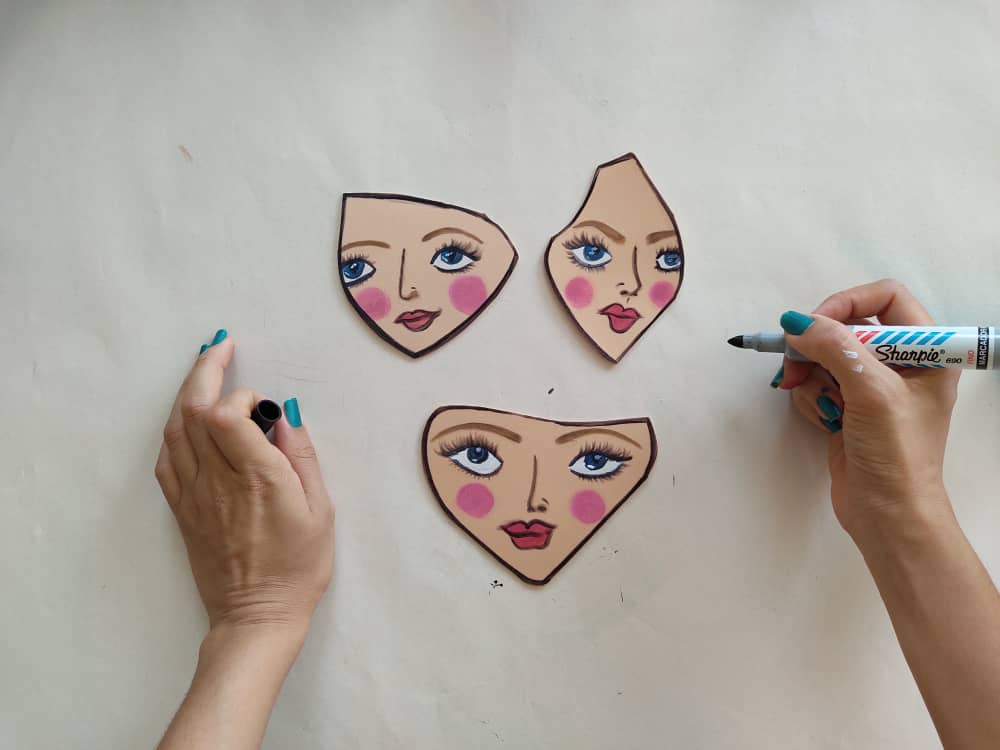
Then, we highlight the eyelashes and edges of the cute faces, using a fine-tip marker. This step will make our drawing stand out and look much better.
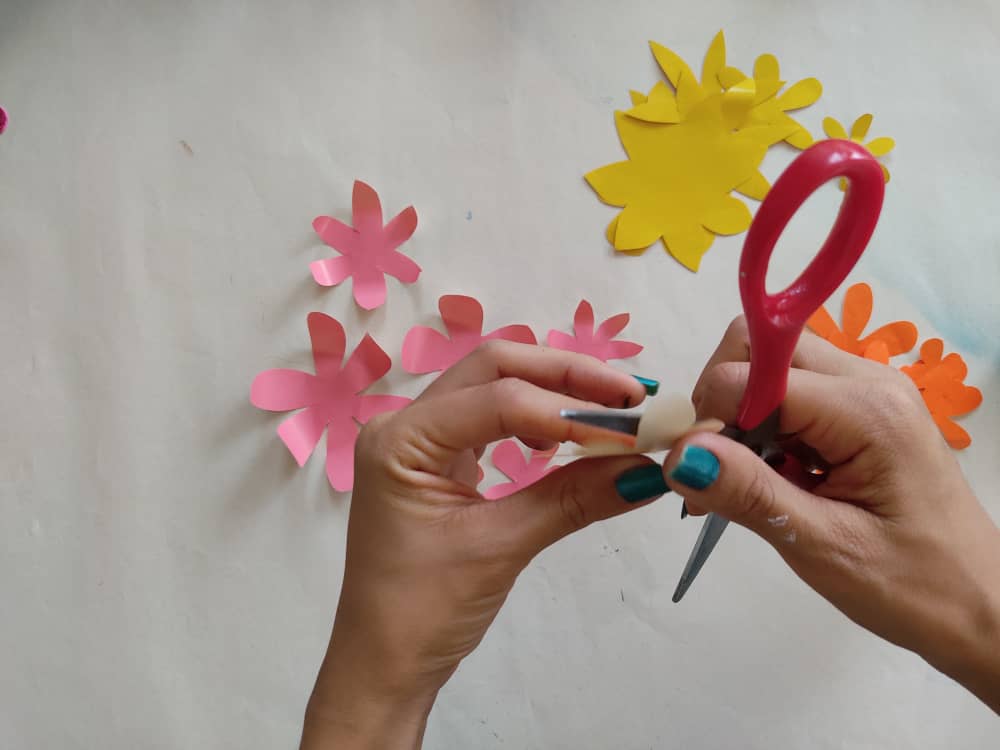
Ahora, diseñamos y fabricamos unas hermosas flores de distinto tamaños hechas de papel lustrillo, y recortamos cada una con mucho cuidado, ya que, este papel es bastante frágil. Recuerden que todas las flores llevan un centro y podemos hacerlos de foami del color que más nos guste o combine con nuestras flores.
Now, we design and manufacture beautiful flowers of different sizes made of luster paper, and we cut each one with great care since this paper is quite fragile. Remember that all flowers have a center and we can make them from foamy of the color that we like the most or combine with our flowers.
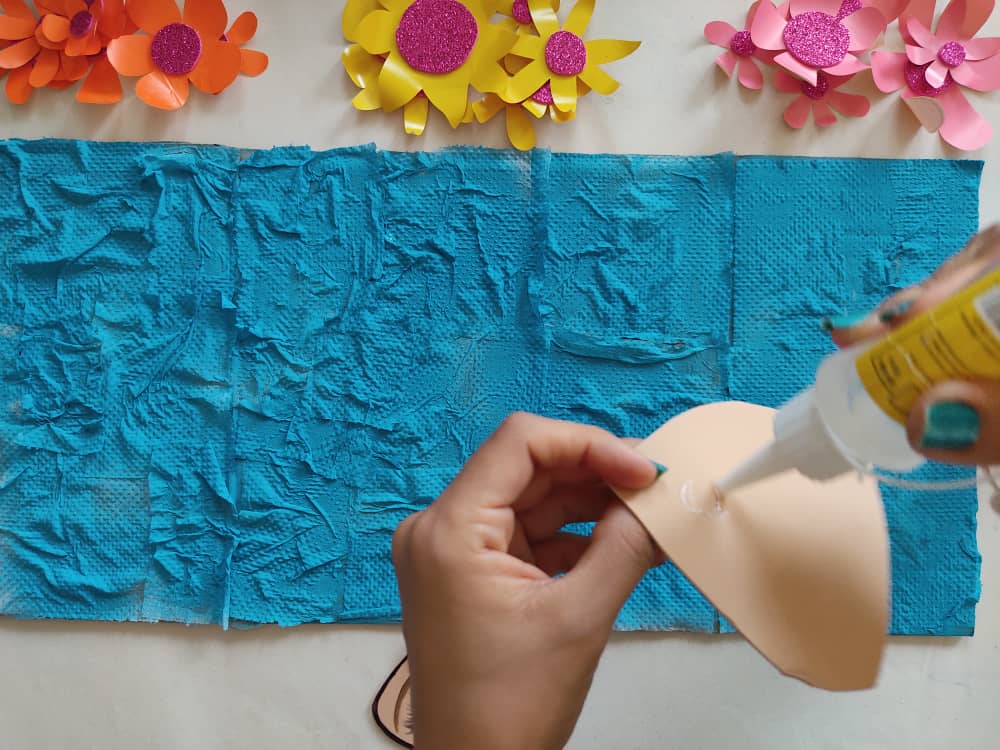
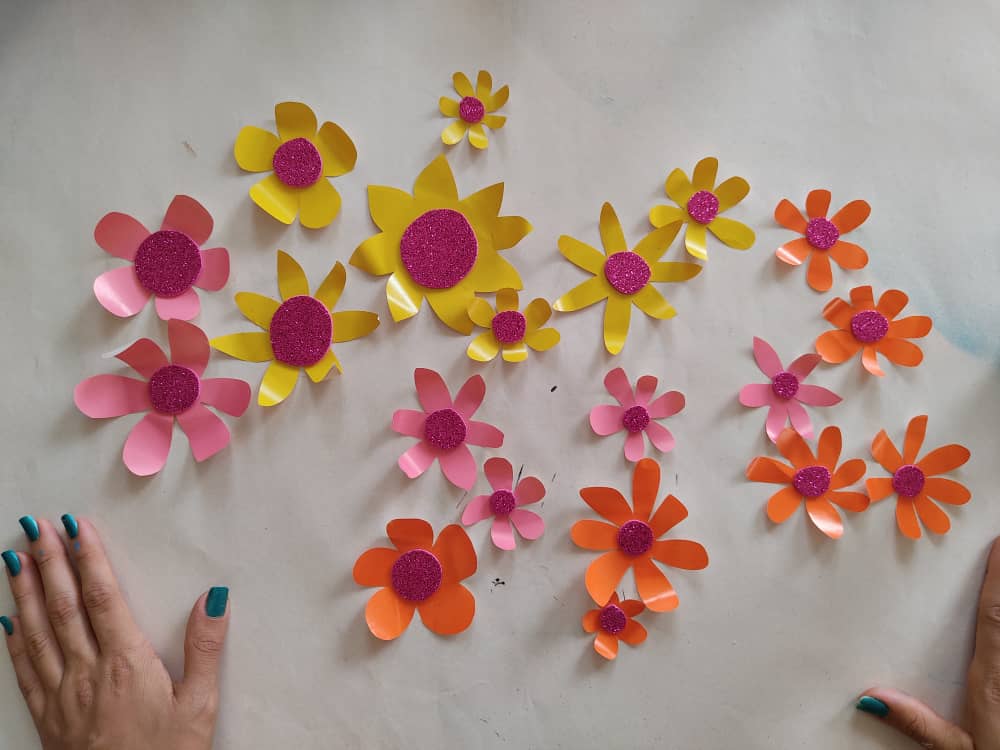
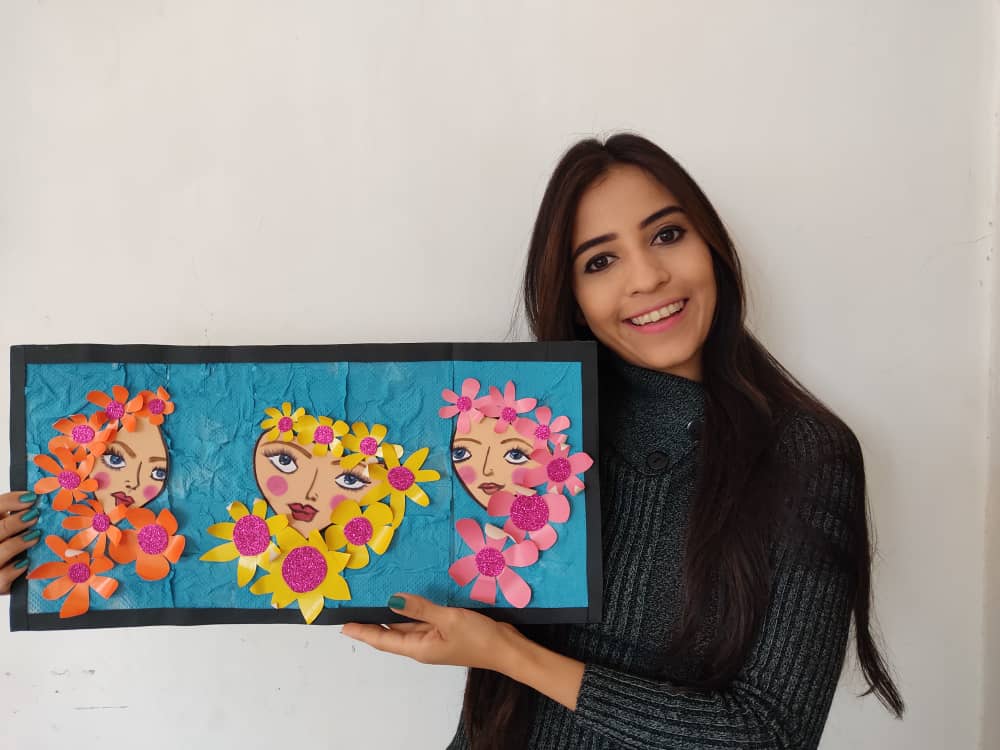
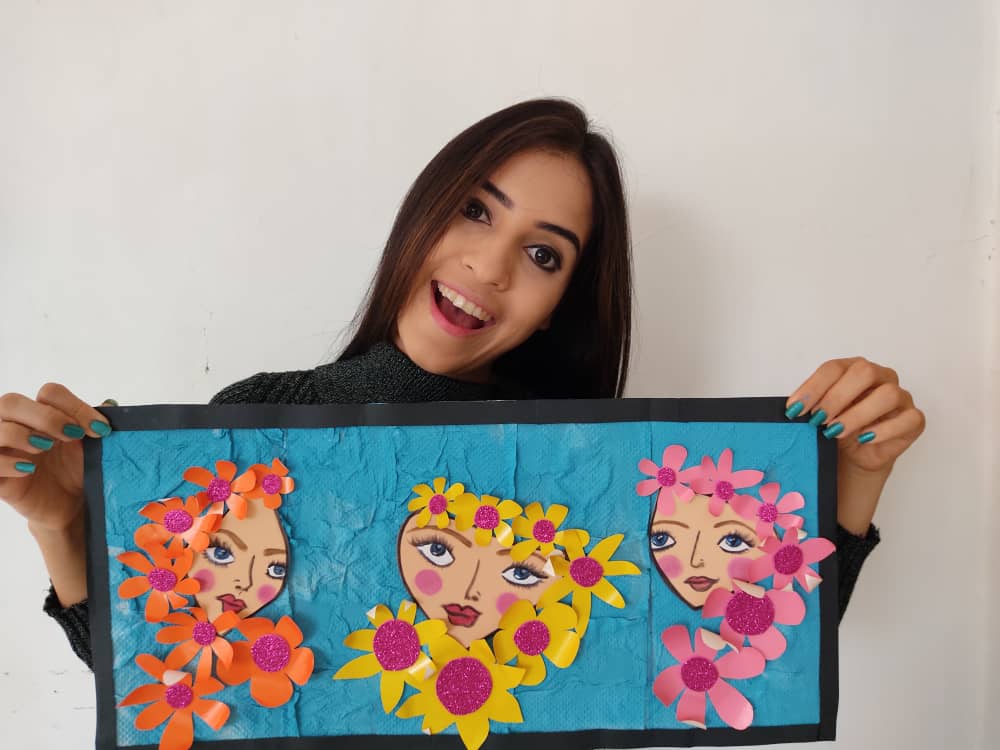
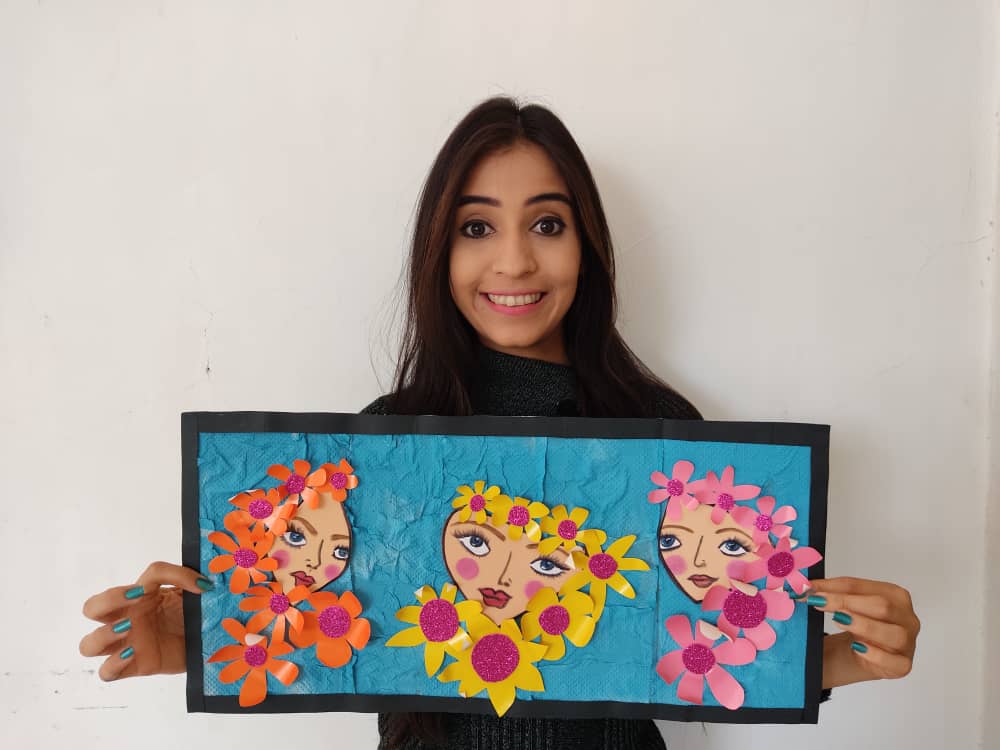
Luego, le damos sentido a nuestra obra, pegando las caras sobre la base dejando una distancia considerable entre ellas, y seguidamente, pegamos las hermosas y coloridas florecitas al rededor de cada una de las caras, para llenar de vida y alegría este fabuloso cuadro. No es obligatorio que uses flores de un color específico para cada cara, podemos dejar volar nuestra creatividad y utilizarlos colores que más nos gusten.
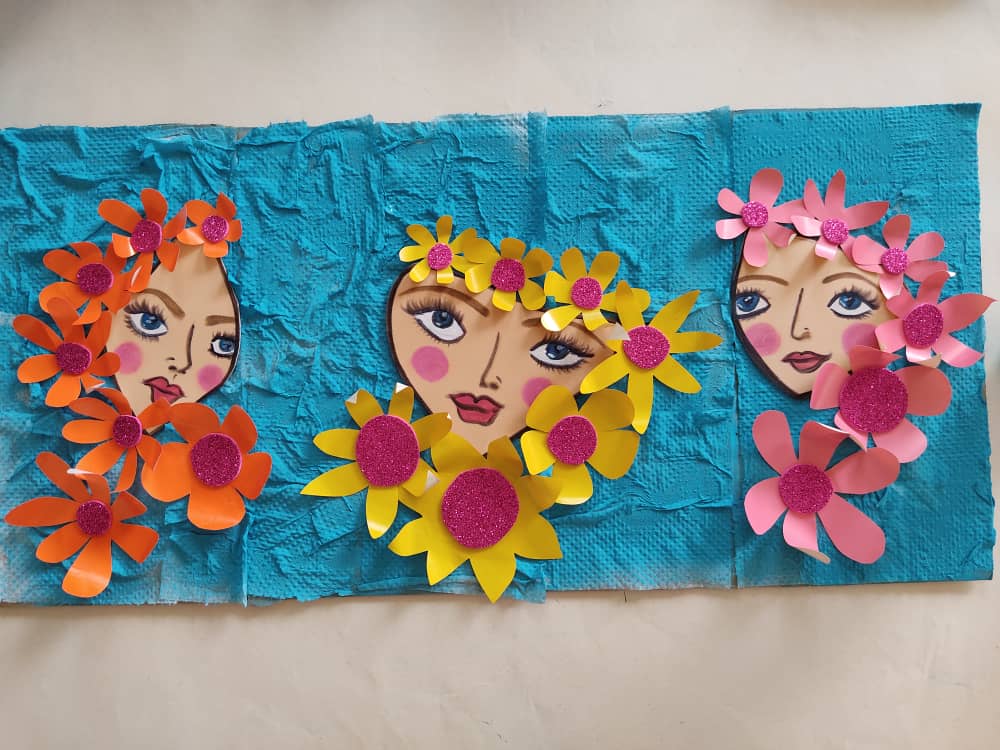
Then, we make sense of our work, gluing the faces on the base leaving a considerable distance between them, and then, we glue the beautiful and colorful flowers around each of the faces, to fill this fabulous painting with life and joy. It is not mandatory that you use flowers of a specific color for each face, we can let our creativity fly and use the colors that we like the most.
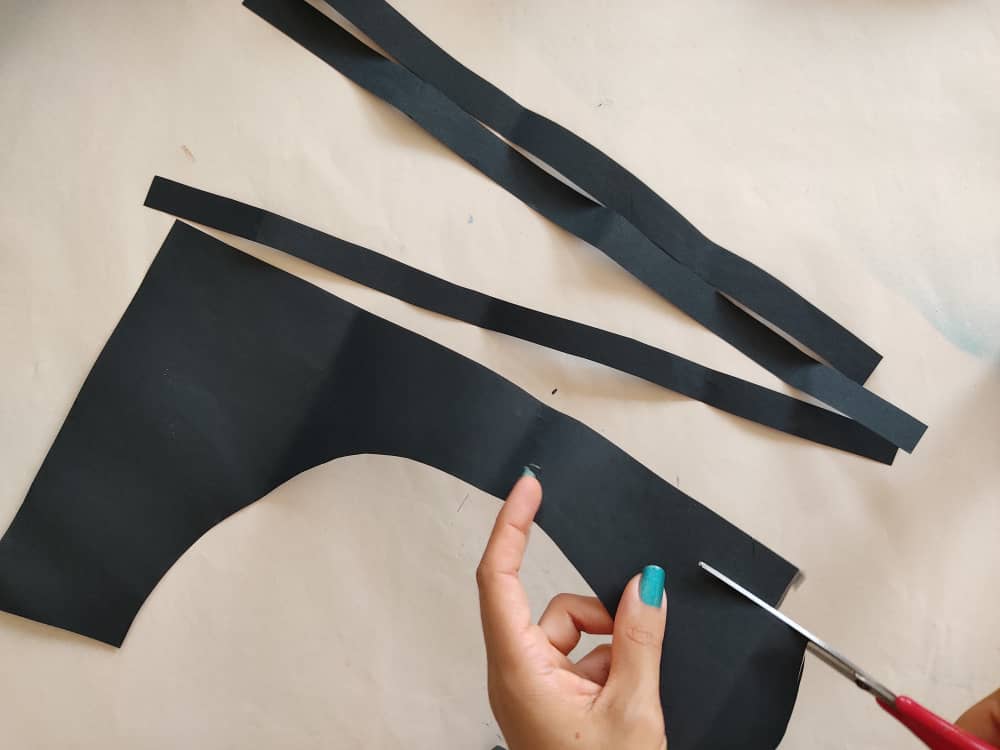
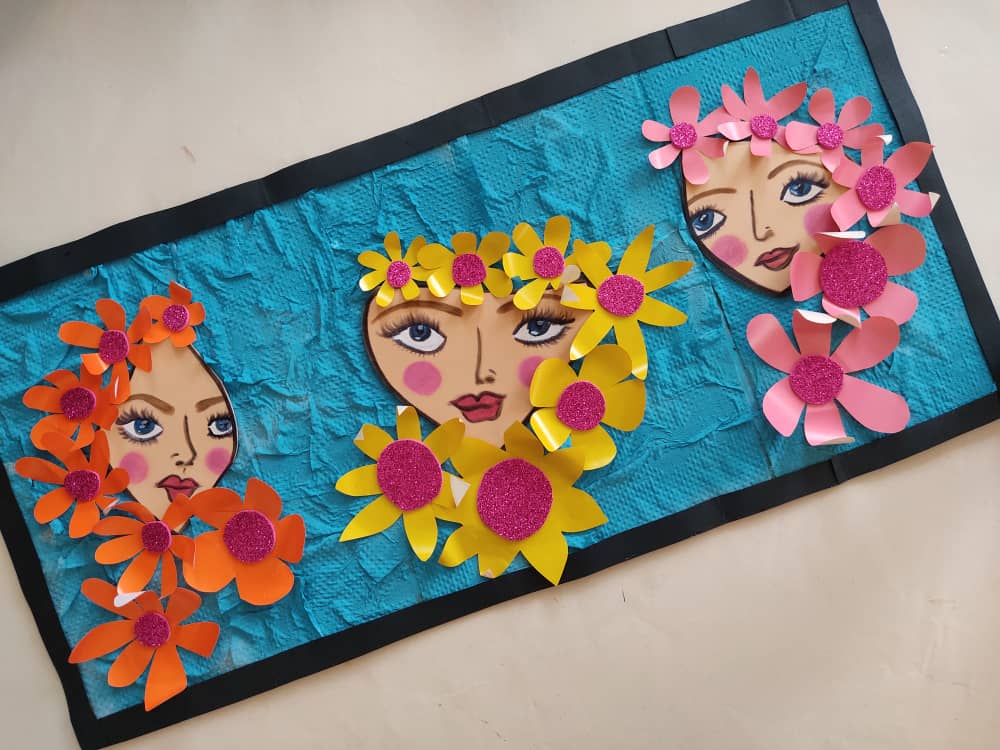
Finalmente, fabricamos un lindo marco para nuestro cuadro, cortando cuatro (4) tiras que coincidan con el tamaño del cuadro, y seguidamente, cubrimos los bordes de la base, para que nuestro cuadro quede terminado.
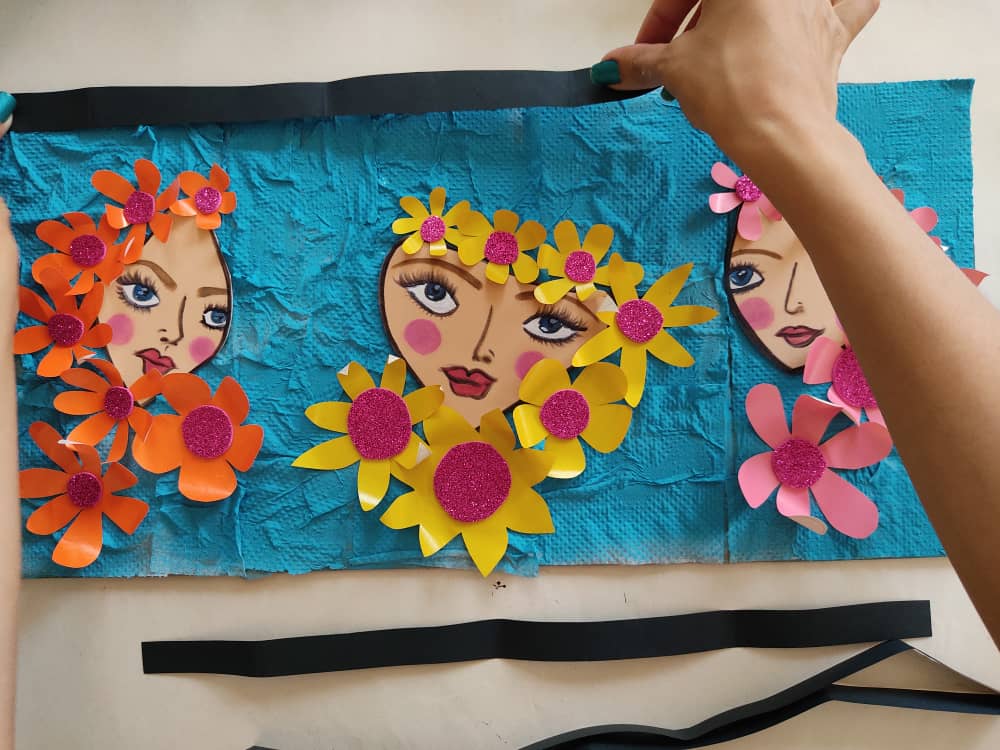
Finally, we make a nice frame for our painting, cutting four (4) strips that match the size of the painting, and then, we cover the edges of the base so that our painting is finished.
.jpeg)
Gracias por acompañarme y espero que lo hayan disfrutado. ❤️
Thanks for joining and I hope you enjoyed it.❤️
.jpeg)
.jpeg)
.jpeg)
.jpeg)
Clic para ver trabajos anteriores | Click to see previous works


My twt #posh
Que bonito te quedó jeje, una excelente forma de decorar el hogar o una habitación con creaciones que caseras, que en mi opinión personal siempre tienen mucho más valor, en mi casa todos los cuadros y pinturas que hay son hechas por mi bisabuelo, un saludo amiguita, que bueno verte por aquí siempre ❗🐻🚀
Tu bisabuelito debio ser un gran artista. Gracias por tu lindo comentario muchas gracias amigo.
Que bonitas, me encantó la técnica amiga. Yo quiero mi pared llena de todas esas cositas. Son muy pero muy buenas y lindas tus ideas de decoración.
Ay amiga gracias por tu lindo comentario de verdad. Me alegra que te guste lo hago. Gracias por la visita. Saludos..
Hola amiga como siempre me encantan tus proyectos!!
Abrazos
Congratulations, your post has been upvoted by @dsc-r2cornell, which is the curating account for @R2cornell's Discord Community.
Enhorabuena, su "post" ha sido "up-voted" por @dsc-r2cornell, que es la "cuenta curating" de la Comunidad de la Discordia de @R2cornell.
This post earned a total payout of 28.744$ and 14.372$ worth of author reward that was liquified using @likwid.
Learn more.