In settings with large numbers of computers, such as offices, computer labs, and workplaces, network topologies are usually encountered. As we have seen, computers are wired together and communicate with one another to send data. But what if we could switch from a wired connection to a wireless one? You can practically mimic the process by considering how quickly the data can be carried, how effective it would be to see no wires tangling around the grounds, and by utilizing Cisco Packet Tracer.
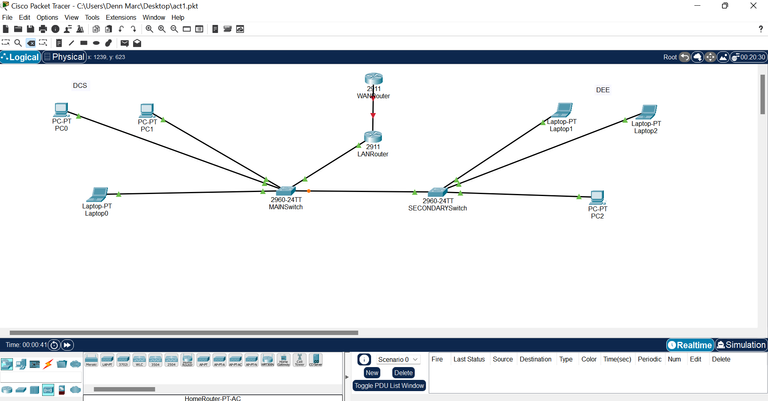
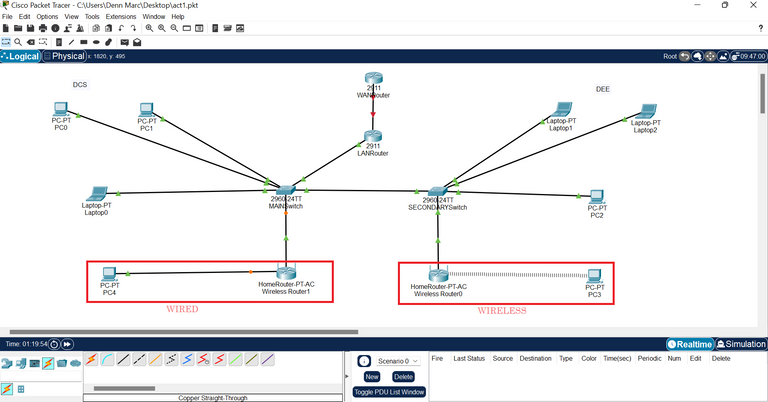
I'll use this example network configuration to illustrate how we can switch from wired to wireless in my explanation. As you can see, the LAN router is under the main switch and a secondary switch. I'll connect a home router to the secondary switch so that it may be used to connect various devices—especially computers and laptops—to the internet.
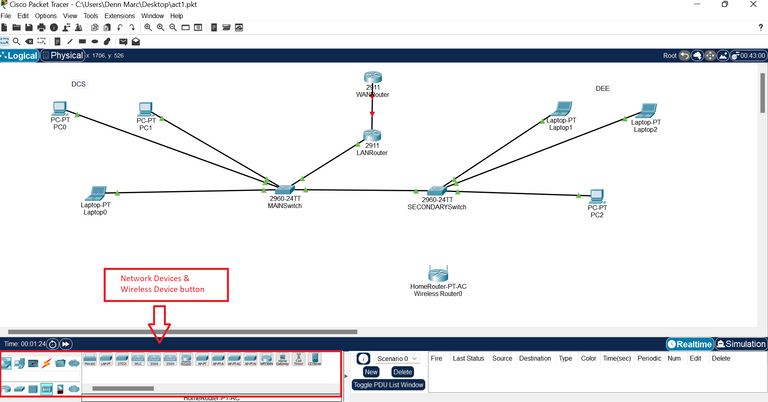
A home router was installed underneath the secondary switch. If you're unsure of where to look in the Cisco Packet Tracer to locate your home router, simply click the network devices button (Ctrl+Alt+R) and then click the wireless devices button (Ctrl+Alt+W) to reveal them. Select your home router next. You may tap it and put it wherever you choose, but since I'll be connecting it to the secondary switch, I put it underneath it.
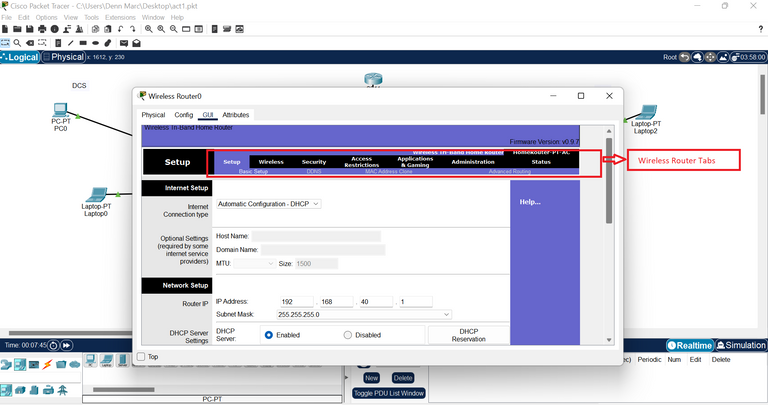
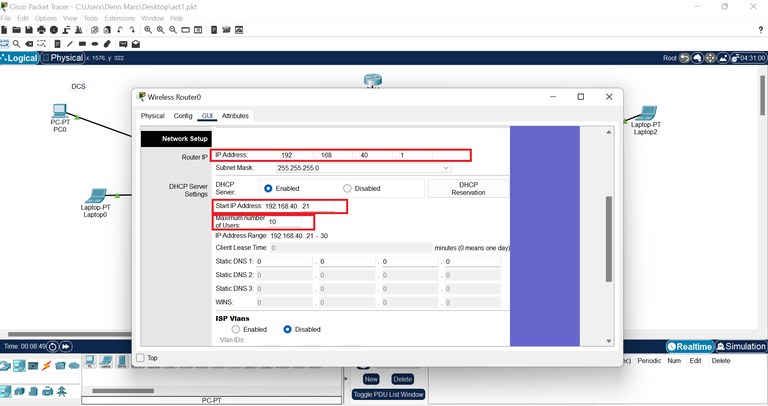
It's time to configure the router after you've linked the secondary switch to the home router. After you click it, a picture of your home router similar to the one in the picture will be shown. Once your home admin router is open, the situation is the same. I set the maximum number of users to 10 and allocated my IP address as 192.168.40.1, starting at 192.168.40.21. In essence, you can change these inputs to meet your preferences. At the bottom of the page, select Save Settings.
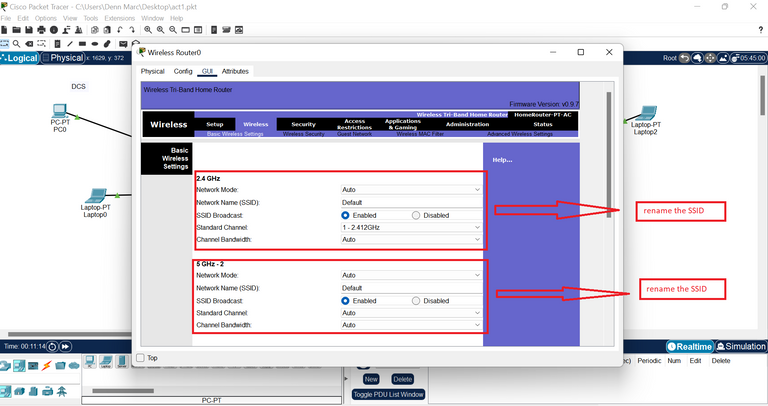
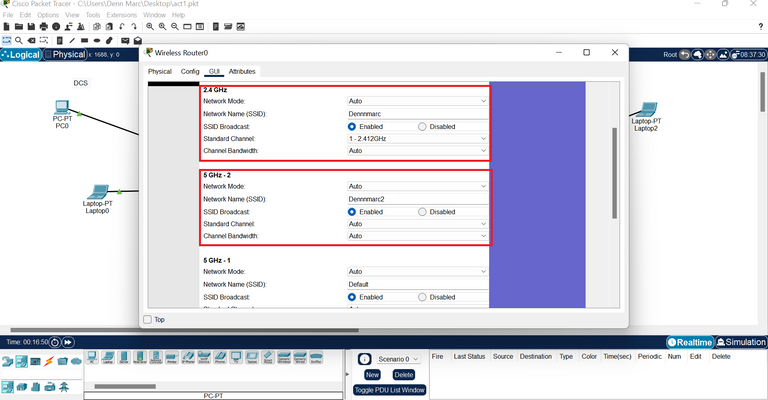
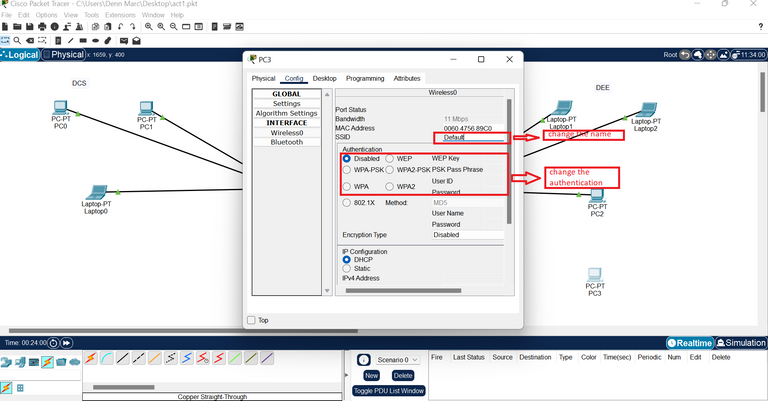
You can view the wireless setup and security on the same page. The 2.4 GHz, 5 GHz-1, and 5 GHz-2 basic wireless parameters are displayed to the user. You must press the arrow down button because all three of these are disabled. The option will show up. Select "auto" from the menu. Use 2.4 GHz and 5 GHz for this. The network name is known by the name "default." Then modify the SSID to your preference. When you access your Wi-Fi, the name you see is the SSID. For the sample, I gave it the new name Dennnmarc. Once more, remember to save changes because they won't be retained once you close the page.
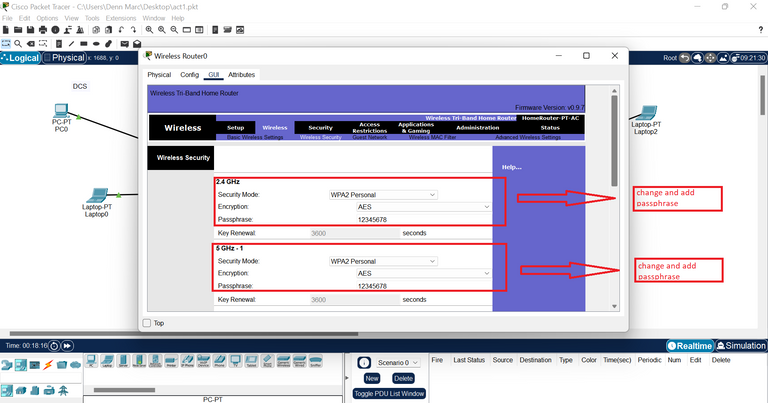
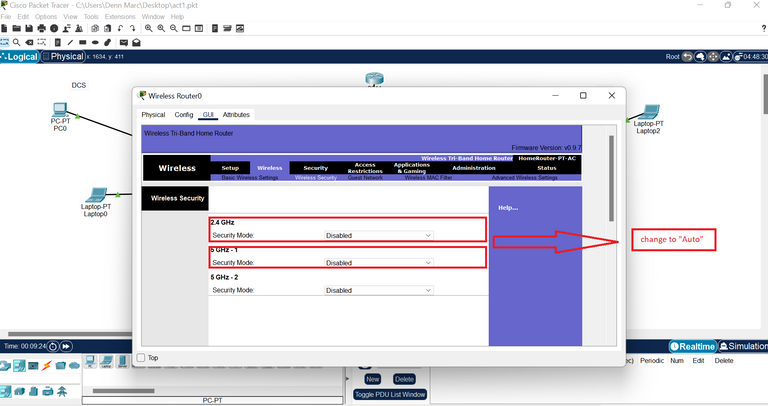
Next to the basic wireless settings is wireless security. It will once more appear disabled, thus you must switch to WPA2 Personal. You indeed have a variety of options, including WEP, WPA Personal, WPA Enterprise, WPA2 Personal, and WPA2 Enterprise. After that, choose AES for encryption. Your password is the passphrase. The less likely it is that someone will connect to your network, the more unique your password should be. At 5 GHz-1, repeat the process. Save the settings after that.
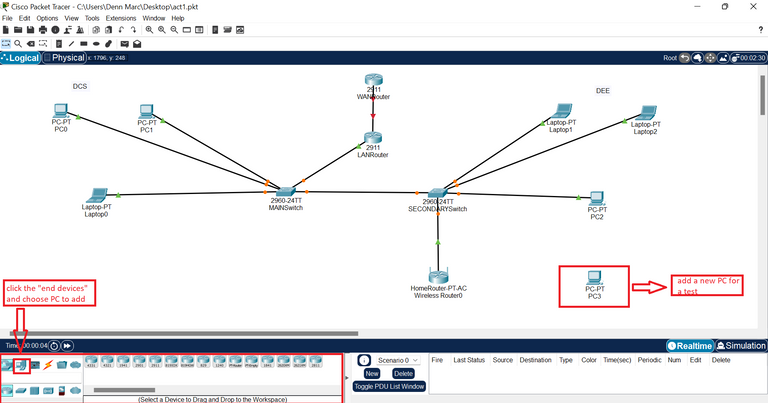
Now that your home router has been configured, it's time to connect and test your PC. I upgraded my home router by adding one PC. I'll attach the PC to my home router and check to see if the wireless connection works. I hooked PC3 to my home router. We'll then need to alter it.
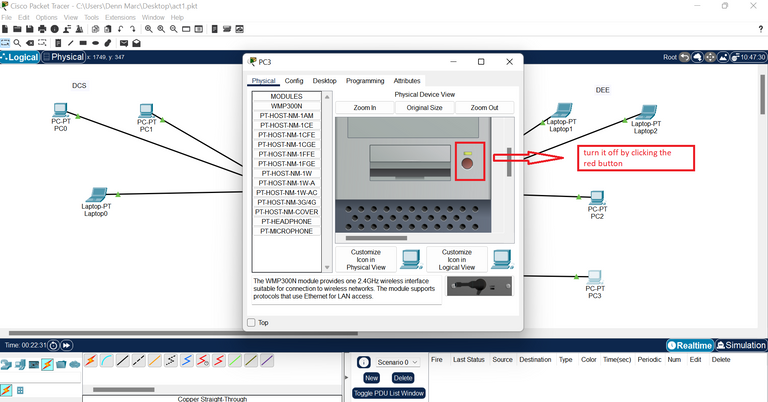
When you click PC3, the computer will appear as a physical device view. You won't be perplexed because your computer operates in the same way. To see the power button indication, try clicking the zoom-in button and moving it to the center of the screen. The computer is on when the indicator is yellow. Since you cannot plug out the cables when the power is on in real life, we must turn it off when we are performing this activity.
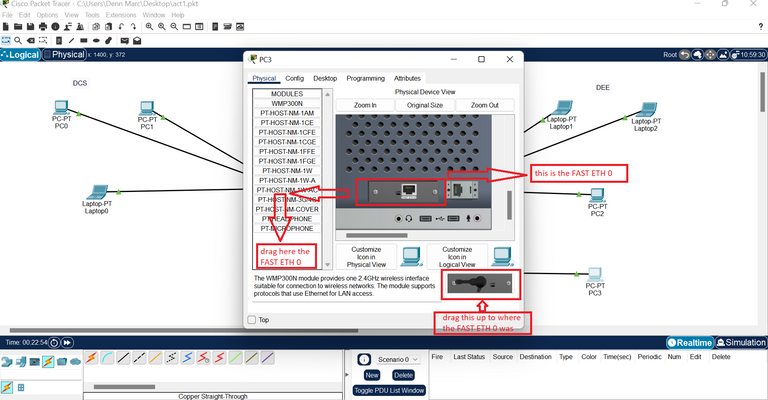
Scroll down to the end once you shut off the computer. You eventually come upon this port, which is identified as "FAST ETH 0." Because it is still wired, we must alter it. Here, switching the PC to wireless is our major objective. Drag the FAST ETH 0 port, which is located under the PT-MICROPHONE on the left, to that location. When finished, click WMP-300N under MODULES at the top. After that, drag the bottom-right image to the port.
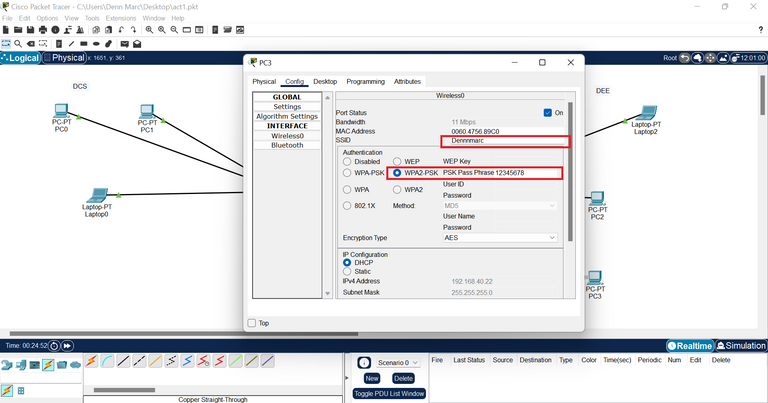
It hasn't ended yet. We must select the Wireless0 after clicking the Config tab. This time, the SSID must be entered, the authentication must be changed, and the passphrase must be configured. Do you still recall the information we entered into the router? Simply copy the same information over here. So, if you forget the information, simply visit your home router and review it. I configured the passphrase (12345678) and entered the SSID (Dennnmarc). I also adjusted the authentication to WPA2-PSK. Again, since it's the same as when you're attempting to connect to your Wi-Fi, the information you provide on this page needs to match what you enter in the router.
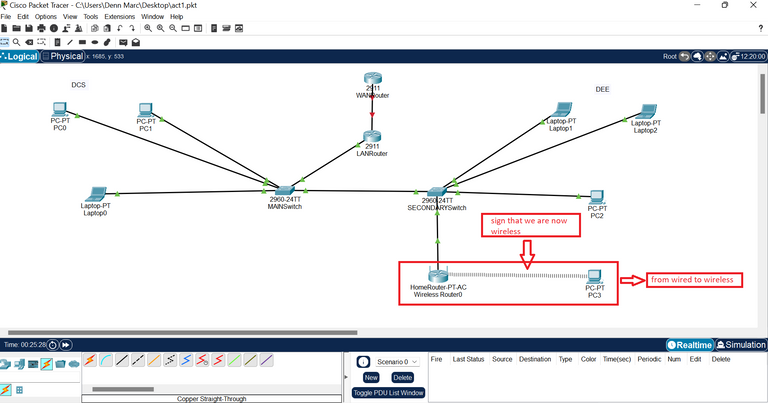
After the drawn-out procedure, close the PC3 window page. Then, you'll see that instead of having a wired connection to your home router, you now have a wireless one. It can be challenging at first to change the specification, port modules, and inputs. But after you grasp the idea and practice it numerous times, you'll find it easier to carry out. This is the advantage of Cisco Packet Tracer: you can theoretically test the network before using it in real life.
More about Cisco Packet Tracer blogs!
Learning Networking through Cisco Packet Tracer
All images are screenshots from my Cisco Packet Tracer application.
The rewards earned on this comment will go directly to the people( @macchiata ) sharing the post on Twitter as long as they are registered with @poshtoken. Sign up at https://hiveposh.com.
I suddenly missed programming..
Gumaga nb kyo software?
Oh, since the first year, we were coding and building web pages. Yes, right now, we're currently sending our thesis titles, and waiting for approval. Once done, we can start building the program from the very first procedure until to the end.
Another helpful cisco post! it would be nice if you also link your previous on the footer too and make this a series.
I haven't thought about that. Yes, I'll edit my post and add my previous Cisco Packet Tracer post. I hope you learn something from my humble post, and I make it more simple terms for others to understand better. Thanks so much!
If you can simplify complex subject, that means you truly understand it. I think it's also good for you since you'd remember it as what you do here is basically "learning by teaching". looking forward to another one!
Nalutang lang isip ko habang binabasa ko 'to hahaha. Gusto ko sana matutunan to pero soon nalang 😆
You can actually learn this at home without being tutored. But it's kind of hard to practice without the proper commands. It takes me around 2 days to understand the whole concept of how wired and wireless connection works. I dig more into it since I used different routers at home.
Ihhh naiistress ako aralin hahahaha
And I'm like, Dang ndi ko gets. Pero ang smart smart talaga sa pag explain eh so yeah. Hahaha
!PIZZA na lang huy @dennnmarc 😉😂
Feeling smart lang po ako dyan ate. Just kidding! It's very tough to understand the whole concept without actually trying or testing it with the application. Thanks so much for the pizza.
Wow this looks like pretty complex!!

!1UP
You have received a 1UP from @gwajnberg!
@stem-curator
And they will bring !PIZZA 🍕.
Learn more about our delegation service to earn daily rewards. Join the Cartel on Discord.