Hello together,
In this documentation I want to show how I have enriched my Hello World Java code to read and write some data via REST API to an elsticsearch database.
In the long run I want to create a simple game with the name "Hammurabi", which uses hive content to influence the run of play.

Preconditions
I have created a naked (Hello World) Springboot Server (https://peakd.com/hive-169321/@achimmertens/creation-of-the-hammurabi-game-part-1-spring-boot-server-from-scratch) and have put it on a docker container on Raspberry Pi (https://peakd.com/hive-169321/@achimmertens/creation-of-the-hammurabi-game-part-2-run-the-app-in-a-docker-on-the-raspberrypi).
Also I have installed an elasticsearch database on my Raspberry Pi (https://peakd.com/hive-122315/@achimmertens/how-i-have-set-up-elasticsearch-and-kibana-on-my-raspberry-pi-to-monitor-token-activities).
Goal
I want to put some new data into my Elasticsearch database. It should look like this:
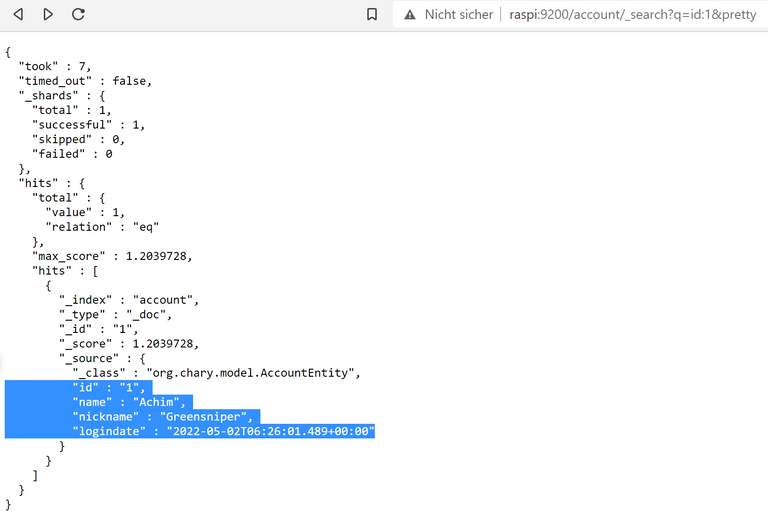
And with my new Java code, I want to set and read these data. My Springboot Server shall parse the elasticsearch content into a more readable format:

New git branch
First I create a new branch from my springboot-branch in git and push it to github:
git checkout -b restapi springboot
git push --set-upstream origin restapi

Add the new classes and files
I have found some good documentation for my case How to connect to Elasticsearch from Spring Boot Application - Spring Data Elasticsearch - Part 1
I played a little bit with it until I could use it for my situation. Here, as a result, I created the following files:
application.properties
Here we describe our elasticsearch server and the port. In my case it is:
Resources/application.properties:
elasticsearch.url=raspi:9200
Config.java
This config file uses the spring framework. I didn't change anything from the example I was given, execept:
@EnableElasticsearchRepositories(basePackages = "org.chary.repository")
@ComponentScan(basePackages = { "org.chary.service" })
Org.chary.config/Config.java:
package org.chary.config;

import org.elasticsearch.client.RestHighLevelClient;
import org.springframework.beans.factory.annotation.Value;
import org.springframework.context.annotation.Bean;
import org.springframework.context.annotation.ComponentScan;
import org.springframework.context.annotation.Configuration;
import org.springframework.data.elasticsearch.client.ClientConfiguration;
import org.springframework.data.elasticsearch.client.RestClients;
import org.springframework.data.elasticsearch.config.AbstractElasticsearchConfiguration;
import org.springframework.data.elasticsearch.repository.config.EnableElasticsearchRepositories;

@Configuration
@EnableElasticsearchRepositories(basePackages = "org.chary.repository")
@ComponentScan(basePackages = { "org.chary.service" })
public class Config extends AbstractElasticsearchConfiguration {

    @Value("${elasticsearch.url}")
    public String elasticsearchUrl;

    @Bean
    @Override
    public RestHighLevelClient elasticsearchClient() {
        final ClientConfiguration config = ClientConfiguration.builder()
                .connectedTo(elasticsearchUrl)
                .build();
        return RestClients.create(config).rest();
    }
}
AccountEntity
This is the file that describes the fields we want to add to the database. Be aware, that the getter- and setter- method names must have the same names as the fields and that the fields must have the same names as in Elasticsearch shall appear (or exists). (In this case: "id", "name", "nickname", "logindate")
Org.chary.model/AccountEntity.java:
package org.chary.model;

import org.springframework.data.annotation.Id;
import org.springframework.data.elasticsearch.annotations.*;

@Document(indexName = "account")
@Setting(settingPath = "static/es-settings.json")

public class AccountEntity {

    @Id
    @Field(type = FieldType.Keyword)
    private String id;

    @Field(type = FieldType.Text)
    private String name;

    @Field(type = FieldType.Text)
    private String nickname;

    @Field(type = FieldType.Date, pattern = "uuuu-MM-dd'T'HH:mm:ss.SSSZZ")  //, patternexample = "2022-05-02T06:26:01.489+00:00"
    private String logindate;


    //getters and setters

    public String getId() {
        return id;
    }

    public void setId(String id) {
        this.id = id;
    }

    public String getName() {
        return name;
    }

    public void setUsername(String name) {
        this.name = name;
    }

    public String getLogindate() {
        return logindate;
    }

    public void setLogindate(String logindate) {
        this.logindate = logindate;
    }

    public String getNickname() {
        return nickname;
    }

    public void setNickname(String nickname) {
        this.nickname = nickname;
    }
}
AccountRepository
This is the interface for the repository. I just adapted the class names.
org.chary.repository/AccountRepository.java:
package org.chary.repository;

import org.chary.model.AccountEntity;
import org.springframework.data.elasticsearch.repository.ElasticsearchRepository;
import org.springframework.stereotype.Repository;

@Repository
public interface AccountRepository extends ElasticsearchRepository<AccountEntity, String> {
}
AccountService
This accountservice is the implementation of the interface, which is hidden in the spring framework. This class is the connection to the REST-API world. I just adapted some class names.
org.chary.service/AccountService.java:
package org.chary.service;

import org.chary.model.AccountEntity;
import org.chary.repository.AccountRepository;
import org.springframework.beans.factory.annotation.Autowired;
import org.springframework.stereotype.Service;

@Service
public class AccountService {

    private final AccountRepository repository;

    @Autowired
    public AccountService(AccountRepository repository) {
        this.repository = repository;
    }

    public void save(final AccountEntity account) {
        repository.save(account);
    }

    public AccountEntity findById(final String id) {
        return repository.findById(id).orElse(null);
    }
}
es-settings.json
Resources.static/es-settings.json:
{
  "index": {

  }
}
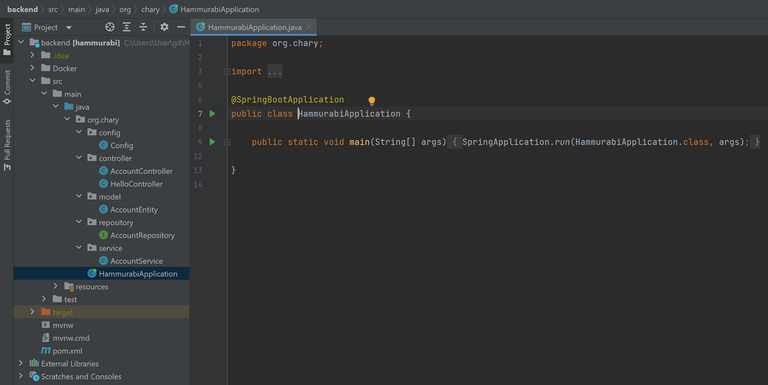
Overview
This shows my structure of the code:
It works
After finishing this code, I have put it to my raspberry Pi, as described here.
The class Accountcontroller defines how we can access our Java application. There are four possibilities to reach our app:
- http://raspi:8080 -> Hello World, Achim was here! (defined in "HelloController")
- http://raspi:8080/api (only via curl or postman, to put the data)
- http://raspi:8080/api/accounts -> shows all accounts
- http://raspi:8080/api/account/1 -> shows the content of account 1 (or another account)
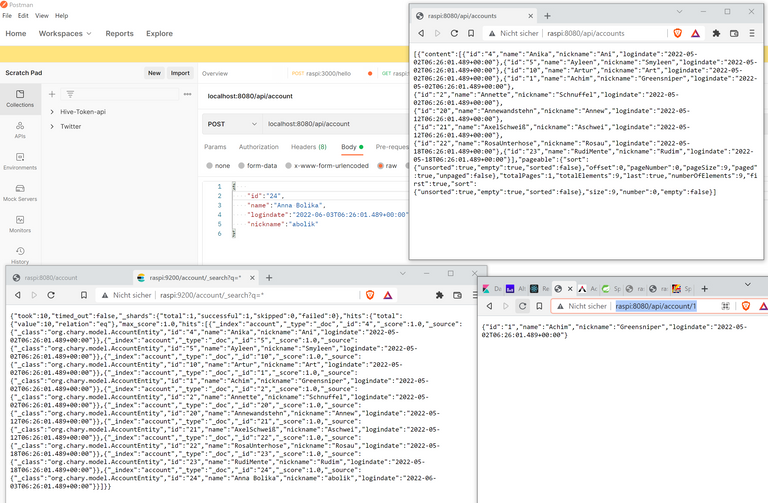
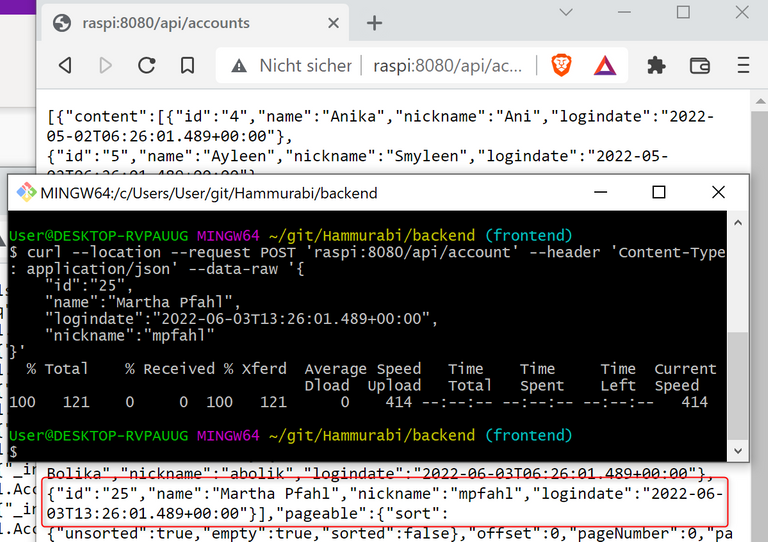
curl --location --request POST 'raspi:8080/api/account' \
--header 'Content-Type: application/json' \
--data-raw '{
    "id":"25",
    "name":"Martha Pfahl",
    "logindate":"2022-06-03T13:26:01.489+00:00",
    "nickname":"mpfahl"
}'
Conclusion
Now we have a Java application, that can fill our elasitcsearch database.
The next step will be the creation of a frontend, which can communicate with the Java code. This will come soon, so stay tuned.
You can also find my (not finished yet) code on github.
Regards, Achim Mertens
The rewards earned on this comment will go directly to the people sharing the post on Twitter as long as they are registered with @poshtoken. Sign up at https://hiveposh.com.
Congratulations @achimmertens! You have completed the following achievement on the Hive blockchain and have been rewarded with new badge(s):
Your next target is to reach 45000 upvotes.
You can view your badges on your board and compare yourself to others in the Ranking
If you no longer want to receive notifications, reply to this comment with the word
STOPTo support your work, I also upvoted your post!
Support the HiveBuzz project. Vote for our proposal!
🚨🚨🚨Airdrop Alert 🚨🚨🚨
UHIVE Metaverse Adoption Airdrop
GET 100 HIVE and 30000 HVE2 Token Airdrop
On 20th June Uhive Started Their Official partnership with Hive and Steemit community.
For mass adoption towards metaverse they announced their Community Airdrop.
All the members from Hive and Sheemit are Eligible for this airdrop.
Airdrop breakdown
This airdrop whitelist will be closed in 72hrs
CLICK HERE TO JOIN AIRDROP WHITELIST NOW
@artgalleryraka Your comment contains a link that is on my blacklists ❗ ❗ ❗ 1 2 3
@achimmertens do NOT click on the link above in their comment.
Reason: PHISHING
Link: "fisranilove.lol*" => DO NOT CLICK ❗
More info: https://hive.blog/hive/@keys-defender/new-feature-phishing-detection-and-auto-reply
Comment 10% downvoted to make it less visible.
This message is self-voted to be more visible among others.
DO NOT FOLLOW any instruction and DO NOT CLICK on any link in the comment!