
Buenas tardes y saludos desde Venezuela a la respetable Comunidad @Hive Blog, en esta oportunidad traigo un Post referente a como configurar un Grupo de Trabajo bajo el entorno de Windows 8.1 lo cual para Organizaciones y Empresas resulta útil a la hora de compartir Carpetas e Impresoras entre ordenadores conectados a la Red
Good afternoon and greetings from Venezuela to the respectable Community @Hive Blog, in this opportunity I bring a Post about how to configure a Workgroup under Windows 8.1 environment which for Organizations and Companies is useful when sharing Folders and Printers between computers connected to the Network.
Para comenzar se necesita cumplir con una serie de pasos importantes que se describen a continuación:
Tener correctamente instalado el Sistema Operativo Windows 8.1 en cualquiera de sus versiones (32 y 64 Bits) según las especificaciones de los equipos que estarán conectados a la Red.
Punto de conexión a red activado.
Tarjeta de Red correctamente instalada y configurada.
Disponer de conector RJ45 – RJ45 desde el ordenador al punto de conexión.
To get started you need to comply with a series of important steps described below:
- To have correctly installed the Windows 8.1 Operating System in any of its versions (32 and 64 Bits) according to the specifications of the equipment that will be connected to the Network.
- Network connection point activated.
- Network card correctly installed and configured.
- To have RJ45 - RJ45 connector from the computer to the connection point.
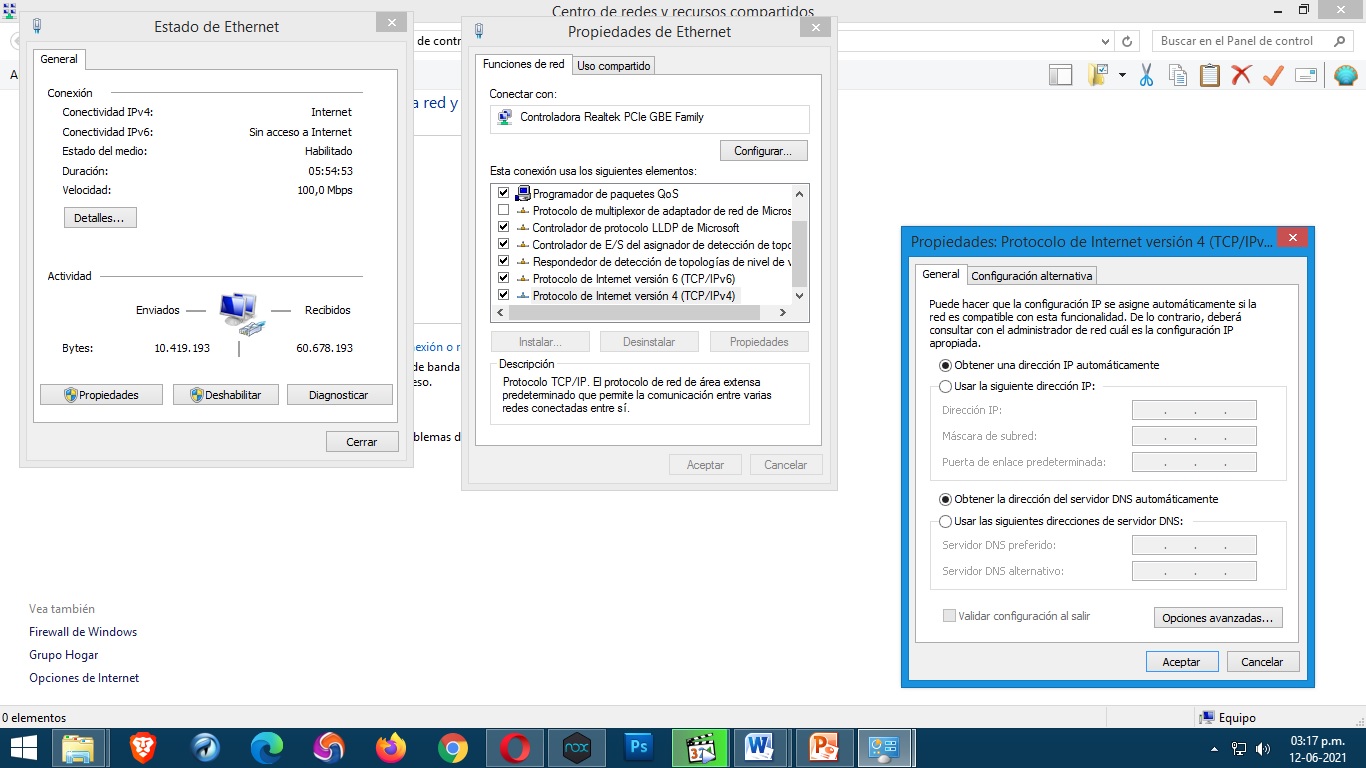
El primer paso es acceder a las propiedades de la red, bien a través del panel de control Centro de redes y recursos compartidos icono conexión de área local. Se hará doble clic sobre él, y una vez esté abierto, se hará clic en el botón PROPIEDADES.
The first step is to access the network properties, either through the control panel Network and Sharing Center icon local area connection. Double click on it, and once it is open, click on the PROPERTIES button.
Despues tenemos dos opciones Obtener una Dirección IP automáticamente y Usar la siguiente dirección IP esta última opción es usada cuando se disponen de Direcciones IP específicas propias de la Empresa y deben llenarse los campos Dirección IP, Máscara de Subred y Puerta de Enlace predeterminada
Then we have two options Obtain an IP Address automatically and Use the following IP address this last option is used when you have specific IP Addresses specific to the Company and you must fill in the IP Address, Subnet Mask and Default Gateway fields.
NOMBRE DE GRUPO Y PC
Un grupo de trabajo, por definición es un grupo de usuarios que trabajan en un proyecto común y comparten información de equipos interconectados, normalmente a través de una red de área local (LAN).
A workgroup, by definition, is a group of users working on a common project and sharing information from interconnected computers, usually through a local area network (LAN).
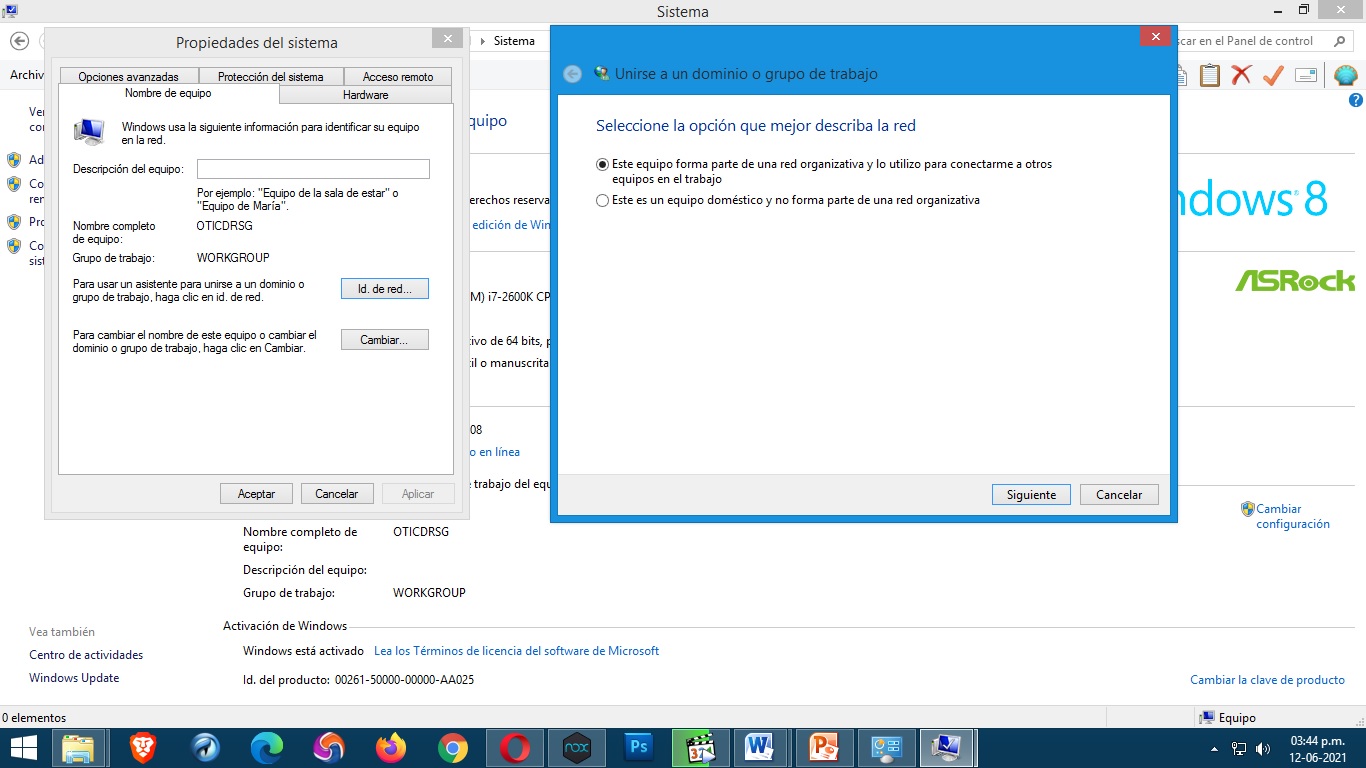
Para conectar el sistema a un grupo de trabajo, o bien se hace en tiempo de instalación, o bien se utiliza el siguiente procedimiento:
Se debe iniciar la sesión como administrador del sistema local.
Buscamos la opción SISTEMA.
Luego ir a la opción cambiar Configuración aparecen dos opciones ID de Red y a su vez otras como: el equipo pertenece a una Red organizativa y se utiliza para conectarse a otros Equipos en el Trabajo y Este equipo es de uso doméstico y no pertenece a ninguna Red Organizativa.
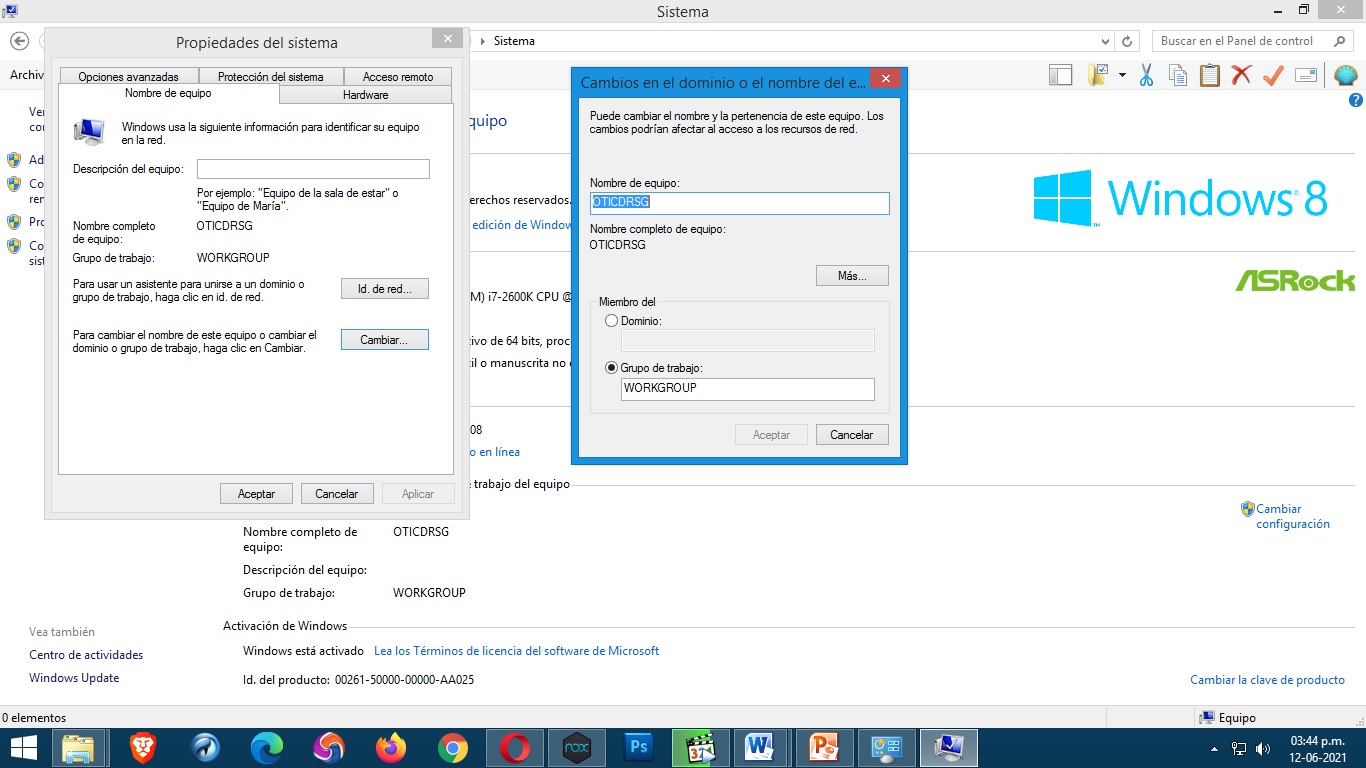
Otro apartado es Cambiar que se usa cuando se cambia el Nombre del Equipo y el Nombre del Grupo de Trabajo.
To connect the system to a workgroup, either this is done at installation time, or the following procedure is used:
You must be logged in as the local system administrator.
Look for the SYSTEM option.
Then go to the option change Configuration two options appear Network ID and in turn others like: the computer belongs to an Organizational Network and is used to connect to other Computers at Work and This computer is for home use and does not belong to any Organizational Network.
Another section is Change which is used when changing the Computer Name and Workgroup Name.
COMPARTIR CARPETAS
La forma de compartir una carpeta en Windows 8.1 en cualquiera de sus versiones es muy simple. Supóngase que se quiere compartir la carpeta PÚBLICA del disco duro (nunca se debe compartir el disco duro completo). Para cualquier otra carpeta el proceso es el mismo.
Se selecciona la carpeta a compartir pulsando el botón derecho del Ratón se busca la opción Propiedades luego Compartir se definen los Permisos, además si se va a permitir Lectura, Lectura – Escritura y Quitar en caso de que no quiera ser compartida.
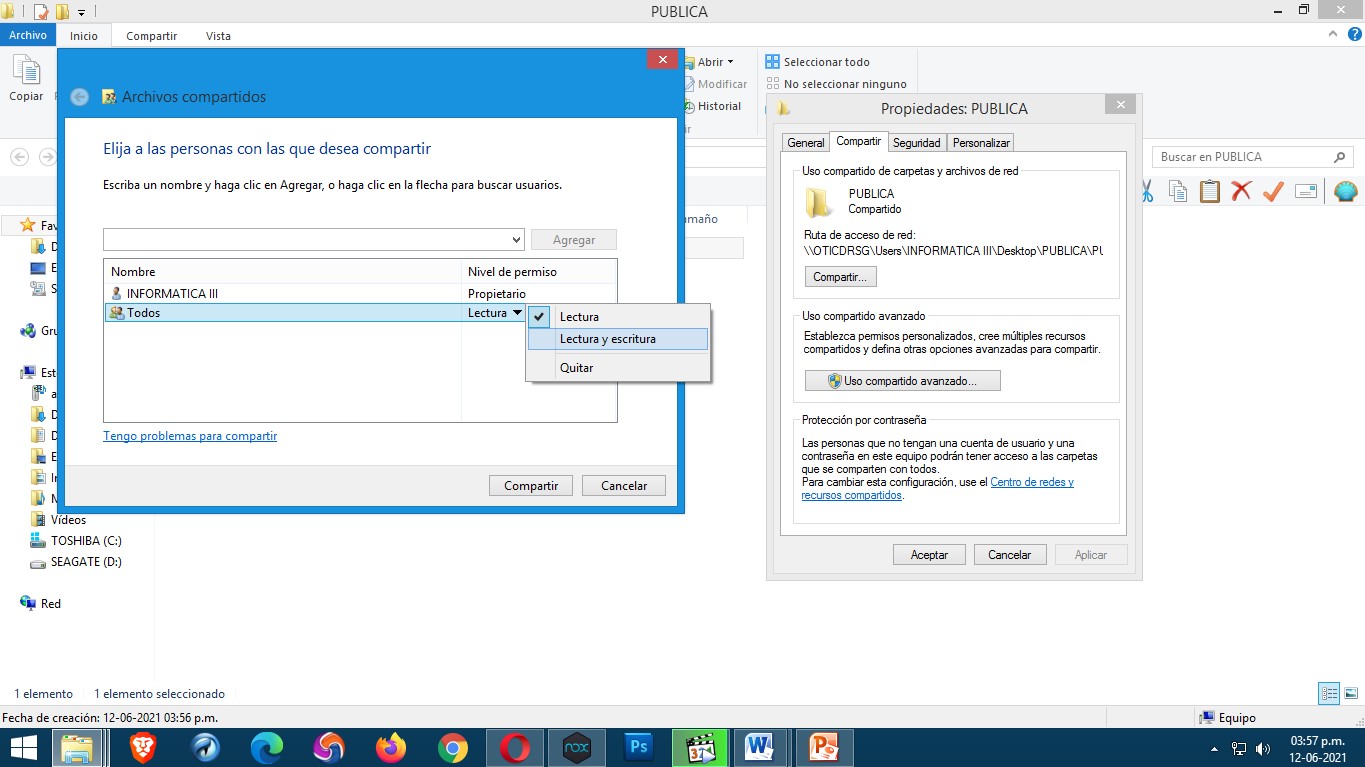
The way to share a folder in Windows 8.1 in any of its versions is very simple. Suppose you want to share the PUBLIC folder on the hard disk (never share the entire hard disk). For any other folder the process is the same.
The folder to share is selected by clicking the right button of the Mouse, the option Properties is looked for, then Share, the Permissions are defined, in addition if it is going to be allowed Read, Read - Write and Remove in case it does not want to be shared.
COMPARTIR IMPRESORAS
Antes de compartir una impresora, se debe instalar y comprobar que imprime de la forma habitual. En el menú Inicio Dispositivos e Impresoras se pueden ver las impresoras disponibles en el ordenador, tanto las conectadas directamente al equipo, como las de otros ordenadores que se hayan instalado según el método que se describe a continuación.
La impresora a compartir se llama SAMSUNG ML-2010 se hace Doble click sobre el dispositivo a compartir y se busca la segunda opción llamada Personalizar impresora, vamos a la pestaña Compartir marcamos la opción compartir Impresora y tildar Presentar trabajos de Impresión en equipos Cliente luego aplicar y aceptar. De este modo la Impresora ya está compartida y lista para ser usada por los otros Equipos pertenecientes a la Red.
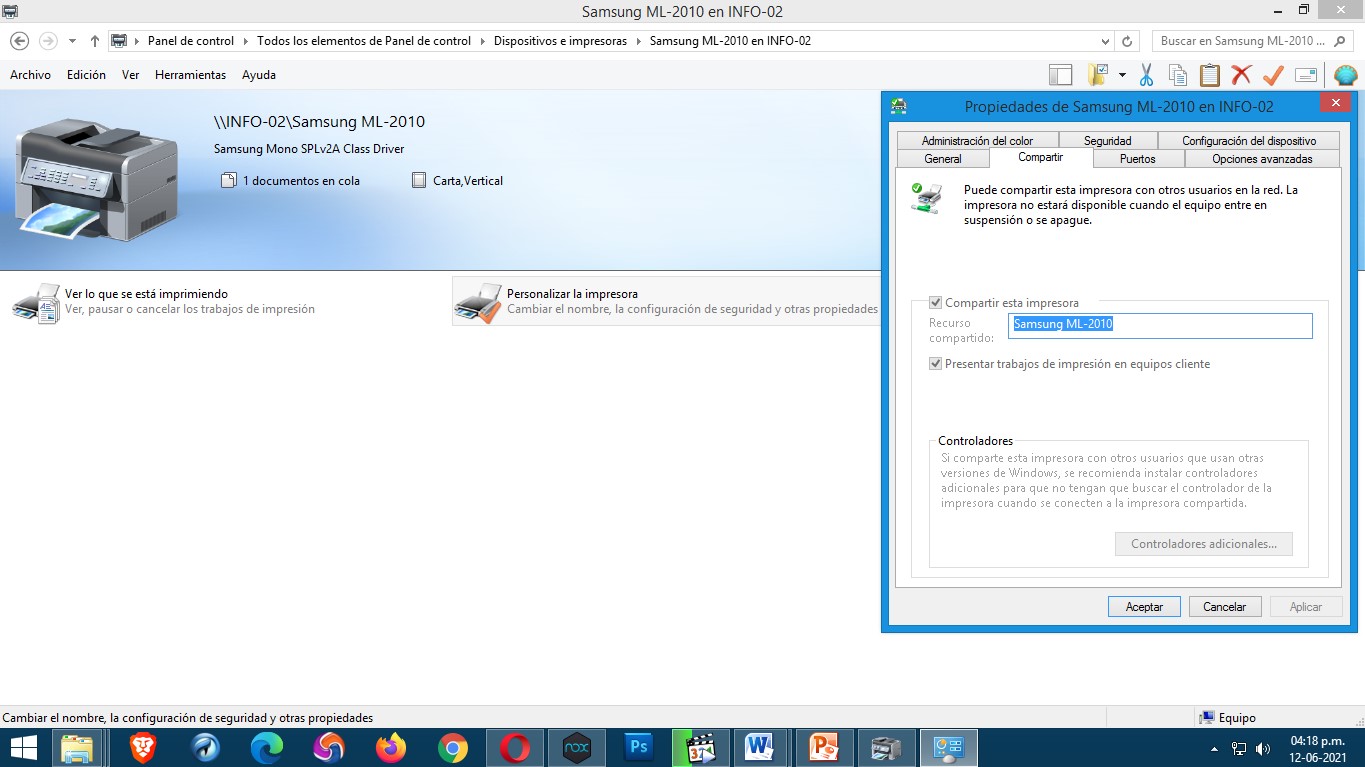
Before sharing a printer, you should install it and check that it prints as usual. In the Start menu Devices and Printers you can see the printers available on your computer, both those connected directly to your computer and those on other computers that have been installed according to the following method.
La impresora a compartir se llama SAMSUNG ML-2010 se hace Doble click sobre el dispositivo a compartir y se busca la segunda opción llamada Personalizar impresora, vamos a la pestaña Compartir marcamos la opción compartir Impresora y tildar Presentar trabajos de Impresión en equipos Cliente luego aplicar y aceptar. De este modo la Impresora ya está compartida y lista para ser usada por los otros Equipos pertenecientes a la Red.
De esta manera es como se configura un Grupo de Trabajo y se comparten Impresoras bajo el entorno Windows 8.1 en sus versiones de 32 y 64 bits. Las capturas de pantalla fueron tomadas desde mi PC de uso personal para la realización de este Post.
This is how to set up a Workgroup and share Printers under Windows 8.1 in its 32 and 64 bit versions. The screenshots were taken from my personal use PC for the realization of this Post.