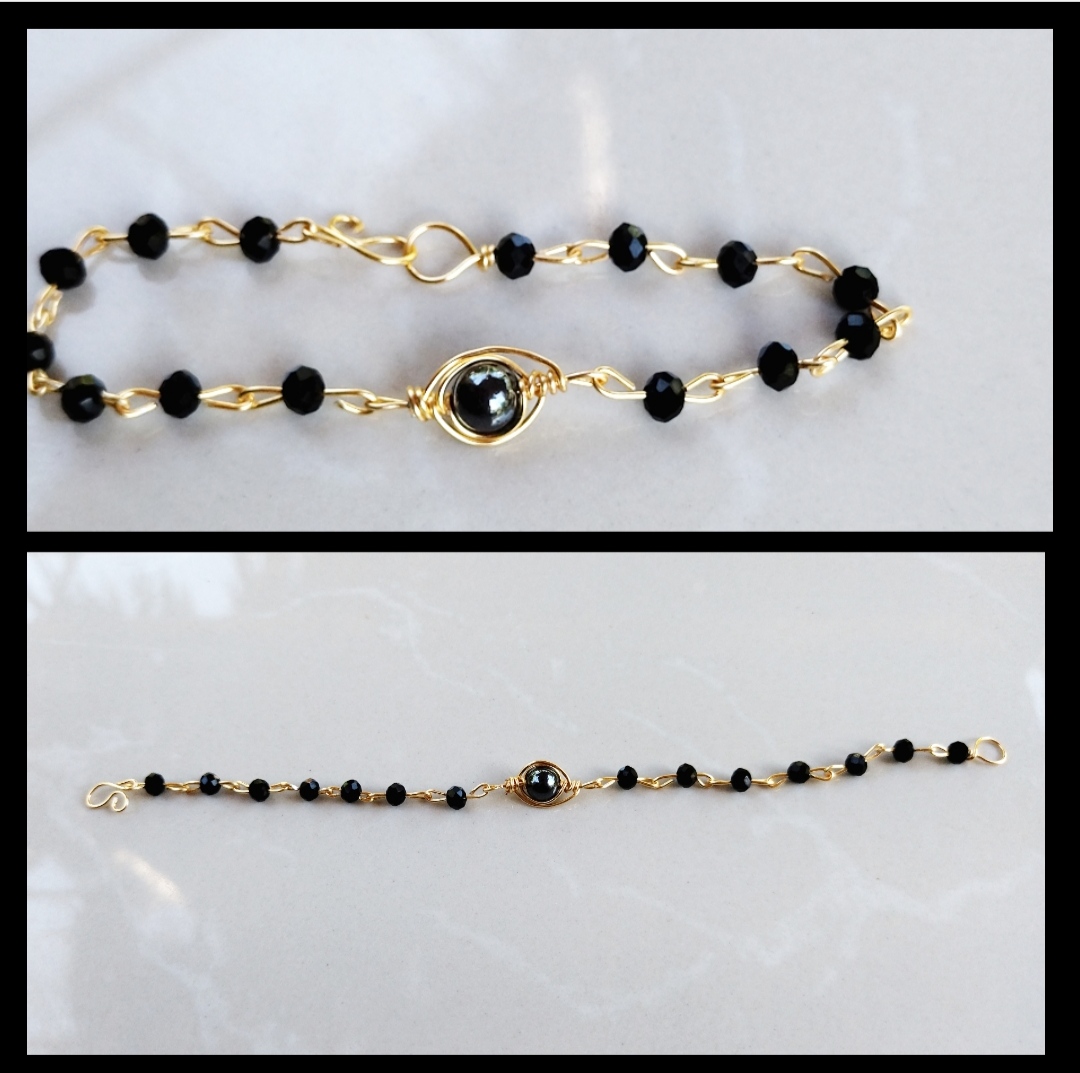
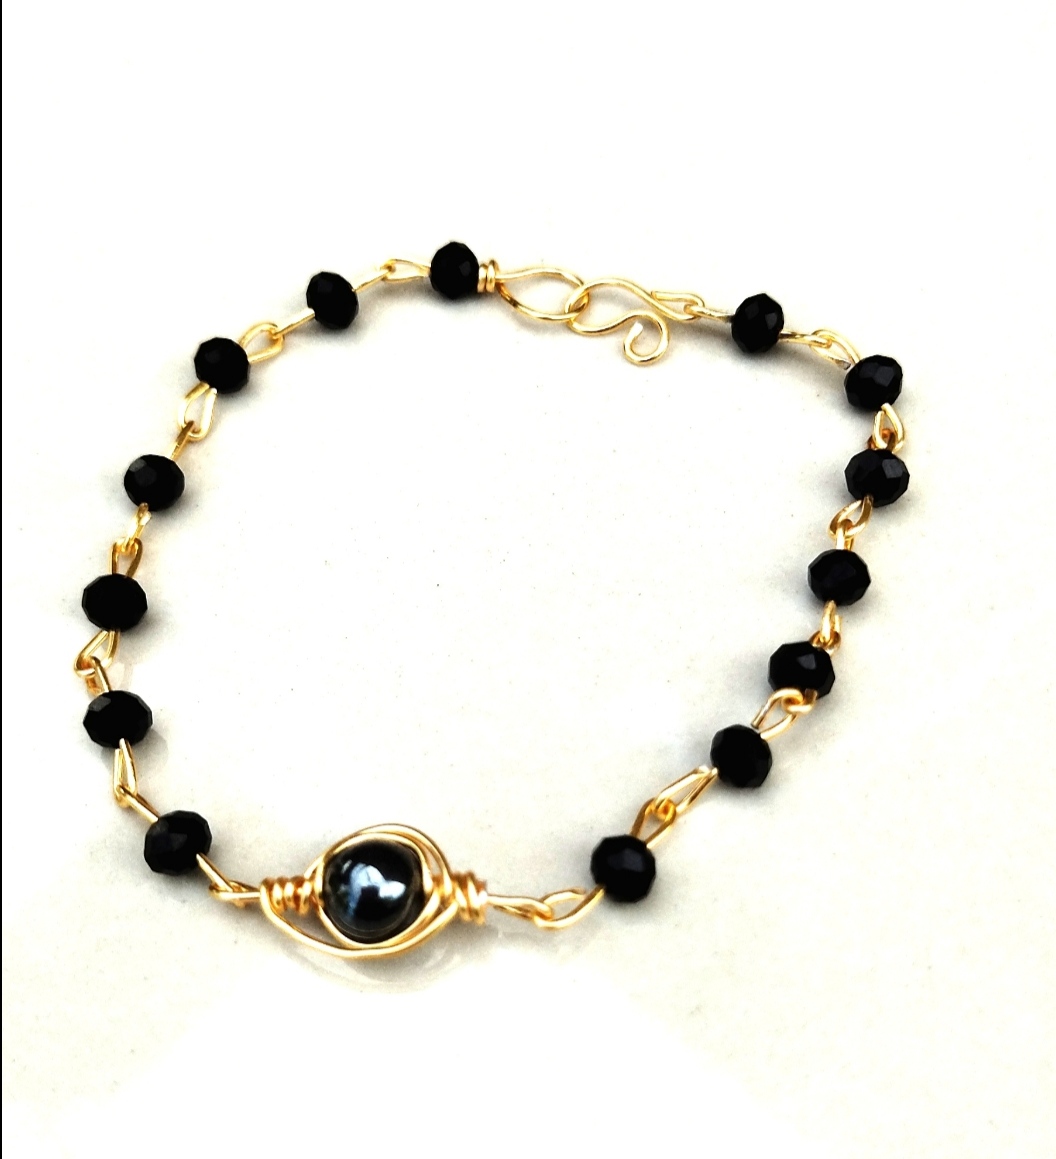
It's time to make our girls fall in love, beautiful lace made with wire and jewelry stones
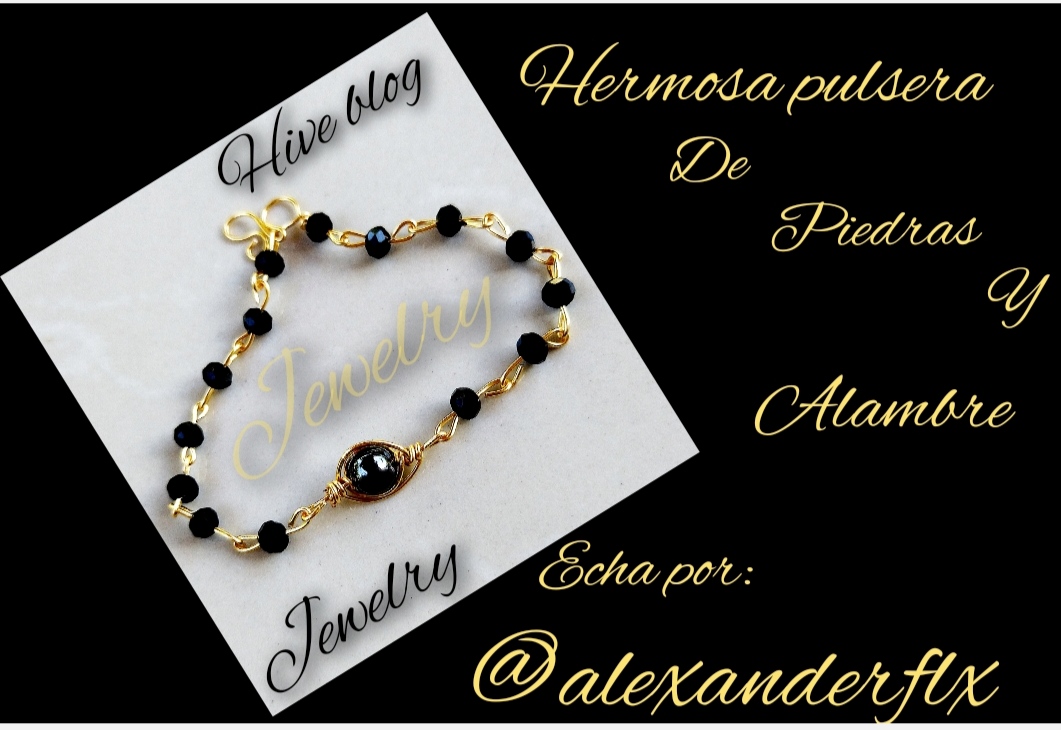
Hola feliz noche para todos espero se encuentren bien y la están pasando muy bien la noche de hoy quiero compartir con ustedes una hermosa prenda muy fácil de hacer y con muy pocos materiales como lo ago siempre esta hermosa pulsera está hecha con alambre y unas piedras de bisutería no usaremos ganchito para asegurarle ya que con el mismo alambre aremos uno muy elegante y super fácil espero el paso a paso sea lo más simple posible espero les gusto bueno sin más que decir pasaremos al paso a paso.
Hello, happy night to all, I hope you are well and having a great time today. I want to share with you a beautiful garment that is very easy to make and with very few materials, as I always do, this beautiful bracelet is made with wire and some jewelery stones we will not use a hook to assure you since with the same wire we will make a very elegant and super easy one I hope the step by step is as simple as possible I hope you like it well without further ado we will go step by step.
What do we need.
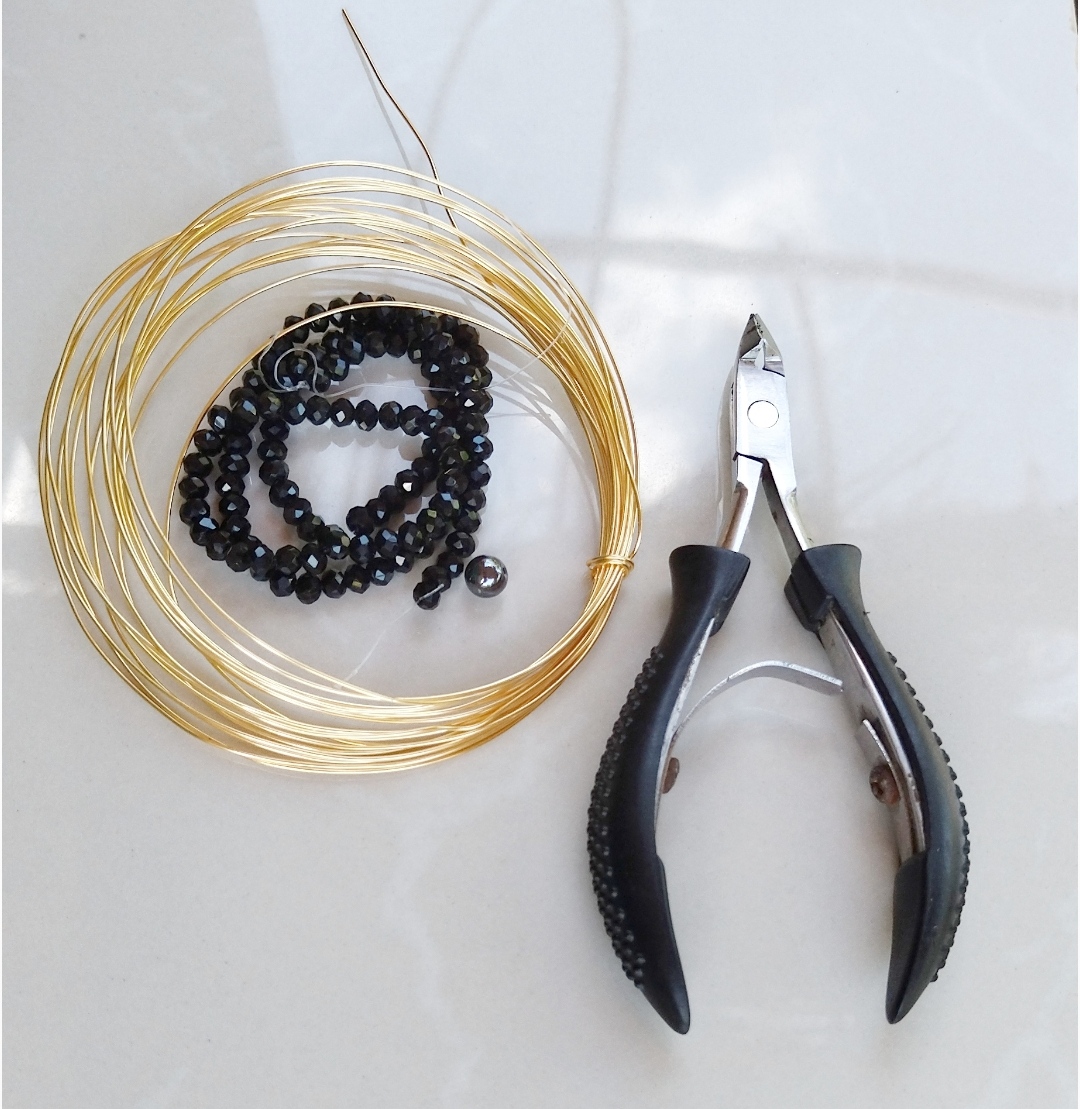
- piedras de bisutería
- alambre para bisutería calibre 22
- pinzas
jewelry stones
22 gauge jewelry wire
tweezers
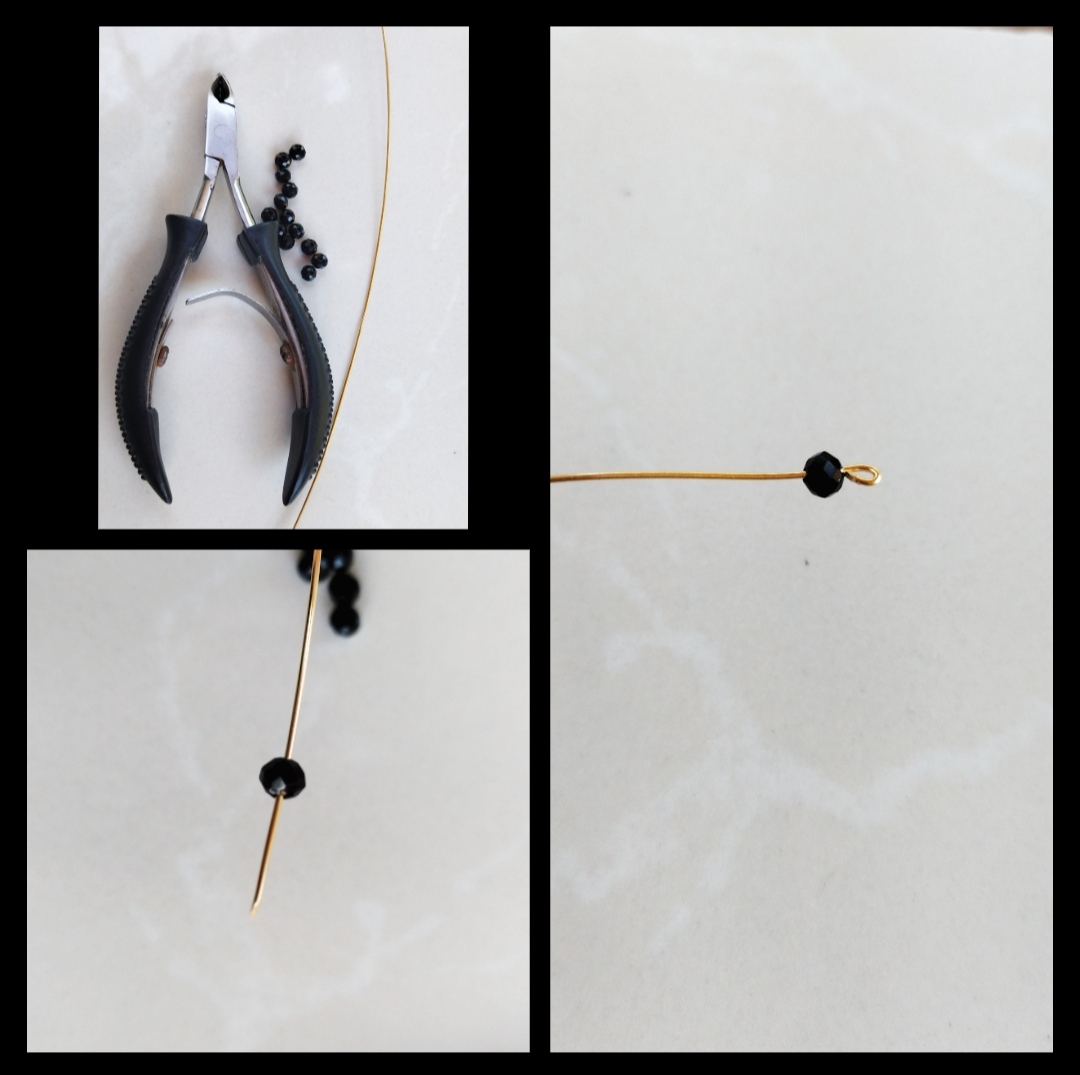
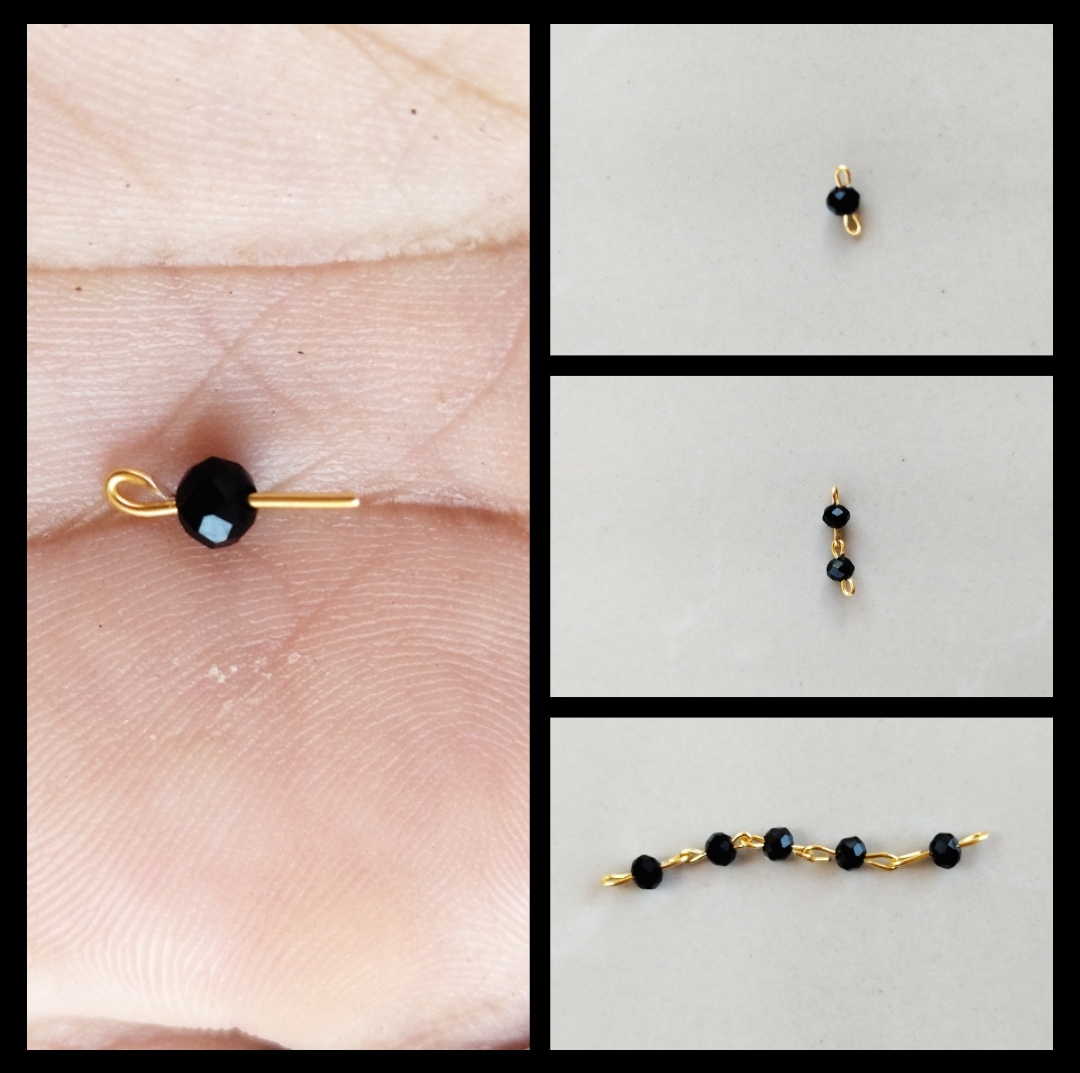
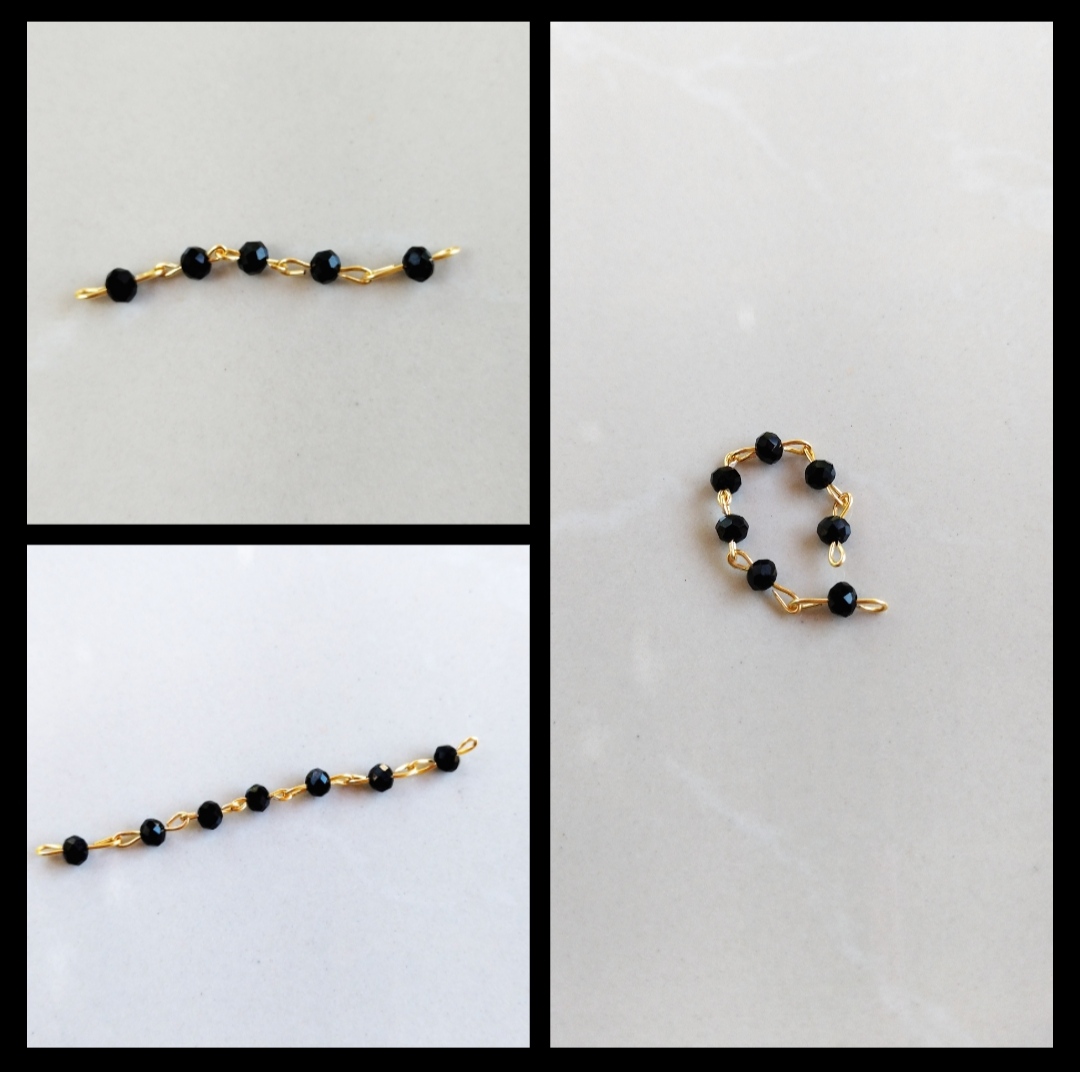
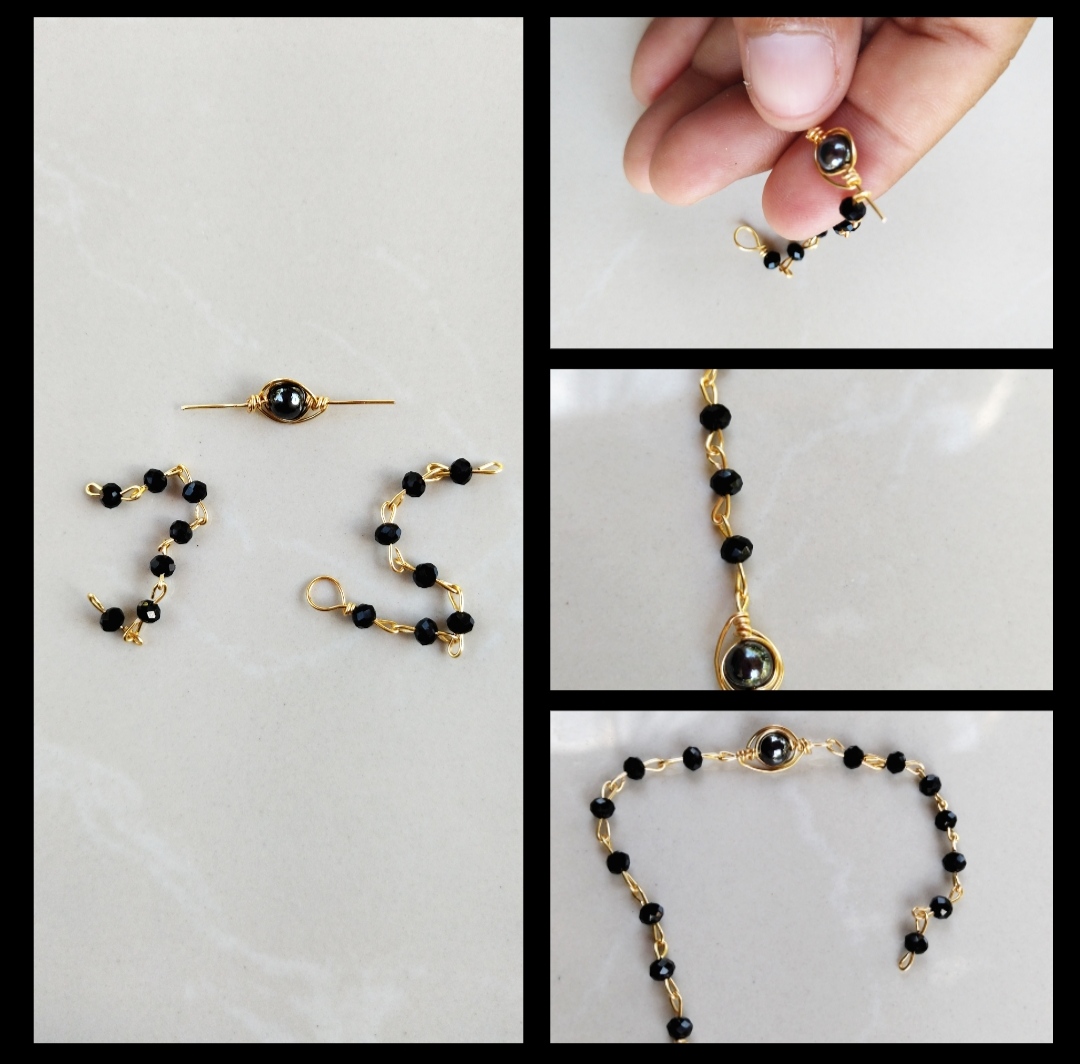
Paso 1:Bueno chicas y chicos preparémonos para empezar a realizar esta hermosa prenda para nuestro primer paso tomaremos un trozo de albre si quieren no cortaremos el alambre utilizaremos el alambre completo para no desperdiciar el alambre, tomamos la punta del alambre y meteremos una piedrita luego aremos una argolla muy pequeña luego cortaremos dejando del otro lado un trozo de alambre no muy largo nos quedará como vemos en la foto para el segunda pieza aremos lo mismo solo que antes de cerrar la última argolla la uniremos con la otra y así lo aremos asta llegar a siete piedras en este paso aremos dos piezas cada una tendrá siete piedra..
Step 1: Well girls and boys let's get ready to start making this beautiful garment for our first step we will take a piece of wire if you want we will not cut the wire we will use the entire wire so as not to waste the wire, we take the end of the wire and we will put a small stone then we will make a very small ring then we will cut leaving on the other side a not very long piece of wire will remain as we see in the photo for the second piece we will do the same thing only that before closing the last ring we will unite it with the other and so on We will do it until we reach seven stones, in this step we will do two pieces, each one will have seven stones.
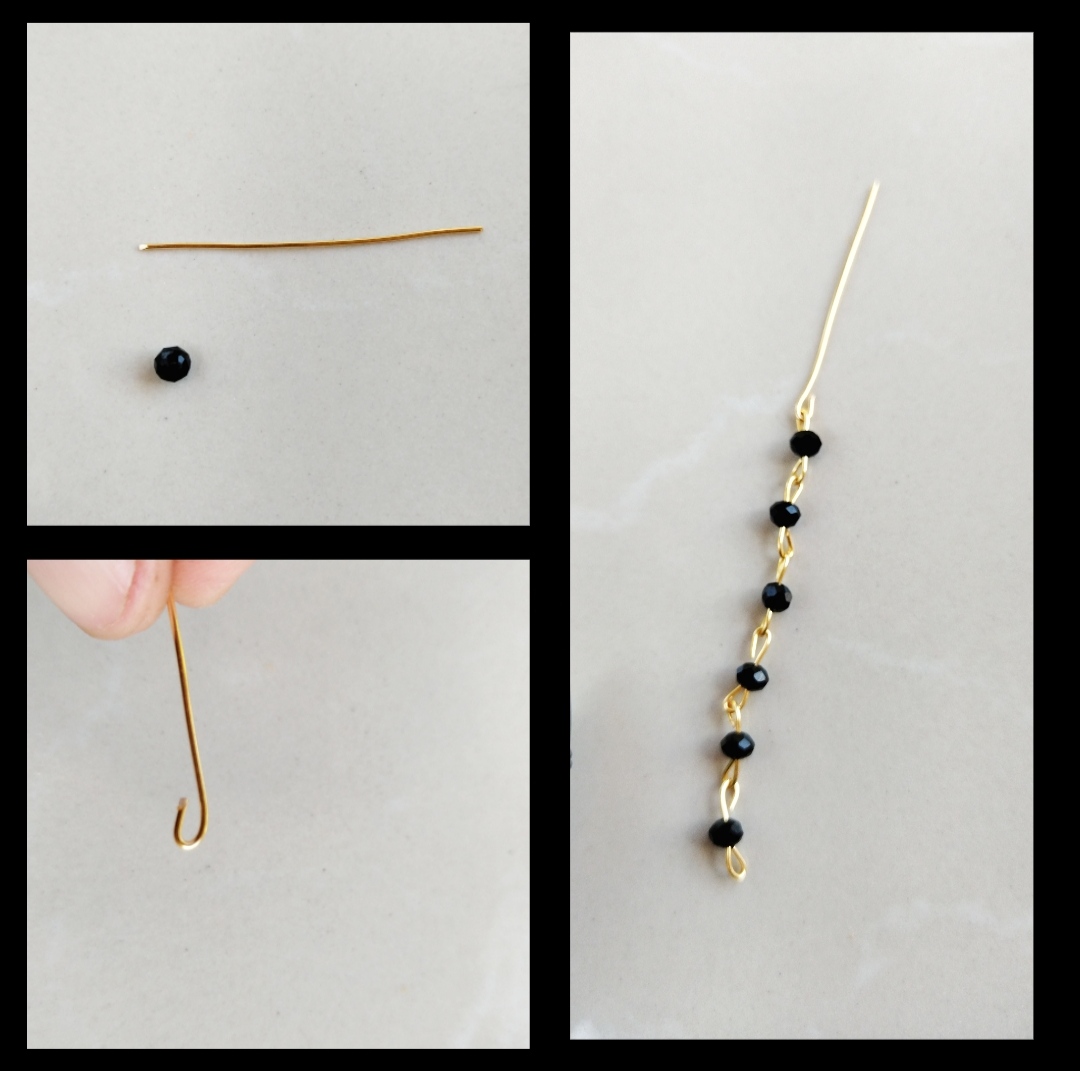
Paso 2: Para este segundo paso cortaremos un trozo de alambre no muy largo y tomaremos una de las dos piezas que hicimos en el primer paso, para realizar este paso tuve que quitar una piedra y dejar una de las dos piezas con solo seis piedras para colocar la última piedra cortamos el trozo de albre y aremos una argolla no muy grande que se parezca a la que estamos haciendo ese trozo de alambre lo enganchamos en la pieza luego meteremos la piedra y aremos un redondo grande luego tomaremos la punta del alambre y le daremos unas vueltas al rededor del mismo y listo ya tenemos dos piezas lista.
Step 2: For this second step we will cut a not very long piece of wire and we will take one of the two pieces that we made in the first step, to do this step I had to remove a stone and leave one of the two pieces with only six stones to place the last stone we will cut the piece of albre and we will make a ring not very big that looks like the one we are making that piece of albre we will hook it in the piece then we will insert the stone and we will make a big round then we will take the point of the wire and we will give it a few laps around it and that's it, we already have two pieces ready.
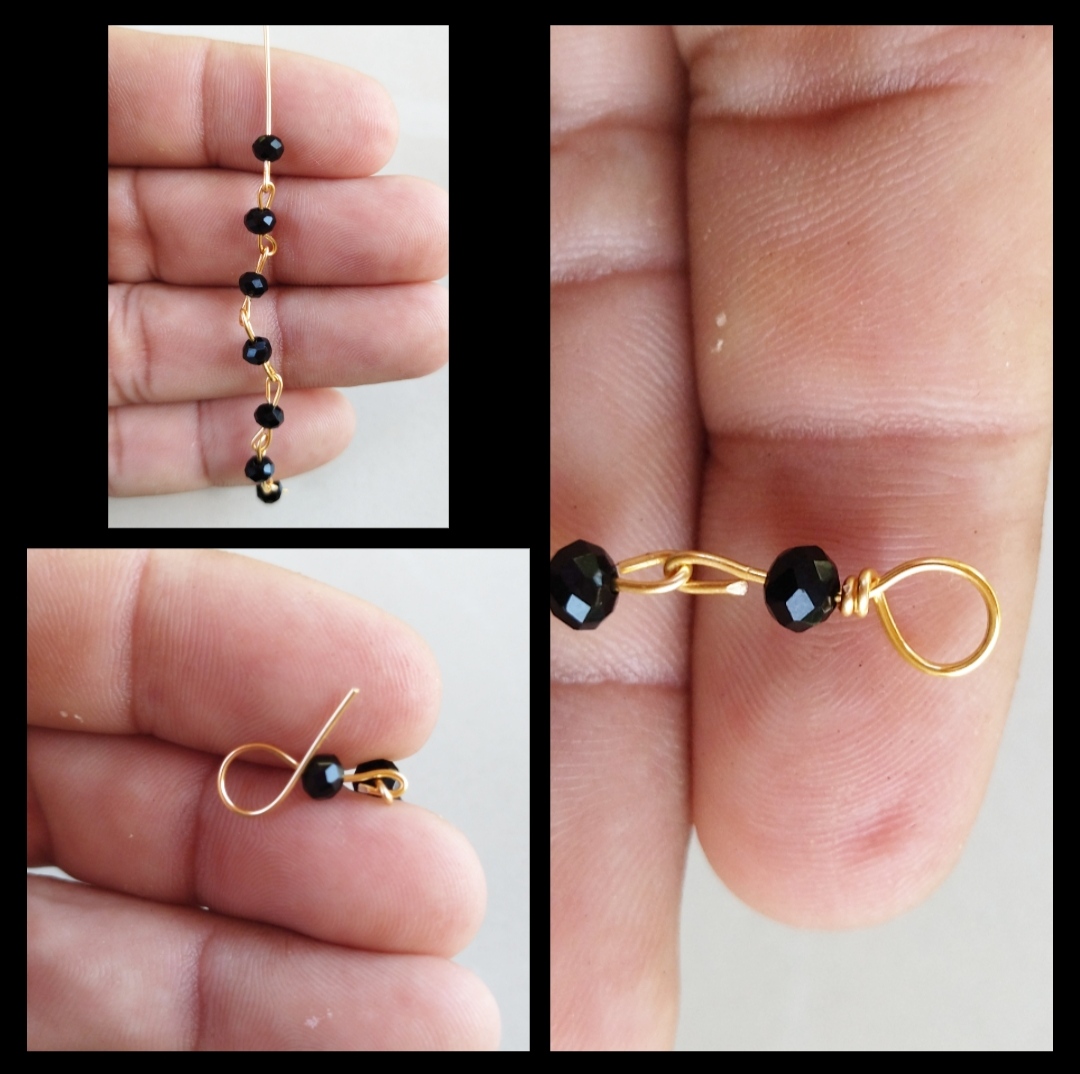
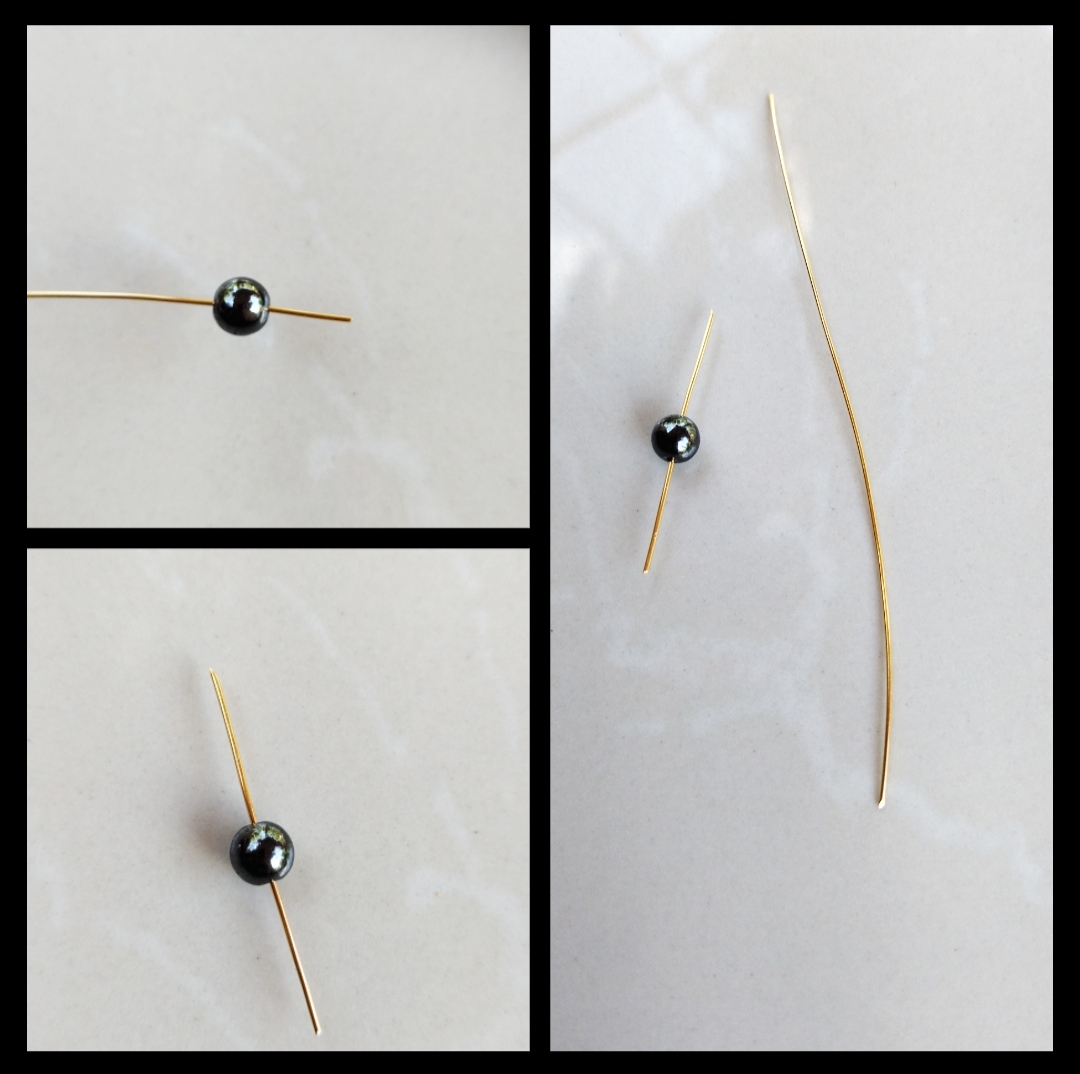
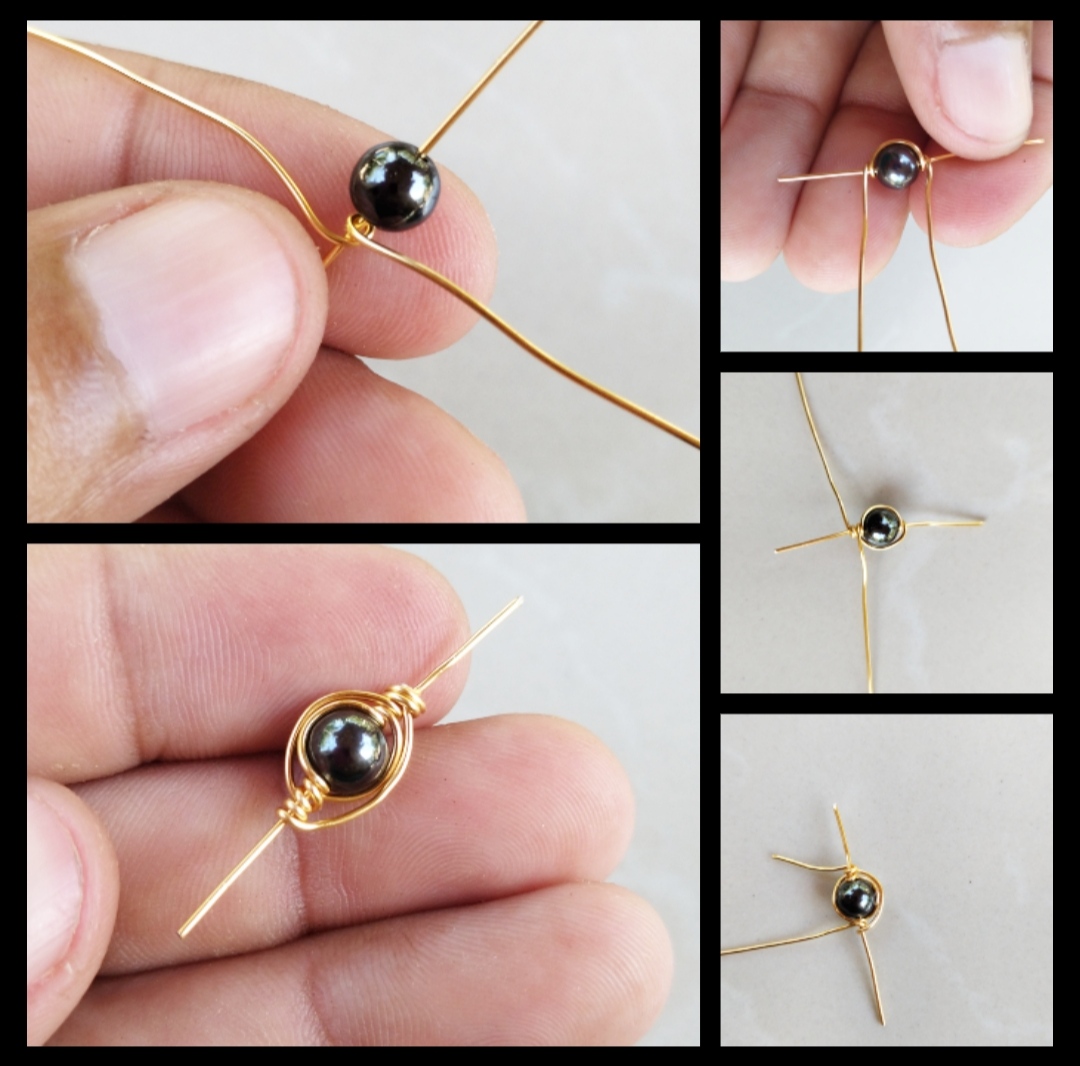
Paso 3: Para nuestro tercer paso tomaremos la piedra más grande y cortaremos un trozo de albre no muy grande como podemos ver en la foto luego cortaremos otro un poco más grande el más chico lo meteremos en el agujero que tiene la piedra y el otro le daremos una vuelta al rededor del albre que metimos en la piedra trataremos que el alambre largo lo doblamos a la mitad luego de darle la vuelta tomaremos una punta y la llevaremos al otro extremo de la piedra y le daremos una vuelta al rededor del albre luego aremos lo mismo con la otra mitad del alambre luego lo aremos otra vez hacia el otro lado asta terminal con el alambre en este caso yo solo pude dar dos vueltas.
Step 3: For our third step we will take the largest stone and cut a piece of albre not very large as we can see in the photo then we will cut another one a little larger the smaller one we will put it in the hole that has the stone and the other we will go around the wire that we put in the stone we will try to fold the long wire in half after turning it over we will take one point and take it to the other end of the stone and we will give it a turn around the albre then we will do the same with the other half of the wire then we will do it again to the other side terminal pole with the wire in this case I could only make two turns.
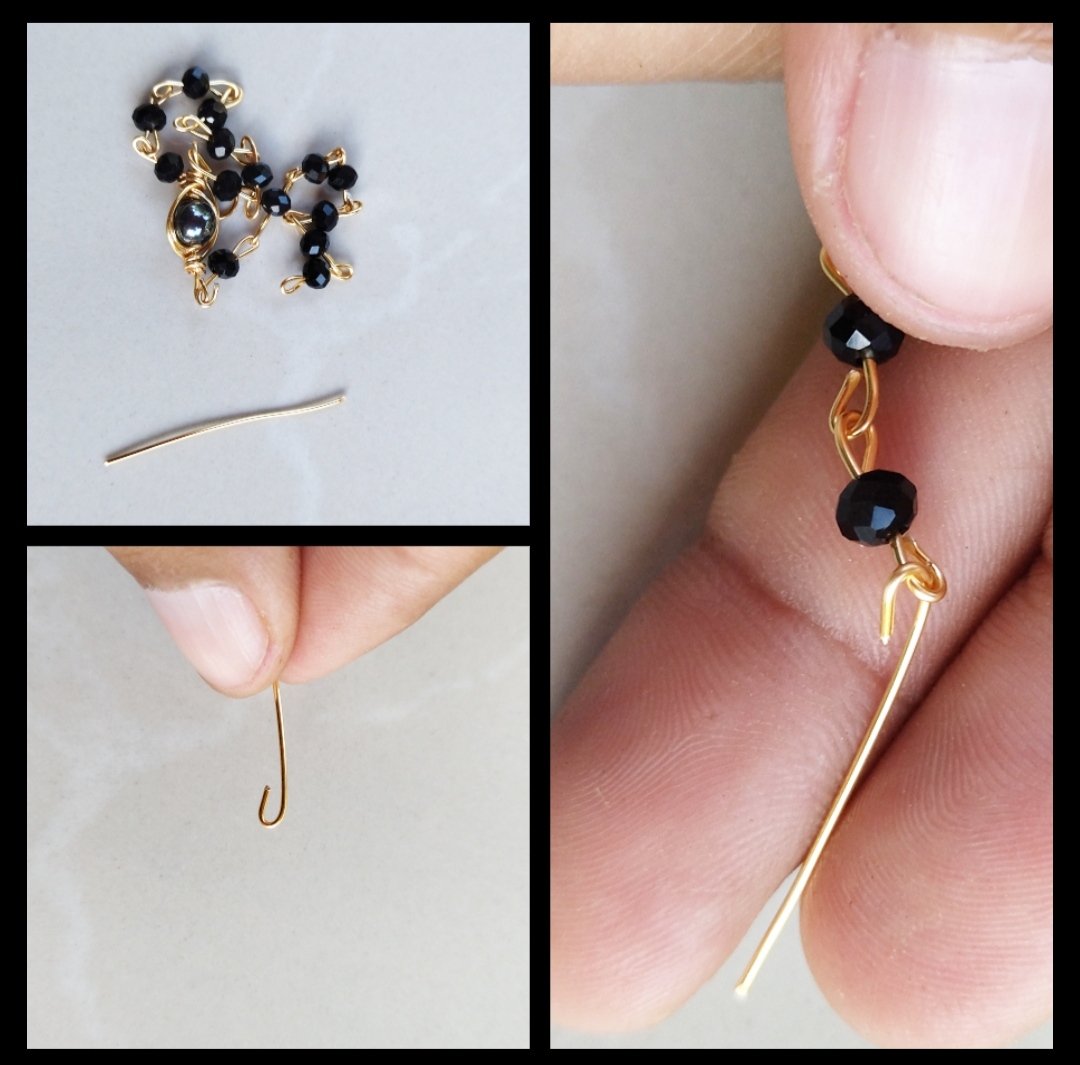
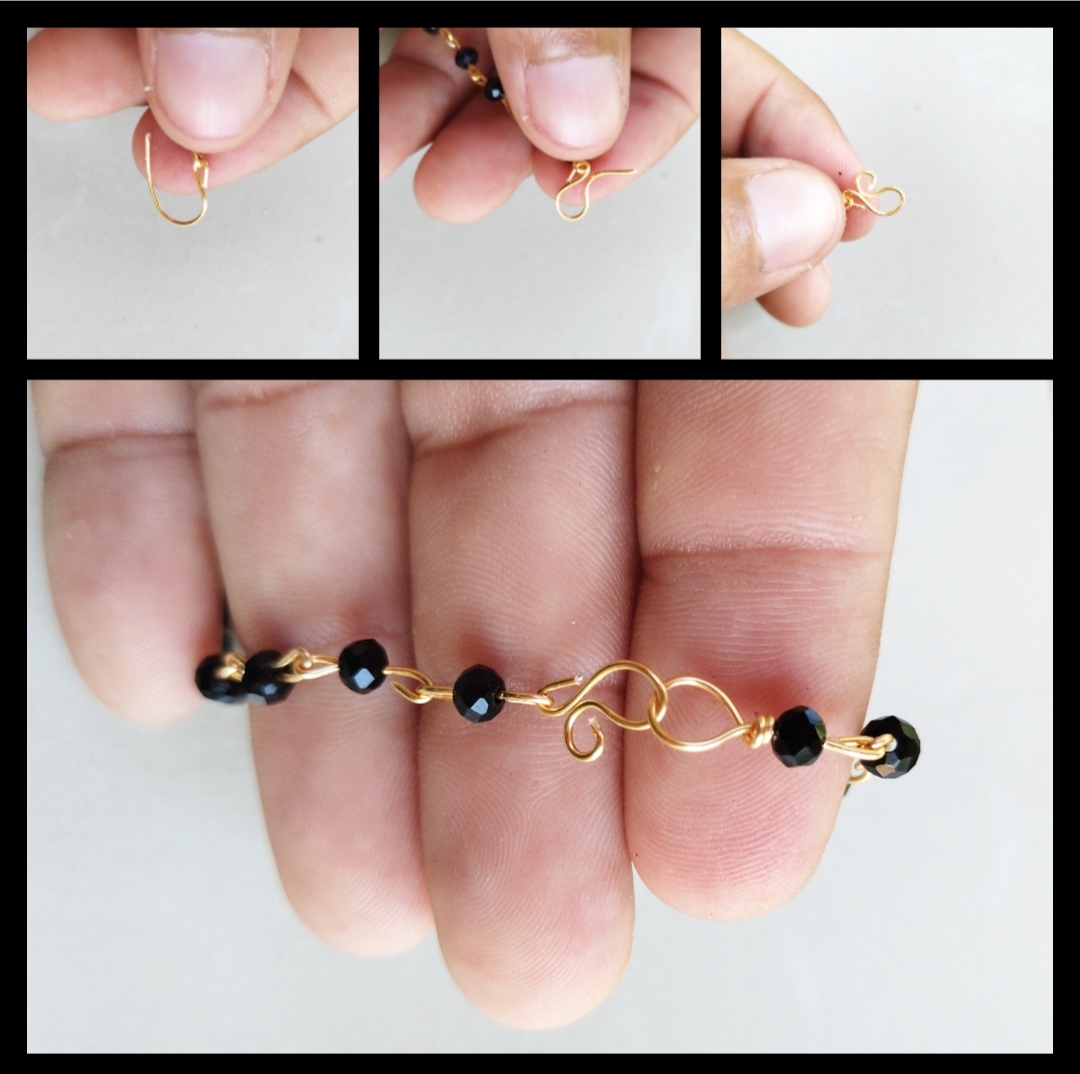
Paso 4:Como pueden ver en este paso nos dedicaremos a unir las piezas y hacer un gancho para asegurar la prenda como uniremos las piezas muy fácil tomaremos la piedra más grande y en uno de los extremos aremos una argolla como estamos haciendo antes de cerrar la argolla tomaremos una de las dos piezas que realizamos al principio y la enganchamos luego aseguramos apretando la argolla super fácil de igual manera lo aremos en el otro lado, para el gancho cortaremos un trozo de alambre y volvemos hacer una argolla no muy grande luego la enganchamos en el extremo de la pulsera pero en el lado que no hicimos el redondo Dra de después de enganchar apretamos muy bien la argolla aremos una U hacia el otro lado de la argolla formando una especie de S luego la punta del alambre la tomaremos y le daremos una vuelta y listo solo tenemos que asegurarnos que los dos lado de la argolla peguen o estén lo más cerca posible bueno espero les allá gustado.
Step 4:As you can see, in this step we will join the pieces and make a hook to secure the garment. As we will join the pieces very easily, we will take the largest stone and in one of the ends we will make a ring as we were doing before. to close the ring we will take one of the two pieces that we made at the beginning and we hook it then we secure it by tightening the ring super easy in the same way we will do it on the other side, for the hook we will cut a piece of wire and we will make a not very big ring again then we hook it on the end of the bracelet but on the side that we did not make the round Dra of after hooking we tighten the ring very well we will make a U towards the other side of the ring forming a kind of S then we will take the tip of the wire and we will give it a spin and ready we just have to make sure that the two sides of the ring hit or are as close as possible well I hope you liked it there.
listo nuestros hermosos pendientes , espero que a las damas les guste, fue un gusto compartir con ustedes .
ready our beautiful earrings, I hope the ladies like it, it was a pleasure to share with you.
Todas las Fotos son de mi autoría y fueron tomadas con mi Celular Redmi 9T
All Photos are my authorship and were taken with my Redmi 9T Cellphone
Una pulsera mágica @alexanderflx muy sencilla y elegante, nos encanta el diseño de la piedra principal, un tutorial fácil de seguir, buen trabajo.
Hola, gracias que bueno que te gusto, si la verdad es muy sencilla pero muy linda, saludo y muchas gracias por su visita.
Esta pulcera está muy hermosa, sin duda la usaría, gracias por compartir el proceso de creación ✨🖤✨🖤✨
Hola, gracias por querer usarla es un gusto saber que le gusta, siempre a sido un placer compartir con ustedes.👍👍
Congratulations @alexanderflx! You have completed the following achievement on the Hive blockchain and have been rewarded with new badge(s):
Your next target is to reach 70 posts.
You can view your badges on your board and compare yourself to others in the Ranking
If you no longer want to receive notifications, reply to this comment with the word
STOPTo support your work, I also upvoted your post!
Check out the last post from @hivebuzz:
Support the HiveBuzz project. Vote for our proposal!
Thank you for sharing this amazing post on HIVE!
Your content got selected by our fellow curator @hafizullah & you just received a little thank you via an upvote from our non-profit curation initiative!
You will be featured in one of our recurring curation compilations and on our pinterest boards! Both are aiming to offer you a stage to widen your audience within and outside of the DIY scene of hive.
Join the official DIYHub community on HIVE and show us more of your amazing work and feel free to connect with us and other DIYers via our discord server: https://discord.gg/mY5uCfQ !
If you want to support our goal to motivate other DIY/art/music/homesteading/... creators just delegate to us and earn 100% of your curation rewards!
Stay creative & hive on!
Hola.amigo Que hermosa. 🤗 Saludos.
Hola, muchas gracias👍👍👍
Te quedó preciosa. Muy bien trabajada la técnica con el alambre. Me encantó como realizaste los cierres. Felicidades.
Siempre trayendo trabajos tan hermosos amigo @alexanderflx. Me encanto. Felicidades y muchos éxitos...✨