¡Bienvenido a mi blog!
Welcome to my blog!
Español.
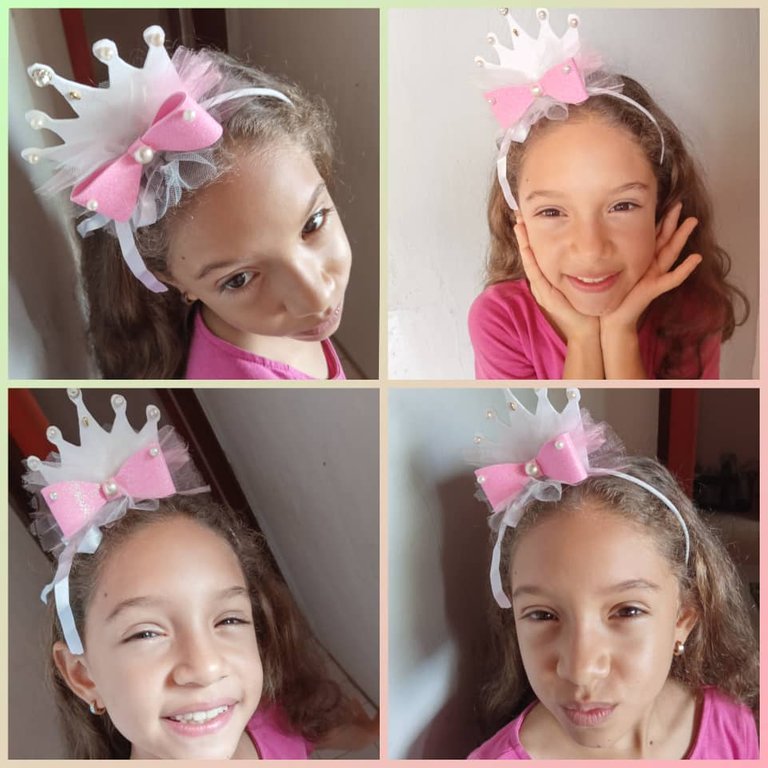
Hola buenas noches tengan todos, desde esta hermosa comunidad @jewelry les comparto otra creatividad que hago para mi princesa, hoy les traigo una linda diadema hecho con coronita y lazo de foami decorado con tela de tour color rosada, perla y piedra preciosa para la princesa de la casa. Es un diadema que le diseñe para una fiesta que tiene y su vestido es rosado y le dije te voy hacer una coronita para que valla como una princesa lo hice con materiales muy económico y sencillo de hacer solo es tener la idea y ser creativa a la hora de tener una ocasión especial, lucir bella y a la ve delicada le puedo decir que ella estaba muy emocionada con su diadema de princesa. Así que los invisto seguir el tutorial de esta linda diadema.
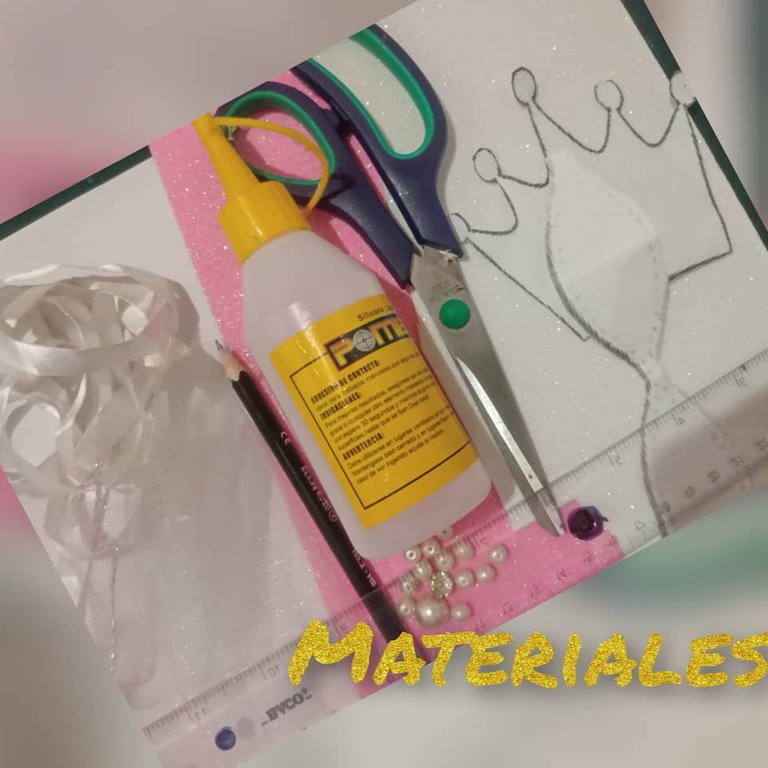
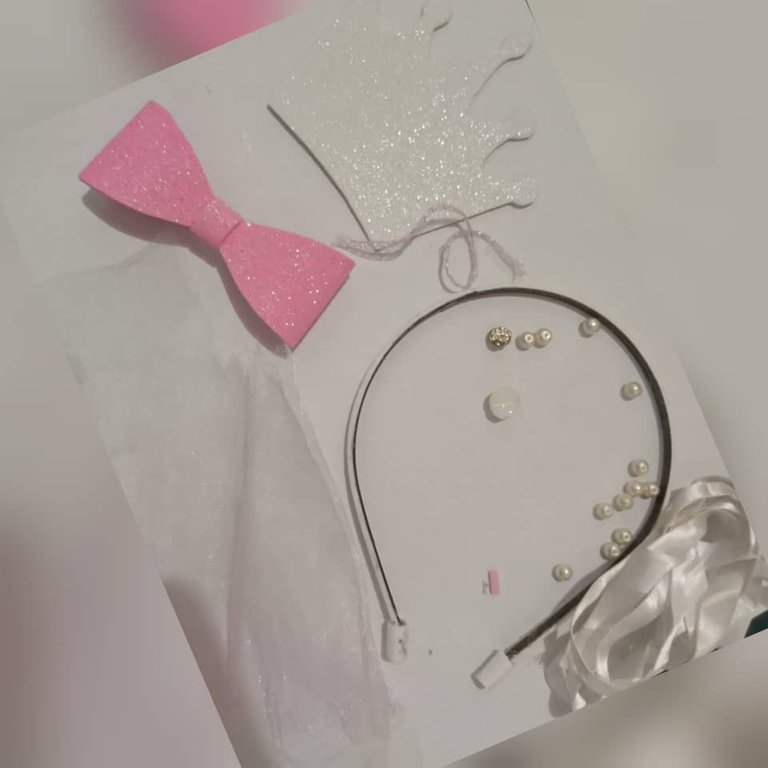
Materiales a utilizar:
- 1 diadema delgada.
- 1 tijera.
- 2 foami rosado, blanco escarchado.
- 1 silicon.
- 1 cinta blanca delgada de 30 centímetro.
- 7 perla blanca.
- 1 piedra preciosa transparente.
- 2 horma 1 de corona, 1 de lazo.
- 2 tela de tour de 20 centímetro de largo y 10 centímetro de ancho color rosada y blanca.
- 1 lápiz.
Paso:
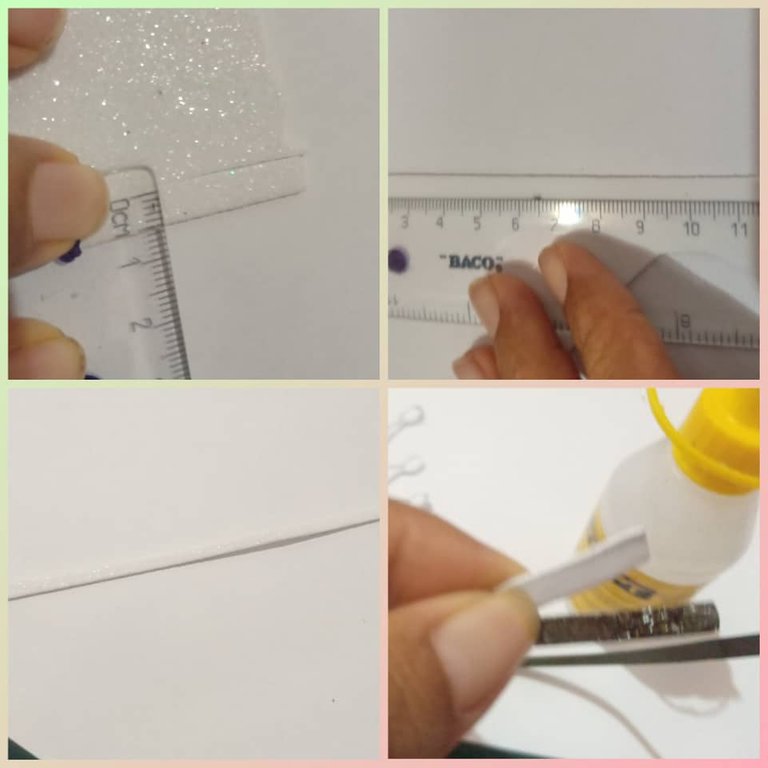
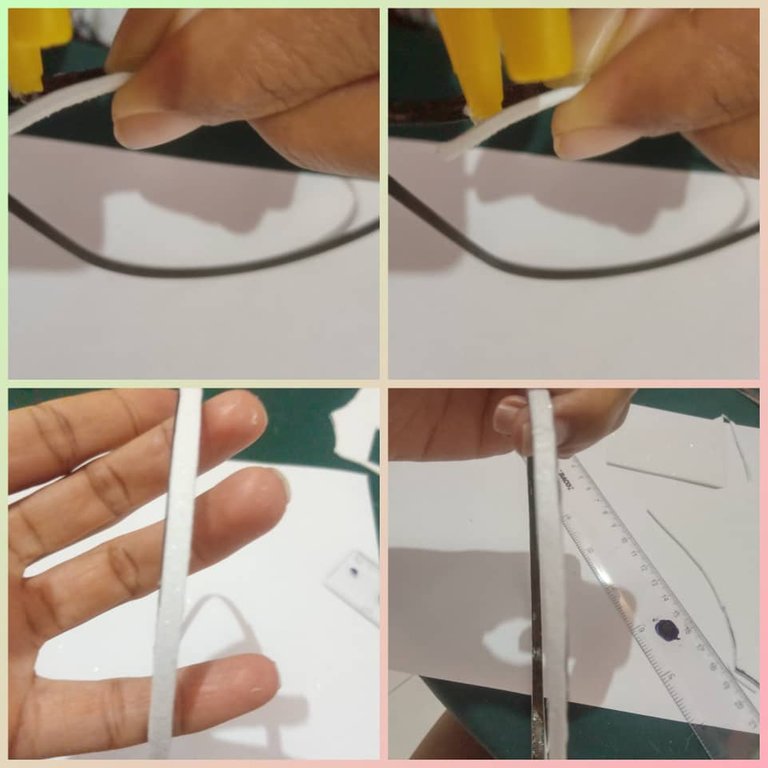
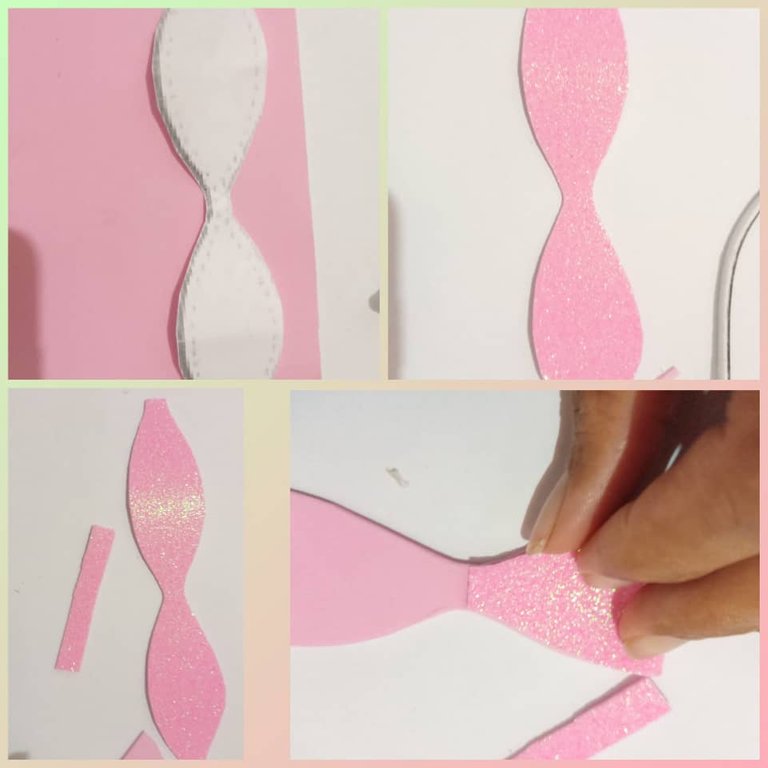
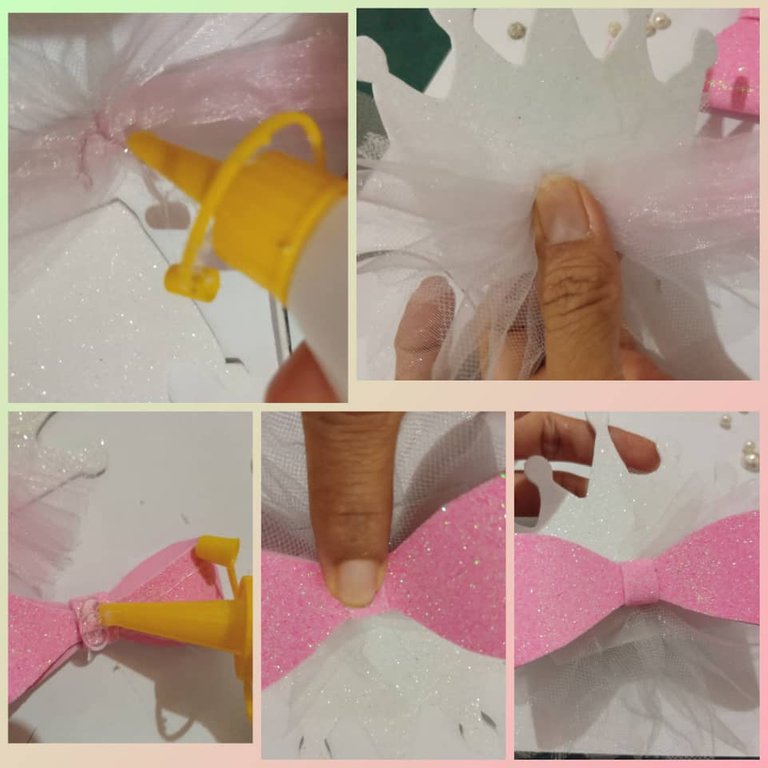
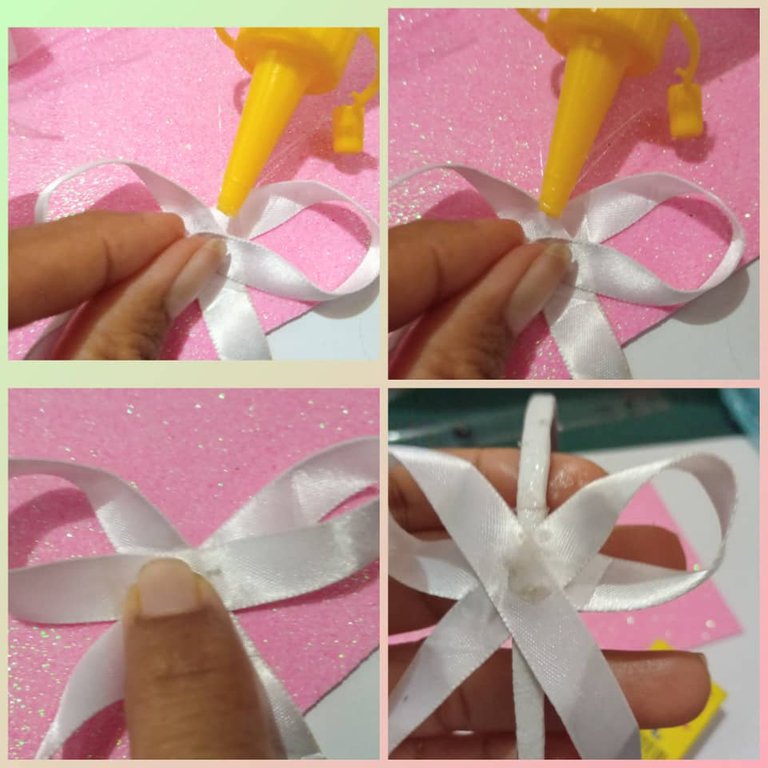
Primero picamos una tira de foami de 20 centímetro de largo por 0,5 centímetro de ancho, tomamos la diadema y lo pegamos con silicón desde la punta y desde ahí vamos pegando todo el alrededor hasta la otra punta cuando este pegado le colocamos en la punta una cinta de 4 centímetro de largo por 1 centímetro de ancho para asegurar bien le agregamos silicón lo ajustamos con la mano hasta que se pegue, así hacemos en mismo procedimientos en la otra punta. Y ya puede observar que el cintillo lo tenemos forrado para empezar hacerlo.
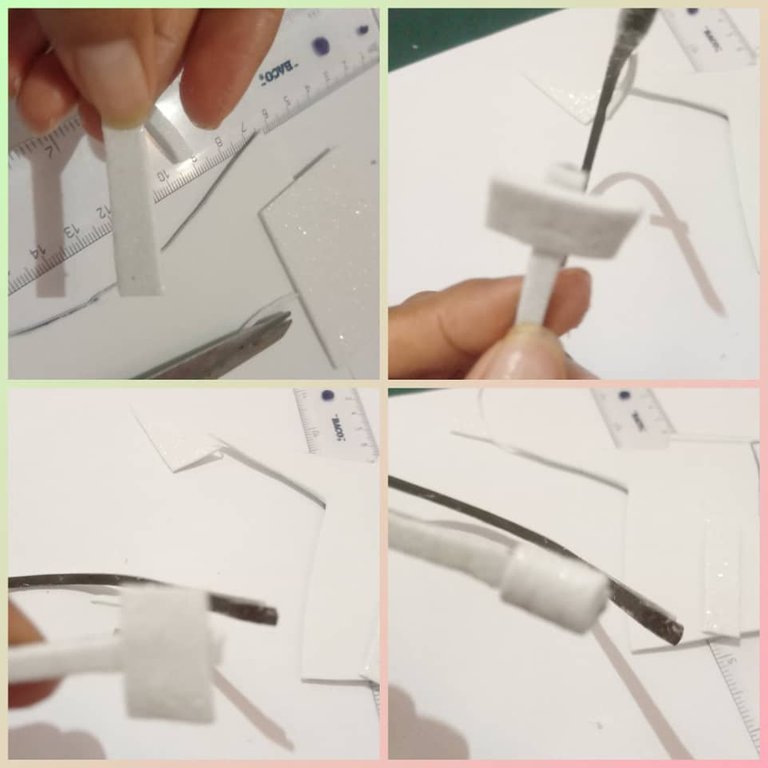
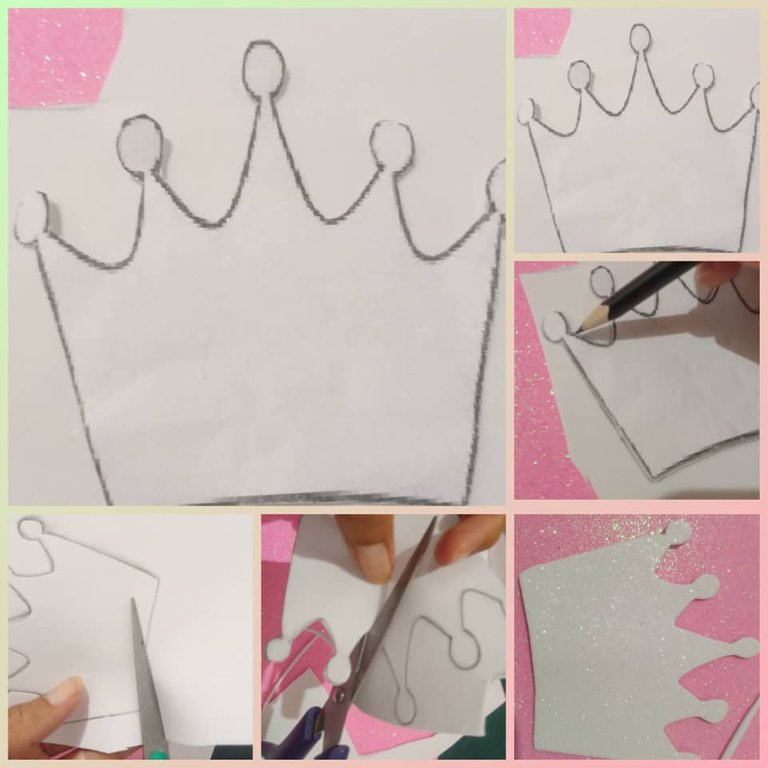
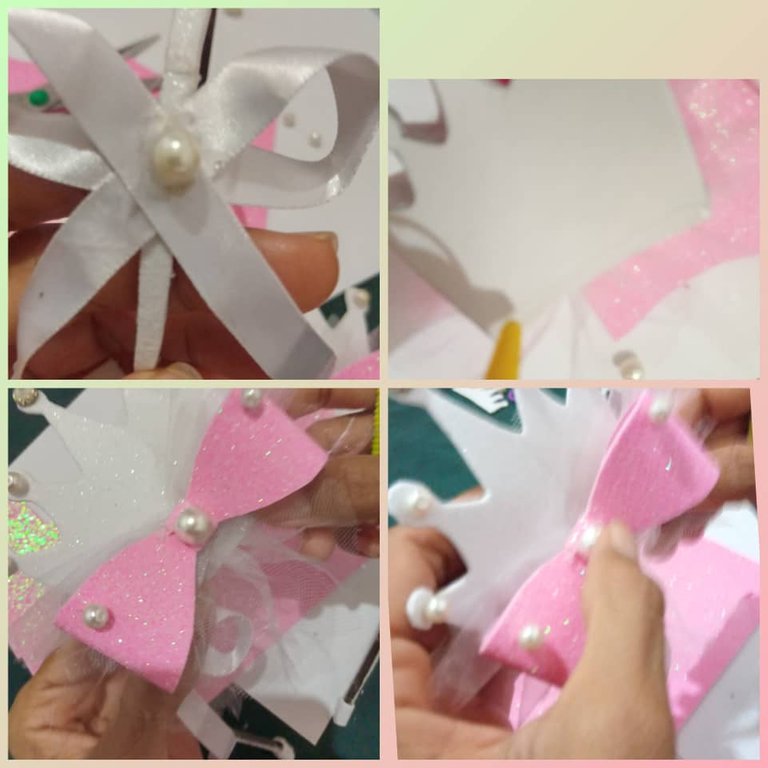
Tomo la horma de la corona empezamos a trazar en el foami blanco escarchado, luego lo recortamos, puede ver que ya tenemos la corona lista.
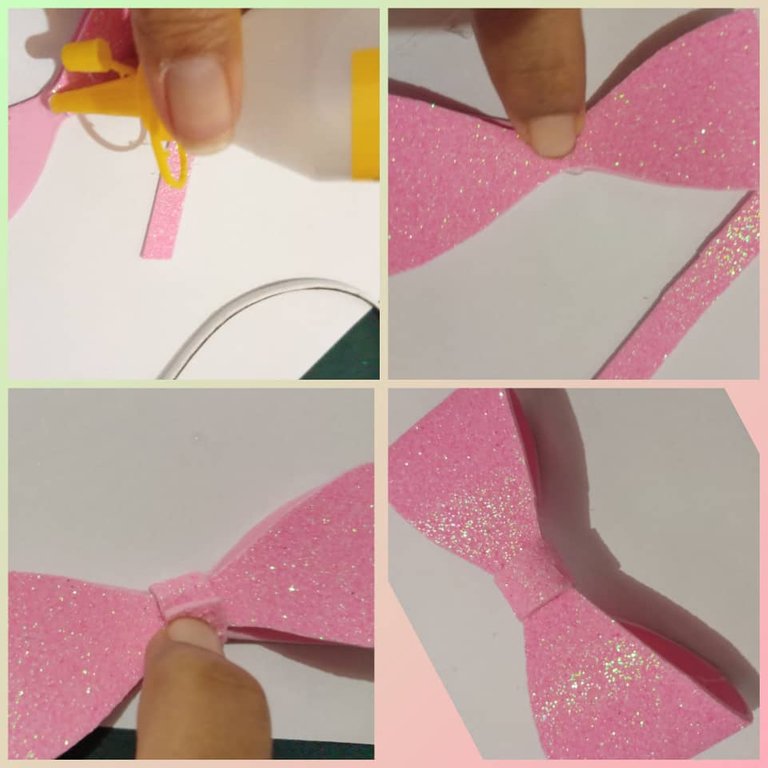
Luego tomo la horma del lazo empezamos a trazar en el foami del color rosado escarchado la recortamos y empezamos ármala por la parte de atrás del lazo doblamos una punta y la pegamos con silicón y así hacemos con la otra punta. Luego picamos una tira de 3 centímetro largo por 1 centímetro de ancho para ajustar el lazo pegamos la tira por todo el medio del lazo lo unimos bien con los dedos para que se pegue y ya tenemos el lazo listo.
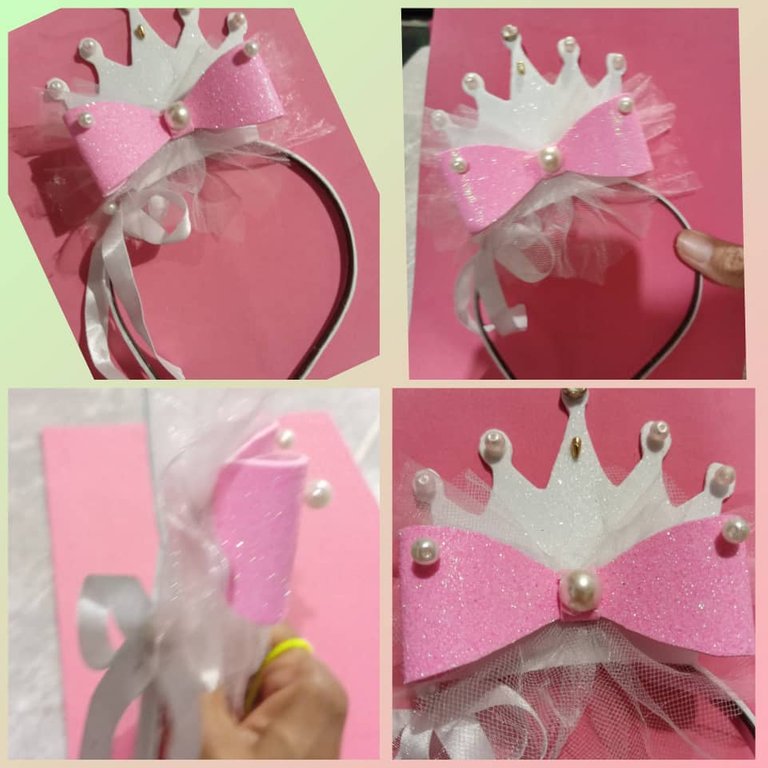
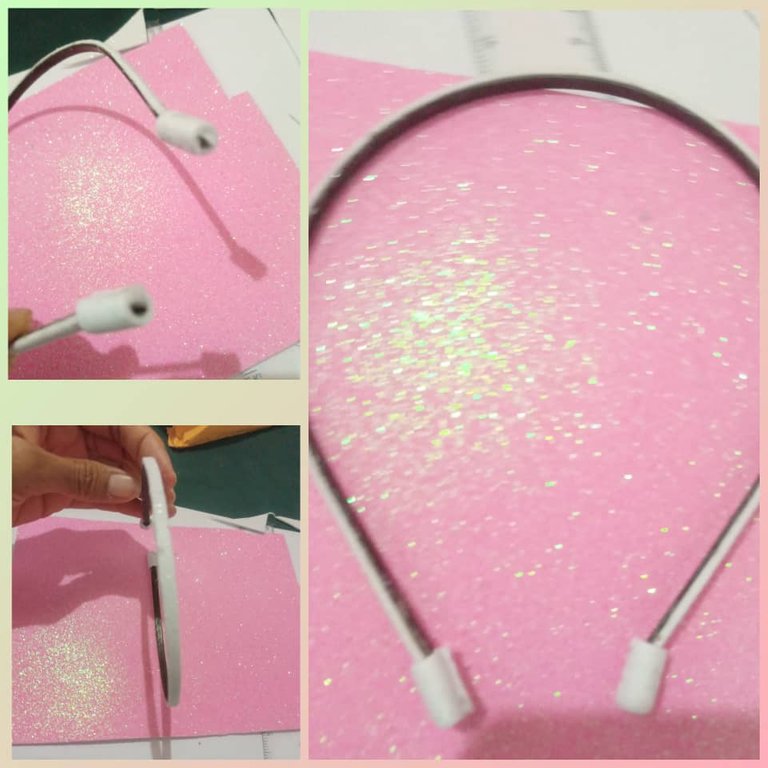
Tenemos listo ahora empezamos a decorar la corona para pegarlo en la diadema.
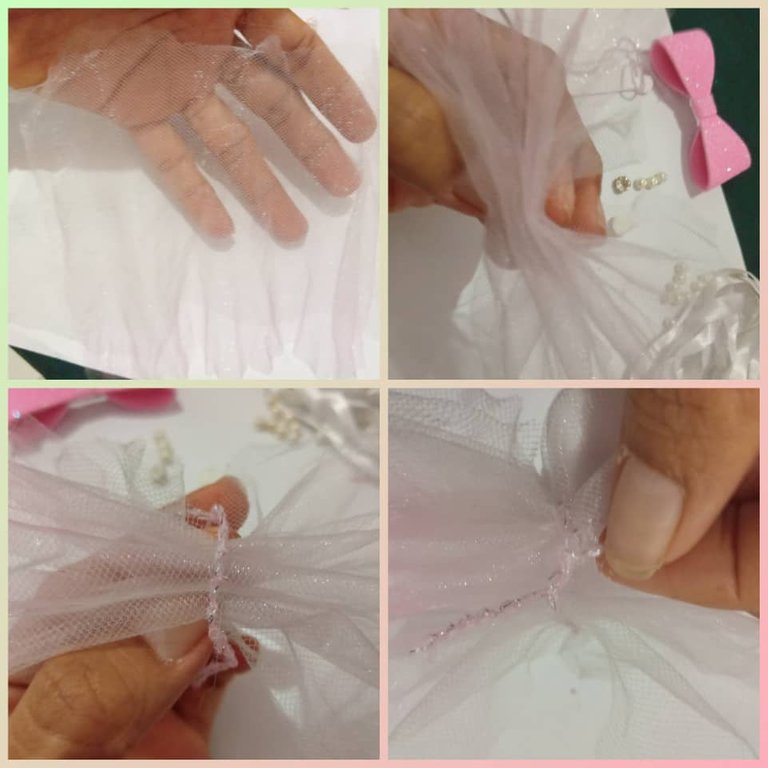
Agarramos la tela de tour de 20 centímetro de largo por 10 centímetro de ancho lo agarramos por el medio y lo amarramos con un hilo le hacemos varios nudo para que no se suerte y ponemos como un lazo, le agregamos silicón para pegarlo en la corona lo presionamos con los dedos hasta que se pegue.
Le agregamos silicón al lazo rosado de foami y lo pegamos arriba de la tela del tour lo dejamos presionado por varios minutos hasta que esté pegada. Ya puede observa que la corona va agarrando forma.
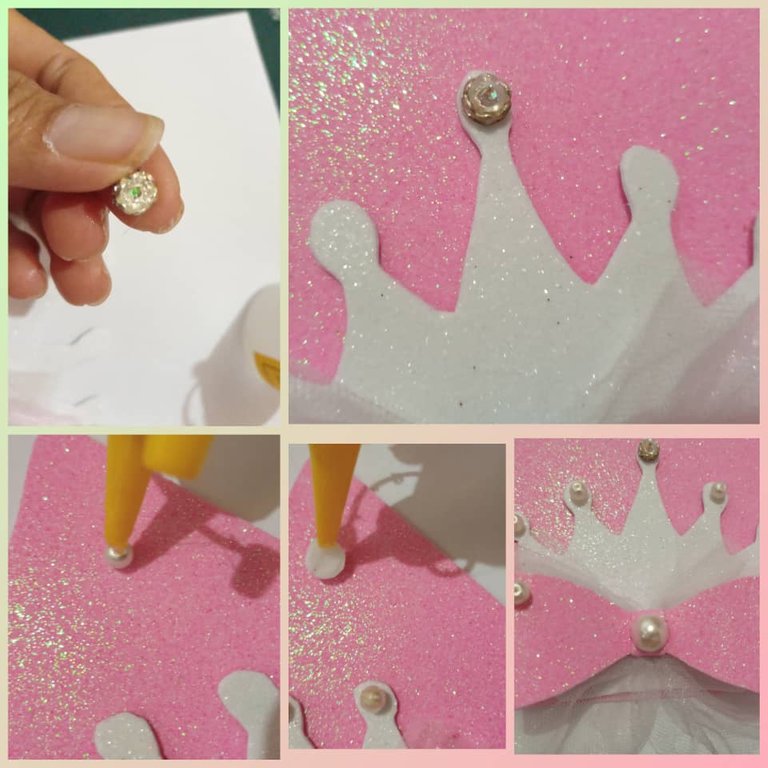
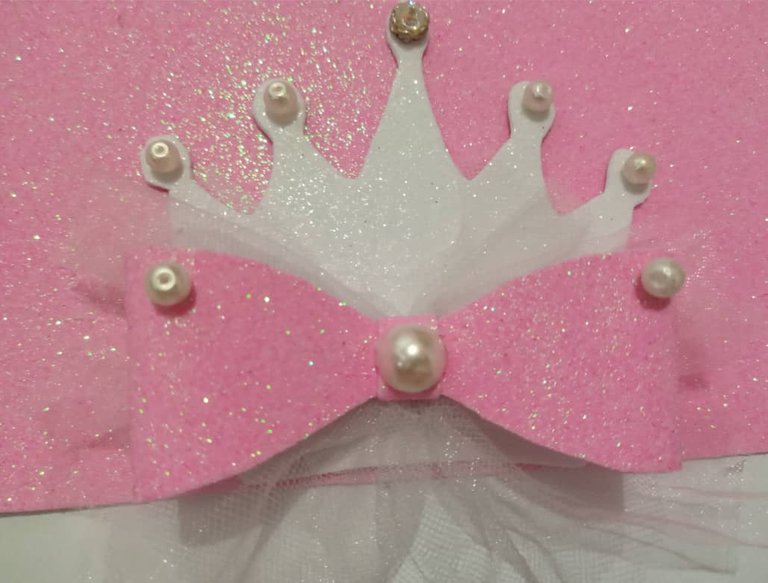
Empezamos a decorar con la piedra preciosa transparente en la punta de la corona que queda en el medio que es la punta más larga hay pegamos la piedra preciosa a los lado de las otras punta de la corona se va pegando la perla en todas la punta. En el medio del lazo rosado le pegamos una perla grande y decoramos en lazo con varias perla. Vea como va quedando muy hermosa la corona ya se ve muy linda.
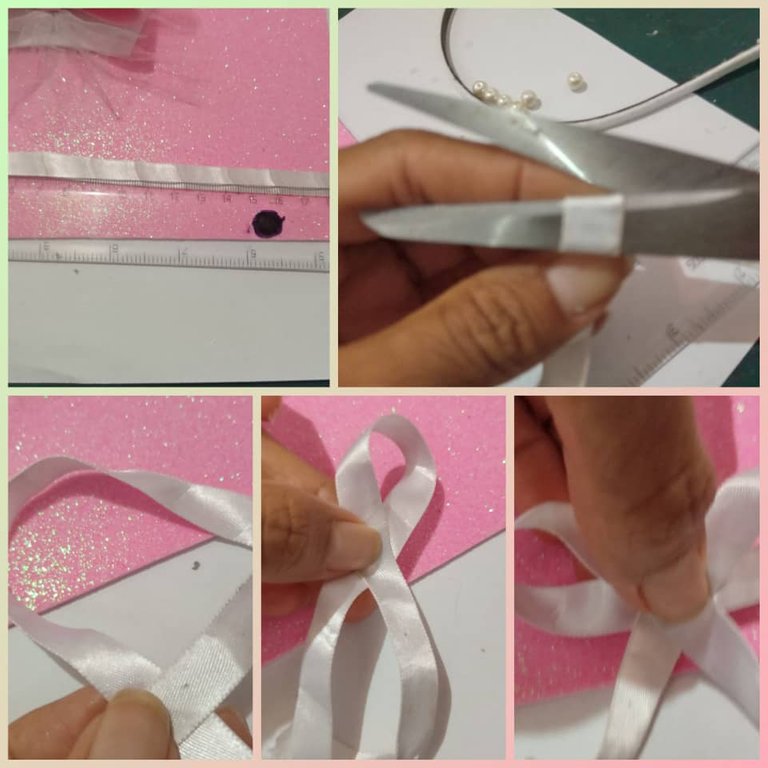
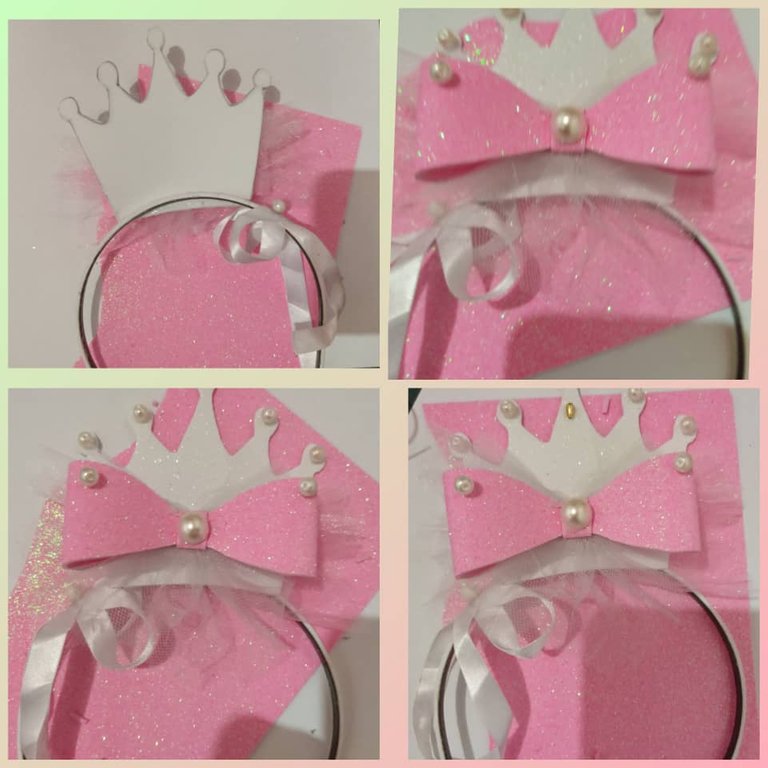
Para empezar a decorar la diadema cojo una cinta blanca de 20 centímetros, la cortamos y empezamos a hacer un lazo, cuando esté listo lo pegamos en el centro del lazo con silicona, cuando esté pegado empezamos a decorar la diadema
Empezamos a decorar la diadema le pegamos la corona le agregamos silicón en la parte de atrás y se la pegamos a la diadema lo presionamos con la mano hasta que se pegue y lista nuestra diadema de corona.
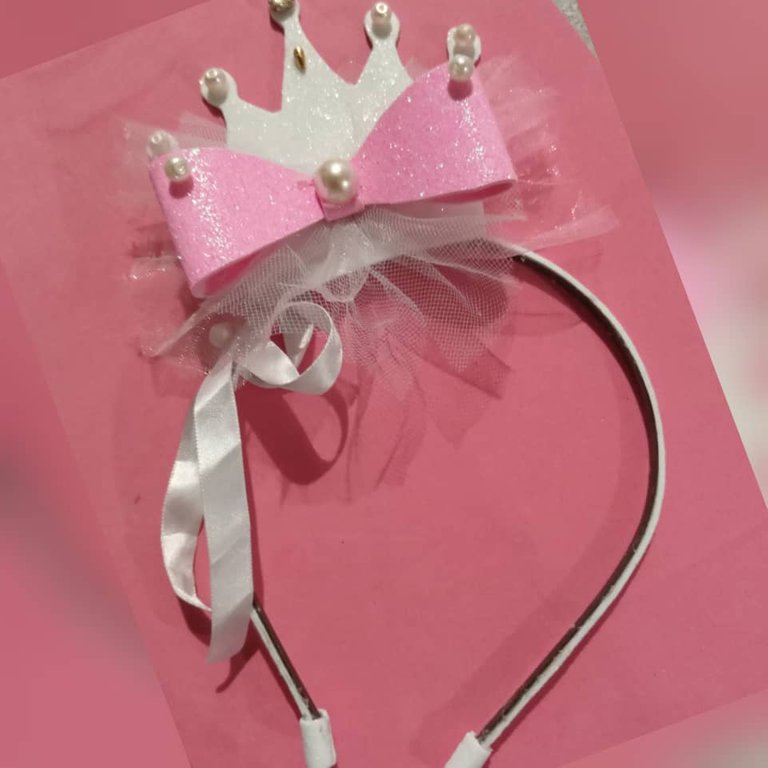
Mira que bonito me ha quedado mi princesa le encanta y a disfrutar de su fiesta con su bonita diadema de corona que es ideal para la fiesta u otras ocasiones.

Espero que les haya gustado esta publicación que tenga un feliz días y bendecidos para todos muchas gracias por leer mi post.
I hope you liked this post have a happy and blessed day, to all thank you very much for reading my post.

Las fotos son mías, tomadas con teléfono alcatel , editadas con incollage y traducidas con Deepl.
The photos are mine, taken with alcatel phone, edited with incollage and translated with Deepl.
ENGLISH
Welcome to my blog!
Welcome to my blog!
Hello good evening have all, from this beautiful community @jewelry I share with you another creativity that I make for my princess, today I bring you a nice headband made with crown and bow of foami decorated with pink tour fabric, pearl and precious stone for the princess of the house. It is a headband that I designed for a party she has and her dress is pink and I told her I am going to make a crown for her to look like a princess. I made it with very inexpensive materials and easy to do it is just having the idea and being creative when having a special occasion, looking beautiful and delicate I can tell you that she was very excited with her princess headband. So I invite you to follow the tutorial of this cute tiara.
Materials to use:.
- 1 thin headband.
- 1 scissors.
- 2 pink foami, frosted white.
- 1 silicon.
- 1 thin white ribbon of 30 cm.
- 7 white pearl.
- 1 transparent precious stone.
- 2 last 1 crown, 1 ribbon.
- 2 tour fabric of 20 centimeters long and 10 centimeters wide, pink and white.
- 1 pencil.
Step:.
First we chop a strip of foami 20 centimeter long by 0.5 centimeter wide, we take the headband and stick it with silicone from the tip and from there we are sticking all around to the other end when this glued we place at the tip a tape 4 centimeter long by 1 centimeter wide to ensure well we add silicone we adjust it by hand until it sticks, so we do the same procedure at the other end. And now you can see that we have the headband lined to start doing it.
I take the last of the wreath we start tracing on the frosted white foami, then we cut it out, you can see we already have the wreath ready.
Then I take the last of the bow we start tracing on the frosted pink foami we cut it out and start assembling it on the back of the bow we fold one end and glue it with silicone and so we do with the other end. Then we cut a strip of 3 centimeters long by 1 centimeter wide to adjust the ribbon we glue the strip all over the middle of the ribbon we join it well with our fingers so that it sticks and we have the ribbon ready.
We have ready now we start decorating the wreath to glue it on the headband.
We grab the tour fabric 20 centimeters long by 10 centimeters wide we grab it in the middle and tie it with a thread we make several knots so that it does not get lucky and we put as a loop, we add silicone to stick it on the crown we press it with our fingers until it sticks.
We add silicone to the pink foami ribbon and glue it on top of the tour fabric and leave it pressed for several minutes until it is glued. You can already see that the wreath is taking shape.
We start decorating with the transparent gemstone on the tip of the wreath that is in the middle, which is the longest tip, we glue the gemstone on the sides of the other tips of the wreath and glue the pearl on all the tips. In the middle of the pink ribbon we glue a large pearl and decorate the ribbon with several pearls. See how beautiful the wreath is already looking very nice.
To start decorating the headband I take a 20 centimeters white ribbon, we cut it and start making a bow, when it is ready we glue it in the center of the bow with silicone, when it is glued we start decorating the headband.
We start decorating the headband we glue the wreath we add silicone on the back and glue it to the headband we press it with our hand until it sticks and ready our wreath headband.
Look how pretty it has turned out my princess loves it and to enjoy her party with her pretty crown headband which is ideal for party or other occasions.
)Espero que les haya gustado esta publicación que tengan un feliz días y bendecidos para todos muchas gracias por leer mi post.
Espero que les haya gustado esta publicación que tengan un feliz días y bendecidos para todos muchas gracias por leer mi post.
Las fotos son mías, tomadas con teléfono alcatel , editadas con incollage y traducidas con Deepl.
The photos are mine, taken with alcatel phone, edited with incollage and translated with Deepl.
Congratulations @anacarolina2022! You have completed the following achievement on the Hive blockchain and have been rewarded with new badge(s):
Your next target is to reach 10000 upvotes.
You can view your badges on your board and compare yourself to others in the Ranking
If you no longer want to receive notifications, reply to this comment with the word
STOPTo support your work, I also upvoted your post!
Support the HiveBuzz project. Vote for our proposal!
Quedó hermosa esa diadema, gracias por compartir, la haré para mi sobrina.
gracias si me quedo bella, y la modelo emocionada. gracias por leer mi post
Me encantan las diademas, esta ha quedado muy linda y a esa princesa le quedó super hermosa. Gracias por compartir😊💖
Me alegra que te guste, gracias por leer mi post..si, ella encantada con su diadema de princesa.
¡Enhorabuena!
✅ Has hecho un buen trabajo, por lo cual tu publicación ha sido valorada y ha recibido el apoyo de parte de CHESS BROTHERS ♔ 💪
♟ Te invitamos a usar nuestra etiqueta #chessbrothers y a que aprendas más sobre nosotros.
♟♟ También puedes contactarnos en nuestro servidor de Discord y promocionar allí tus publicaciones.
♟♟♟ Considera unirte a nuestro trail de curación para que trabajemos en equipo y recibas recompensas automáticamente.
♞♟ Echa un vistazo a nuestra cuenta @chessbrotherspro para que te informes sobre el proceso de curación llevado a diario por nuestro equipo.
Cordialmente
El equipo de CHESS BROTHERS
Linda diadema de princesa se ve hermosa
Gracias por leer mi Post
Que hermosa diadema perfecta para las niñas coquetas como esa linda modelo, el tutorial está muy bien hecho, pero sin dudas la que se roba el show es la pequeña posando como profesional.
gracias por tu comentario, si la modelo esta emocionada con su diadema.
HErmosa niña. te quedo bellisimo el cintillo
graciaspor leer mi post, si amiga me quedo muy lindo la modelo encantada