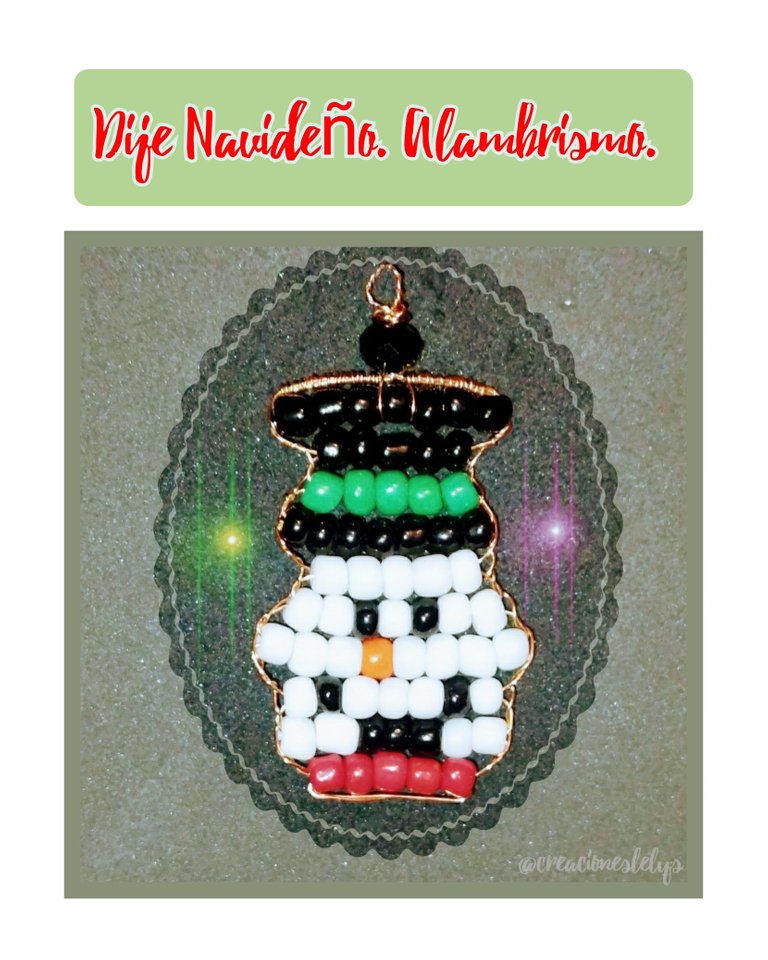
Hola amigos, deseo que todos estén muy bien. Ya llegó diciembre 🥂 época para la celebración tradicional navideña. Por acá mucho silencio este año, la mayoría de los vecinos que acostumbraban hacer fiestas desde los primeros días del mes se han ido. Gran parte se ha ido del país y los otros de la parroquia o ciudad. Estoy segura que desde donde estén continuarán con sus celebraciones decembrinas para regalar alegría a sus nuevos vecinos.
Yo aprovecho esta tranquilidad para inspirarme y seguir creando. El día de hoy quiero mostrarles el paso a paso para elaborar un lindo dije navideño en forma de Muñeco de nieve. Es muy lindo.
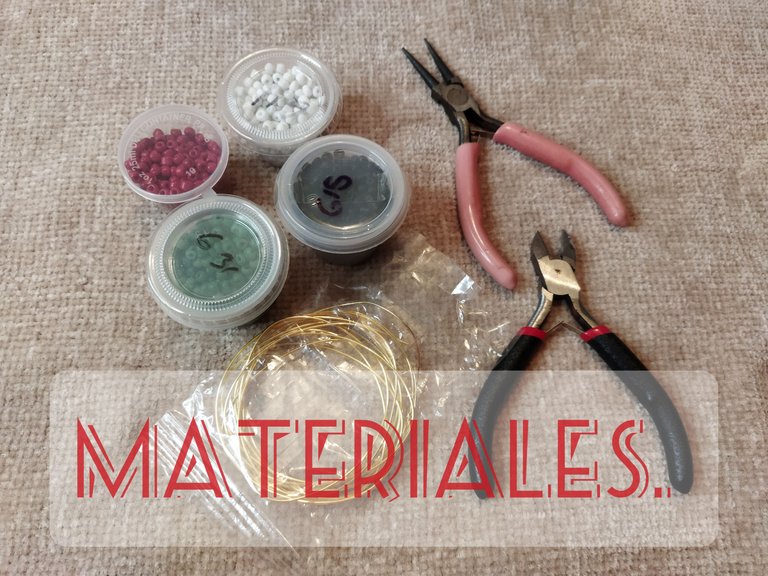
Los materiales que usaremos son: Alambre número 26. Pinza de corte. Pinza mandril. Mostacillas negras, blancas, rojas, anaranjada y verde. Cinta métrica.
Hello friends, I wish you all to be very well. December is here 🥂 time for the traditional Christmas celebration. Around here a lot of silence this year, most of the neighbors who used to have parties since the first days of the month have left. Most of them have left the country and the others have left the parish or city. I am sure that from wherever they are they will continue with their Christmas celebrations to give joy to their new neighbors.
I take advantage of this tranquility to inspire me and continue creating. Today I want to show you the step by step to make a nice Christmas charm in the shape of a snowman. It is very cute.
The materials we will use are: Wire number 26. Cutting pliers. Mandrel pliers. Black, white, red, orange and green beads. Measuring tape.
Procedimiento:
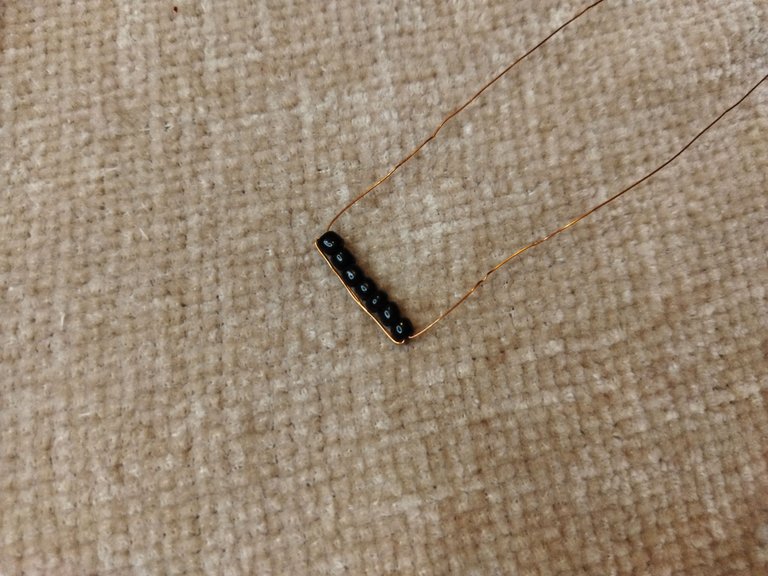
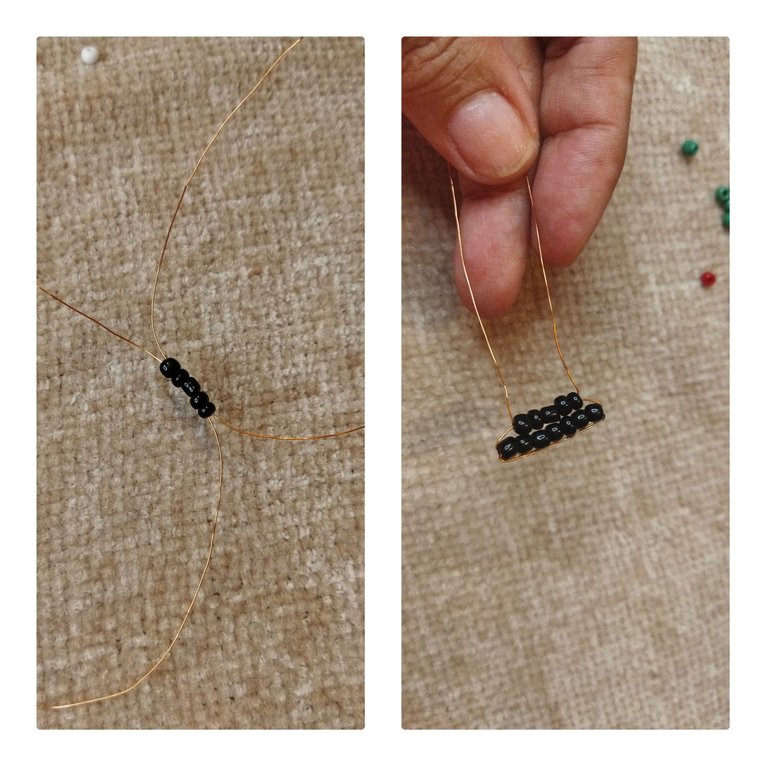
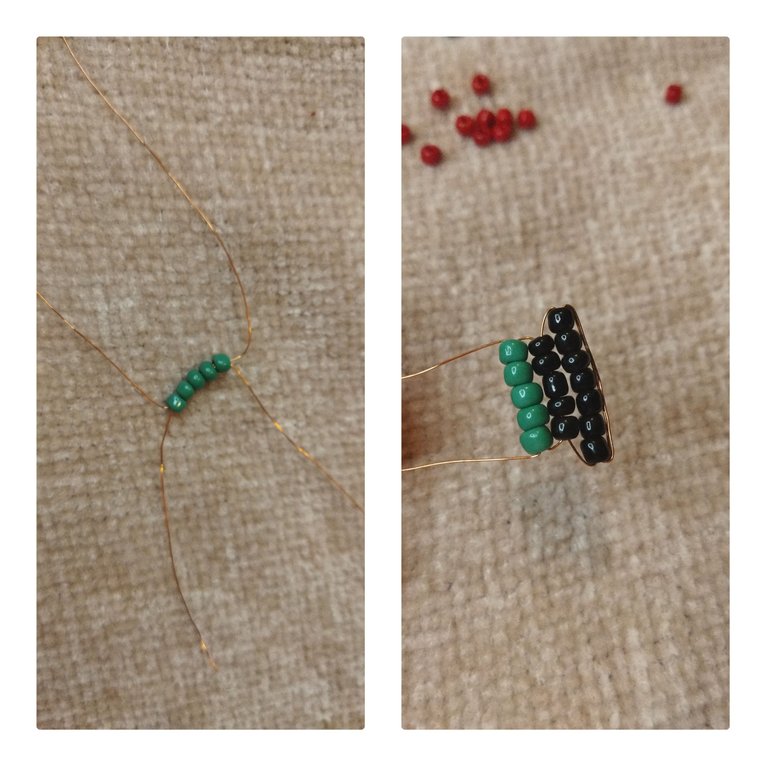
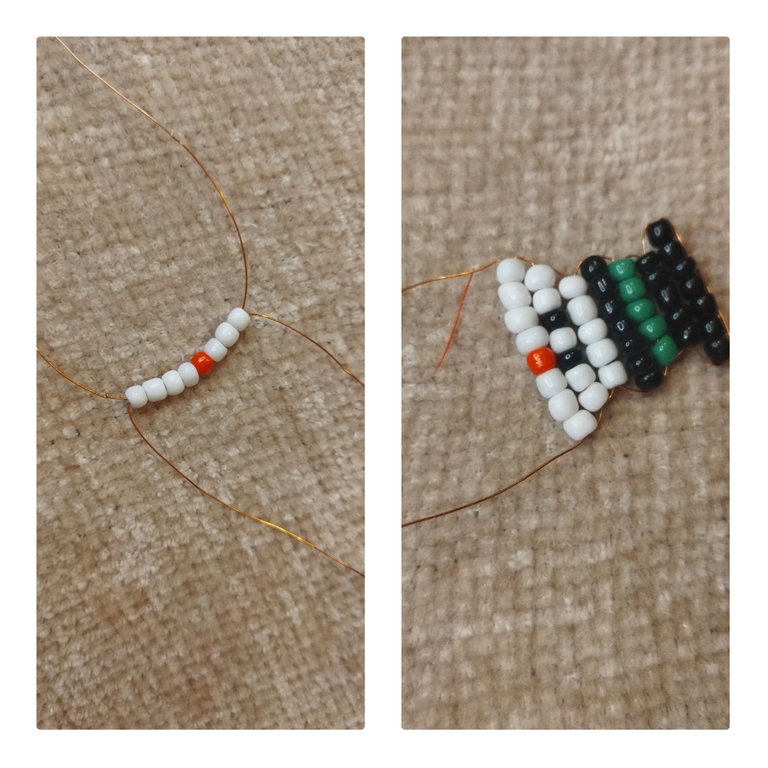
☃️ Vamos a usar 1,50 metros de alambre. Empezamos metiendo 7 mostacillas negras, la ubicamos en el centro de alambre y hacemos doble cruce.
Procedure:
☃️ We are going to use 1,50 meters of wire. We start by tucking 7 black beads, place it in the center of wire and make double cross.
☃️ En la segunda vuela metemos 5 mostacillas negras, hacemos el cruce normal de los alambres procurando que siempre queden derechas las líneas.
In the second flight we put 5 black beads, we make the normal crossing of the wires, making sure that the lines are always straight.
☃️ Se introducen en la tercer vuelta 5 mostacillas verdes y se cruzan los alambres.
☃️ 5 green beads are inserted in the third loop and the wires are crossed.
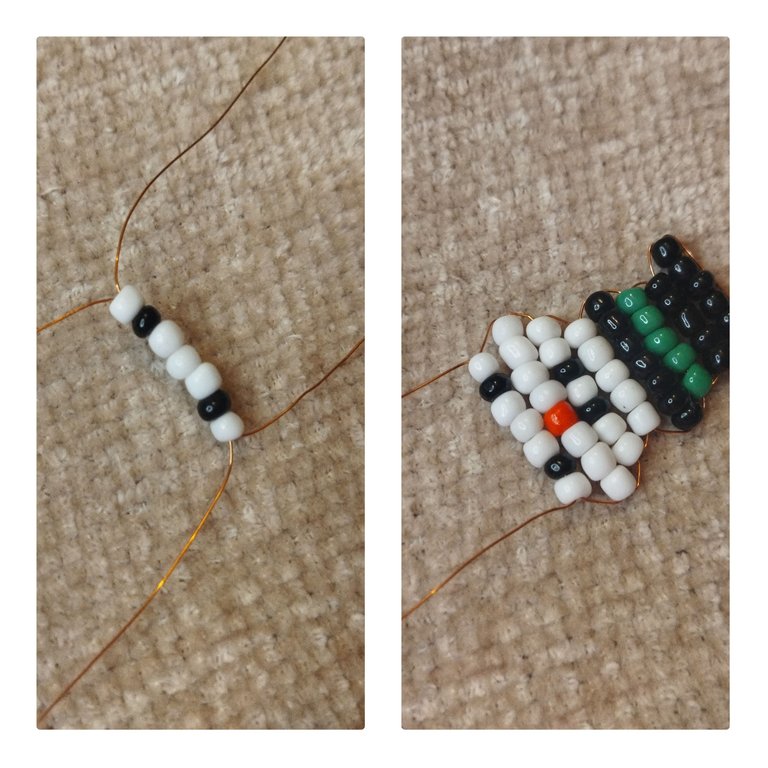
☃️ En la cuarta vuelta se pasan por el alambre 7 mostacillas negras y se cruzan los alambres. Este paso de cruzar los alambres siempre vamos a repetirlo en cada vuelta.
☃️ In the fourth round, 7 black beads are passed through the wire and the wires are crossed. This step of crossing the wires we will always repeat it in each turn.
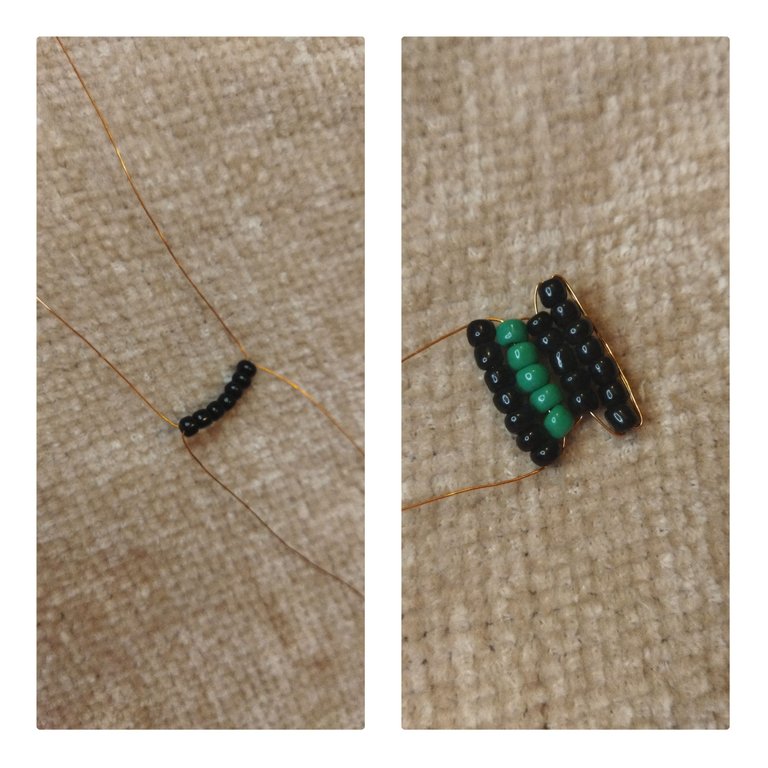
☃️ Pasamos 5 mostacillas blancas para hacer la vuelta número cinco.
☃️ We pass 5 white beads to make round number five.
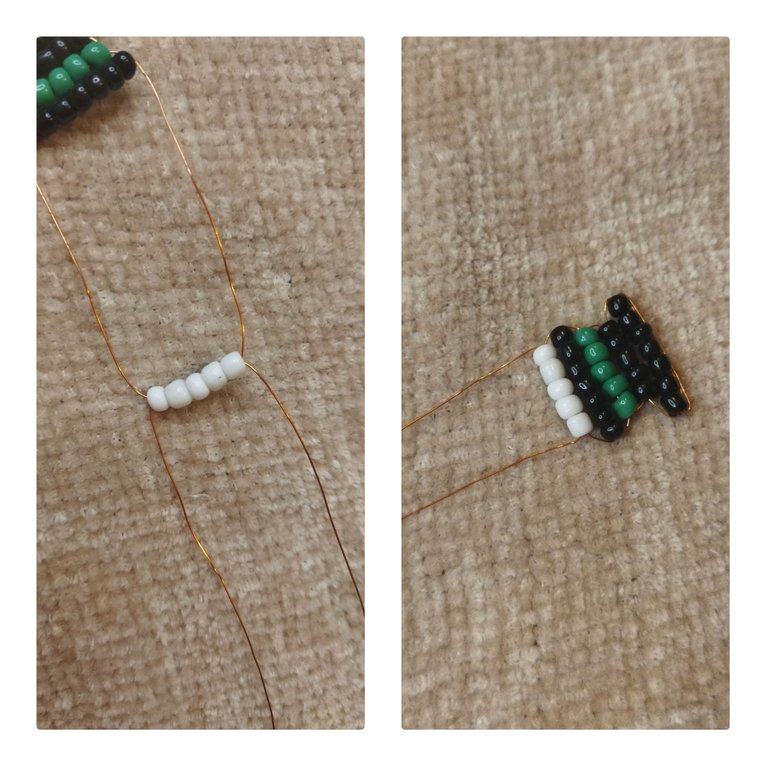
☃️ En la vuelta número seis pasaremos 2 mostacillas blancas, 1 negra, 1 blanca, 1 negra y 2 blancas. Cruzamos los alambres siempre aplanando, dejando derecha y apretada la línea.
☃️ In the sixth loop we pass 2 white, 1 black, 1 white, 1 black, 1 black and 2 white beads. We cross the wires always flattening, leaving the line straight and tight.
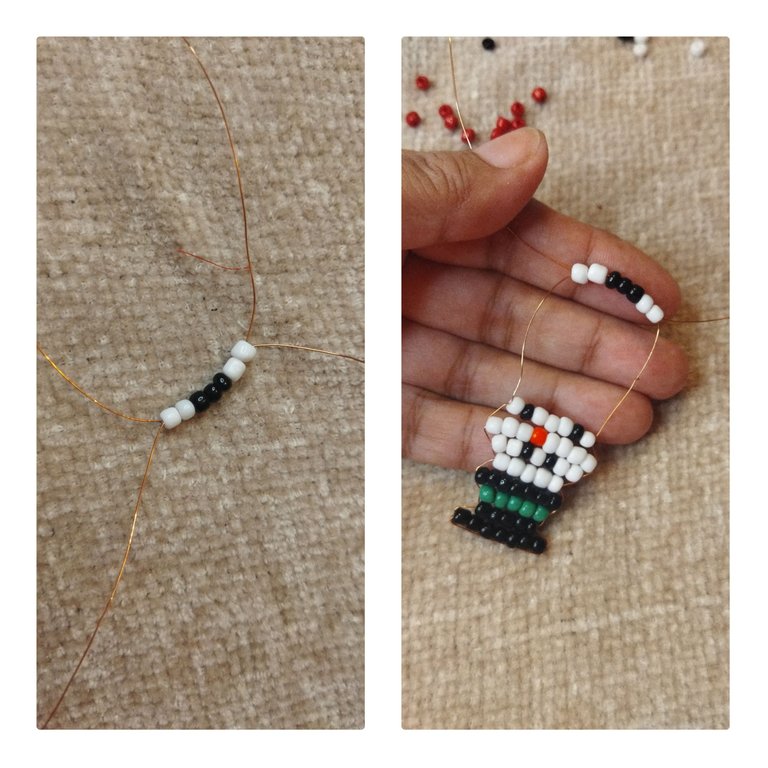
☃️ En la vuelta siete pasaremos por el mismo extremo que usamos en la vuelta anterior 3 mostacillas blancas, 1 anaranjada y 4 blancas. Cruzamos los alambres. Es importante pasar las mostacillas asegurándonos de formar la figura de manera correcta.
☃️ In the seventh row we will pass through the same end that we used in the previous row 3 white, 1 orange and 4 white beads. We cross the wires. It is important to pass the beads making sure to form the figure correctly.
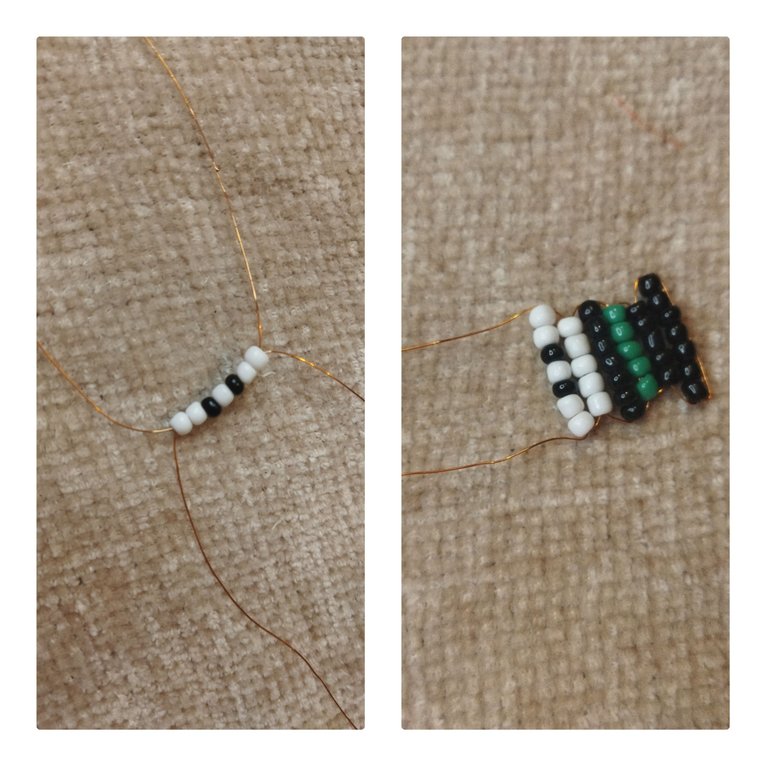
☃️ En la vuelta ocho pasamos 1 mostacilla blanca, 1 negra, 3 blancas, 1 negra y 1 blanca.
☃️ In round eight we pass 1 white, 1 black, 3 white, 1 black and 1 white mustard.
☃️ Pasaremos en la vuelta nueve 2 mostacillas blancas, 3 negras y 2 blancas.
☃️ We will pass on the back nine 2 white, 3 black and 2 white beads.
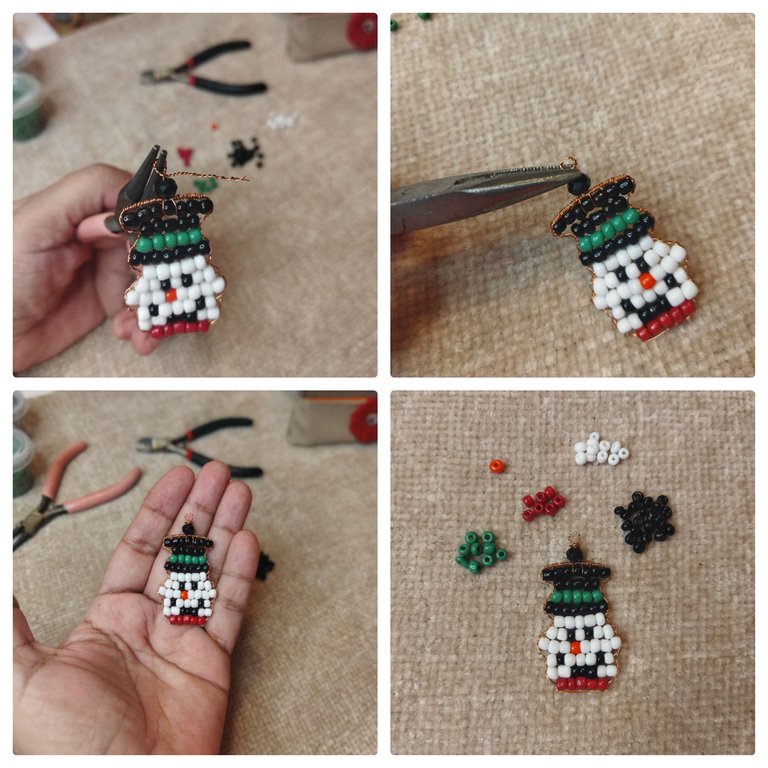
☃️ Para finalizar pasaremos 5 mostacillas rojas en la vuelta 10. En esta vuelta pasaremos doble vuelta de alambre. Es bueno hacer doble vuelta al inicio y al final para que el dije quede más firme ya que el alambre número 26 es bastante flexible.
☃️ To finish we will pass 5 red beads in the 10th row. In this loop we will pass a double loop of wire. It is good to make a double loop at the beginning and at the end to make the pendant firmer as the wire number 26 is quite flexible.
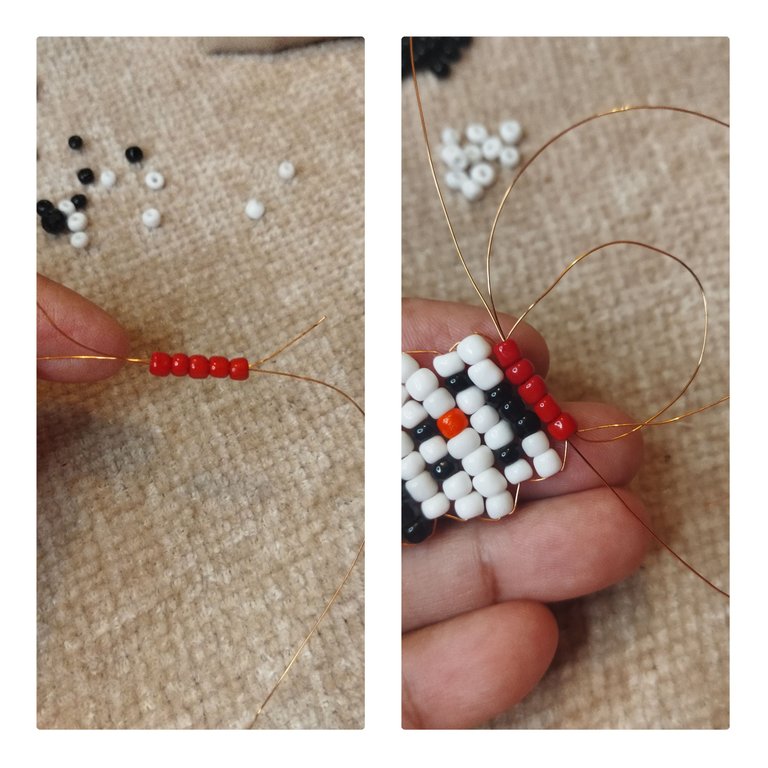
☃️ Corresponde ahora reforzar toda la figura, para ello iremos pasando cada punta por entre los espacios de alambre ubicados en los laterales del dije. Solo daremos una o dos vueltas a medida que vamos subiendo hasta llegar a la vuelta 1. Pasamos dos filas de un lado y dos filas del otro lado sin hacer mucha fuerza. Debemos ir alternando las pasadas de esta forma para que el dije no pierda la figura.
☃️ Al tener ambos alambres en la vuelta 1 haremos una pasada por el alambre visible hasta que se encuentren en medio de la vuelta. La última pasada se hará tomado el alambre de esta primera vuelta como lo ves en la foto. Después se unen los alambres sobrantes enrollándolos. Cortamos lo que no se enrolló.
It is now time to reinforce the whole figure, for this we will pass each end through the wire spaces located on the sides of the pendant. We will only make one or two turns as we go up until we reach turn 1. We pass two rows on one side and two rows on the other side without much force. We must go alternating the passes in this way so that the pendant does not lose the figure.
☃️ When we have both wires in loop 1 we will make a pass through the visible wire until they meet in the middle of the loop. The last pass will be made by taking the wire from this first loop as you see it in the photo. Then we join the remaining wires by winding them. We cut what is not wound.

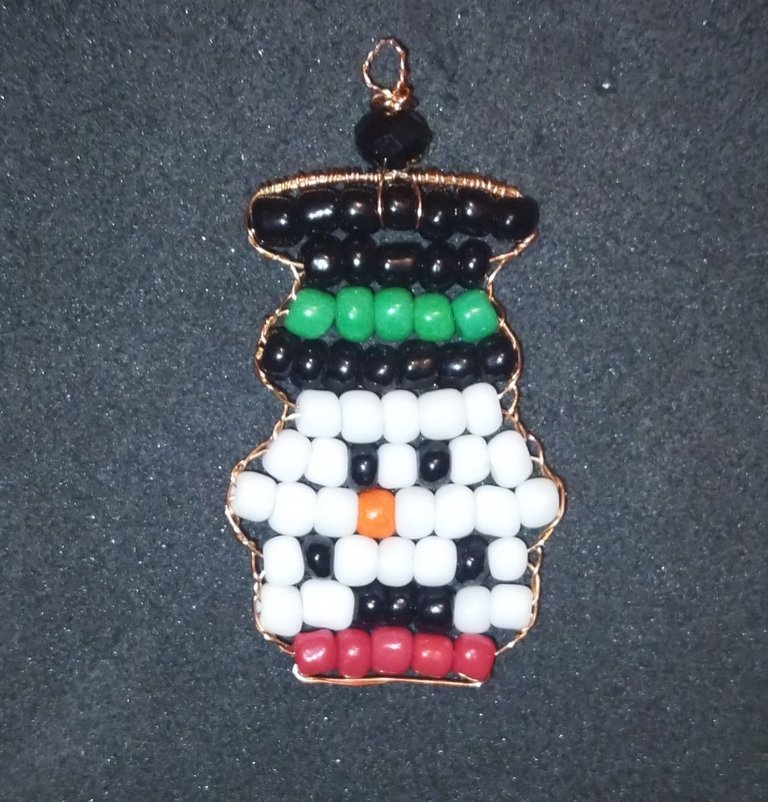
☃️ Ya la figura de Muñeco de nieve está formada. Yo la veo muy linda. Mis mostacillas no son calibradas por eso no se ve perfecta, pero sí se logra distinguir su forma. Ahora según tu gusto puedes colocar abalorios. Yo coloqué un murano color negro. No pensaba colocarlo, pero estaba entre las mostacillas y después decidí usarlo.
☃️ Solo resta hacer la argolla final por donde pasará la cadena o hilo en la que montaremos el dije. Usando la pinza mandril hacemos el aro y con el alambre sobrante vamos envolviendo la parte de abajo del aro. Con la pinza plana escondemos la punta que quedó para que no moleste.
☃️ Already the Snowman figure is formed. It looks very nice to me. My beads are not calibrated so it doesn't look perfect, but you can make out its shape. Now you can place beads according to your taste. I placed a black murano bead. I didn't plan to place it, but it was between the beads and then I decided to use it.
All that's left is to make the final ring where the chain or thread will pass through to mount the pendant. Using the mandrel pliers we make the ring and with the leftover wire we wrap the bottom of the ring. With the flat pliers we hide the remaining tip so that it does not bother us.
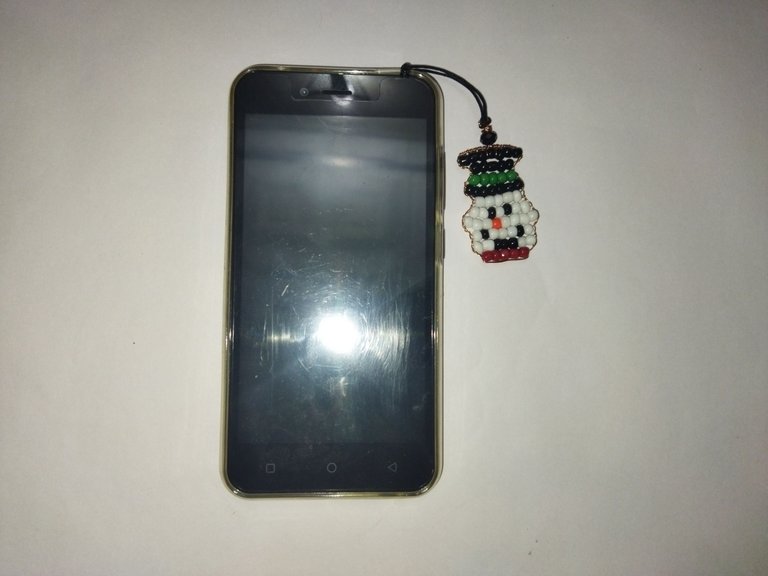
Ahora podemos darle el uso que más nos guste. En mi caso lo estrenaré ya mismo. Coloqué un poco de hilo chino color negro y lo pasé por la argolla del dije. Después lo guindé en el forro de mi teléfono. Así se ve.
Now we can use it as we like. In my case I will use it for the first time right now. I put some black Chinese thread and threaded it through the ring of the charm. Then I hung it on the lining of my phone. Here's how it looks.
☃️ Espero que este tutorial les sea útil. Todas las fotos son de mi propiedad. Edité con Polish y Picsart. Usé el traductor de DeepL. Hasta la próxima. Cuidense. Bendiciones 🤗
☃️ I hope you find this tutorial useful. All photos are my property. I edited with Polish and Picsart. I used the translator from DeepL. See you next time. Take care of yourselves. Blessings 🤗
~~~ embed:1599212381665898496 twitter metadata:MTQyMjQxMzkxNTI3NTgxMjg2NHx8aHR0cHM6Ly90d2l0dGVyLmNvbS8xNDIyNDEzOTE1Mjc1ODEyODY0L3N0YXR1cy8xNTk5MjEyMzgxNjY1ODk4NDk2fA== ~~~
The rewards earned on this comment will go directly to the people( @creacioneslelys, @mariajcastro28 ) sharing the post on Twitter as long as they are registered with @poshtoken. Sign up at https://hiveposh.com.
Congratulations, your post has been upvoted by @dsc-r2cornell, which is the curating account for @R2cornell's Discord Community.
Un dije muy navideño sin duda, nos encanta como lo fuiste formando hasta logar el resultado del muñeco, gran paso a paso amiga @creacioneslelys
Hola. Muchas gracias por apreciarlo 🙏 me gusta hacer este tipo de dijes. Es emocionante. ☃️👆😁🥳🙋✅🥂🤶
¡Hermoso! excelente trabajo, ¡felicidades!💖👏🌹
Hola amiga @anaarevalo01 bienvenida a mi blog. Muchas gracias por tu comentario.
Te quedo genial amiga, y con alambre, que lindo tutorial.
Hola. Buen día. Gracias, también me gustó el resultado ☃️
Te quedo precioso @creacioneslelys! Muy bueno el tutorial del paso a paso y el resultado hermoso. Gracias Lelys!❤️
Muchísimas gracias amiga. Me encantó hacerlo.
Quedo genial, me encanta el toque del sobrero, me encanta que acabamos un accesorio para el teléfono 😍😍
Hola 🙋 muchas gracias. Me alegra saber que te gustó 🥳
Que belleza amiga. La verdad me gustaría intentar ago así con ese tipo de alambre ya que tengo disponible. Vamos a ver y pensar que podría hacer en algún momento. Me encantó el detalle que le hiciste a tu celular, siempre nosotras mismas debemos obsequiarnos algo, y nos llena de satisfacción que este hecho con nuestras manos. Bello día amiga @creacioneslelys 🎄😘🥰🤗❤️✨
Hola. Feliz tarde. Es muy entretenido realizar este tipo de dijes. Estos modelos son realmente sencillos. Seguro que sí harás muchos accesorios bellos con alambre. 🙋🥂🤶👏🤗👆😁🙏☺️☃️🤓
Thank you for sharing this post on HIVE!
Your content got selected by our fellow curator semarekha & you just received a little thank you upvote from us for your great work! Your post will be featured in one of our recurring compilations which are aiming to offer you a stage to widen your audience within the DIY scene of Hive. Next time make sure to post / cross-post your creation within the DIYHub community on HIVE and you will receive a higher upvote ;) Stay creative & HIVE ON!
Please vote for our hive witness <3
Thank you 🤗
You're welcome.
Bellísimo
Muchas gracias ☃️
Te quedó lindo @creacioneslelys, me gustó muchísimo, feliz comienzo de navidad.
Hola amiga. Me alegra saber que te gustó. Saludos y felices fiestas 🥳
One of the things I enjoy about your creative work is the color combinations and the steps you do provide. The charm gave the phone another good look.
Hello friend, I hope you are well. Thank you very much for your words, I value them very much. 🙋🥳☃️👏🤶🤗🙏☺️
LINDO TRABAJO AMIGA...EXCELENTE PARA OBSEQUIAR EN ESTOS DIAS. SALUDOS
Hola. Si. Muchas gracias. Se pueden hacer varios en un día 👏
hermoso y espectacular estimada.
felicidades.
felices fiesta.
Hola. Muchas gracias ☺️ igual para ti ☃️