Holaa!!💜✨
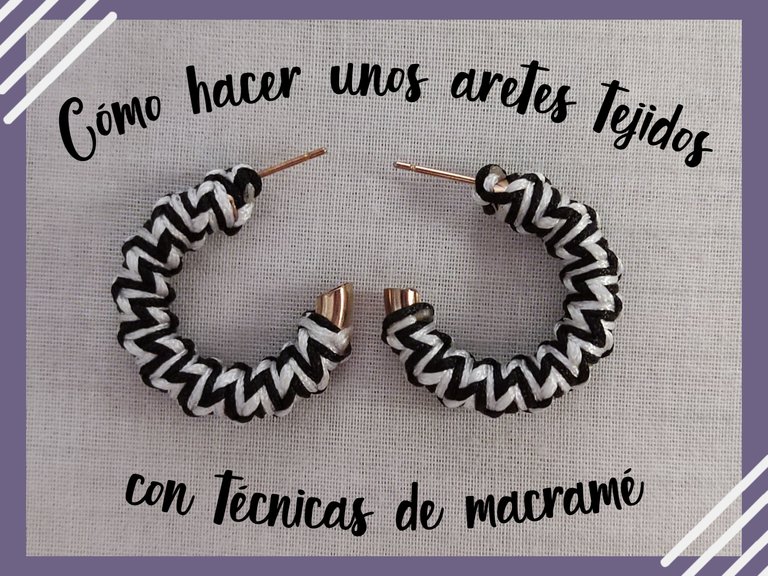
El día de hoy quiero compartirles este tutorial paso a paso de cómo hacer unos aretes tejidos usando técnicas de macramé.
Aprendí este arte cuando apenas iniciaba mi carrera universitaria, me lo enseñó mi mejor amiga Patricia, y aprender de este arte fue en su momento una ayuda económica para mí, ya que vendía pulseras y collares para pagar mis gastos universitarios. Hoy en día, se volvió una actividad que realizo para liberar estrés.
En el macramé existen muchas técnicas y formas de tejido muy bonitas, pero el día de hoy les voy a enseñar la técnica de "Tejido en espiral", muy fácil de ejecutar y se darán cuenta a continuación.
Helloo!!!💜✨
Today I want to share with you this step by step tutorial on how to make some woven earrings using macramé techniques.
I learned this art when I was just starting my college career, it was taught to me by my best friend Patricia, and learning this art was at the time an economic help for me, since I was selling bracelets and necklaces to pay my college expenses. Today, it has become an activity that I do to release stress.
In macramé there are many beautiful weaving techniques and forms, but today I am going to show you the "Spiral Weaving" technique, which is very easy to execute and you will see it below.
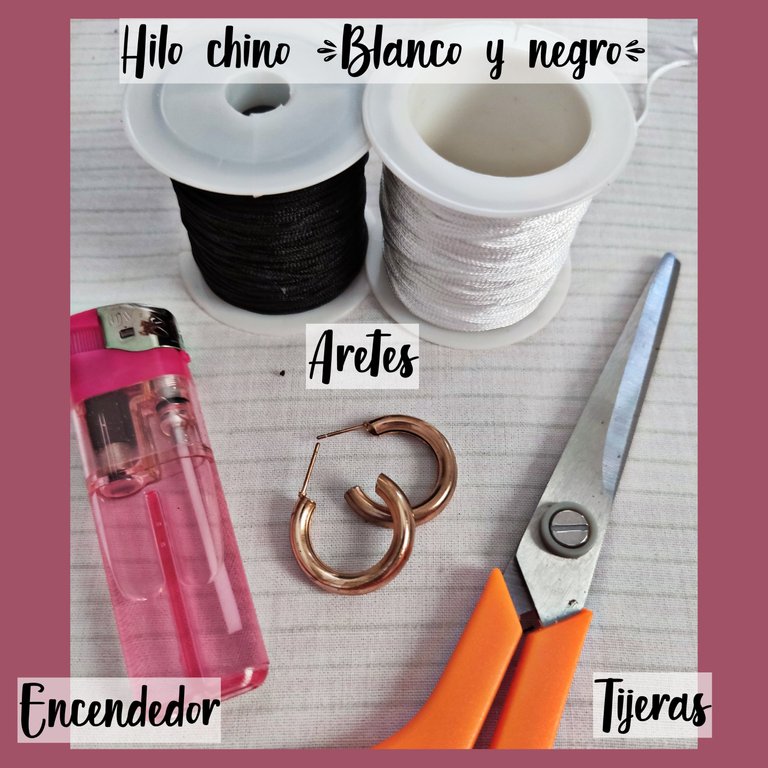
Para empezar el tutorial, primero debemos saber que materiales utilizar, en mi caso:
- Hilo chino o encerado blanco y negro
- Un par de aretes que no utilices o se te hayan oxidado
- Tijeras
- Encendedor
Observación: Prefiero utilizar hilo chino o encerado en vez del hilo común, porque este agarra una forma más bonita al tejer y al quemar las puntas se crea una especie de pega que permite sellar perfectamente el final de tu creación.
To start the tutorial, first we must know what materials to use, in my case:
- Chinese thread or black and white waxed thread.
- A pair of earrings that you don't use or that you have rusted
- Scissors
- Lighter
Note: I prefer to use Chinese or waxed thread instead of regular thread, because it holds a nicer shape when weaving and burning the ends creates a kind of glue that allows you to perfectly seal the end of your creation.
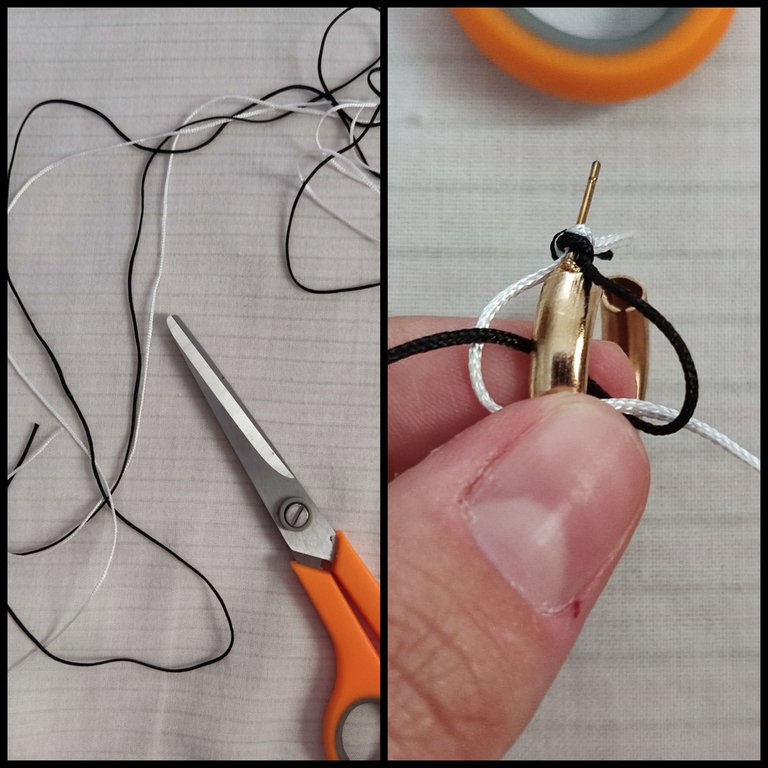
Para iniciar, depende del largo o la circunferencia de tu argolla, cortaremos el hilo.
Yo utilicé 1.5 metros de cada color para las dos argollas. Luego, uní las dos puntas e hice un nudo simple al comienzo, e introduje por el mismo, el palito de mi argolla, así como muestro en la fotografía.
De este modo, puedo tener fijo el hilo para empezar a tejer, más tarde, al terminar el tejido este nudo se deshace y se sellan las puntas con el encendedor para tener un acabado impecable.
To start, depending on the length or circumference of your ring, we will cut the thread.
I used 1.5 meters of each color for the two rings. Then, I joined the two ends and made a simple knot at the beginning, and introduced through it, the stick of my ring, as shown in the picture.
In this way, I can have the thread fixed to start weaving, later, when I finish weaving, this knot is undone and the ends are sealed with the lighter to have an impeccable finish.
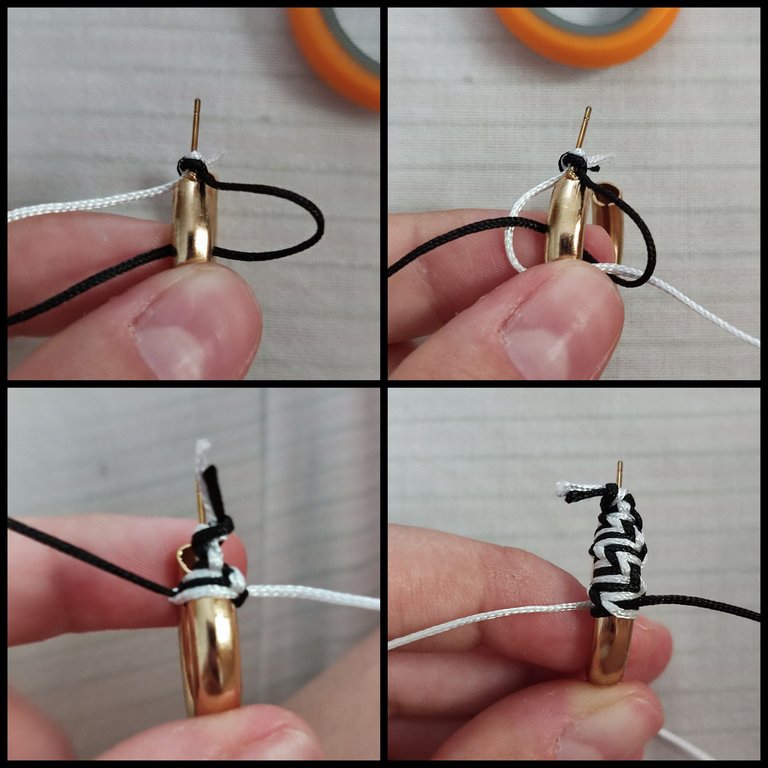
Entonces, al tener cada hilo en su lugar (A cada lado), empezaremos cruzando por debajo o haciendo una especie de "C" con el hilo derecho y el hilo izquierdo, lo pasaremos por debajo del hilo derecho y por encima de la "C" y apretamos fuerte.
Then, having each thread in place (on each side), we will start by crossing under or making a kind of "C" with the right thread and the left thread, we will pass it under the right thread and over the "C" and tighten it tightly.

Este mismo paso, lo repetiremos hasta tejer toda la argolla, es importante que apretemos bien cada nudo.
Esta técnica se llama "Tejido de espiral", pero para que se vea más bonito podemos ir dándole más forma de espiral al apretar y ajustar el tejido, para que se vea lo más tupido posible.
Al finalizar, vamos a cortar los sobrantes y sellaremos las puntas con el encendedor, y desharemos el nudo del inicio, sellando las puntas igualmente.
This same step, we will repeat it until we weave the whole ring, it is important that we tighten each knot well.
This technique is called "spiral weaving", but to make it look more beautiful we can give it more of a spiral shape by tightening and adjusting the weave, so that it looks as tight as possible.
At the end, we will cut the leftovers and seal the ends with the lighter, and we will undo the knot at the beginning, sealing the ends as well.
Luego, repetiremos el mismo proceso en la otra argolla y listo!
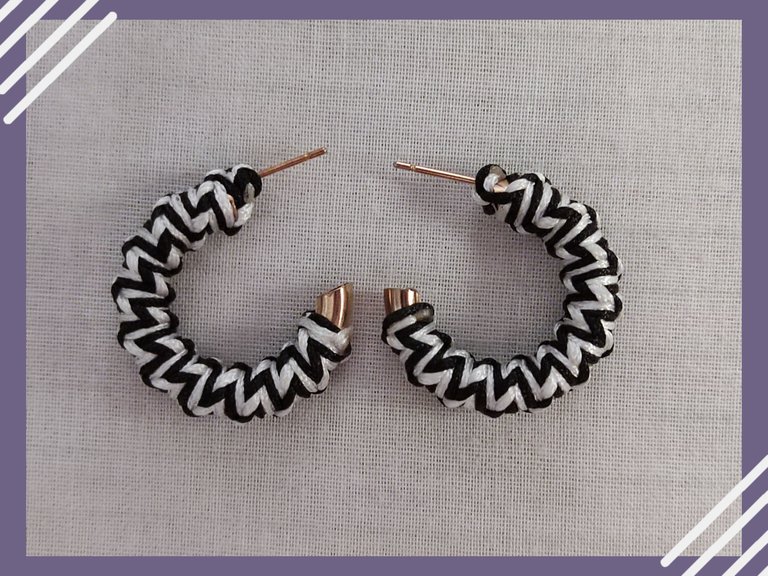
Este es el resultado, un hermoso par de aretes con un llamativo tejido que te hará lucir hermosa y robarte todas las miradas!💜✨
Lo mejor de elaborar tus propios accesorios es que puedes personalizarlo y llevar tus ideas a la vida, con diferentes colores, piedras preciosas y más.
Espero les haya gustado mi tutorial, y puedan recrearlo.
✨¡¡Hasta la próxima!!✨
Then, we will repeat the same process on the other earring and that's it!
This is the result, a beautiful pair of earrings with a striking weave that will make you look beautiful and steal all the looks!💜✨
The best thing about making your own accessories is that you can customize it and bring your ideas to life, with different colors, gemstones and more.
I hope you liked my tutorial, and you can recreate it.
✨See you next time!✨✨

Todas las fotografías son de mi autoría tomadas con mi celular POCO X3 Pro
Ediciones elaboradas con PicsArt
Traducido en DeepL
All photographs are my own, taken with my POCO X3 Pro cell phone
Editions made with PicsArt
Translated at DeepL
~~~ embed:1571968270344884227 twitter metadata:SmV3ZWxyeTIwMjN8fGh0dHBzOi8vdHdpdHRlci5jb20vSmV3ZWxyeTIwMjMvc3RhdHVzLzE1NzE5NjgyNzAzNDQ4ODQyMjd8 ~~~
The rewards earned on this comment will go directly to the people( @emybaby ) sharing the post on Twitter as long as they are registered with @poshtoken. Sign up at https://hiveposh.com.
Me gustan los aretes redondos, éste tejido y el color que utilizaste son muy bonitos de combinar con la ropa.
Fué buena elección utilizar dos colores, hace mostrar el estilo del tejido, hermoso trabajo.
Gracias por apreciar mi trabajo, amiga, un abrazo 💜
Excelente tutorial amiga @emybaby nos encanta el tejido Macrame y el color utilizado es genial hace un contraste muy bonito, estas argollas te han quedado preciosas, Excelente trabajo 😉
Gracias ❤️
!discovery 25
This post was shared and voted inside the discord by the curators team of discovery-it
Join our community! hive-193212
Discovery-it is also a Witness, vote for us here
Delegate to us for passive income. Check our 80% fee-back Program
Your content has been voted as a part of Encouragement program. Keep up the good work!
Use Ecency daily to boost your growth on platform!
Support Ecency
Vote for new Proposal
Delegate HP and earn more
Hermoso trabajo @emybaby👏💖
Gracias ❤️
Me encanta trabajar este tipo de aretes, siempre son un accesorio para cualquier ocasión @emybaby la combinación de colores está perfecta nos dará un toque distintivo en el outfit diario.
Ciertamente amiga, gracias por leer mi post❤️