Holaa!!🪷
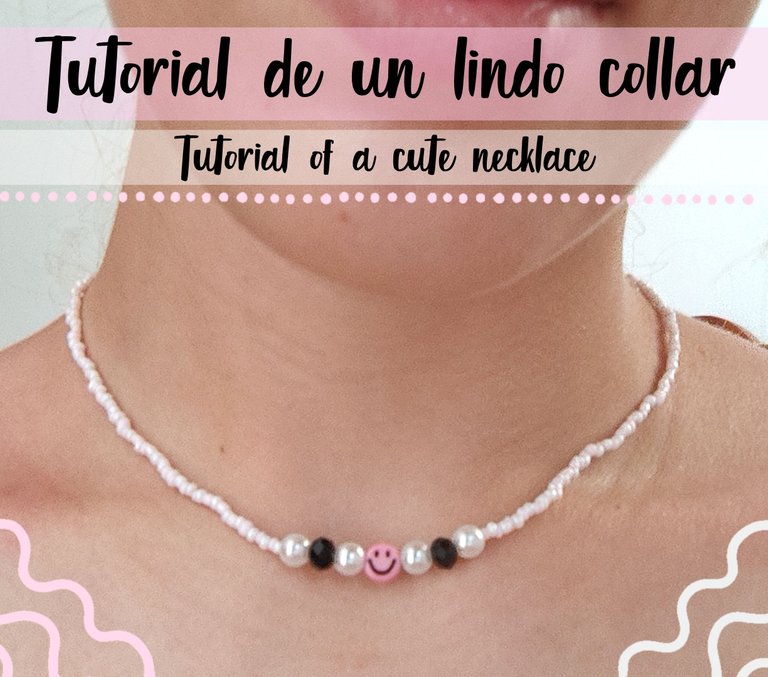
Buscando nuevas comunidades para experimentar en otras áreas, me encontré con esta linda comunidad en la que puedes compartir tutoriales de joyería o cualquier ámbito de la misma, así que como tenía material en casa me dispuse a realizar un fácil tutorial de cómo hacer este collar que ven en la portada de mi post.
Para ello utilizaremos los siguientes materiales:
- Hilo nylon transparente
- Abalorios del color y forma de tu preferencia
- Miyuki, en mi caso utilicé blanco y rosa
- Broche de metal
- Aro de metal para cerrar
- Tijera
- Encendedor
Hii!!!🪷
Looking for new communities to experiment in other areas, I came across this nice community where you can share jewelry tutorials or any area of jewelry, so since I had material at home I set out to make an easy tutorial on how to make this necklace you see on the cover of my post.
For this we will use the following materials:
- Transparent nylon thread
- Beads of the color and shape of your choice.
- Miyuki, in my case I used white and pink
- Metal brooch
- Metal ring for closing
- Scissors
- Lighter
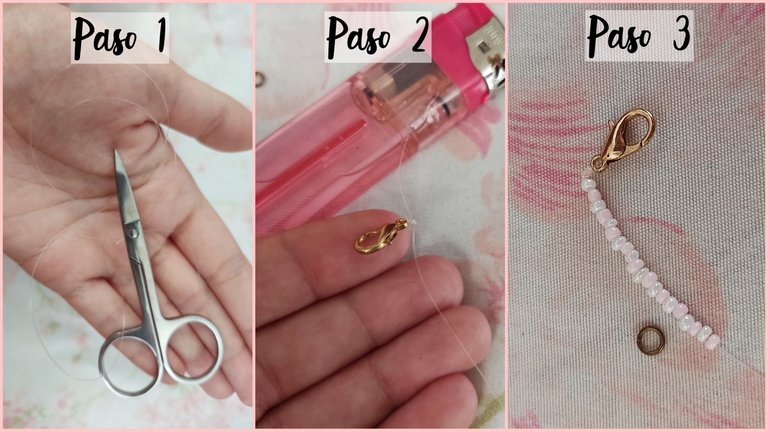
Para iniciar, empezamos recortando un pedazo de nylon del doble de tamaño de la circunferencia de nuestro cuello depende de que tan largo o corto lo querramos. Luego, vamos a meter una de las puntas del hilo de nylon por el orificio del broche de metal, y haremos unos cuantos nudos, para después sellar con el encendedor.
Seguido de esto, vamos a insertar de uno a uno varios miyukis con colores intercalados, hasta que lleguemos a la mitad de la circunferencia de nuestro cuello en el largo del hilo que recortamos ya.
To start, we start by cutting a piece of nylon about twice the size of the circumference of our neck, depending on how long or short we want it to be. Then, we are going to put one of the ends of the nylon thread through the hole of the metal clasp, and we will make a few knots, and then seal it with the lighter.
After this, we are going to insert one by one several miyukis with interspersed colors, until we reach half the circumference of our neck in the length of the thread that we already cut.
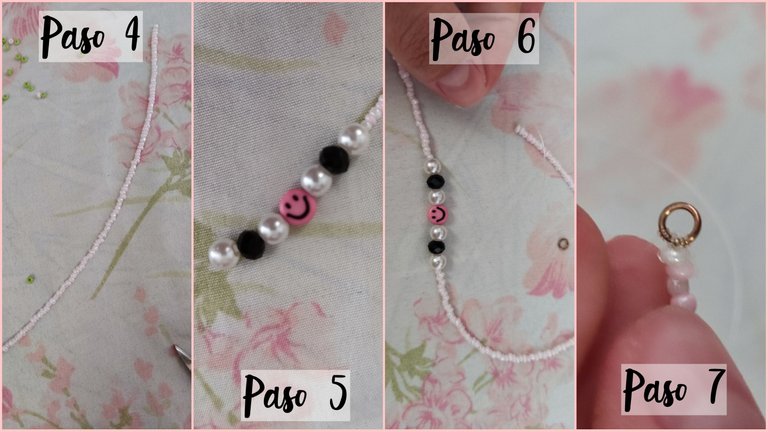
Cuando ya tengamos ese largo como guía, insertaremos los abalorios que hemos elegido para nuestro collar, en mi caso yo elegí:
- 4 perlas de fantasía
- 2 abalorios negros de plástico
- 1 carita feliz de masa flexible
Después, haremos el mismo paso del inicio, insertar miyukis intercalados, hasta obtener el largo correcto para nuestro collar. Luego, haremos varios nudos en el aro de metal, y ese hilo sobrante lo insertaremos a través de todo el collar, para reforzarlo y que no se nos rompa tan fácil. Luego, hacemos un último nudo y sellamos con el encendedor.
Once we have that length as a guide, we will insert the beads we have chosen for our necklace, in my case I chose:
- 4 fancy pearls
- 2 black plastic beads
- 1 flexible dough smiley face
Next, we will do the same step as at the beginning, inserting miyukis in between, until we get the right length for our necklace. Then, we will make several knots in the metal ring, and we will insert the excess thread through the whole necklace, to reinforce it so it won't break so easily. Then, we make a last knot and seal it with the lighter.
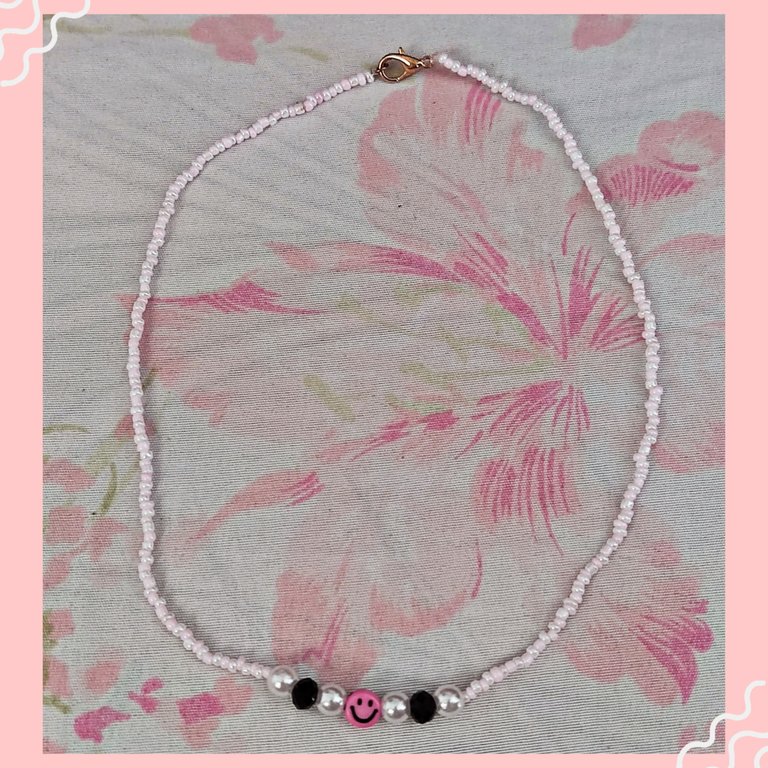
Este fue el resultado, espero se animen a crear sus propias joyas siguiendo mi tutorial, lo bueno de crearlas uno mismo a parte de la personalización que cada quién le da, esta el hecho de hacer una actividad recreativa para pasar el rato, y además que es muy divertido!!🪷
Hasta la próxima!!💜
This was the result, I hope you are encouraged to create your own jewelry following my tutorial, the good thing about creating them yourself apart from the customization that everyone gives it, is the fact of doing a recreational activity to pass the time, and it is also very fun!!!🪷
See you next time!!!💜

Todas las fotografías son de mi autoría tomadas con mi celular POCO X3 Pro
Ediciones elaboradas con PicsArt
Traducido en DeepL
All photographs are my own, taken with my POCO X3 Pro cell phone
Editions made with PicsArt
Translated at DeepL
The rewards earned on this comment will go directly to the people( @emybaby ) sharing the post on Twitter as long as they are registered with @poshtoken. Sign up at https://hiveposh.com.
Has sido votado por
PROYECTO ENLACE
'Conectando Ideas y Comunidades'
PROYECTO ENLACE es un proyecto de curación de habla hispana enfocado en recompensar contenido de calidad y apoyar autores en su proceso de crecimiento en HIVE.
Creemos y apostamos por el futuro de esta gran plataforma, y estamos muy emocionados de poder hacerla crecer junto a esta comunidad. Así que te invitamos a usar nuestra etiqueta ENLACE y estar atento a todas las actividades que tenemos preparadas y que estaremos publicando en breve.
¿QUIERES AUTOMATIZAR TUS GANANCIAS DE CURACIÓN? SE PARTE DEL PROYECTO ENLACE APOYANDO A NUESTRO TRAIL EN HIVE.VOTE INGRESA AQUÍ PARA CONOCER LOS DETALLES.
¿QUIERES INVERTIR ENLACE? DESCUBRE COMO HACERLO Y GENERAR INGRESOS DE FORMA SEMANAL MEDIANTE TU DELEGACIÓN DE HP AQUÍ TE EXPLICAMOS COMO.
Te invitamos a participar en nuestro servidor de Discord: https://discord.gg/3S9y7BbWfS
Atentamente
EQUIPO ENLACE 2022
Bienvenida a la comunidad amiga @emybaby que bueno tenerte por aquí, te invitamos primeramente a leer las reglas de la comunidad ya que los post deben ser de más de 1000 palabras si es en dos idiomas y 500 solo en inglés.
El tutorial te ha quedado muy bonito, es entendible y el collar muy de moda astethic muy chic, saludos