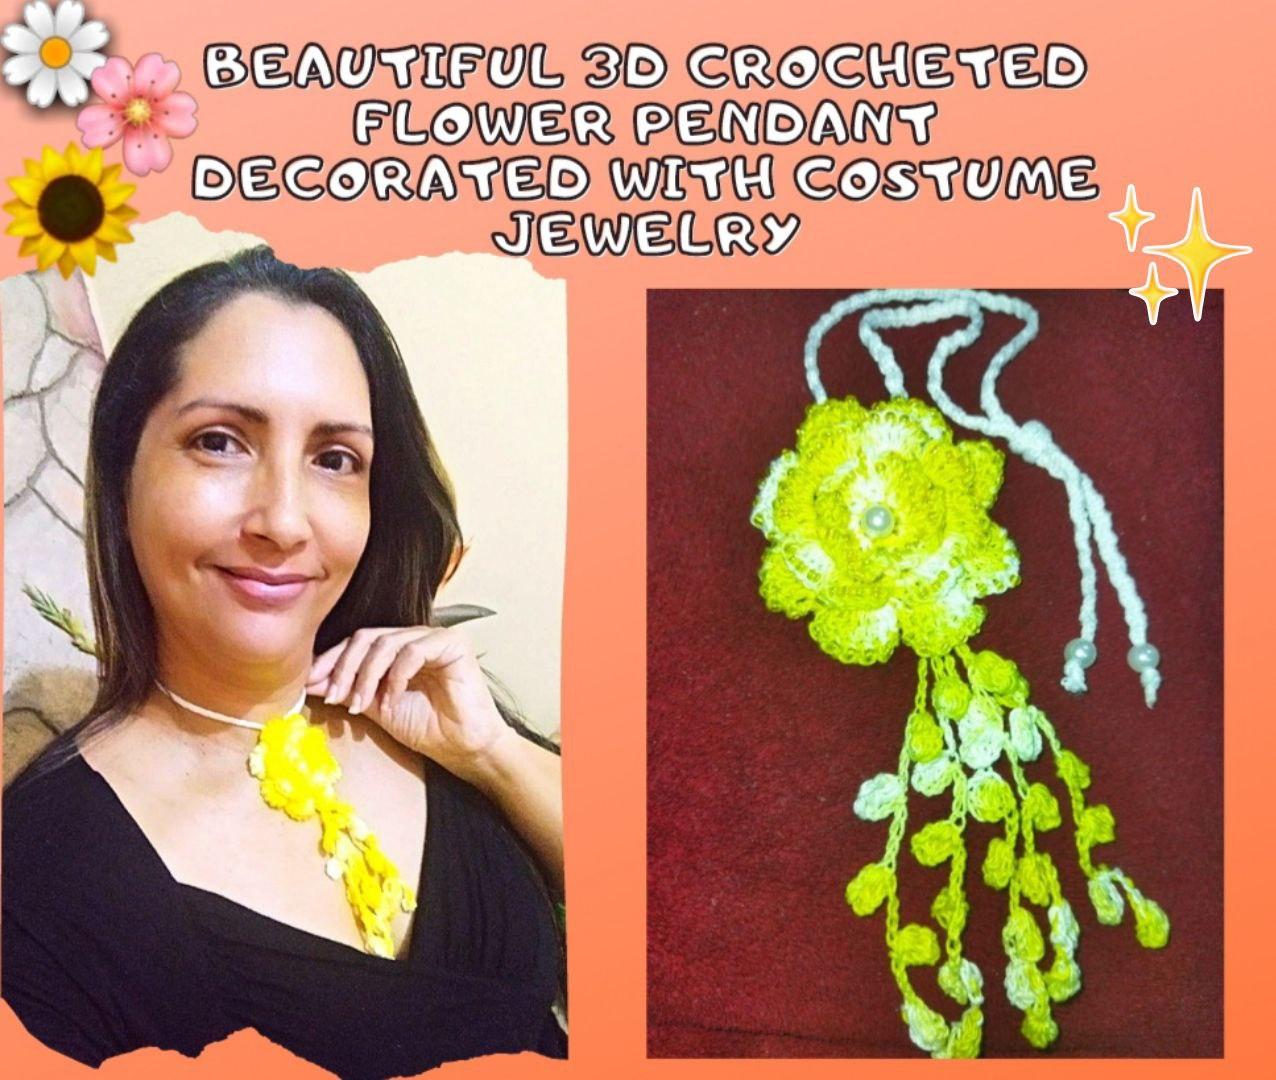

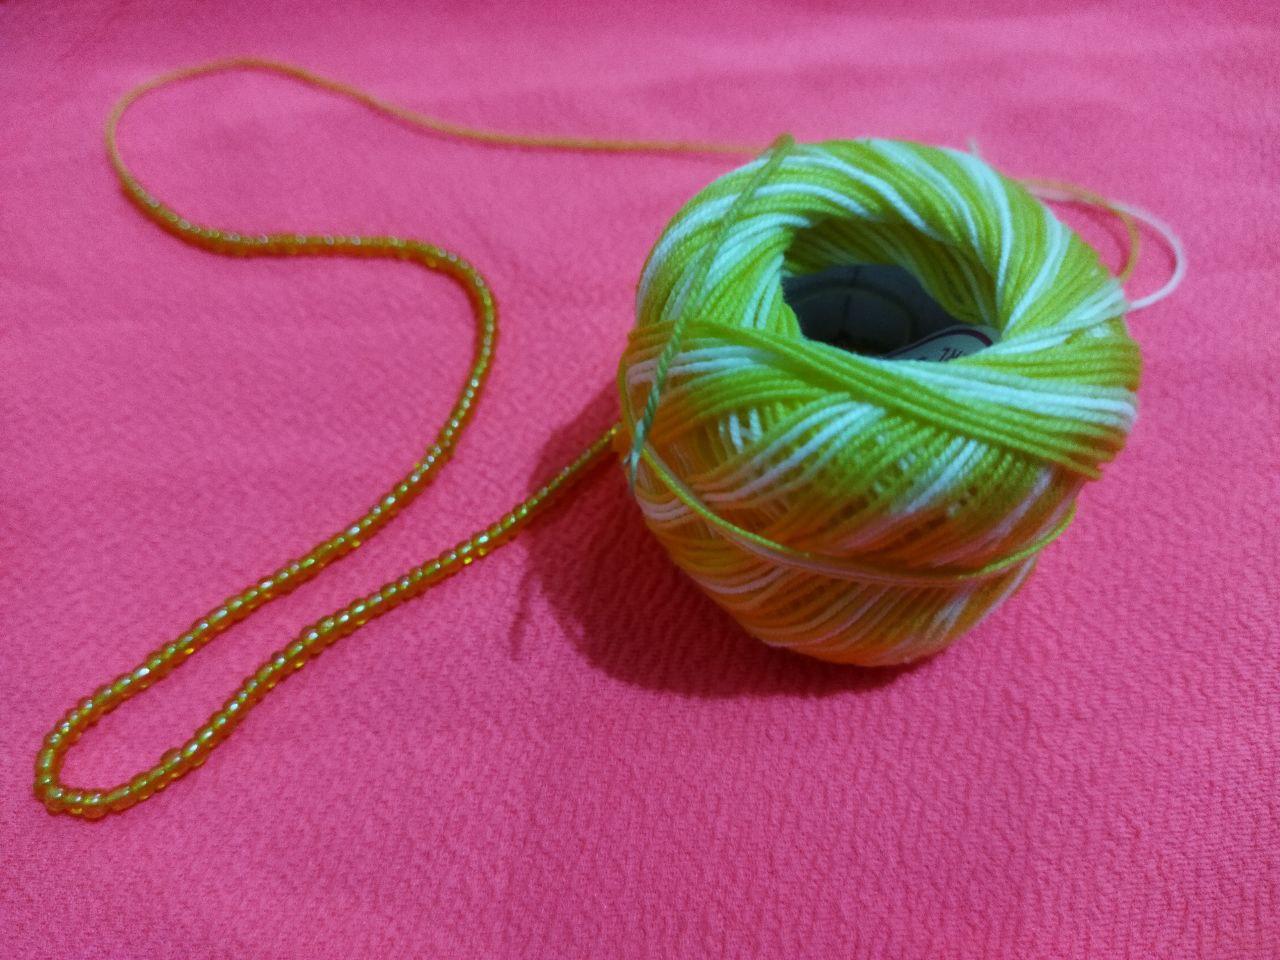
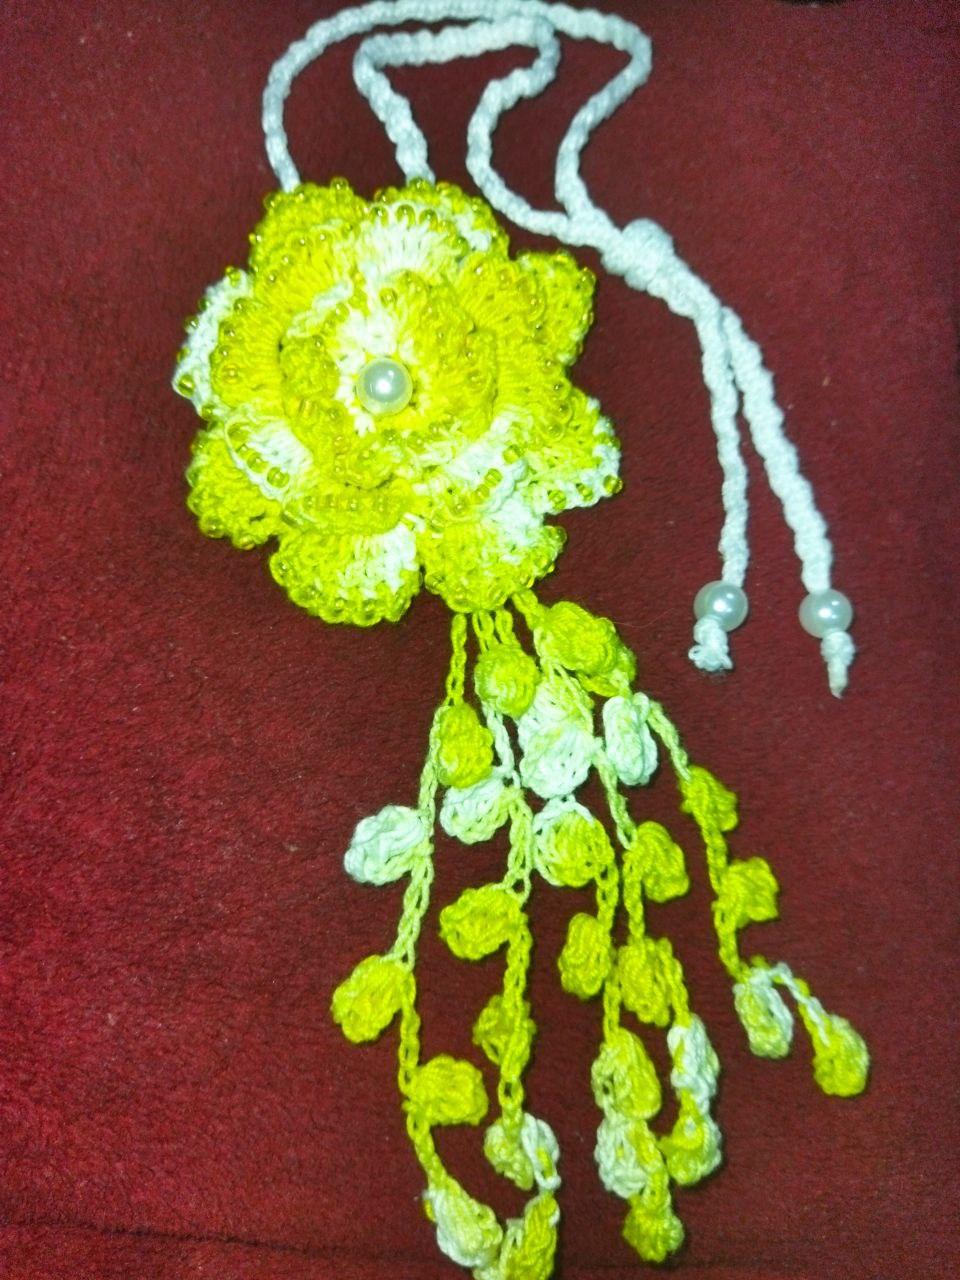
Un saludo mi querida comunidad @Jewelry feliz día 💙 el tejido a crochet es versátil puedes realizar lo que menos te imaginas con el, hasta hermosas prendas y accesorios del color que quieras y ademas añadirles cuentas y bisutería para hacerlas brillar. Hoy les comparto una flor en 3D con pétalos colgantes que puedes darle la utilidad que mas te agrade; desde un shocker o collar hasta un lindo accesorio para el cabello. Para esto utilice un hilo color amarillo matizado que va degradado desde un amarillo intenso hasta terminar en color blanco ademas le fui agregando pequeñas cuentas en cada pétalo conocidas como mostacillas que la hacen lucir muy elegante y le dan un acabado muy delicado a la prenda. Ahora materiales en manos que comenzamos con nuestro paso a paso
Greetings my dear community @Jewelry happy day 💙 crochet knitting is versatile you can make what you least imagine with it, even beautiful garments and accessories of the color you want and also add beads and jewelry to make them shine. Today I share with you a 3D flower with hanging petals that you can use in any way you like; from a shocker or necklace to a cute hair accessory. For this I used a nuanced yellow thread that goes from an intense yellow to a white color and I also added small beads in each petal known as beads that make it look very elegant and give a very delicate finish to the garment. Now materials in hands we start with our step by step

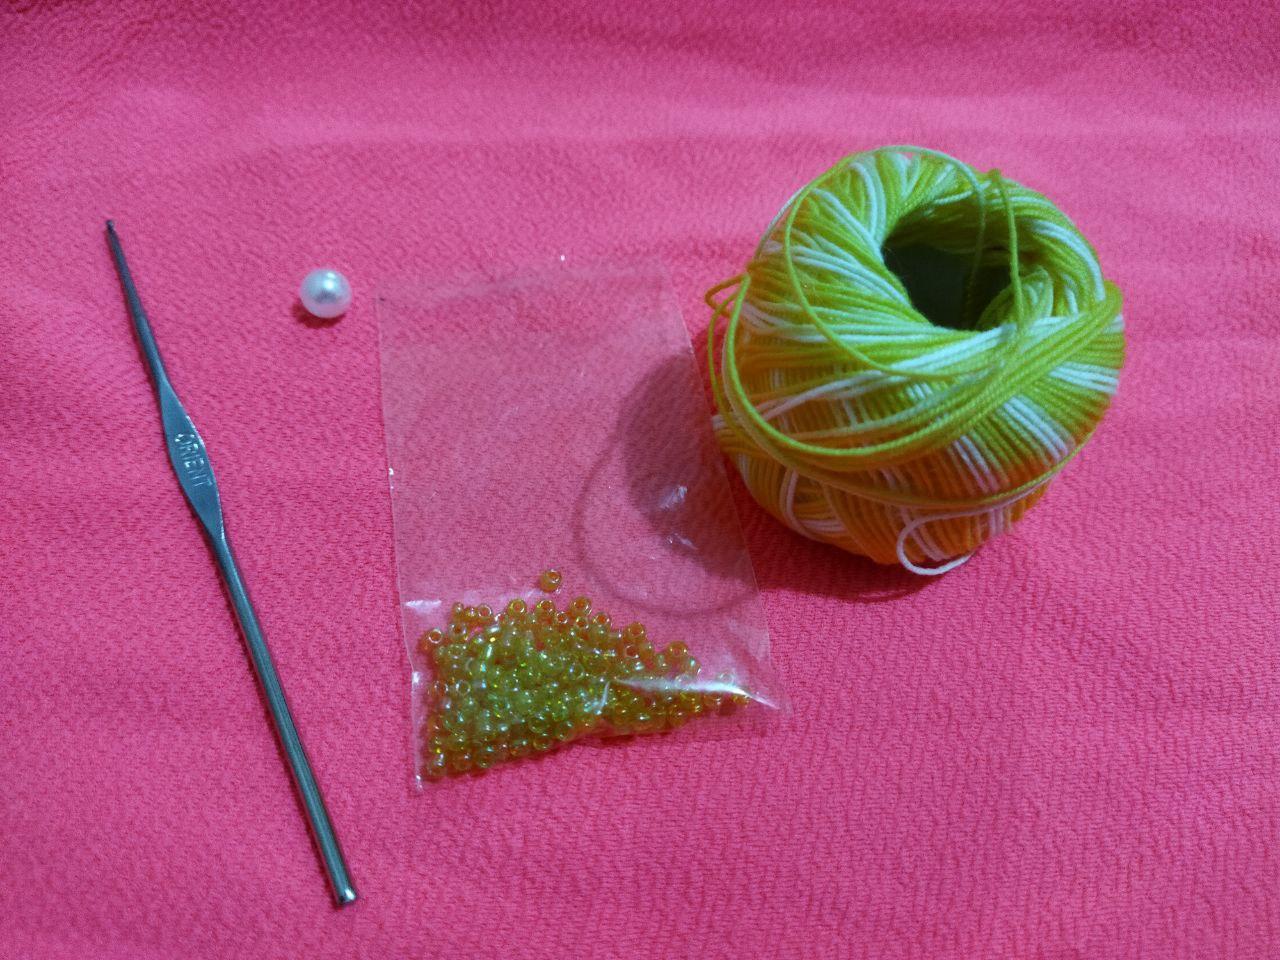
- Hilo de crochet amarillo matizado
- 3 dedales de mostacillas amarillas
- Perla blanca
- Aguja para crochet
- Silicona caliente
- Cordón blanco
- Tinted yellow crochet thread
- 3 thimbles of yellow beads
- White pearl
- Crochet needle
- Hot silicone
- White cord
Antes de comenzar a elaborar esta hermosa flor en 3D lo primero que debemos hacer es insertar la cantidad de cuentas de mostacilla que sean necesarias por el hilo, utilice aproximadamente 3 dedales. Para facilitar el ensartado quemamos con un encendedor la punta del hilo para hacerla mas delgada
Before starting to make this beautiful 3D flower, the first thing to do is to insert as many beads as necessary through the thread, use approximately 3 thimbles. To facilitate the stringing we burn with a lighter the tip of the thread to make it thinner.
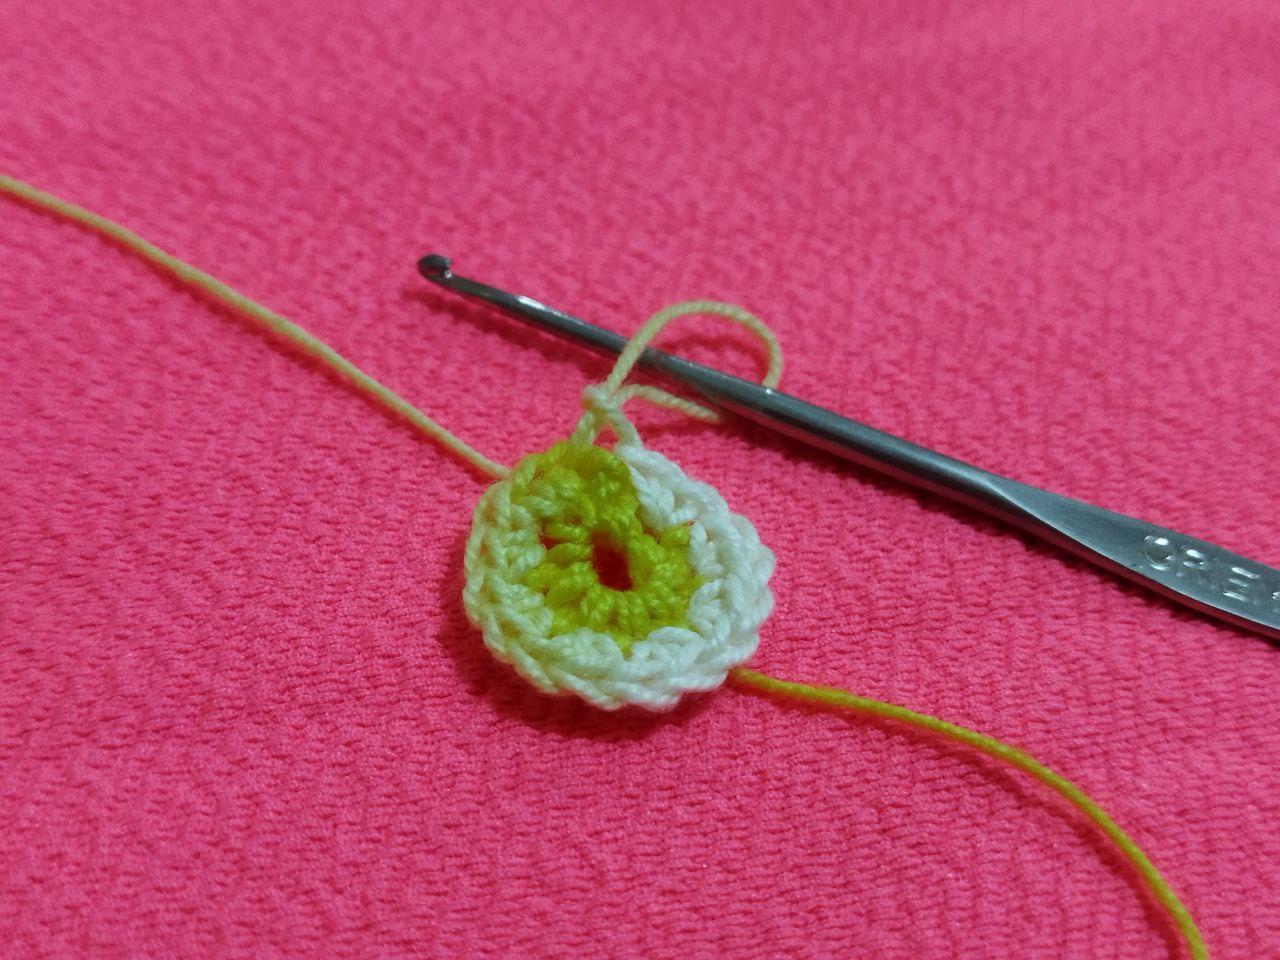
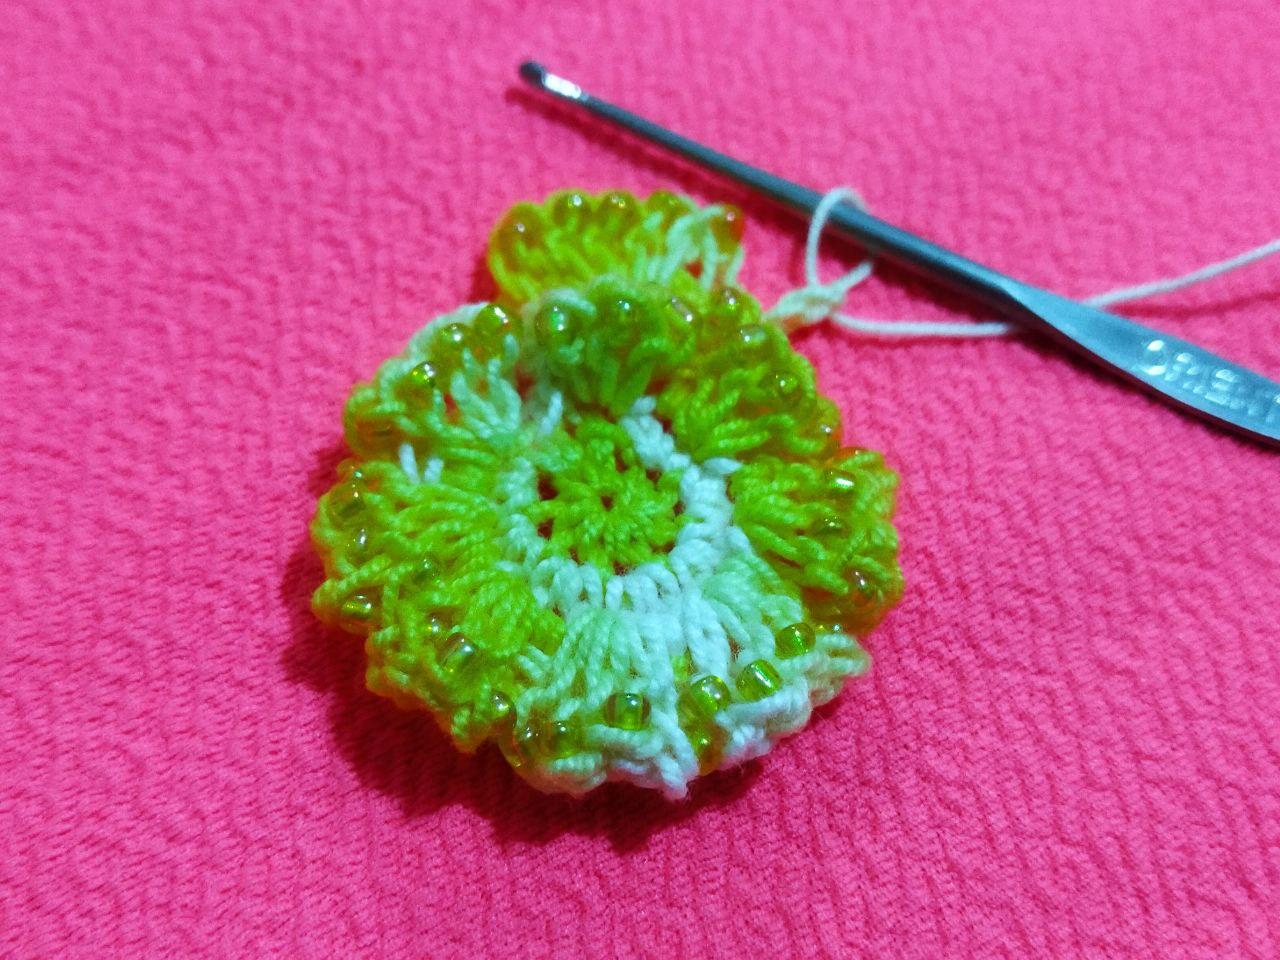
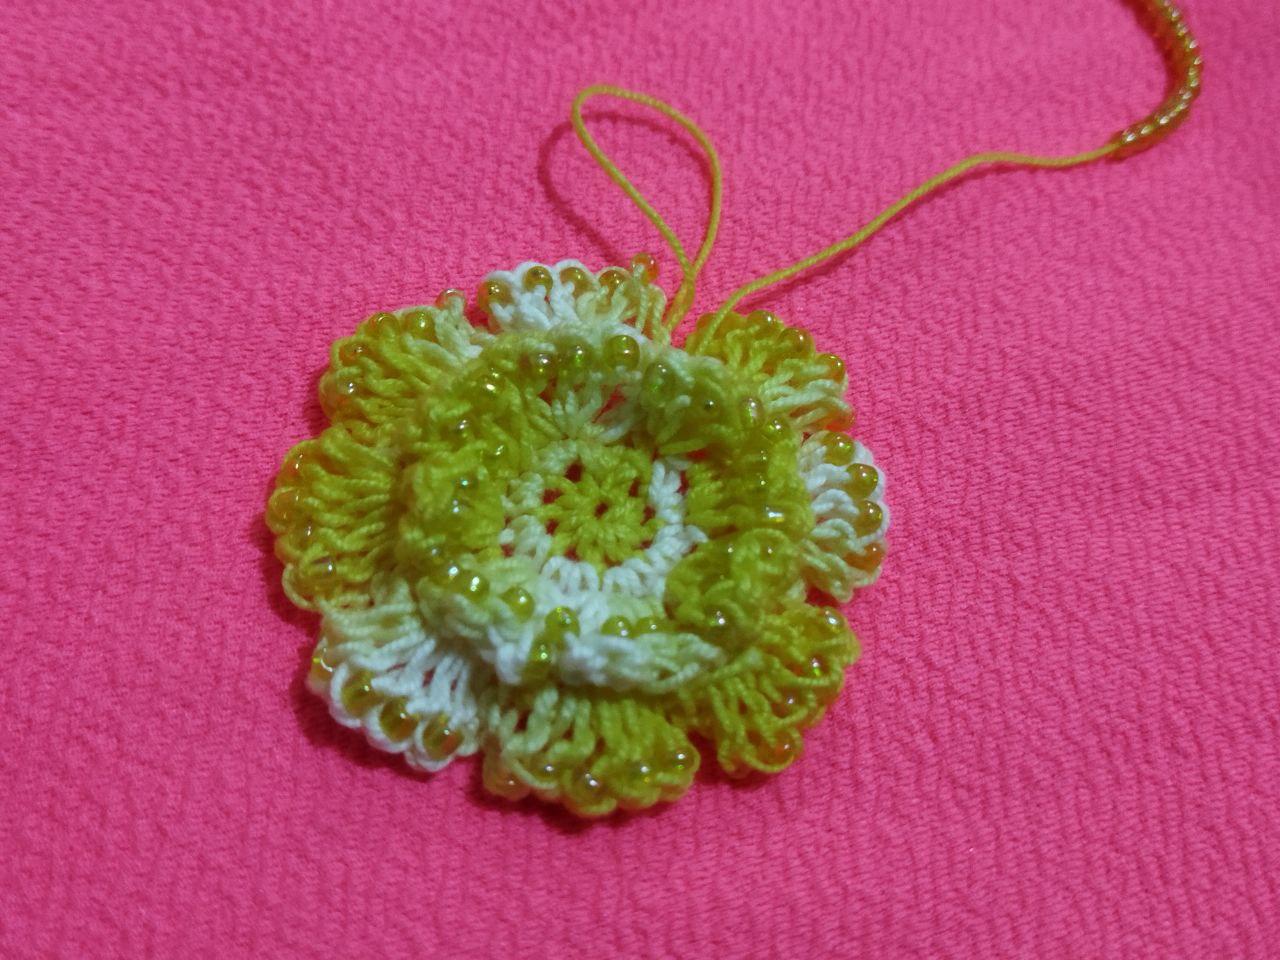
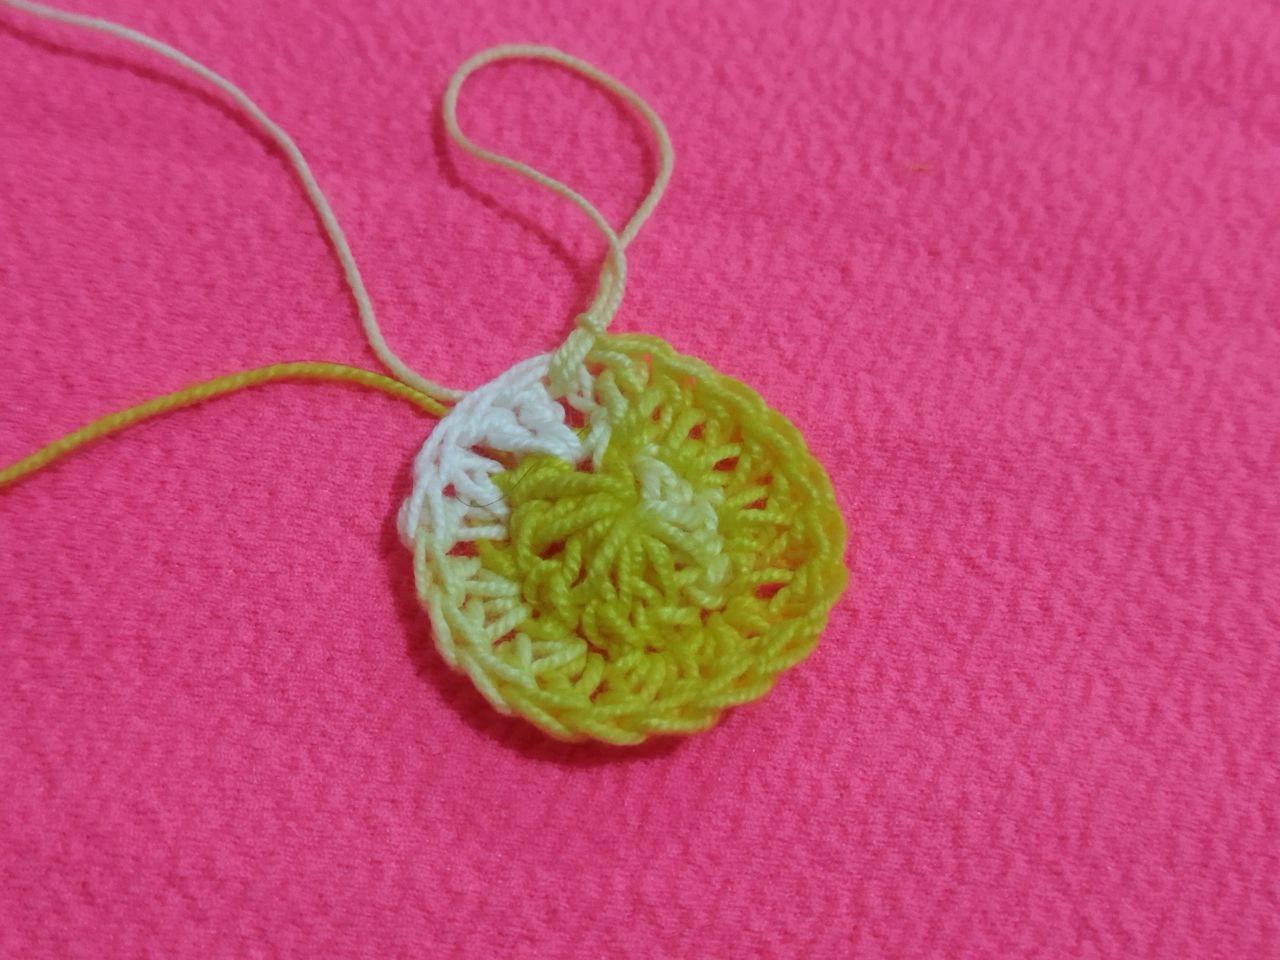
Ahora comenzamos a tejer esta hermosa flor 3D. Primero elaboramos un aro mágico y en el hacemos 8 medios puntos o puntos bajos y para la segunda vuelta en cada punto realizamos aumentos o puntos dobles. Para la tercera vuelta subimos con una cadena de dos punto luego dos puntos altos en un mismo punto después nuevamente hacemos una cadena de dos puntos y la insertamos en el siguiente punto con un punto bajo. Les explico antes de terminar cada punto alto rodamos hacia la aguja una mostacilla para luego terminar el punto y nos quede por todo el borde del pétalo. Esto lo repetimos hasta obtener ocho pétalos
Now we begin to knit this beautiful 3D flower. First we make a magic ring and in it we knit 8 half stitches or single crochets and for the second round in each stitch we make increases or double stitches. For the third row we go up with a chain of two stitches, then two double crochets in the same stitch, then again we make a chain of two stitches and insert it in the next stitch with a single crochet. I explain before finishing each high stitch we roll a mustard to the needle to finish the stitch and then we have it all the way around the edge of the petal. We repeat this until we have eight petals.
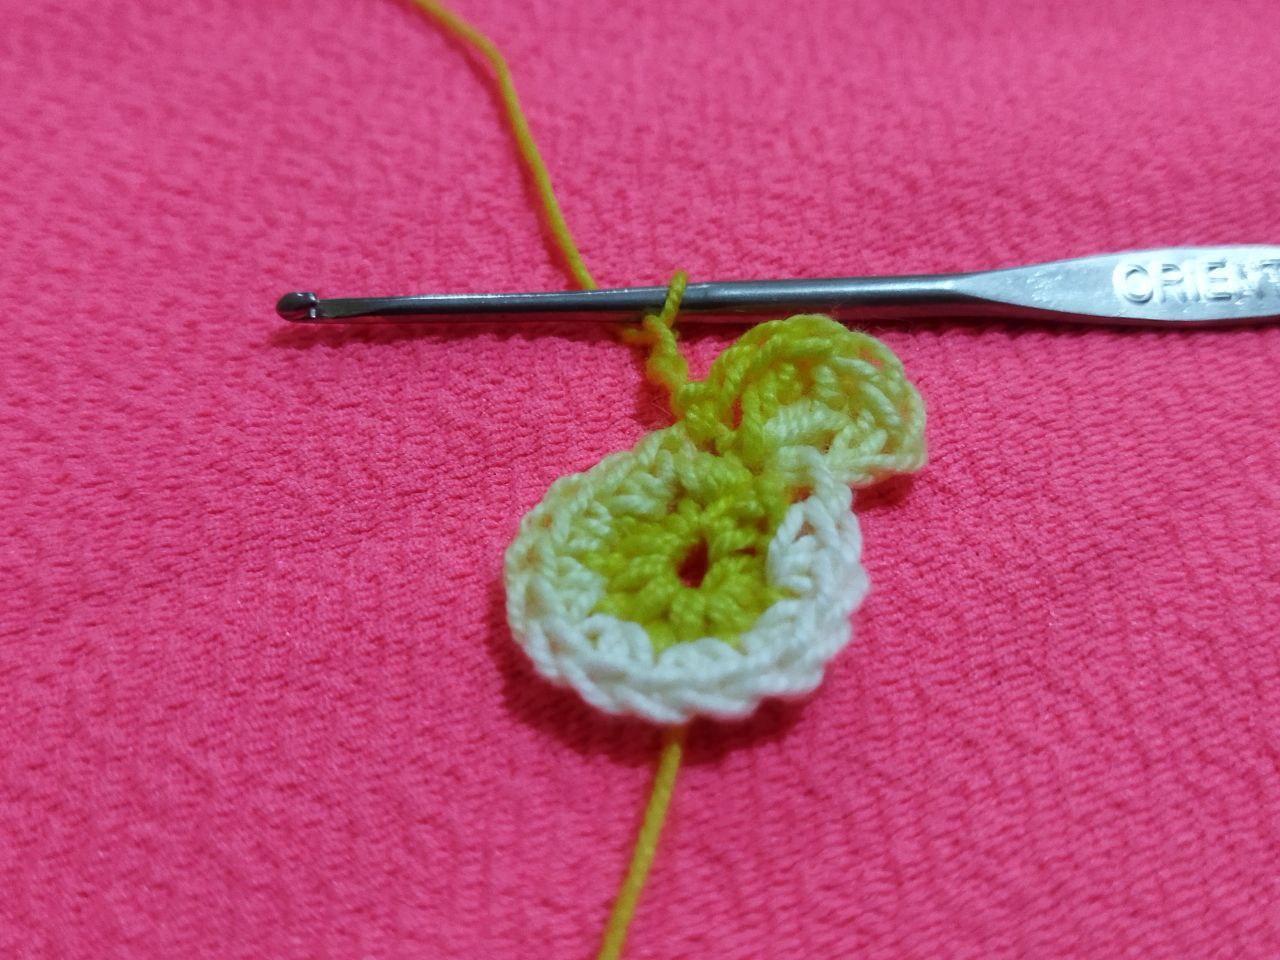
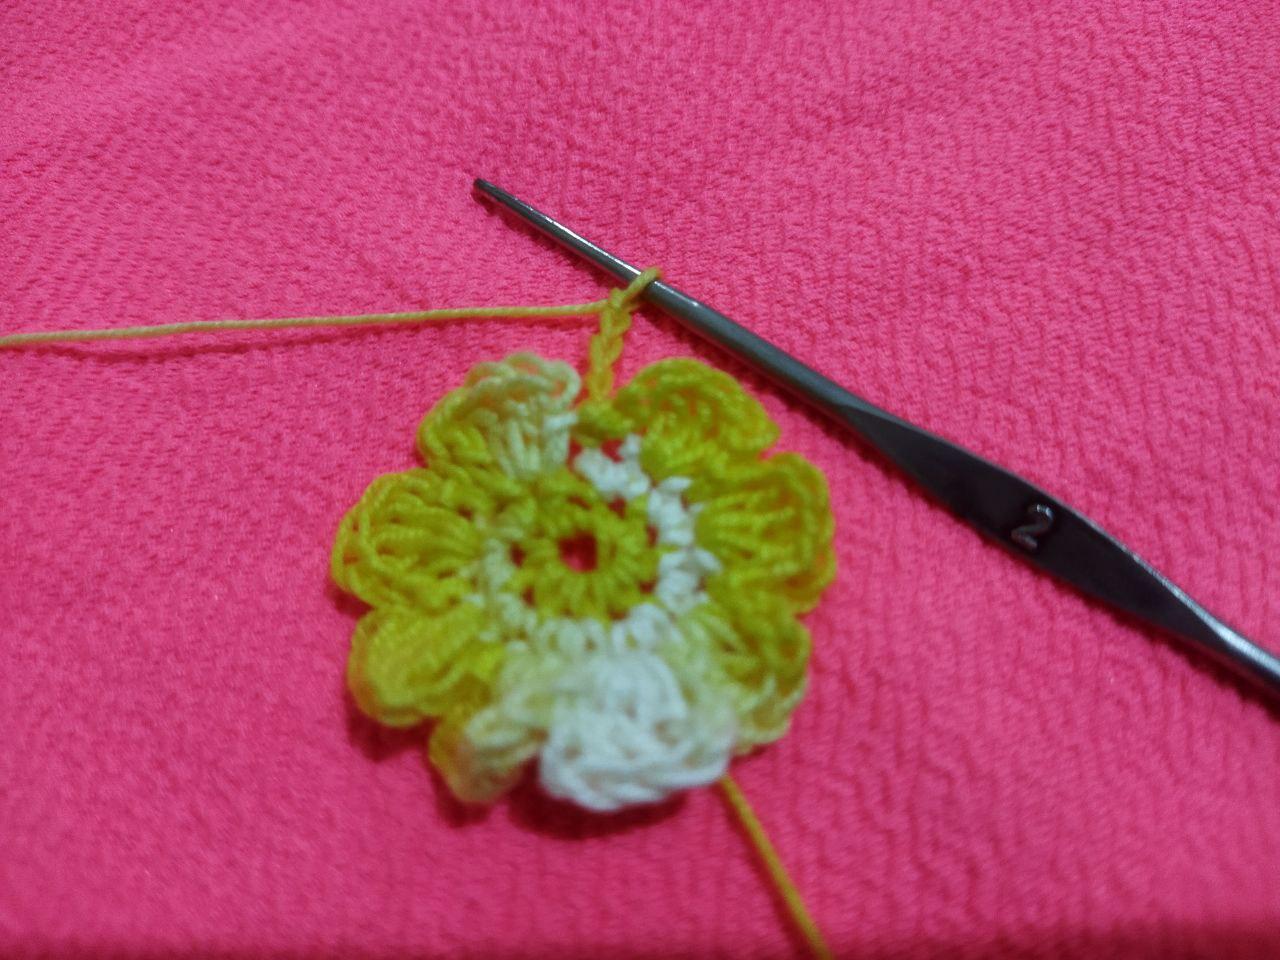
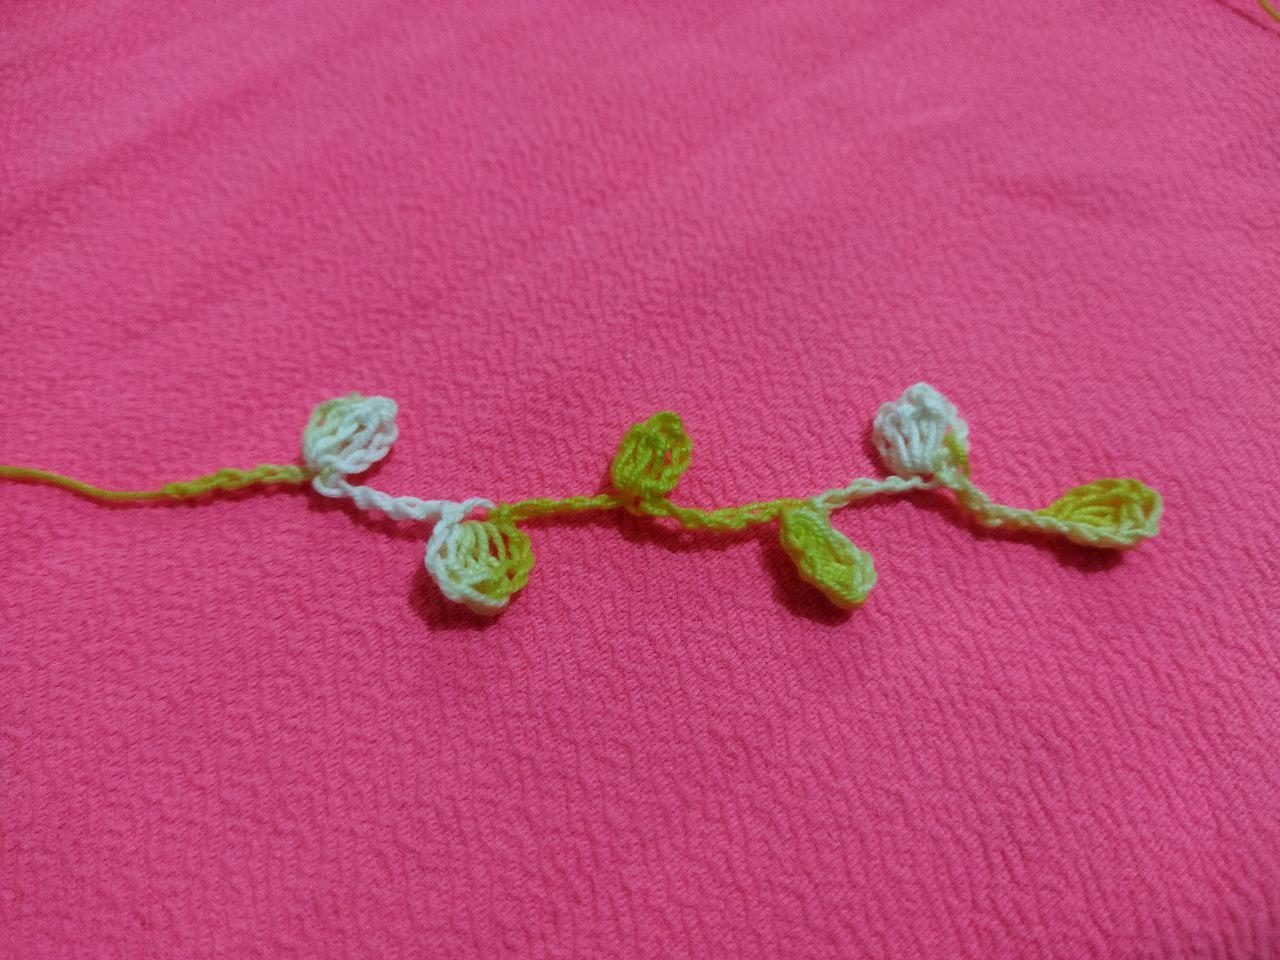
Para la otra secuencia de pétalos vamos a comenzar haciendo una cadena de cuatro puntos y la insertamos por la parte de atrás de la flor tomando los dos últimos puntos altos de cada pétalo. Repetimos hasta realizar toda la vuelta
For the other sequence of petals we will start by making a chain of four stitches and insert it through the back of the flower taking the last two high stitches of each petal. We repeat until we have completed the whole round.
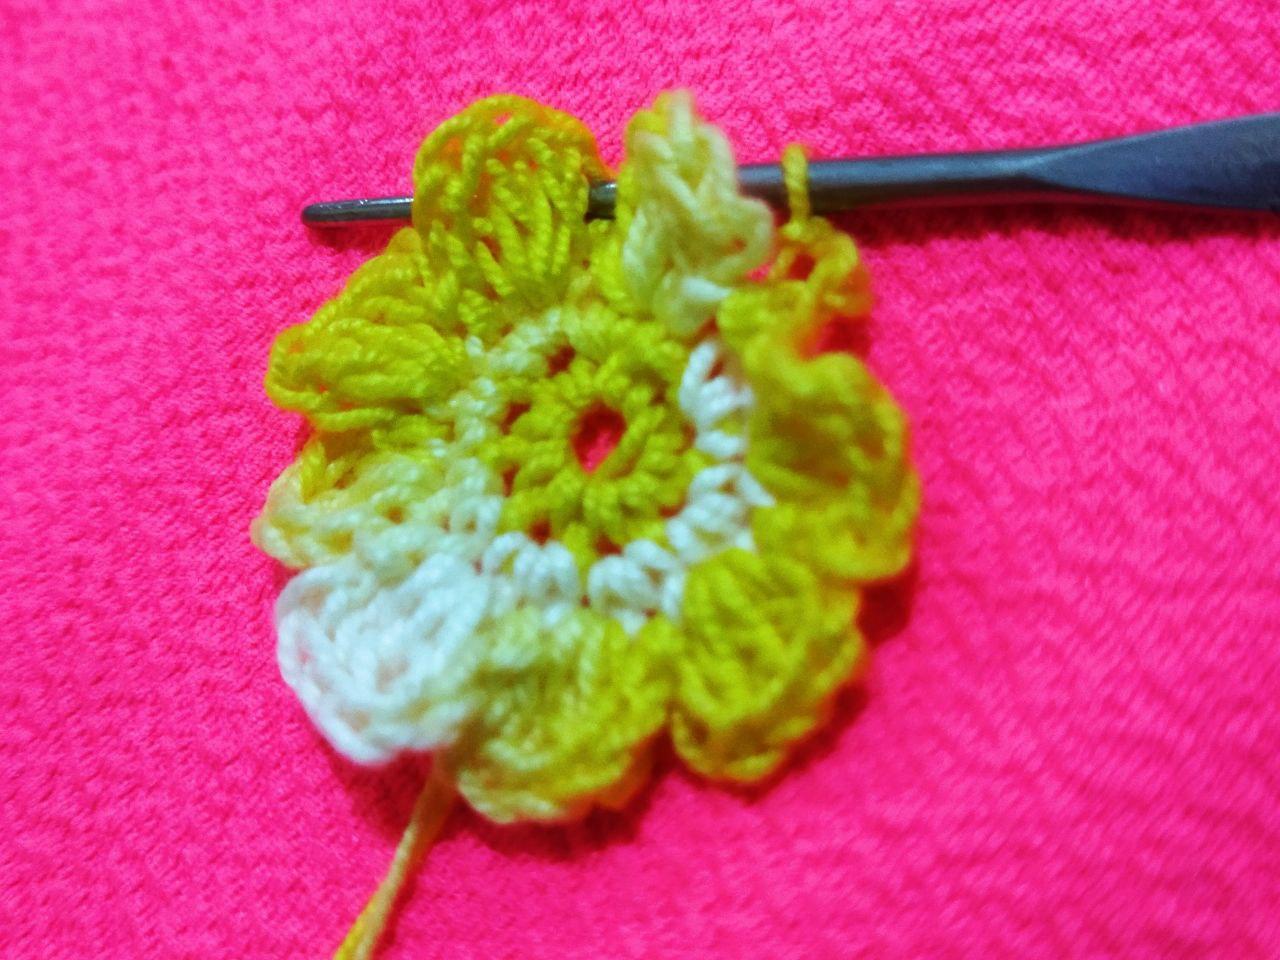
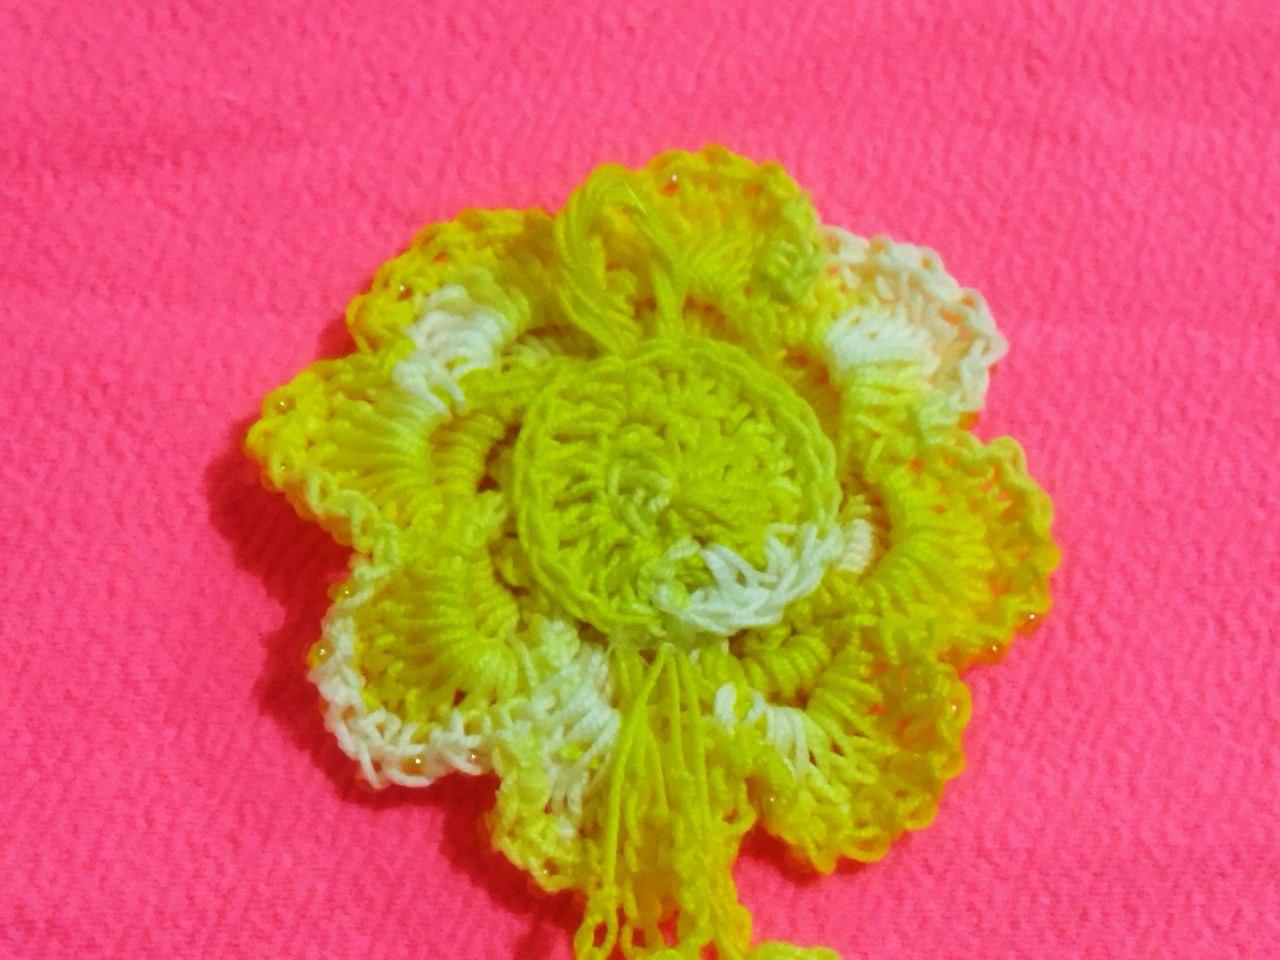
En esos espacios que creamos con las cadenas es que vamos a realizar los siguientes pétalos de la siguiente manera. Levantamos una cadena de dos puntos y tomando la cadena realizamos cinco puntos altos para terminar nuevamente con una cadena de dos puntos y un punto bajo, luego nos pasamos al otro espacio y repetimos lo explicado anteriormente, hasta que realicemos los ocho pétalos. Sin olvidar tomar en canutillo al final antes de cerrar cada punto alto.
In those spaces that we created with the chains is that we are going to make the following petals in the following way. We pick up a chain of two stitches and taking the chain we make five high stitches to finish again with a chain of two stitches and a low stitch, then we move to the other space and repeat as explained above, until we make the eight petals. Do not forget to take a crochet at the end before closing each high stitch.
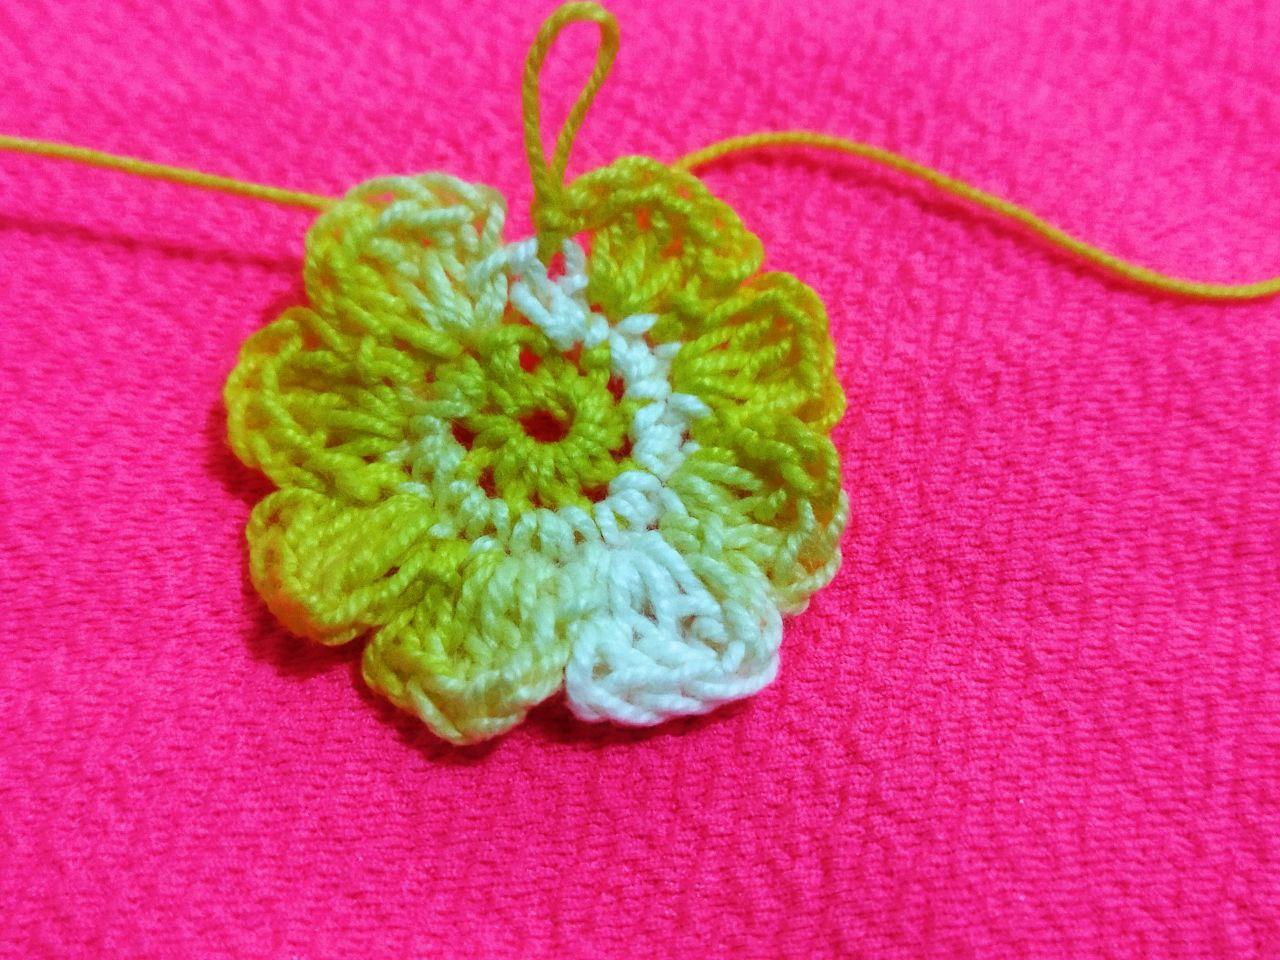
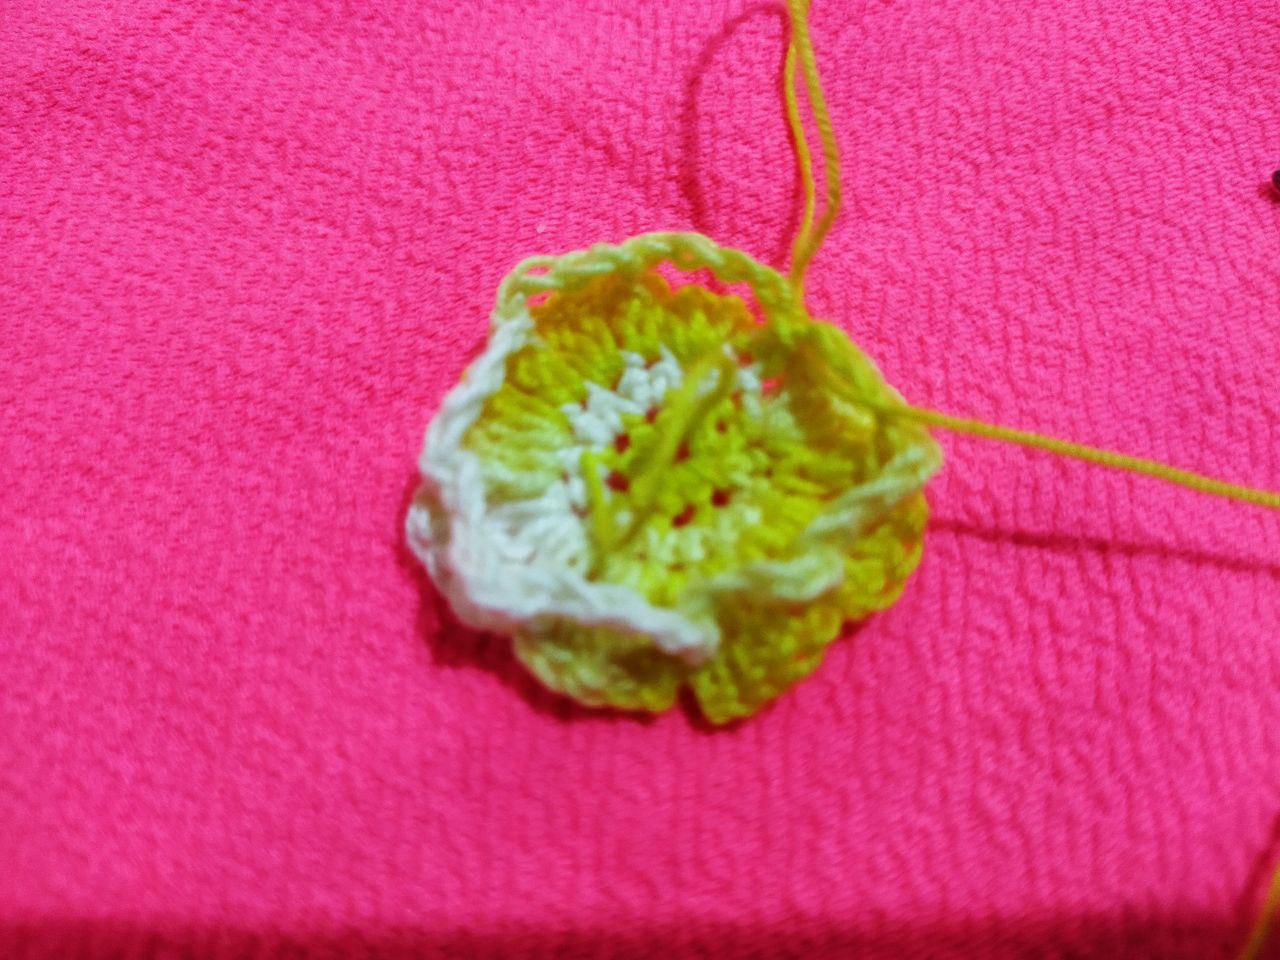
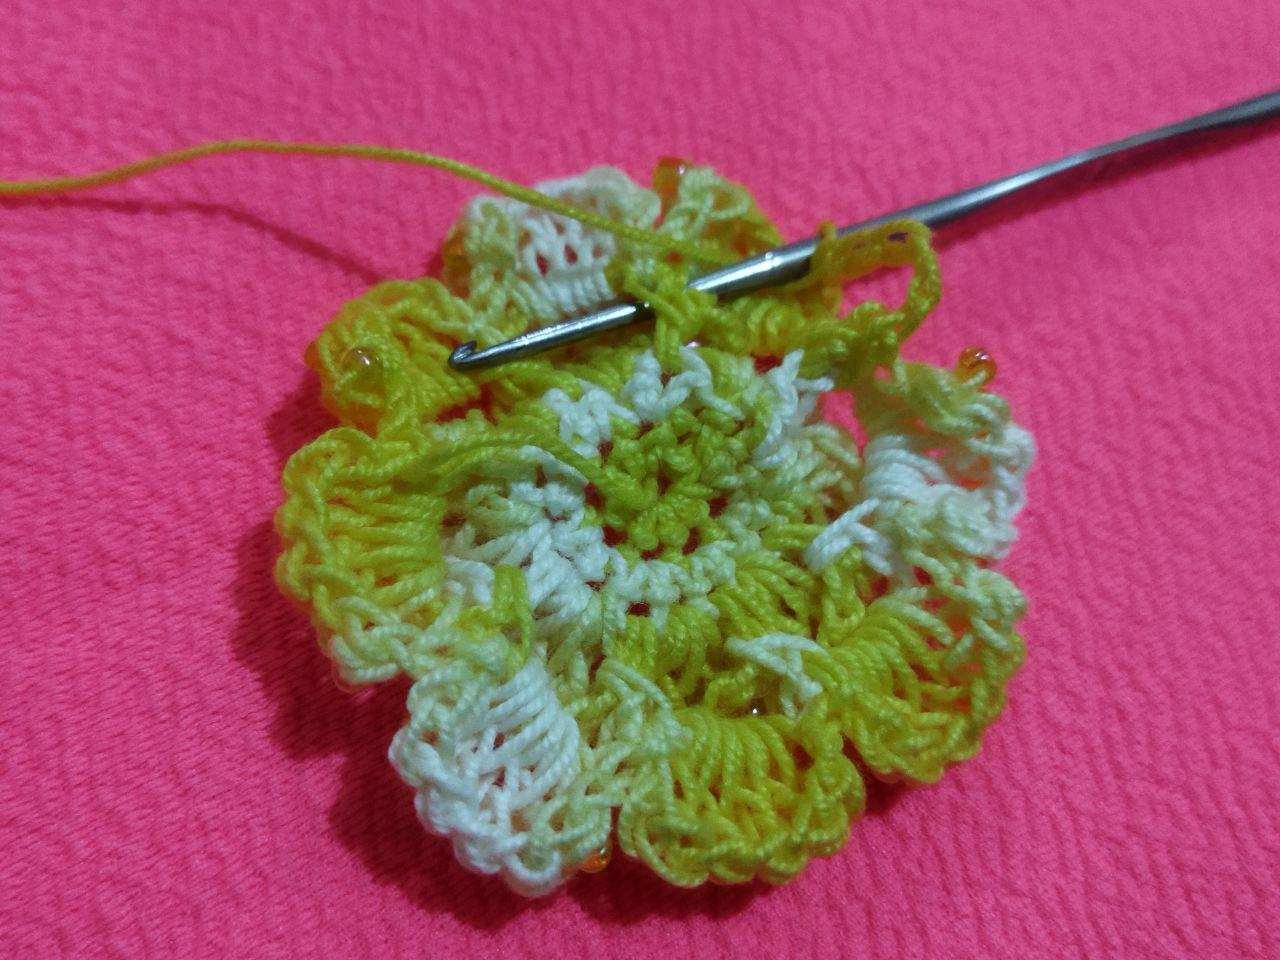
Este paso es el mismo que el anterior solo que la cadena creada para cada pétalo sera de cinco puntos, de igual manera la tomamos del espacio que separa ambos pétalos con un punto bajo. Para comenzar a realizar cada petalo de esta vuelta sera de la siguiente manera;
1 medio punto
1 medio punto alto
5 puntos altos
1 medio punto alto
1 medio punto
Esta es la secuencia a seguir hasta culminar los ocho pétalos
This step is the same as the previous one only that the chain created for each petal will be of five stitches, in the same way we take it from the space that separates both petals with a single crochet. To begin to make each petal of this round will be as follows;
1 half stitch
1 half stitch high
5 high stitches
1 half double crochet
1 half stitch
This is the sequence to follow until the eight petals are completed

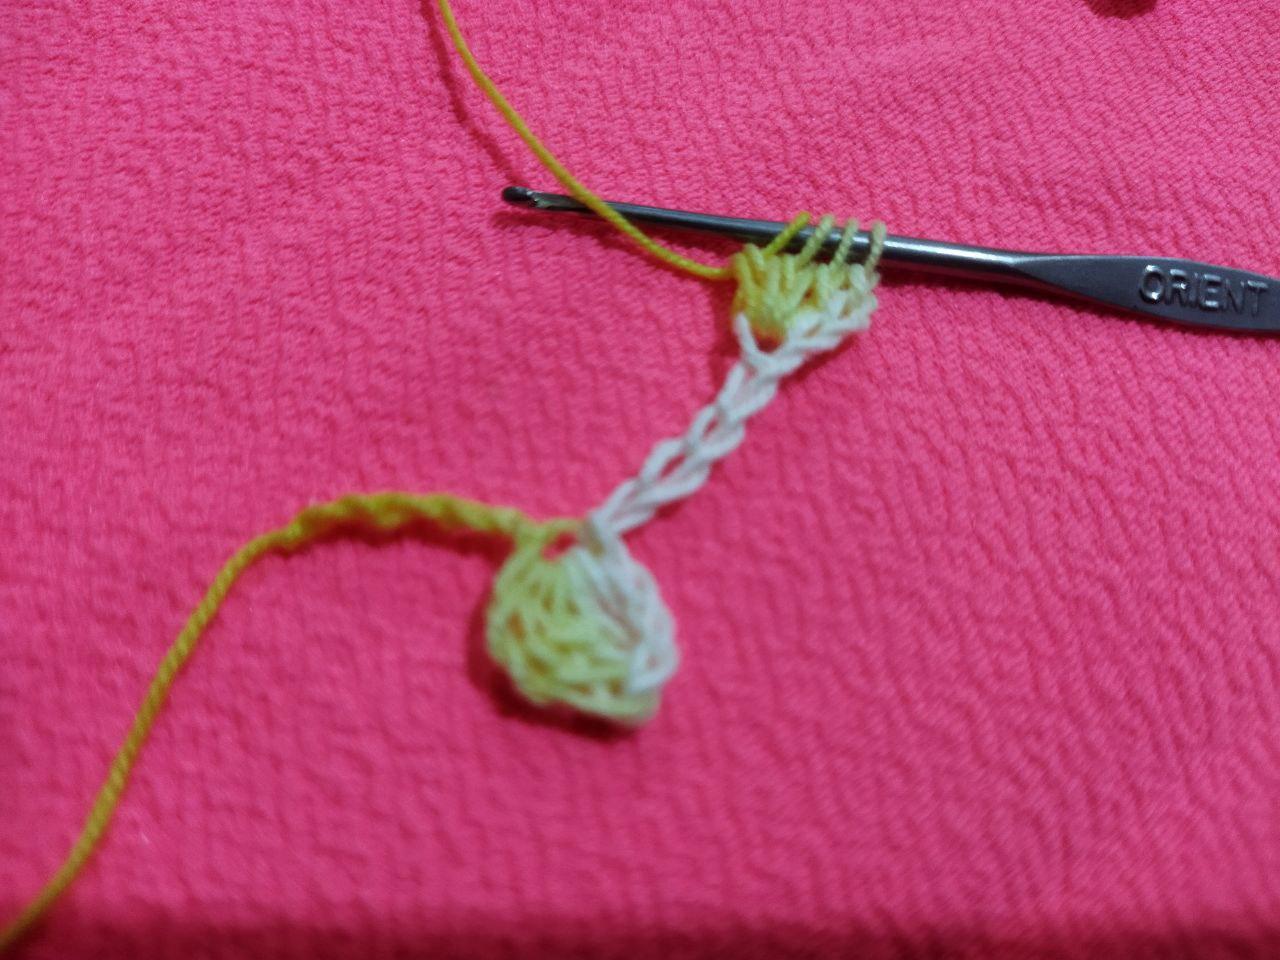
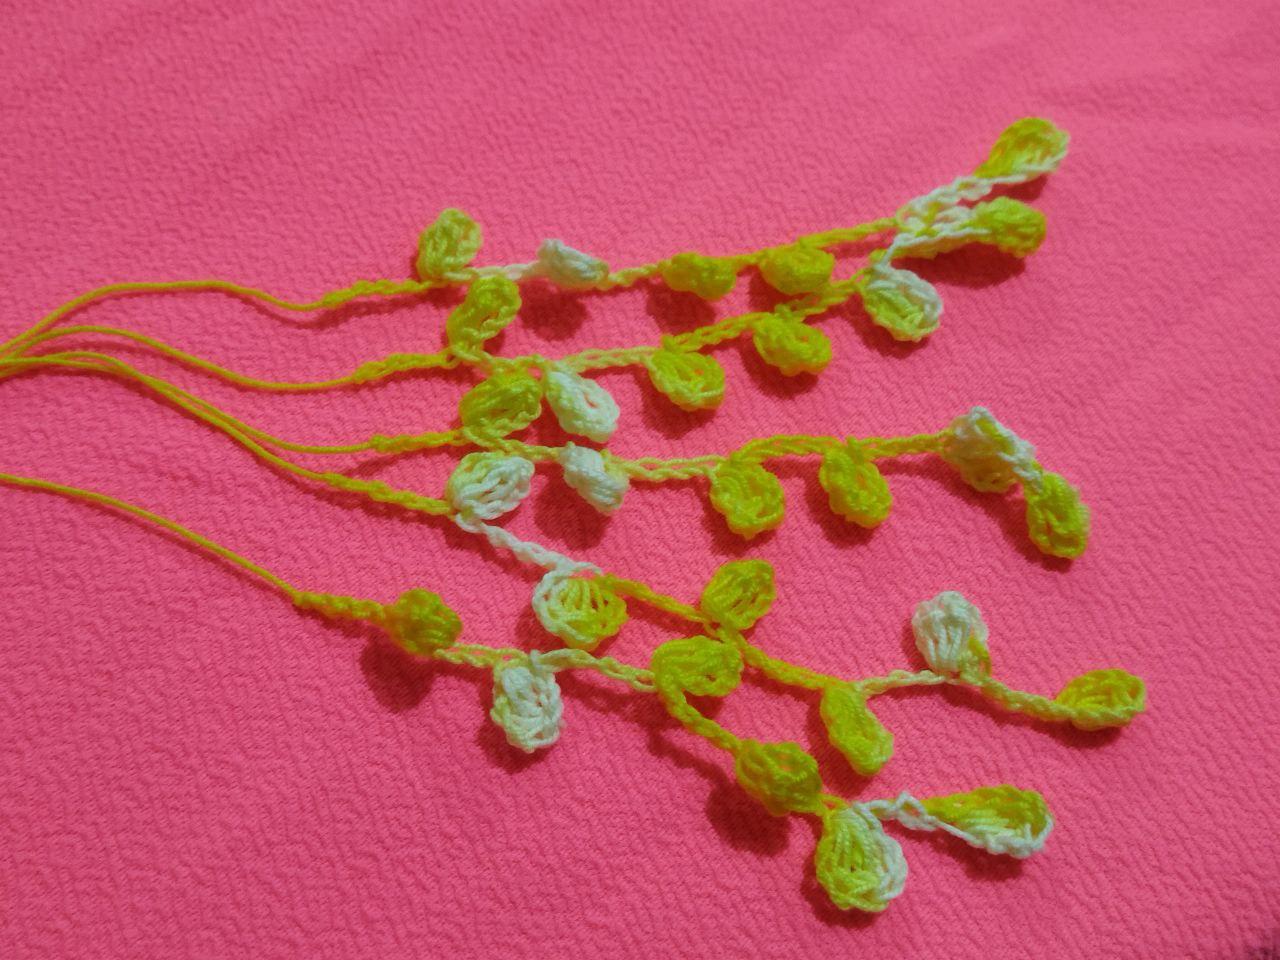
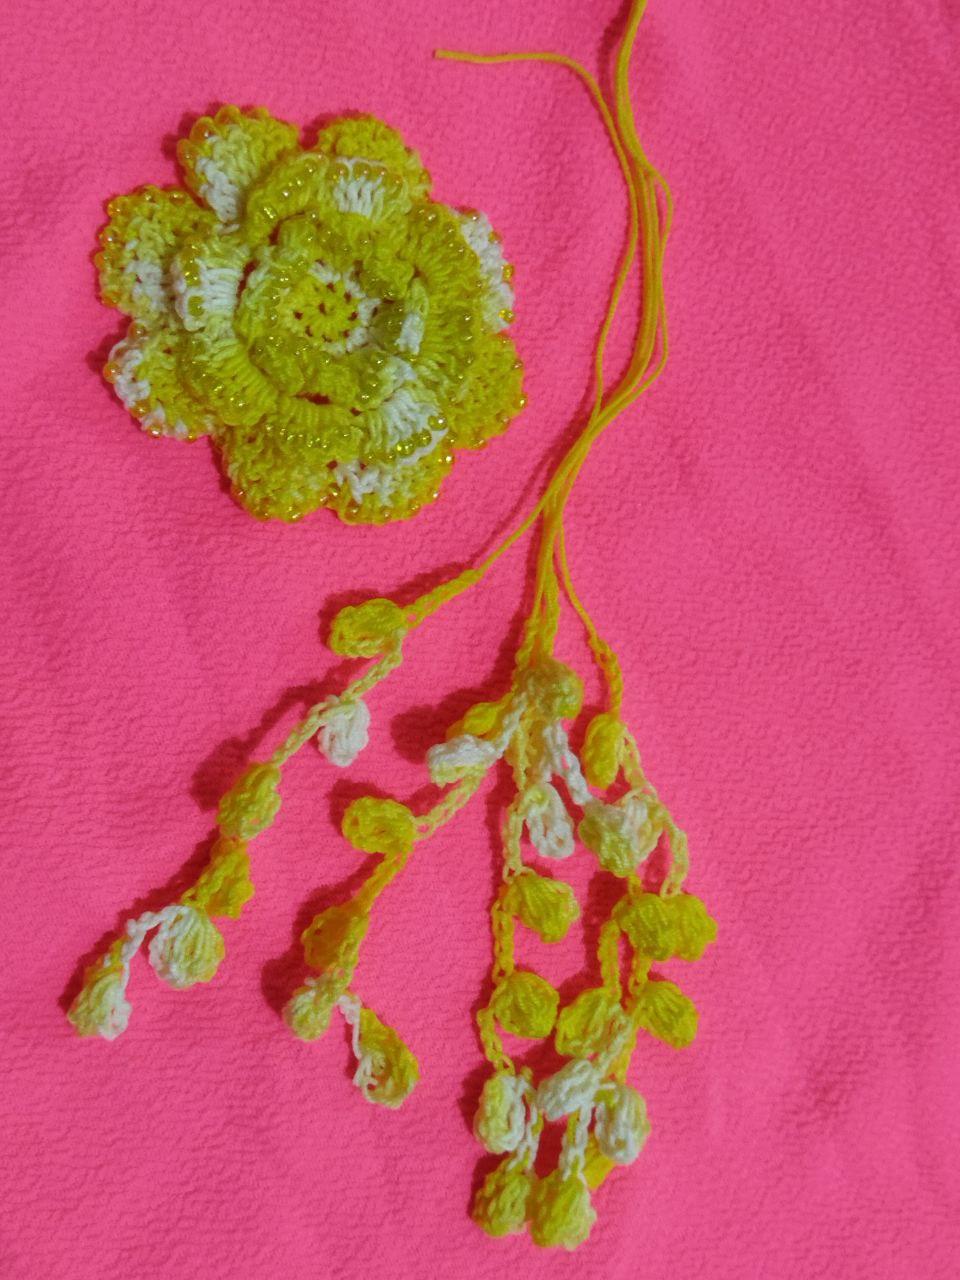
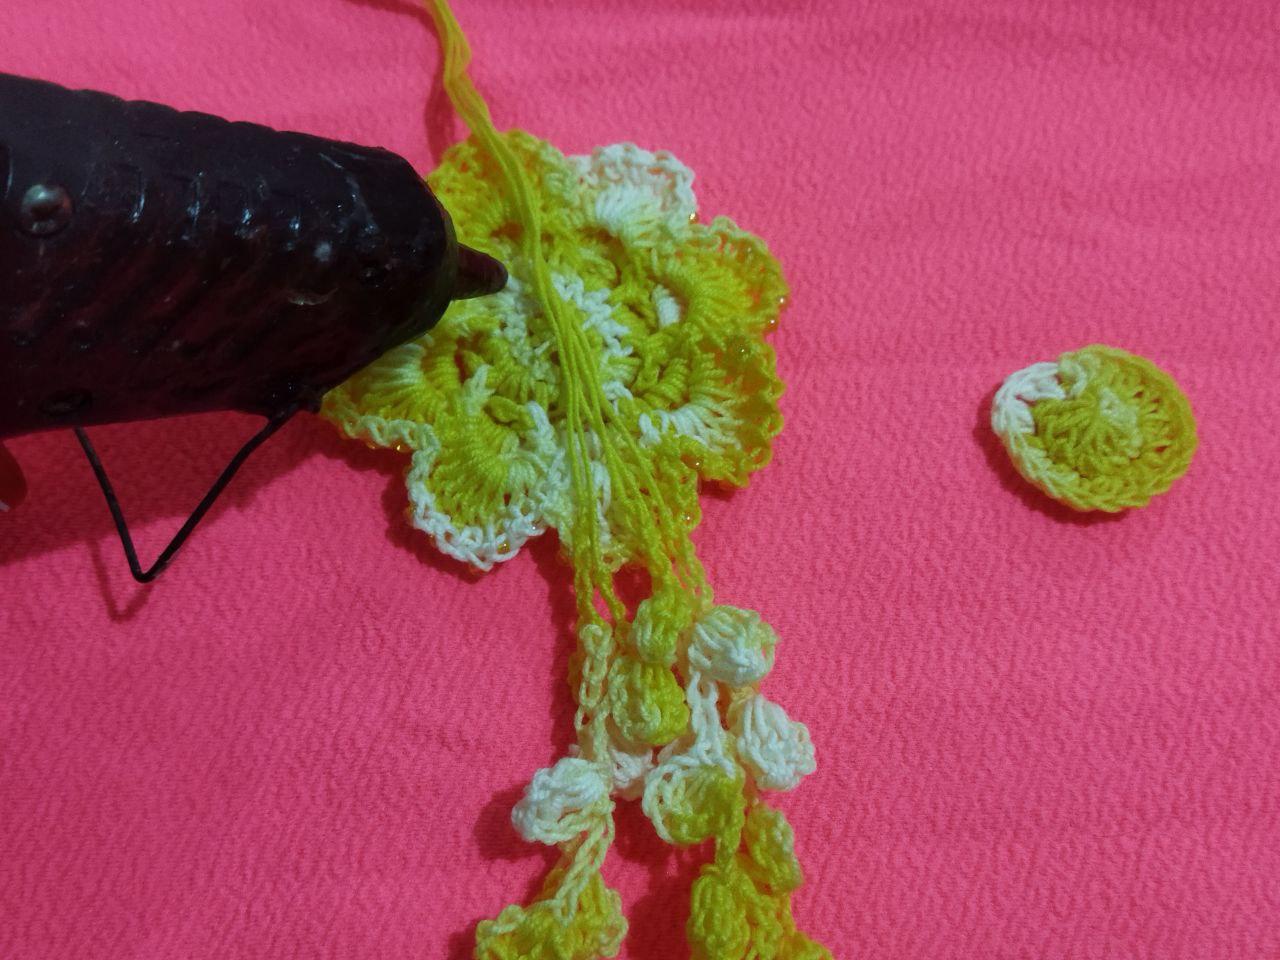
Terminada la flor vamos a realizar como unas ramitas colgantes, para esto dejamos un sobrante de hilo antes de comenzar a elaborar la cadena de nueve punto,tomamos hilo y no devolvemos introduciendo la aguja el cuarto espacio de la cadena y luego realizamos 4 puntos altos incompletos y después pasamos el hilo por todos los puntos cerramos con un punto deslizado, repetimos la cadena volvemos hacer los puntos altos y así seguimos la secuencia hasta realizar seis hojitas. realice un total de seis ramitas colgantes
Once the flower is finished, we are going to make some hanging twigs, for this we leave an excess of thread before starting to elaborate the nine stitch chain, we take thread and we do not return introducing the needle in the fourth space of the chain and then we make 4 incomplete high stitches and then we pass the thread through all the stitches we close with a slipped stitch, we repeat the chain we make the high stitches again and so we continue the sequence until we make six little leaves. make a total of six hanging twigs
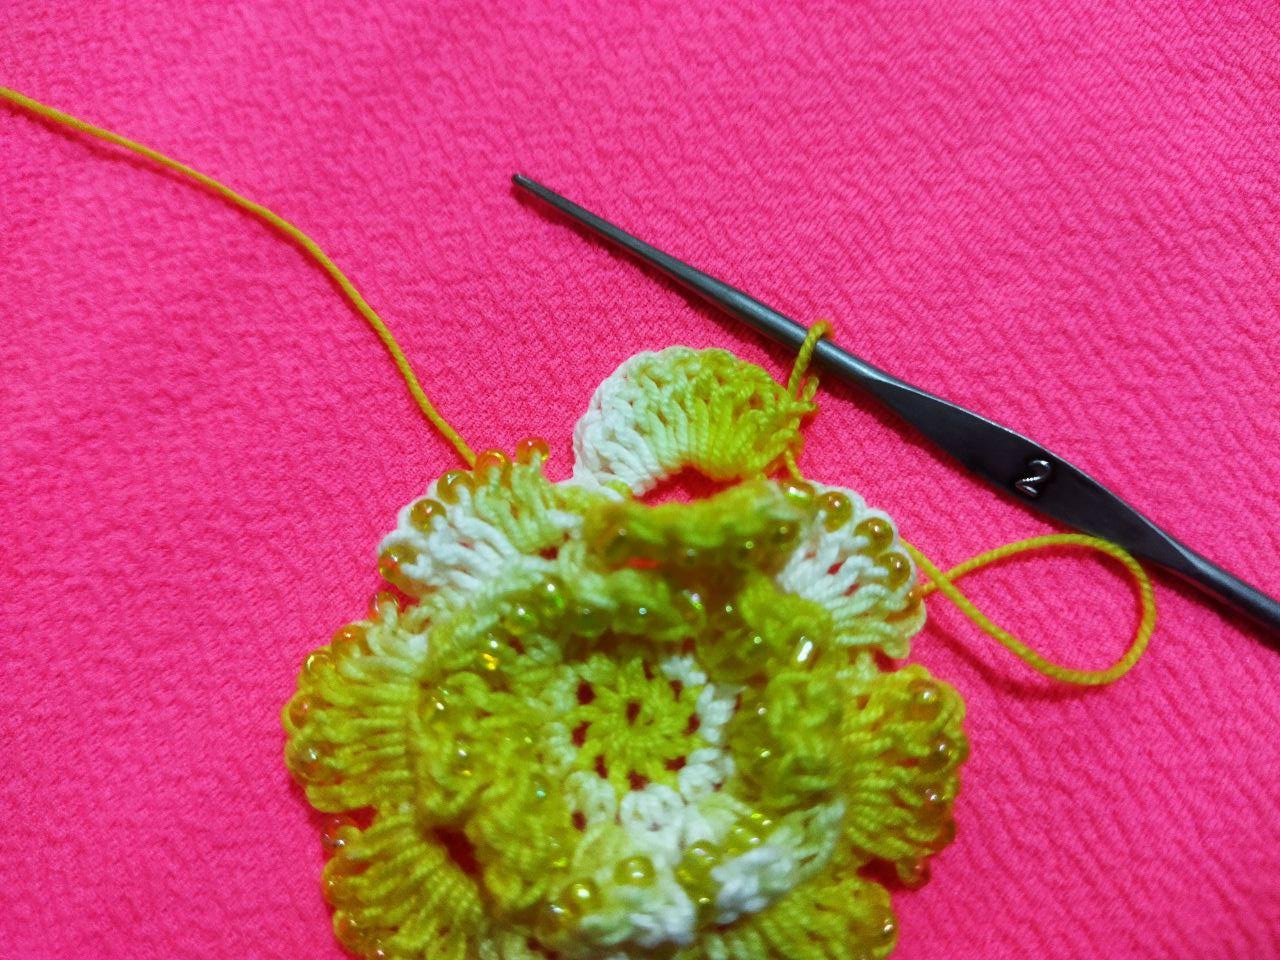
Ya teniendo lista la flor y las ramitas colgantes aprovechamos para colocar en el centro de la flor una perla. Le insertamos un hilo y lo amarramos por la parte de atrás de la flor
Once the flower and the hanging twigs are ready, we place a pearl in the center of the flower. We insert a thread and tie it at the back of the flower.
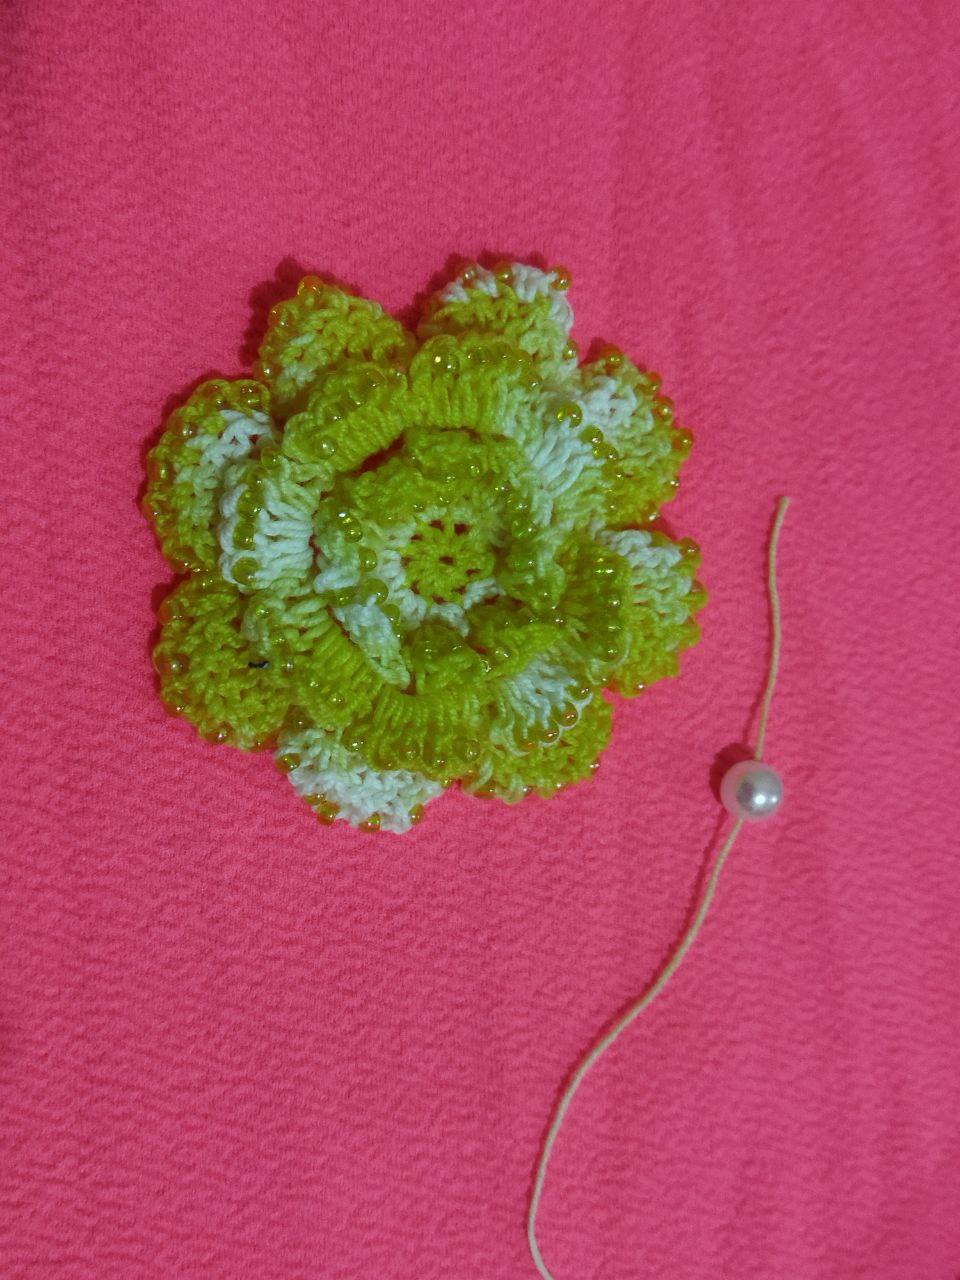
Para ocultar todos los detalles antes de pegar, realizamos un aro mágico con ocho puntos bajos y luego para siguiente vuelta 16 puntos altos es decir por cada punto un aumento. Con este circulo tapamos todas los detalles que le puedan quedar por el revés de la flor y aprovechamos para hacer la pieza por donde vamos a colgar el cordón para el shocker o collar
To hide all the details before gluing, we make a magic ring with eight low stitches and then for the next round 16 high stitches, that is to say, for each stitch an increase. With this circle we cover all the details that may be left on the back of the flower and we take the opportunity to make the piece where we are going to hang the cord for the shocker or necklace.
Por ultimo para darle el acabado al cordón o collar le colocamos un perla en cada punta y un nudo para evitar que se desaten
Finally, to finish the cord or necklace, we place a pearl on each end and a knot to prevent them from untying.
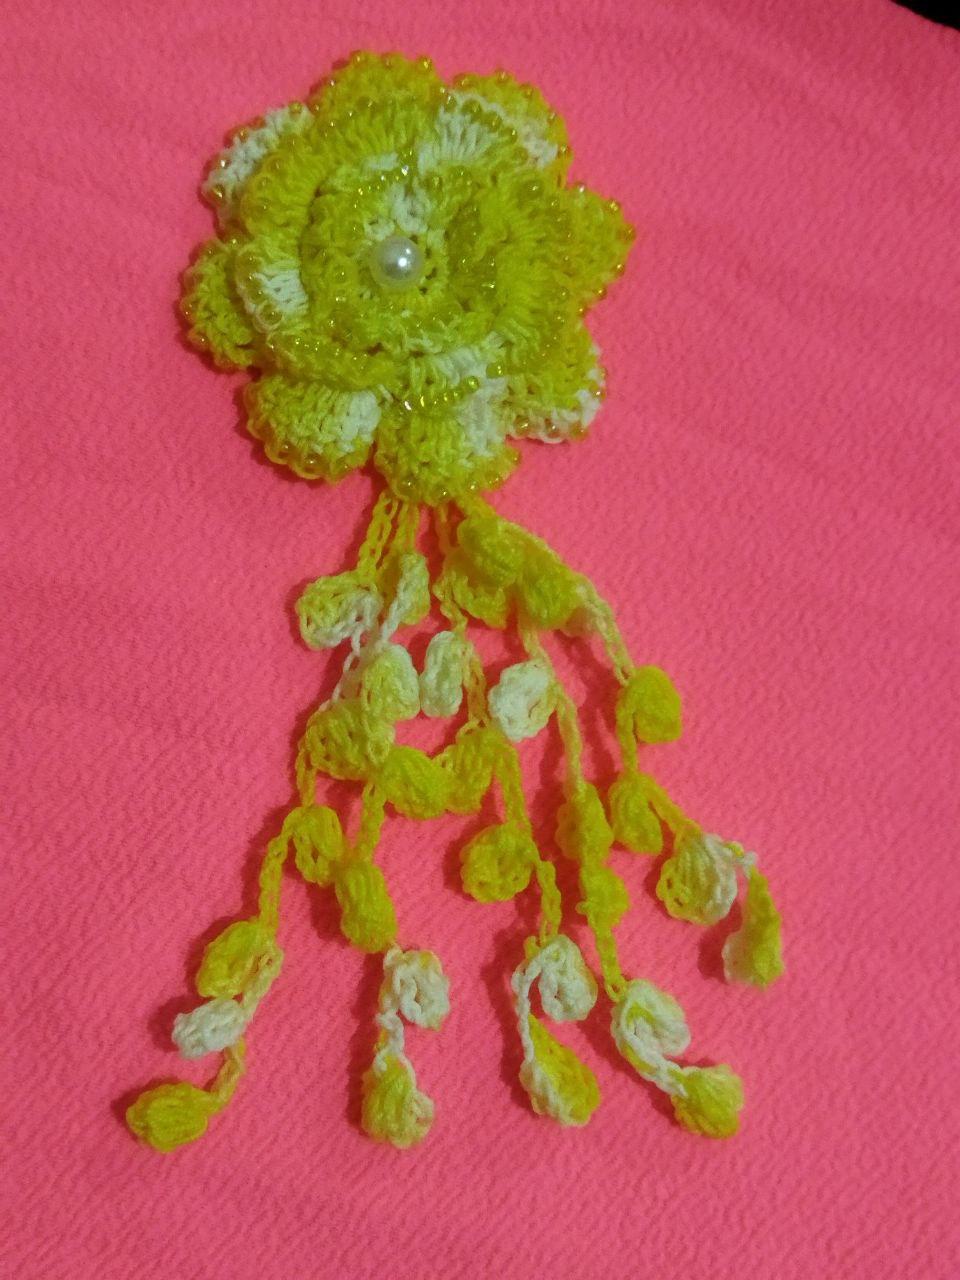

Listo ! De esta manera terminamos este hermoso dije de flor en 3D tejida a crochet decorada con bisutería, me encanto el resultado ya que no tenia un accesorio de este color tan llamativo, pero luce muy lindo. Esta flor también puedes usarla como un tocador adaptada en una peineta, en una diadema, creo que donde la pongas queda muy coqueta.Espero se animen a realizarla. Con esmero y dedicación podemos lograr muchas cosas que nos proponemos
Done ! This is how we finished this beautiful 3D crocheted flower charm decorated with costume jewelry, I loved the result because I didn't have an accessory of this color so striking, but it looks very nice. This flower can also be used as a dressing table adapted in a comb, in a headband, I think that wherever you put it is very flirtatious, I hope you are encouraged to make it. With care and dedication we can achieve many things we set out to do.


| Pueden seguirme en 💙: | You can follow me on 💙: |
|---|---|
| eveyese1312 | |
| Discord | eveyese1312#6211 |
Las fotos y el contenido son de mi autoria
Imágenes editadas en PowerPoint Canva y PicMonkey
Para la traducción usé el traductor: DeepL
The photos and content are my own.
Images edited in PowerPoint Canva and PicMonkey
For the translation, I used the translator: DeepL

Hermoso proyecto amiga! El color amarillo le luce! Saludos! 😘
Hola @razielmorales si desde hace rato quería realizarme un accesorio en amarillo y esa flor 3D me pareció ideal y tejida a crochet quedó muy delicada. Me encantó el resultado. Gracias amiga 😊 por visitar y además dejar tu comentario. Saludos
Ha quedado hermoso, muchas felicidades 😊
Gracias @anaarevalo01, si me encantó el resultado se ve muy coqueta. Saludos amiga 😃 gracias por apreciar mi trabajo además comentar. Exito
Waoo te ha quedado preciosa esa flor tejida amiga que buen paso a paso, el color es hermoso y lo mejor es el fleco que le has hecho y la perla que le da un toque especial.
No tenias ese color pero ahora ya puedes lucir un accesorio asombroso, gracias por ese paso a paso fenomenal.
Gracias 😊 mi comunidad @hive-189504, si esa flor luce hermosa en ese color y además quería algo grande que resaltará. Me encanta explicar cada detalle del proceso de elaboración porque el fin es que si alguien le gusta la pueda hacer fácilmente sin ningún problema. Gracias por su apoyo y exitos
The rewards earned on this comment will go directly to the people sharing the post on Twitter as long as they are registered with @poshtoken. Sign up at https://hiveposh.com.
Una belleza de trabajo, realmente encantada con tu proceso creativo! Yo realizó esa misma flor con mostacillas... Algún día aprenderé a tejer 😂 Gracias por mostrarnos tu trabajo tan detallado @eveyese1312
Hola @marleyn tejer es un arte muy hermoso y siempre digo cuando hay interés y nos gusta algo solo con un poco de empeño y dedicación lo puedes lograr, primero debes comenzar a practicar los puntos básicos. Gracias ☺️ por visitar y comentar. Saludos
Dear @eveyese1312, sorry to jump in a bit off-topic.
May I ask you to review and support the new proposal (https://peakd.com/me/proposals/240) so I can continue to improve and maintain this service?
You can support the new proposal (#240) on Peakd, Ecency,
Thank you!