
Welcome || Bienvenidos
Happy day to all dear friends of Hive and @Jewelry today I am pleased to be once again in this great creative space on this occasion I want to share with you how to make a beautiful bracelet with few materials but certainly has a very delicate touch that will make us look beautiful.
Feliz día para todos queridos amigos de Hive y @Jewelry hoy me complace estar una vez más en este gran espacio creativo en esta ocasión quiero compartir con ustedes como realizar una hermosa pulsera con pocos materiales pero que sin duda tiene un toque bastante delicado que nos hará lucir hermosas.
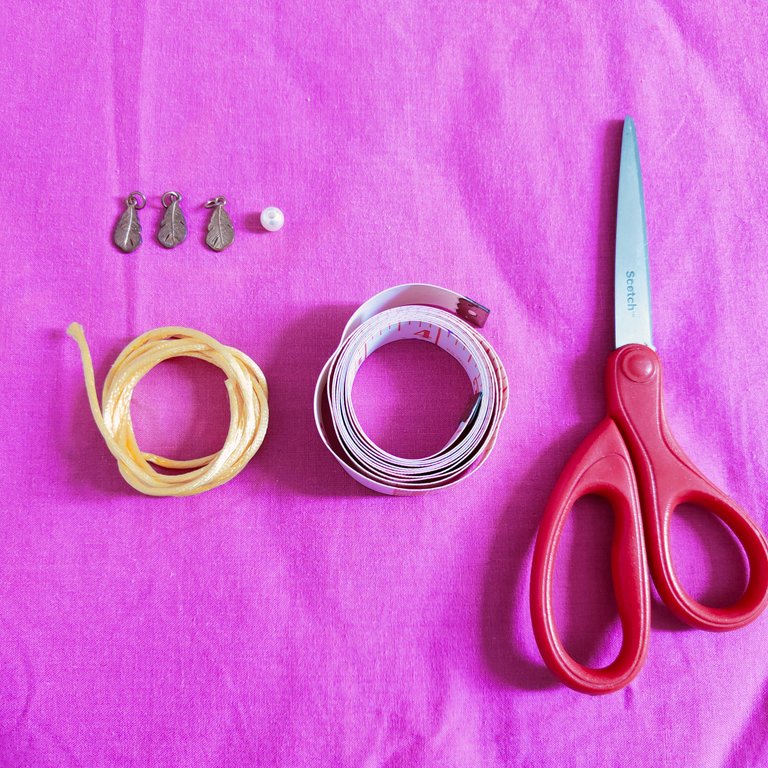
Materials || Materiales
✂️ 2 meters of mouse tail in yellow color.
✂️ Tape measure.
✂️ Scissors.
✂️ 1 white pearl.
✂️ Lighter.
✂️ 2 metros de cola de ratón en color amarillo.
✂️ Cinta métrica.
✂️ Tijera.
✂️ 1 perla blanca.
✂️ Encendedor.
Steps || pasos
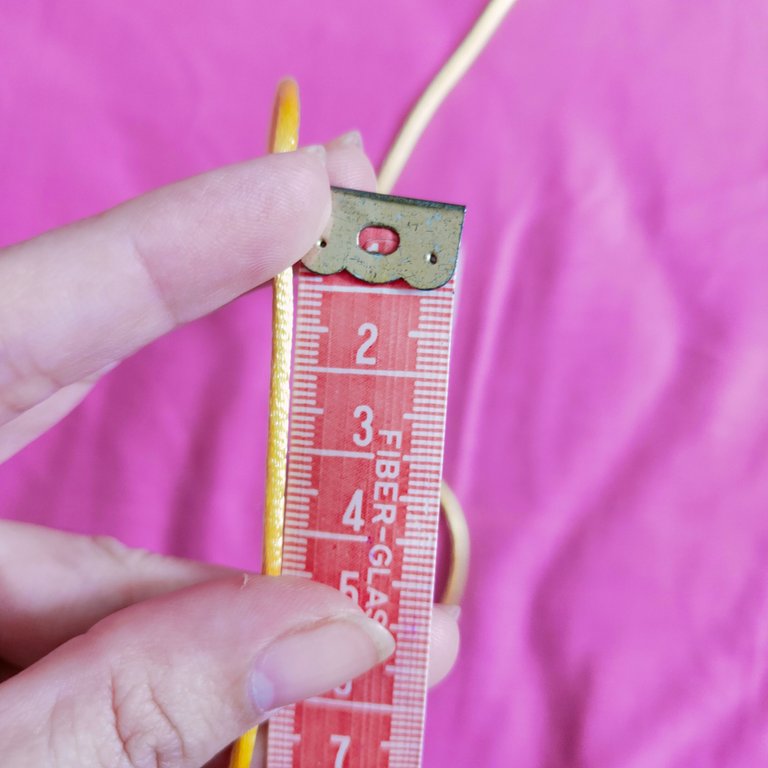
1.| We will start by taking the tape measure and our mouse tail we will measure 1 meter and proceed to cut, in this way we will obtain 2 ribbons of mouse tail both of the same length.
1.| Iniciaremos tomando la cinta métrica y nuestra cola de ratón vamos a medir 1 metro y procederemos a cortar, de esta manera obtendremos 2 cintas de cola de ratón ambos del mismo largo.
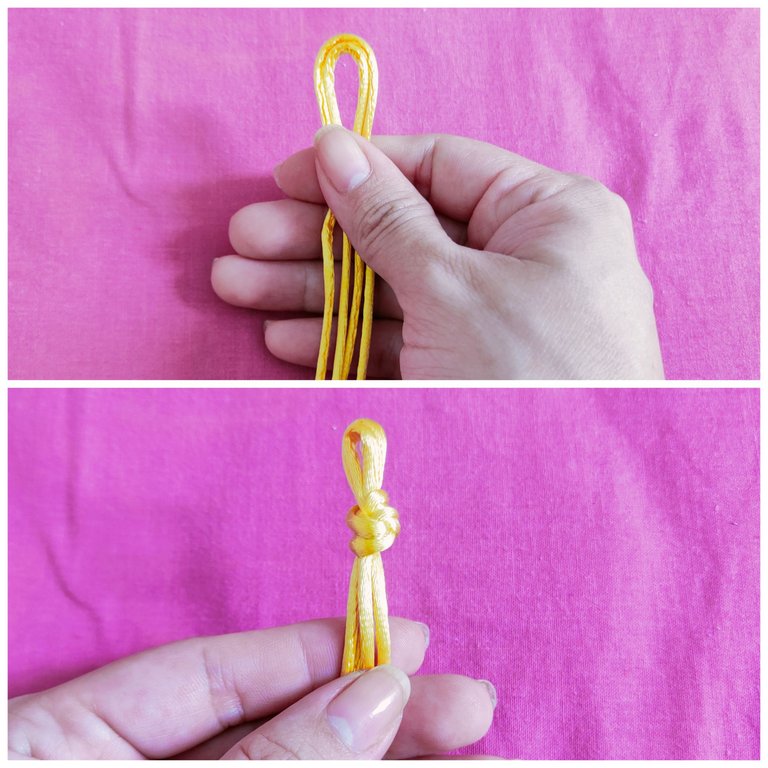
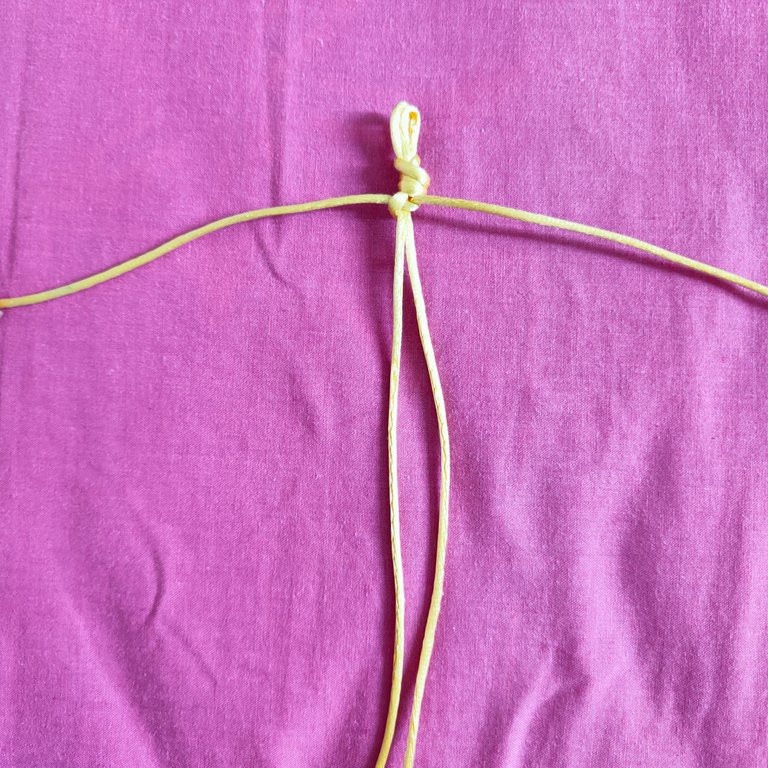
2.| Once we cut the mouse tail we are going to join them and we will fold them by the half, as a result we will obtain 4 ends, in the other end we will make a knot leaving a small hole with the purpose that this will serve us to hold the bracelet when the same one this culminated.
2.| Una vez que cortamos la cola de ratón vamos a juntarlas y doblaremos por la mita, como resultado obtendremos 4 puntas, en el otro extremos realizaremos un nudo dejando un pequeño orificio con el fin que este nos sirva para sujetar la pulsera cuando la misma este culminada.
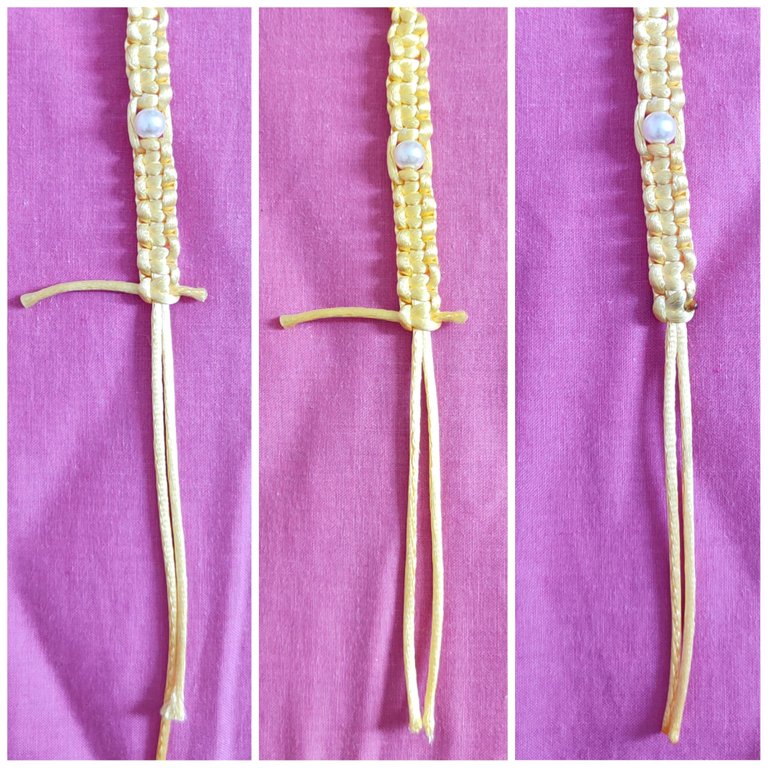
3.| Next we are going to position our future bracelet in a linear way towards us, to proceed to interlace we will leave in the center 2 of the four points and on each side we will leave 1 point as shown in the photo below.
3.| Seguidamente vamos a posicionar nuestra futura pulsera de forma lineal hacia nosotros, para proceder a entrelazar dejaremos en el centro 2 de las cuatros puntas y a cada costado dejaremos 1 punta como se visualiza en la foto a continuación.
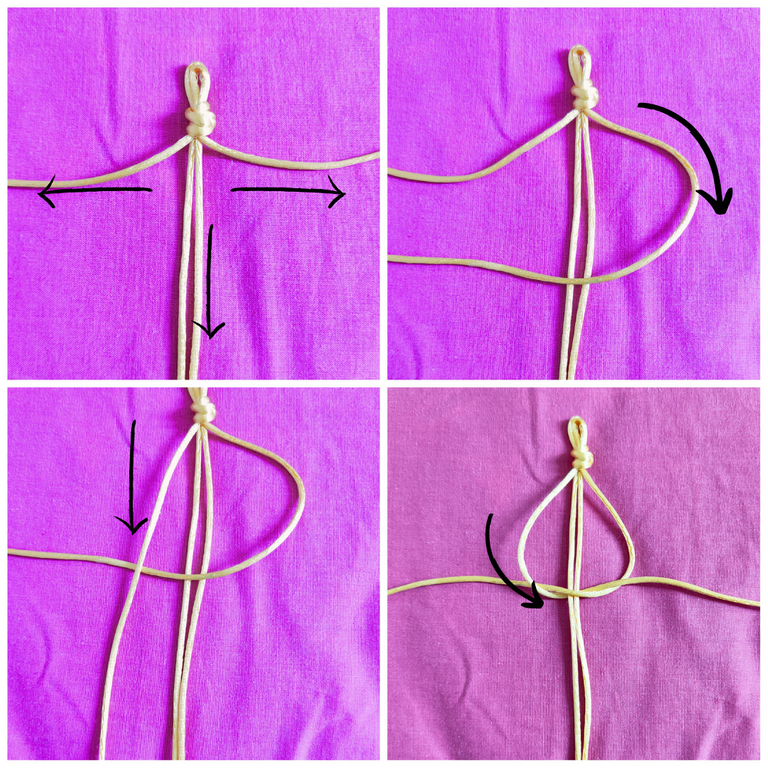
4.| We will continue to interlace, the ends of the center will always remain in that position ... since the interlacing will be done with the points that are at both ends, in the first instance we will take the end that is to the right we will take this point to the left passing over the points that are in the center, then the tip that is at the left end we will take it to the right passing under the points of the center and taking its tip through the hole created by the tip of the right end this applies to both ends of that. In this way we will be able to adjust the interlacing and have our first stitch, for better understanding in the photo is included signaling.
4.| Continuaremos a entrelazar, las puntas del centro siempre permanecerán en esa posición... ya que el entrelazado lo vamos a realizar con las puntas que están en ambos extremos, en primera instancia tomaremos el extremos que está a la derecha llevaremos está punta hacia la izquierda pasando por encima de las puntas que están en el centro, seguidamente la punta que está en el extremo izquierdo lo vamos a llevar hacia la derecha pasando por debajo de las puntas del centro y llevando su punta por el orificio creado por la punta del extremo derecho esto aplica para ambos extremos de esa.menra podremos ir ajustando el entrelazado y tener nuestro primer punto, para mayor entendimiento en la foto se incluye señalización
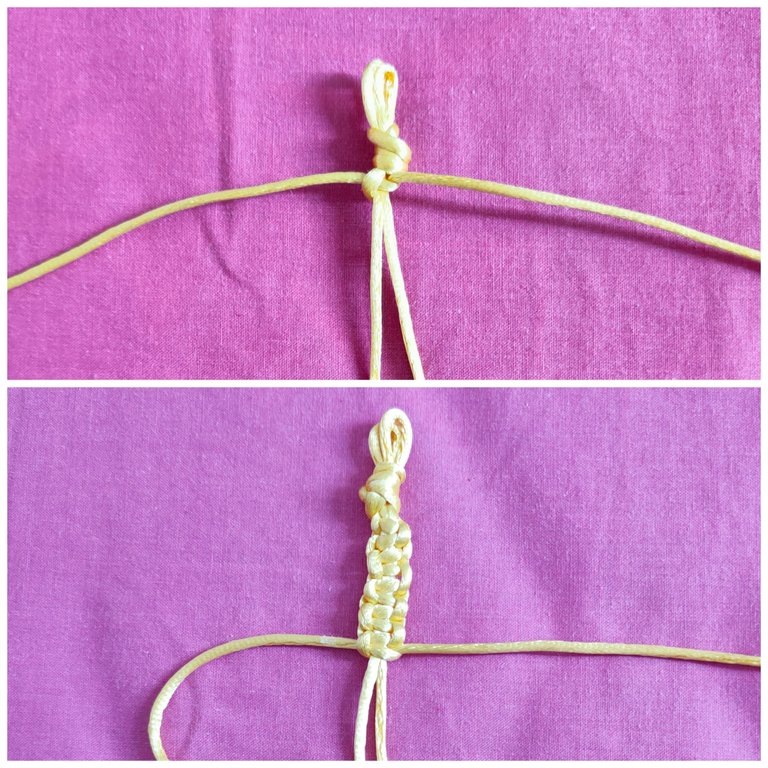
5.| In this way we will continue until half of the bracelet has been made.
5.| De esta forma vamos a continuar hasta que la mita de la pulsera esté realizada.
6.| This bracelet can go perfectly well without a charm or any other accessory, however I personally love to make accessories with pearls because it makes them look more subtle and elegant, so we are going to introduce the white pearl in one of the ends of the center.
6.| Esta pulsera puede ir perfectamente sin dije o algún otro accesorio sin embargo en lo personal me encanta realizar accesorios con perlas ya que los hace lucir más sutil y elegante así que una de las puntas del centro vamos a introducir la perla blanca.
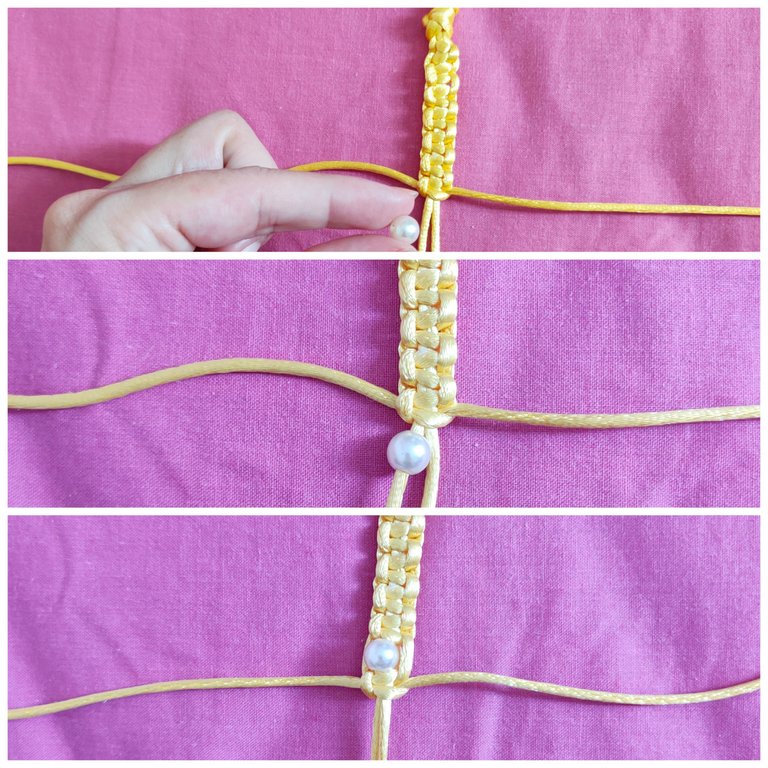
7.| Subsequently we will continue intertwining the ends of the sides to complete the bracelet ... at this point we will cut with scissors proportionally the ends of the center, leaving a length of approximately 5 centimeters because with these we will tie our bracelet when we use it and the ends of the sides we will cut as close as possible to the bracelet and to finish with a lighter burn these ends to prevent damage to these and likewise the bracelet.
7.| Posteriormente vamos a seguir entrelazando las puntas de los costados hasta culminar la pulsera... en este punto vamos con una tijera cortar proporcionalmente las puntas del centro, dejando un largo de 5 centímetros aproximadamente ya que con estas vamos amarras nuestra pulsera cuando la utilicemos y las puntas de los costados las vamos a cortar lo más cerca posible a la pulsera y para finiquitar con un encendedor quemaremos estás puntas para evitar que se dañe estás y asi mismo la pulsera.
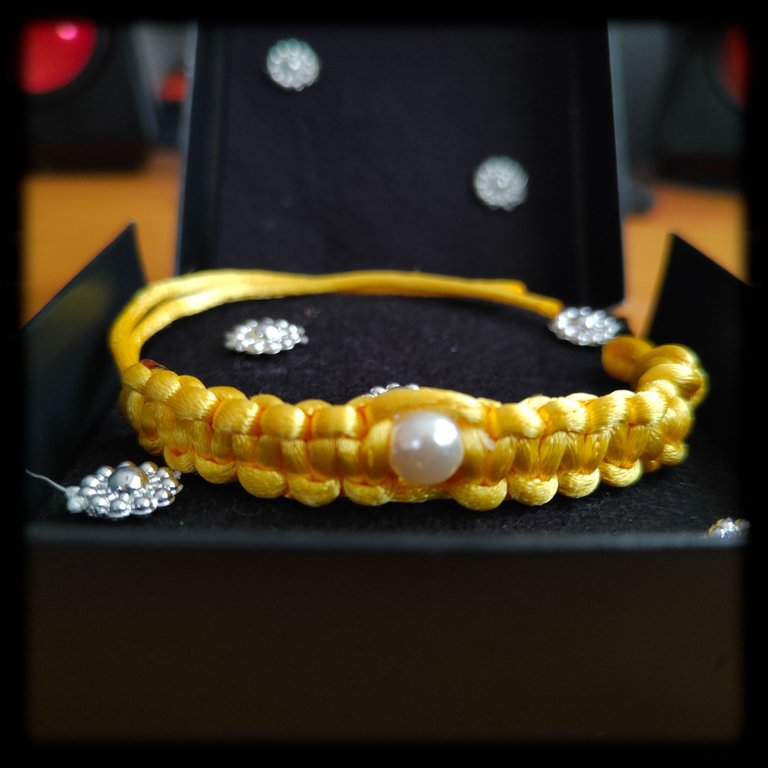
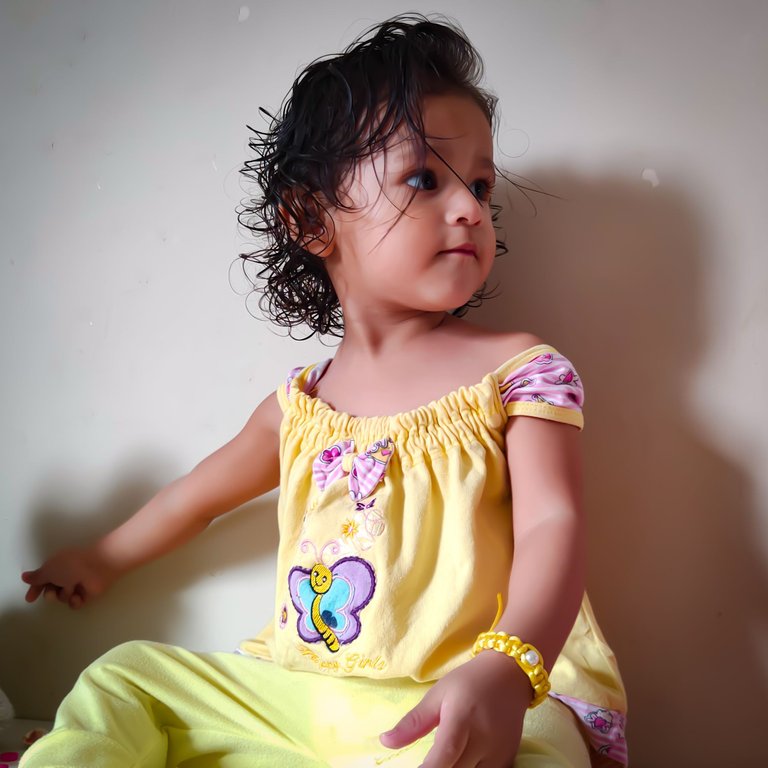
Result || Resultado
In this way our bracelet was ready, I hope that as far as possible I have been as explicit as possible the tutorial on how to make this beautiful bracelet so I show you photos of the finished work.
De esta manera estuvo lista nuestra pulsera, espero que en la medida de lo posible haya sido lo más explícita el tutorial de cómo se realiza esta hermosa pulsera así que les muestro fotos del trabajo concluido.
It is important to mention that depending on the size of the wrist of our hand we will need more meters of mouse tail, this time the bracelet was made for my daughter so we used 2 meters of mouse tail, if the bracelet is for an adult would be 4 meters which will be used, personally I like this type of bracelet for my daughter because they look beautiful and are more durable because the elastic bracelets are easily damaged, so the macrame bracelets with mouse tail is an excellent choice for our children under 2 years and economically speaking is also quite accessible and if we talk about entrepreneurship is also an excellent choice.
Es importante mencionar que dependiendo del tamaño de la muñeca de nuestra mano vamos a necesitar más metros de cola de ratón, en esta ocasión la pulsera fue realizada para mí hija por ello se utilizó 2 metros de cola de ratón, si la pulsera es para un adulto sería 4 metros los que se van a utilizar, en lo personal me gustan este tipo de pulsera para mí hija ya que lucen hermosas y son más duraderas ya que las pulseras de elásticos las daña fácilmente, así que las pulseras de macramé con cola de ratón es una excelente opción para nuestros hijos menores de 2 años y económicamente hablando tambien resulta bastante accesible y si hablamos de emprendimiento también es una excelente opción.
I hope that today's content has been to your liking and will be useful too, without further ado your friend says goodbye wishing you well, from Ecuador a strong and warm embrace.
Espero que el contenido de hoy haya sido de su agrado y les sea de utilidad también, sin más se despide su amiga deseando que se encuentren bien, desde Ecuador un fuerte y cálido abrazo.
🎥Imágenes y vídeo creados con: |Images and video created with: Youcut video| Bitmoji| Canva
🇪🇸 Traducido con DeepL
The rewards earned on this comment will go directly to the people sharing the post on Twitter as long as they are registered with @poshtoken. Sign up at https://hiveposh.com.
Gracias por tu apoyo bella @mariajcastro28 un abrazote amiga! 😊☀️✨
Un gusto amiga, lindo trabajo ♥️
Gracias ☺️ me alegra tanto saber que te gustó y leer tu cálido comentario amiga @mariajcastro28
No es nada amiga, te quedó muy lindo ♥️
Bella amiga
Gracias mi bella @jorgelissanchez
Gracias por el apoyo querido equipo @mayvileros ✨😊☀️
Amiga lindo trabajo, adoro ese tipo de tejido, y a la beba le luce😊❤️. Saludos 🤗💖💖
Gracias mi linda la verdad que amo este estilo de pulsera para mí niña es más resistente y lucen bastante @delvallecedeno gracias por tu lindo cumplido. 😊☀️✨
Yo quiero una 🥺❤️... Una para cada color de ropa 😁.
Lindo trabajo Amiga hermosa 😍
!discovery 33
Mi @maridmc bella con gusto te haría una de cada color, me alegra mucho que te gustará 😊✨☀️ gracias por el apoyo un fuerte abrazote amiga bella.
This post was shared and voted inside the discord by the curators team of discovery-it
Join our community! hive-193212
Discovery-it is also a Witness, vote for us here
Delegate to us for passive income. Check our 80% fee-back Program
Thank you for your support @discovery-it
Le quedo preciosa la pulsera a tu hija, se ve preciosa y coqueta, nos encanta ver el lindo paso a paso que nos has regalado hoy.
Muchas gracias ☺️ me alegra mucho leer su comentario y saber que fue grato el proyecto de hoy y fuerte abrazo y bendiciones estimado equipo @hive-189504
You are very creative and very suitable to be a mother.😁🥰
¡Felicitaciones!
Estás participando para optar a la mención especial que se efectuará el domingo 2 de octubre del 2022 a las 8:00 pm (hora de Venezuela), gracias a la cual el autor del artículo seleccionado recibirá la cantidad de 1 HIVE transferida a su cuenta.
¡También has recibido 1 ENTROKEN! El token del PROYECTO ENTROPÍA impulsado por la plataforma Steem-Engine.
1. Invierte en el PROYECTO ENTROPÍA y recibe ganancias semanalmente. Entra aquí para más información.
2. Contáctanos en Discord: https://discord.gg/hkCjFeb
3. Suscríbete a nuestra COMUNIDAD y apoya al trail de @Entropia y así podrás ganar recompensas de curación de forma automática. Entra aquí para más información sobre nuestro trail.
4. Visita nuestro canal de Youtube.
Atentamente
El equipo de curación del PROYECTO ENTROPÍA