Hola, holaaa! Cómo se encuentran hoy, artistas Creativos de la joyería? Otra vez en la mitad de semana acercándonos a esas fechas que siempre nos animan y nos dan alegría ya que casi siempre seguimos esa tradición de reunirnos en familia para despedir un año y recibir otro.
Aprovechando el proyecto que les traigo en este día; agradezco en nombre de todos los artesanos de la comunidad, los elogios de que fueron objetos las cuentas con que realicé mi manualidad pasada, de verdad ellos son grandiosos en madera, ceramica, arcilla y todo ese etcétera larguísimo en lo que a ese ramo se refiere.
Bueno estoy elaborando mi detalle para compartir con mis compañeros como un recuerdo de este año, que aunque ha tenido muchos altibajos lo hemos pasado unidos y como la gran familia que somos.
Hice un arbolito de navidad para un llavero, ya que así lo puedo obsequiar a todos porque es una pieza unisex, pero usando materiales para joyería fina, con el mismo proyecto se puede elaborar unos bellísimos aretes, un colgante para una bonita cadena, cualquier uso para adornarnos en navidad estaría fantástico; en alambrismo se vería coquetisimo verdad @alexanderflx?.
Con mucho gusto para todos ustedes reciban su llavero virtual y aquí les dejo el paso a paso de cómo lo hice
Hello, hello! How are you today, Creative jewelry artists? Once again in the middle of the week, approaching those dates that always encourage us and give us joy, since we almost always follow that tradition of getting together as a family to say goodbye to one year and receive another.
Taking advantage of the project that I bring you today; I thank on behalf of all the artisans of the community, the praise that the beads with which I made my last craft were the objects, they really are great in wood, ceramics, clay and all that very long etcetera in what this branch refers to .
Well, I am preparing my detail to share with my colleagues as a memory of this year, that although it has had many ups and downs, we have spent it together and as the great family that we are.
I made a Christmas tree for a keychain, since I can give it to everyone because it is a unisex piece, but using materials for fine jewelry, with the same project you can make beautiful earrings, a pendant for a pretty chain, any use to decorate ourselves at Christmas it would be fantastic; In wire rope it would look very cute, right @alexanderflx?
With great pleasure for all of you receive your virtual keychain and here I leave the step by step of how I did it:

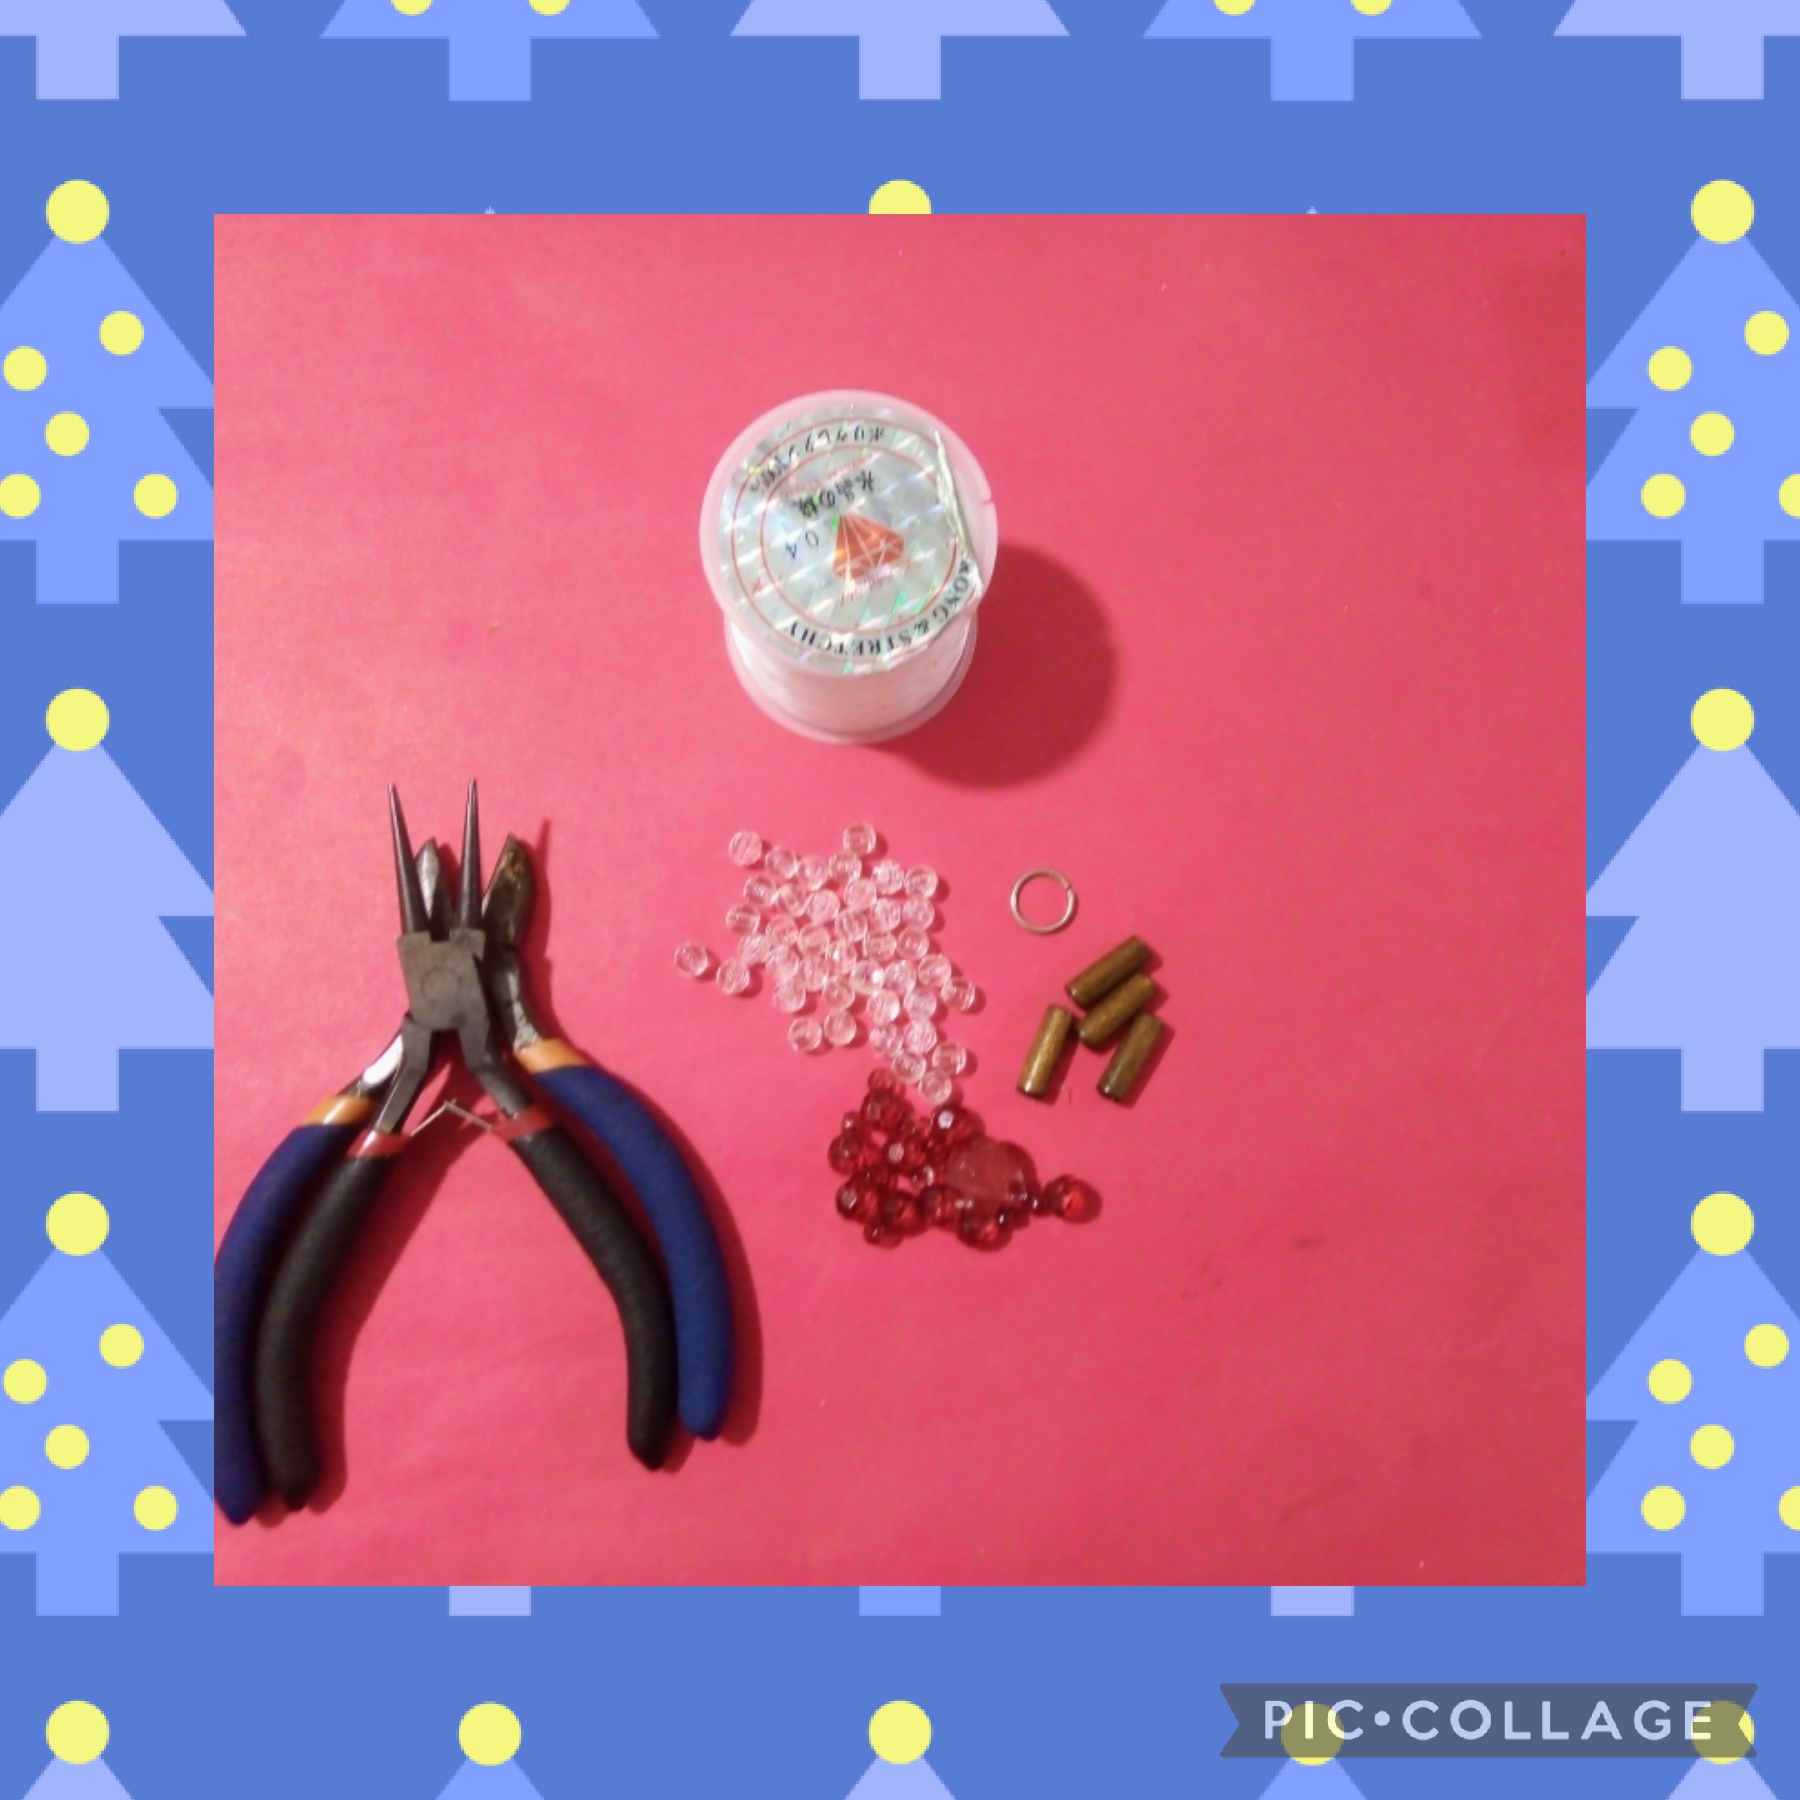
Los materiales que use para elaborar mi bello arbolito navideño:
*Zafetas acrílicas
transparentes.
*Hilo de nylon
transparente.
*Cuenta acrílica en forma
de flor roja.
- Cuentas
tubulares de madera
marrón .
*Mostacillas: colores
variados.
*Regla.
*Tijeras. - Pinzas.
The materials I used to make my beautiful Christmas tree:
*Acrylic trays
transparent.
*Nylon thread
transparent.
*Acrylic bead in shape
of red flower
- Accounts
wooden tubular
Brown . - Beads: colors
varied.
*Rule.
*Scissors. - Tweezers
Así realicé con estos pasos mi llavero con forma de Arbolito Navideño :
PRIMER PASO:
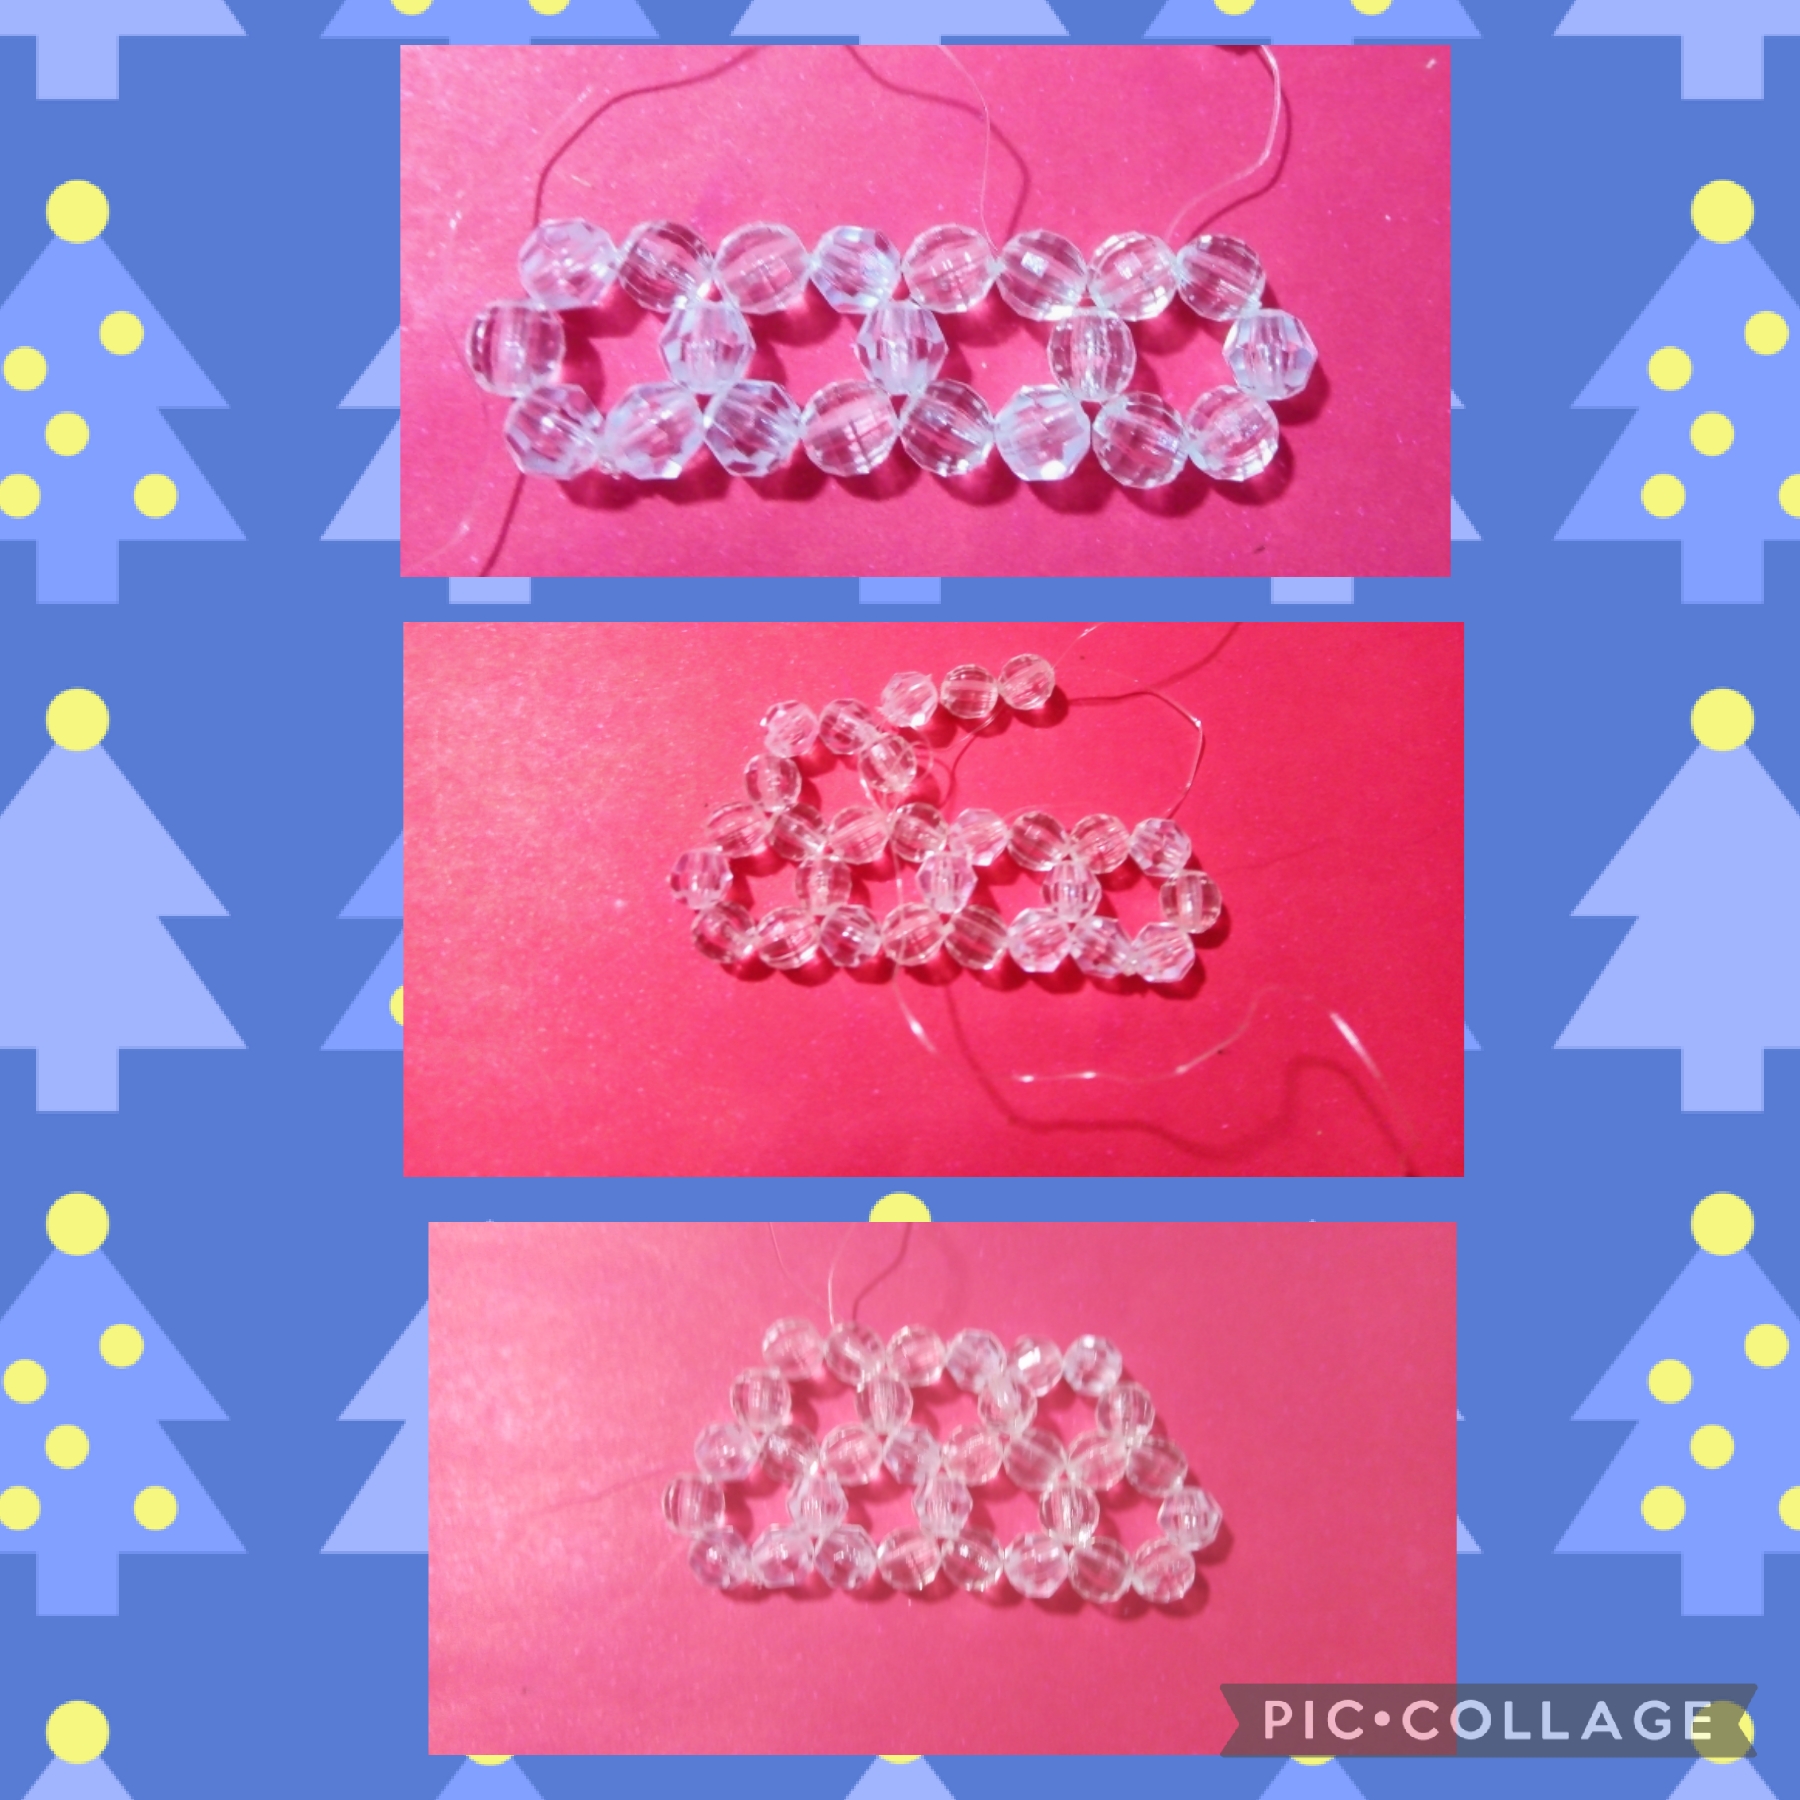
Comienzo usando la regla para medir sesenta centímetros del hilo de nylon transparente y corto con las tijeras, ahora pongo seis piedras zafetadas acrílicas transparentes para formar un anillo como ya lo he explicado antes en otros tutoriales introduciendolas por una punta del hilo de nylon y cruzando en la última cuenta, como muestro las fotos.
This is how I made my keychain in the shape of a Christmas tree with these steps:
FIRST STEP:
I start using the ruler to measure sixty centimeters of the transparent nylon thread and cut with scissors, now I put six transparent acrylic zafetadas stones to form a ring as I have explained before in other tutorials, introducing them through one end of the nylon thread and crossing in the last account, as I show the photos.
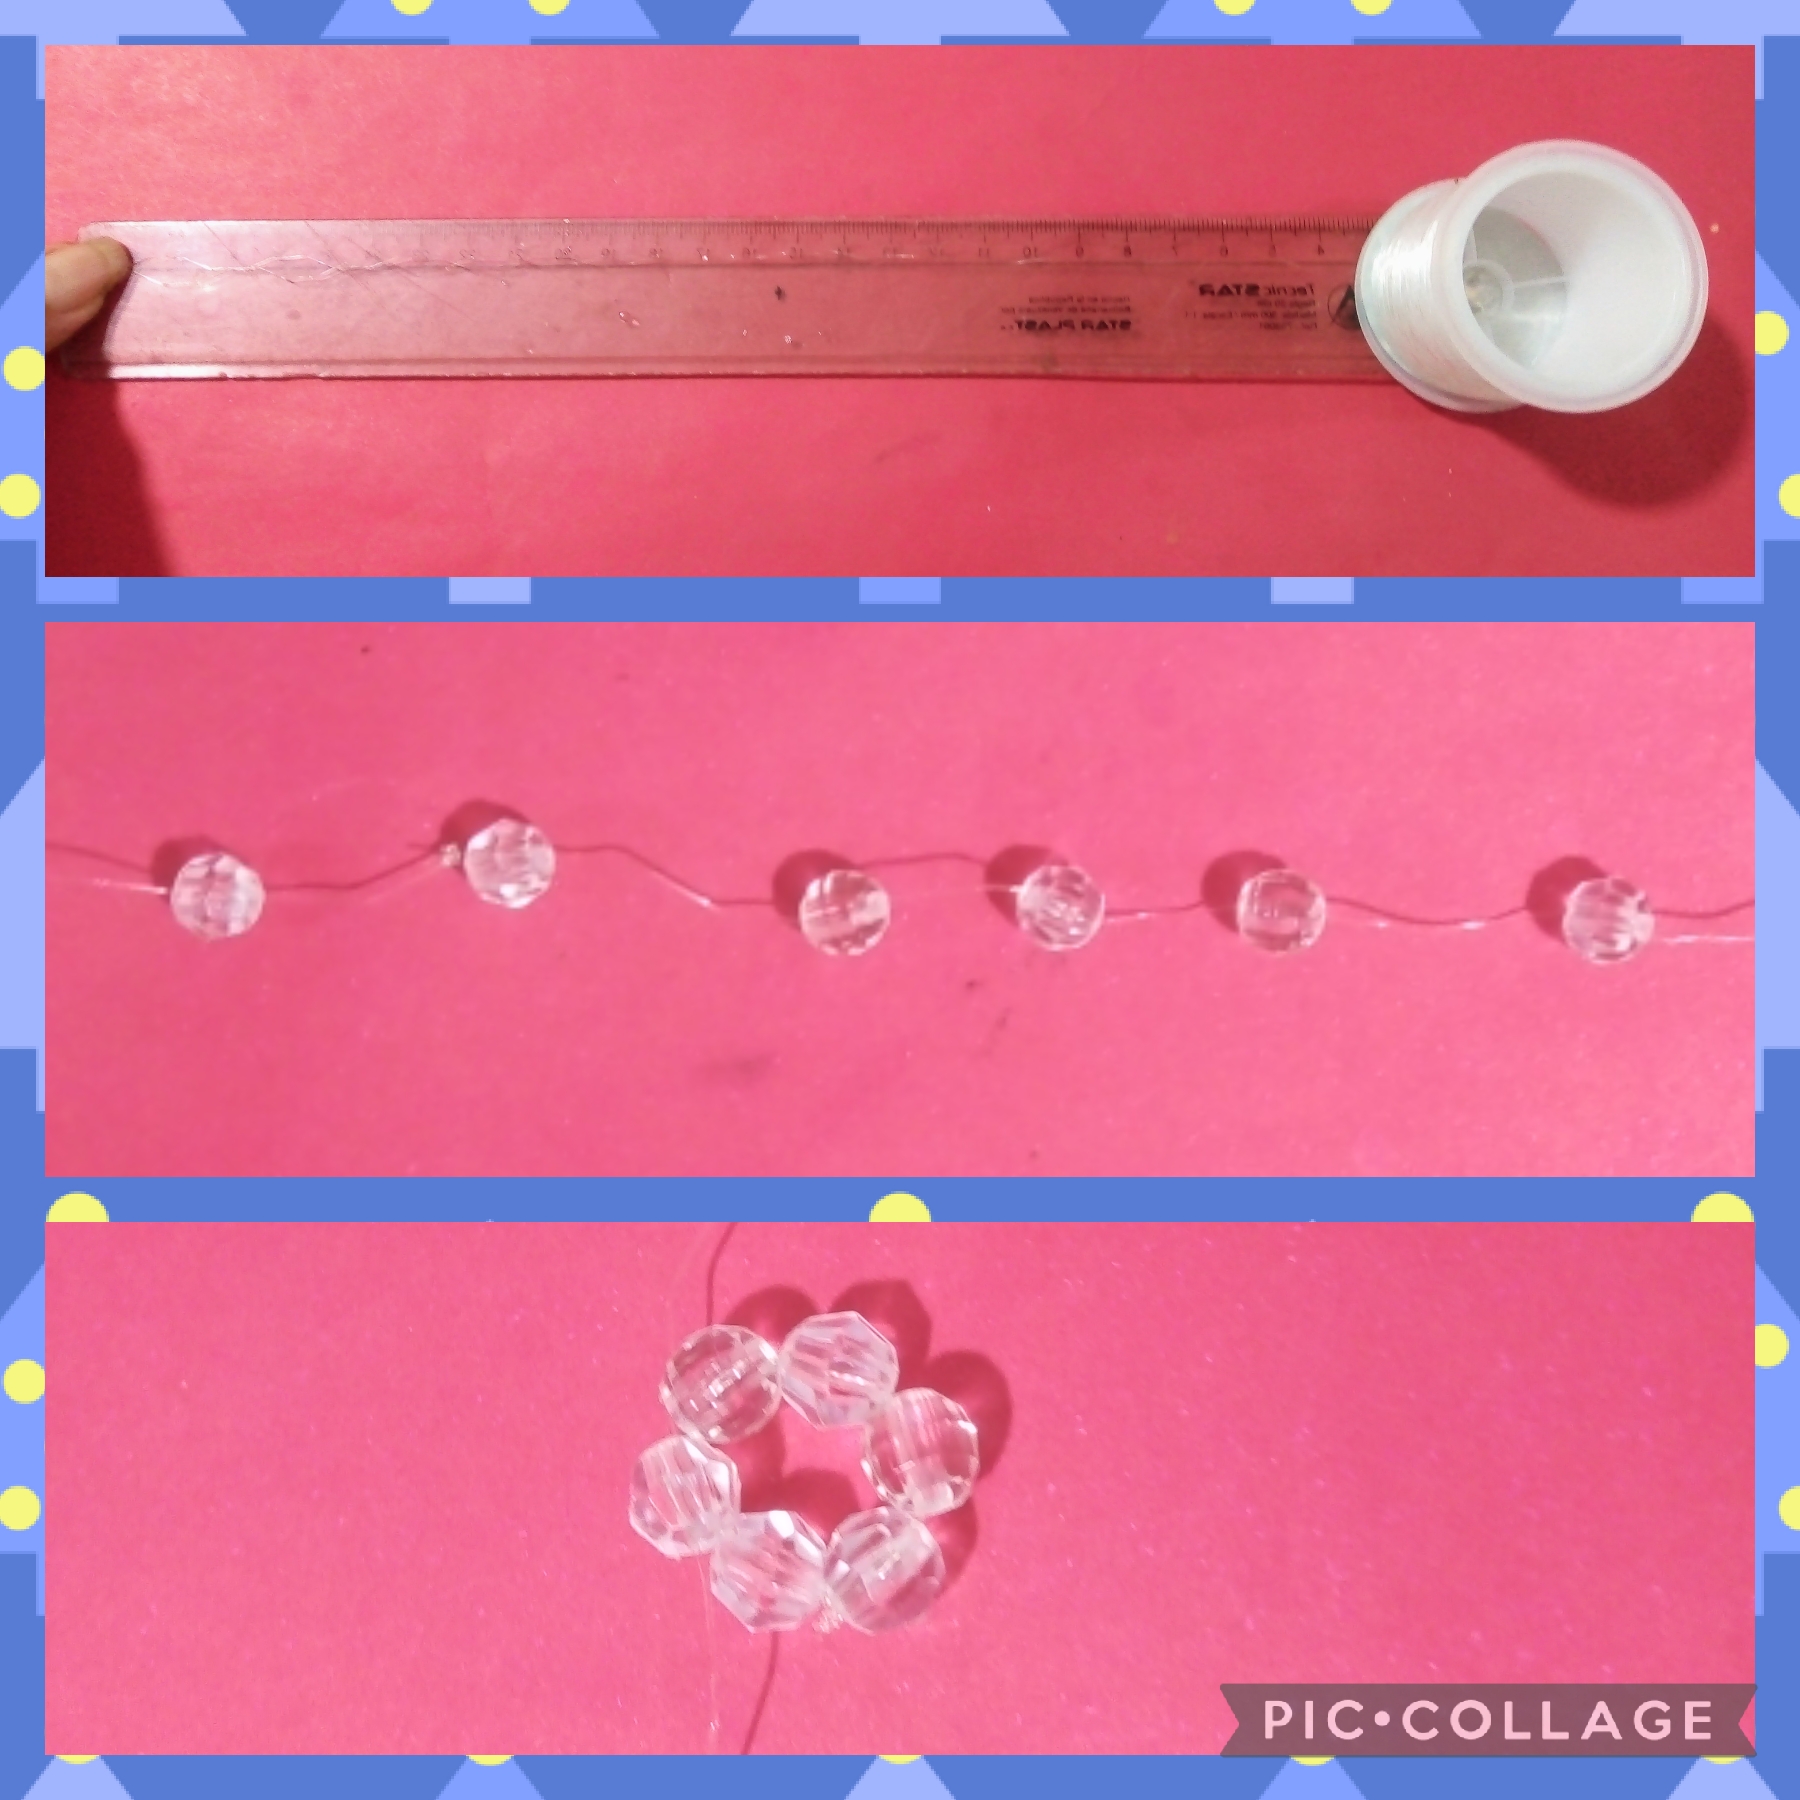
SEGUNDO PASO:
Después de formar el primer anillo, introduzco cinco piedras en vez de seis por la punta del lado derecho y cruzo con la ultima del lado izquierdo para formar dos anillos, así se ve en la foto.
SECOND STEP:
After forming the first ring, I introduce five stones instead of six through the tip on the right side and cross with the last one on the left side to form two rings, as seen in the photo.
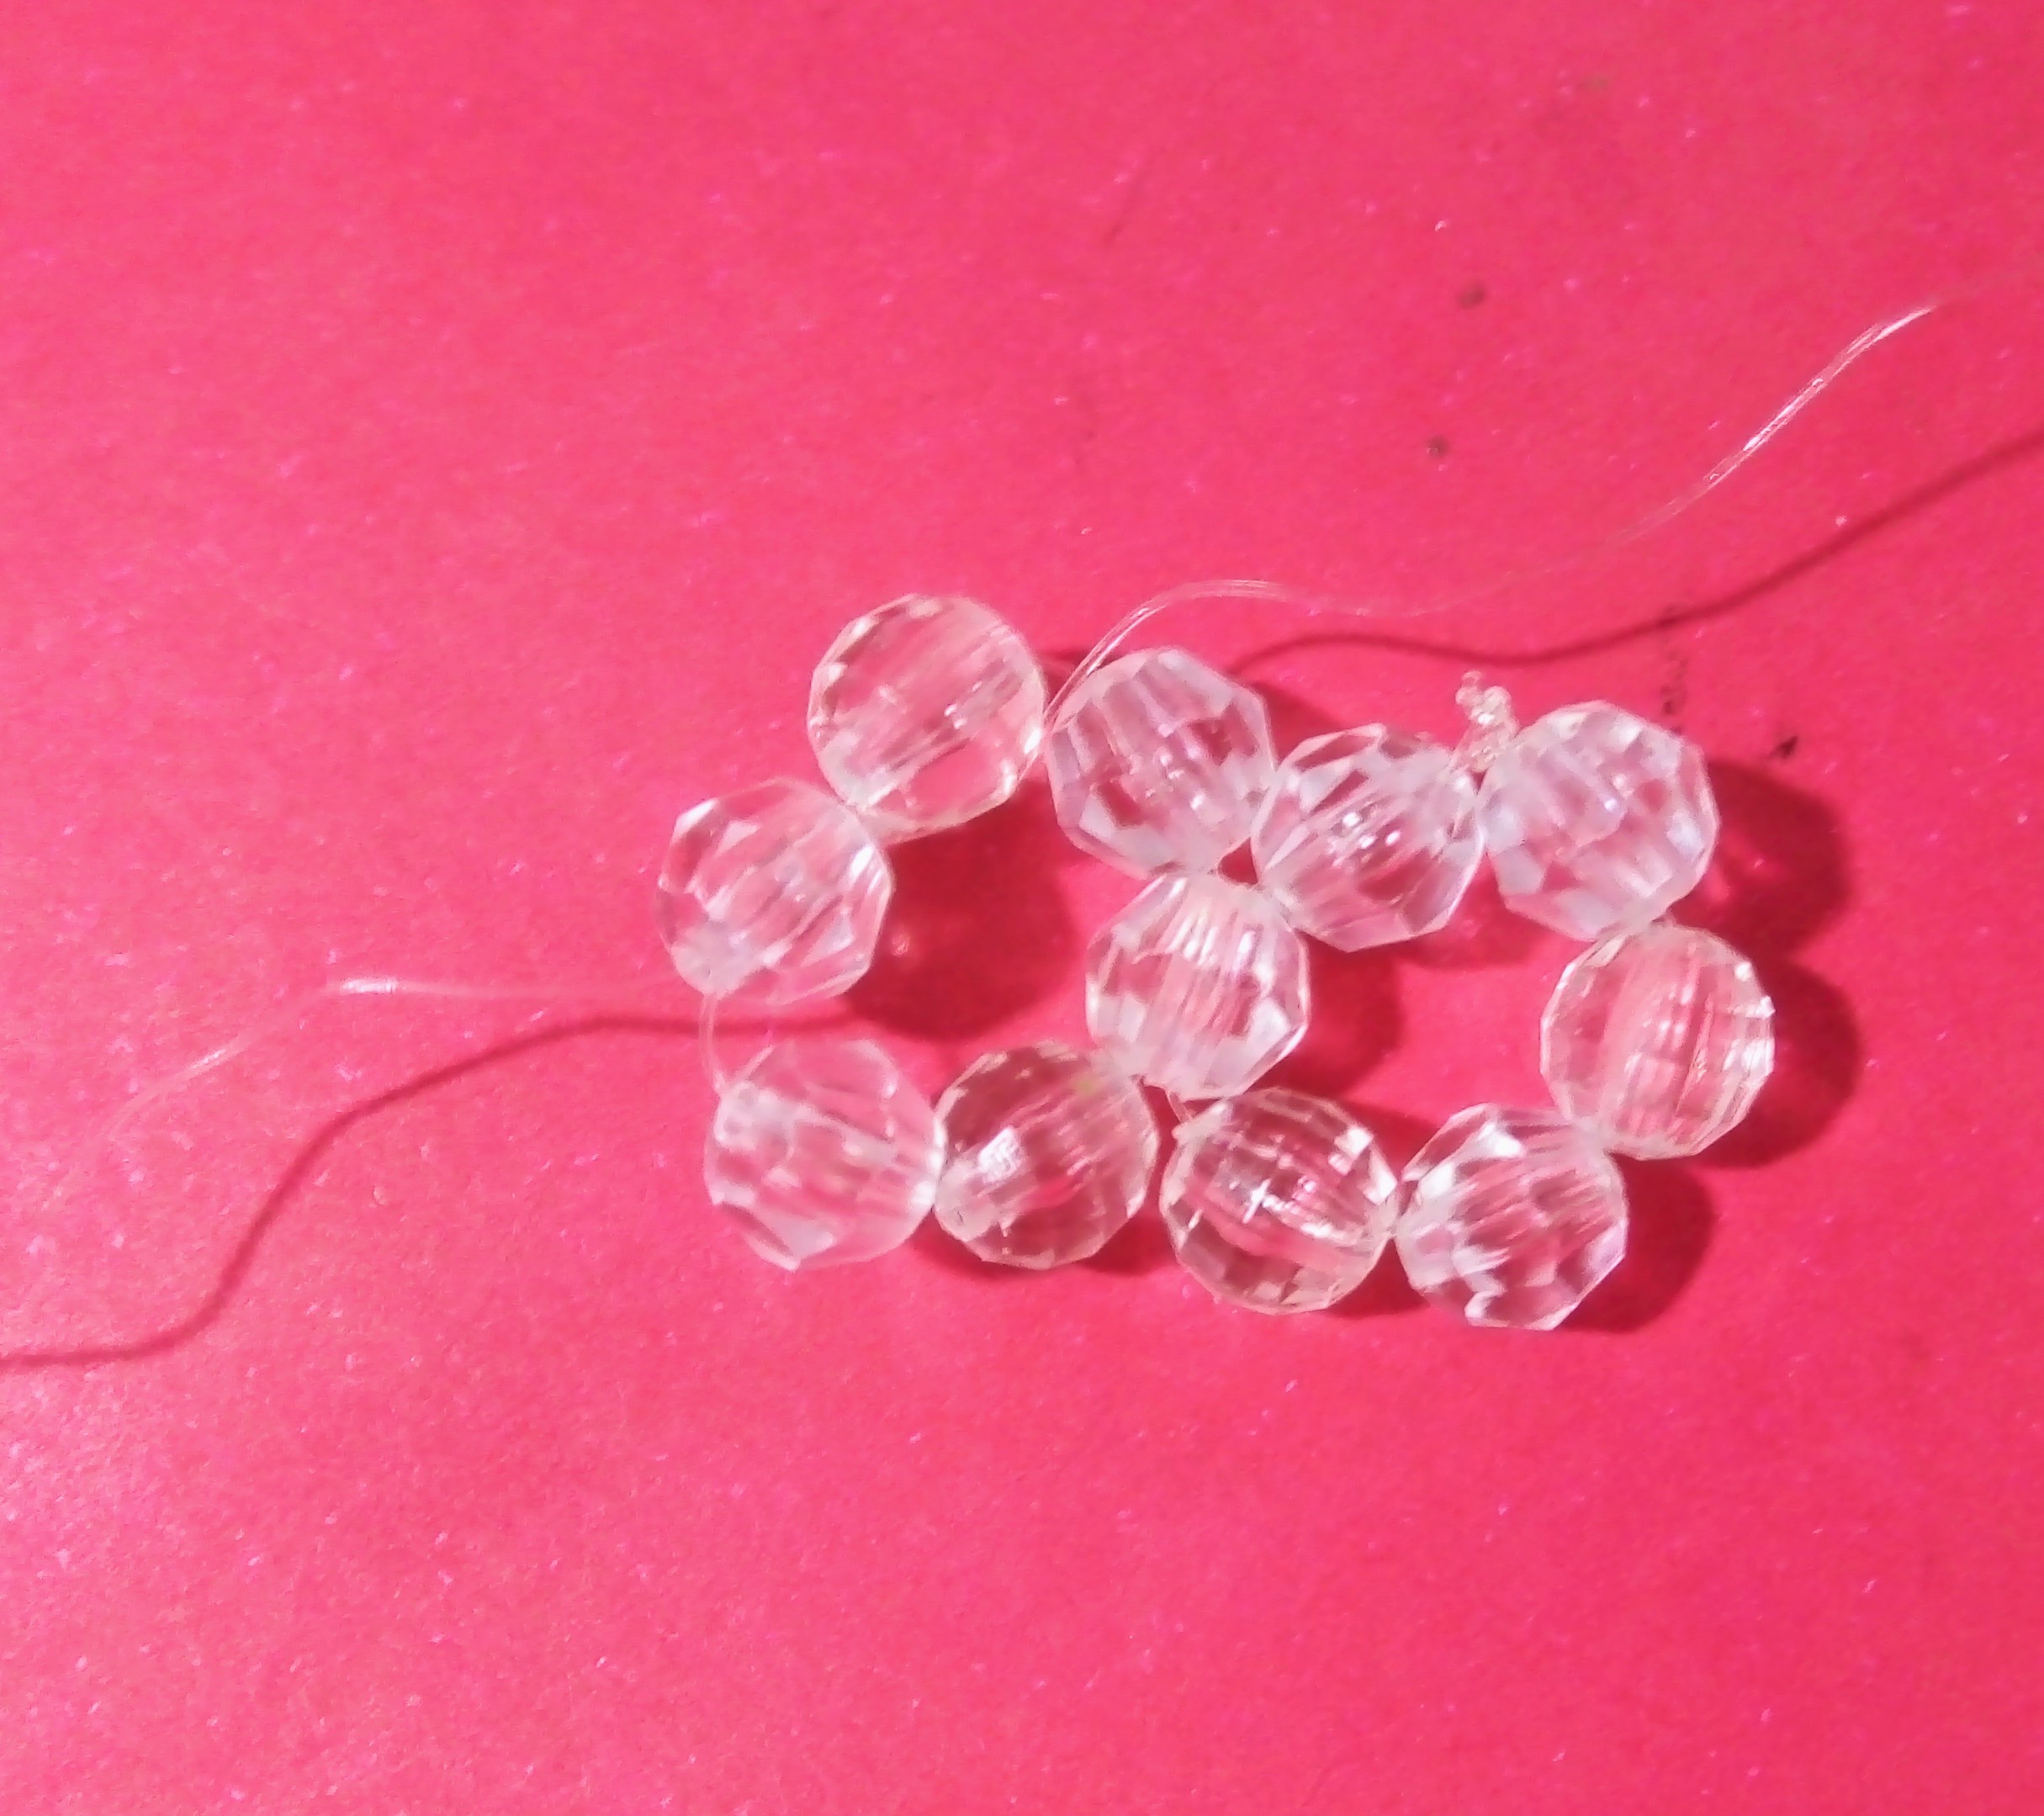
TERCER PASO:
Sigo con la misma secuencia introduciendo cinco piedras en cada paso hasta lograr cuatro círculos (ver fotos
).
THIRD STEP:
I continue with the same sequence introducing five stones in each step until I achieve four circles (see photos
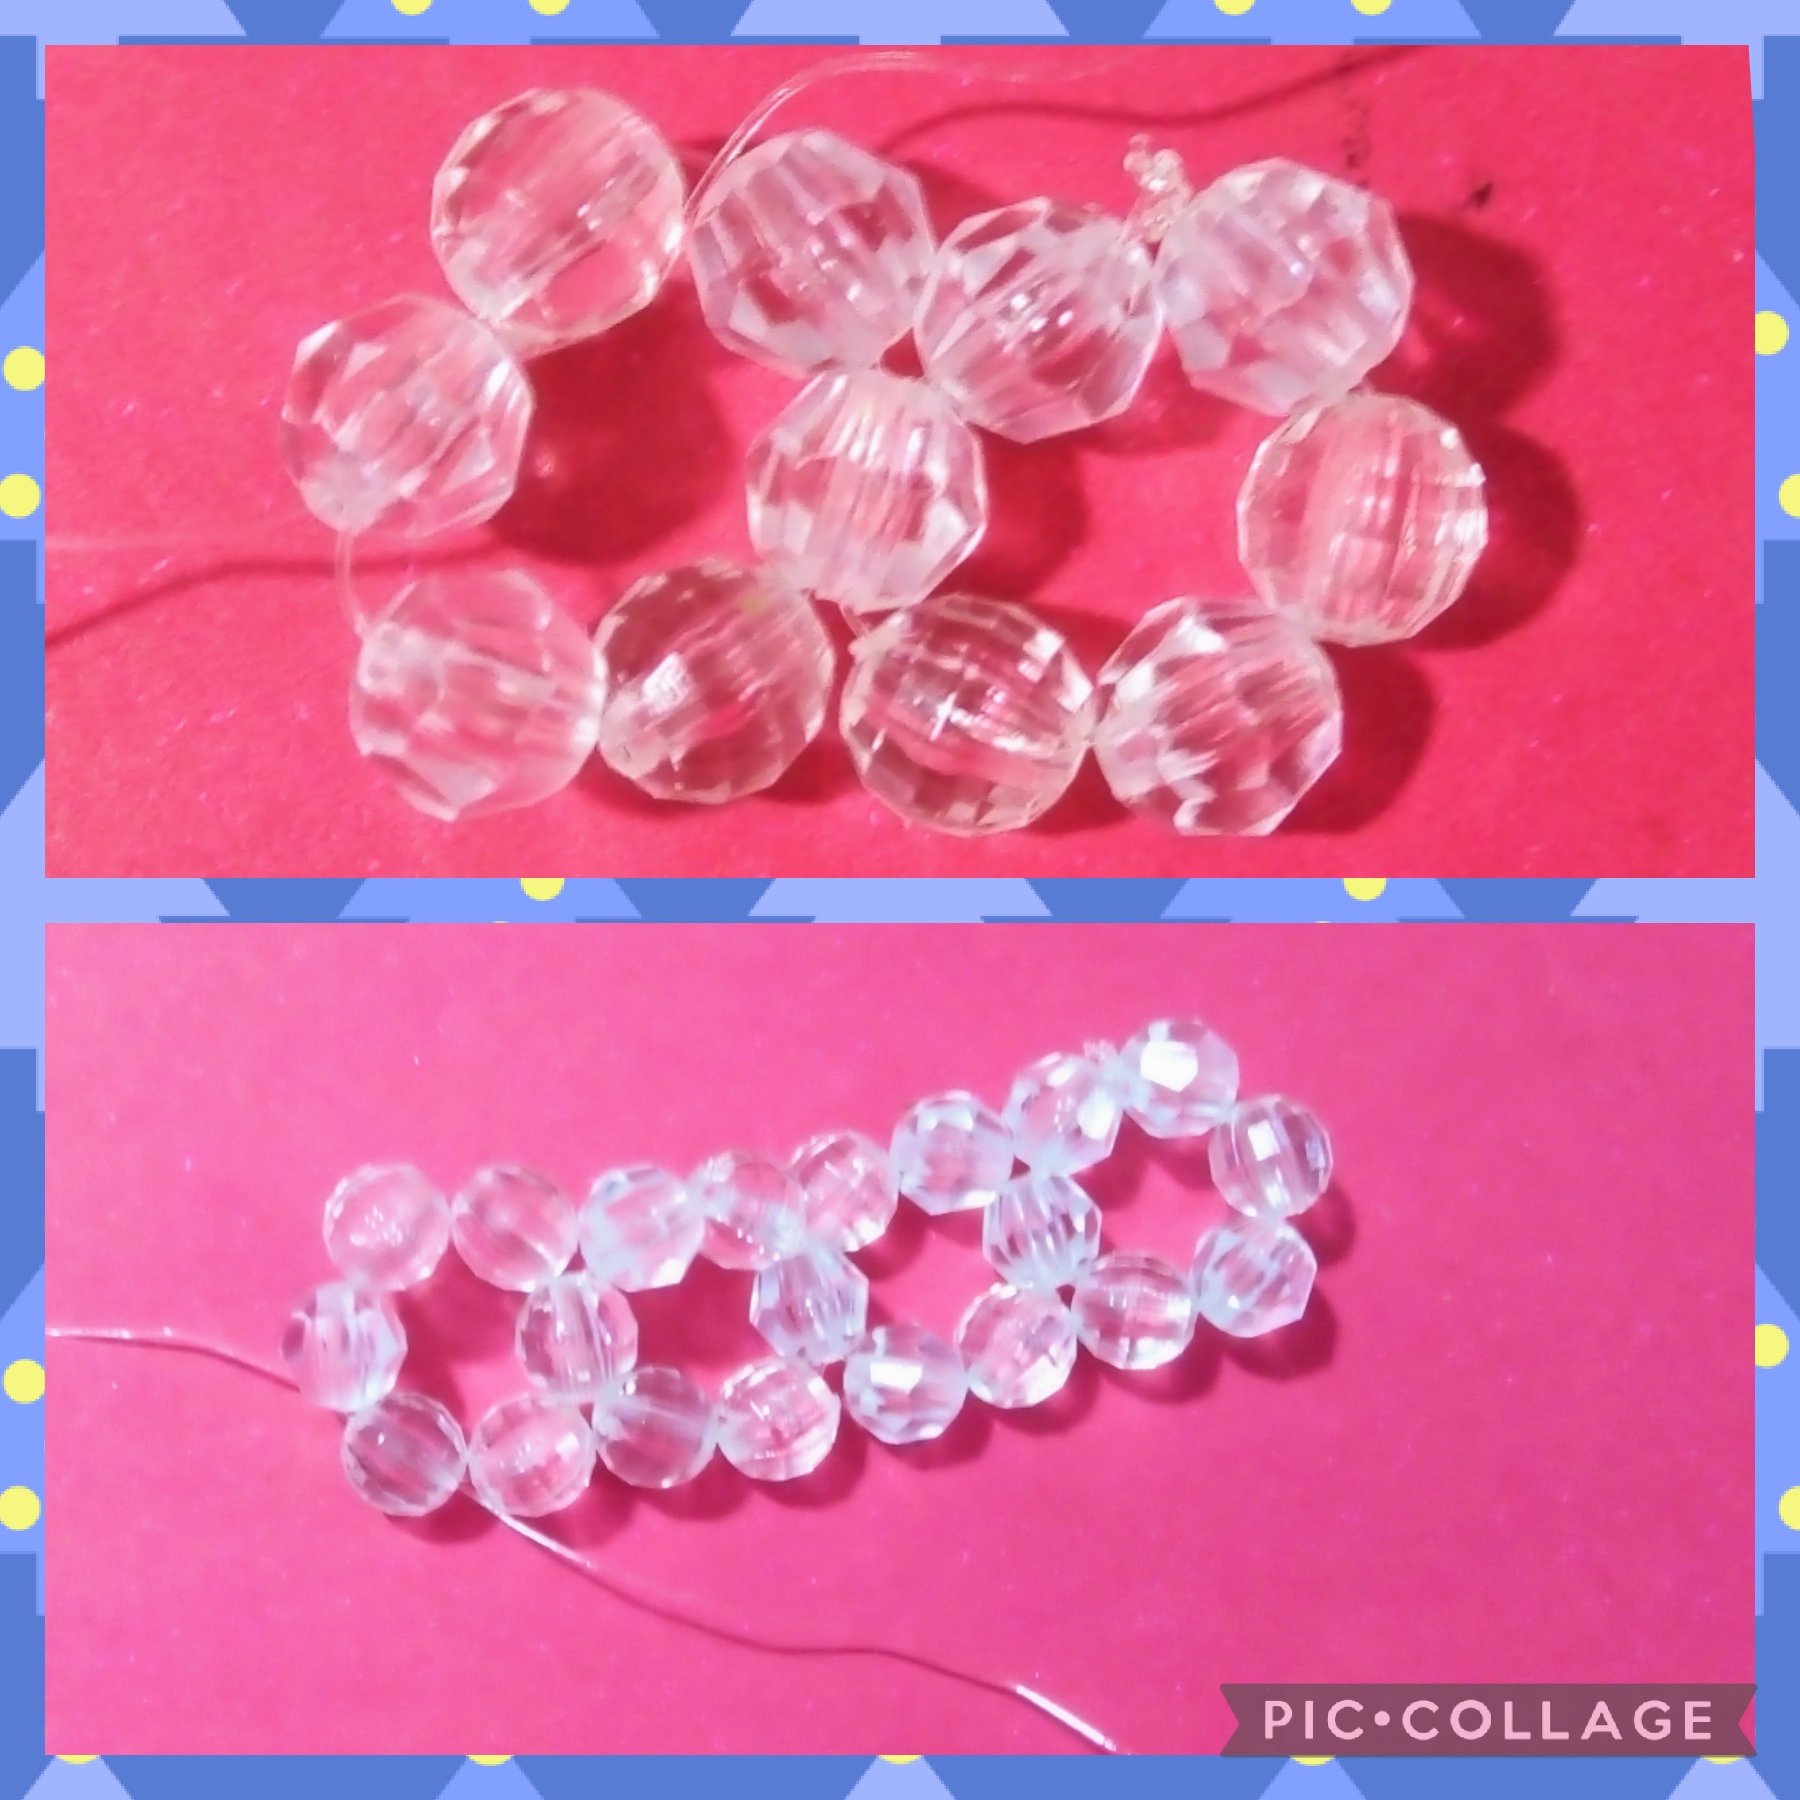
CUARTO PASO:
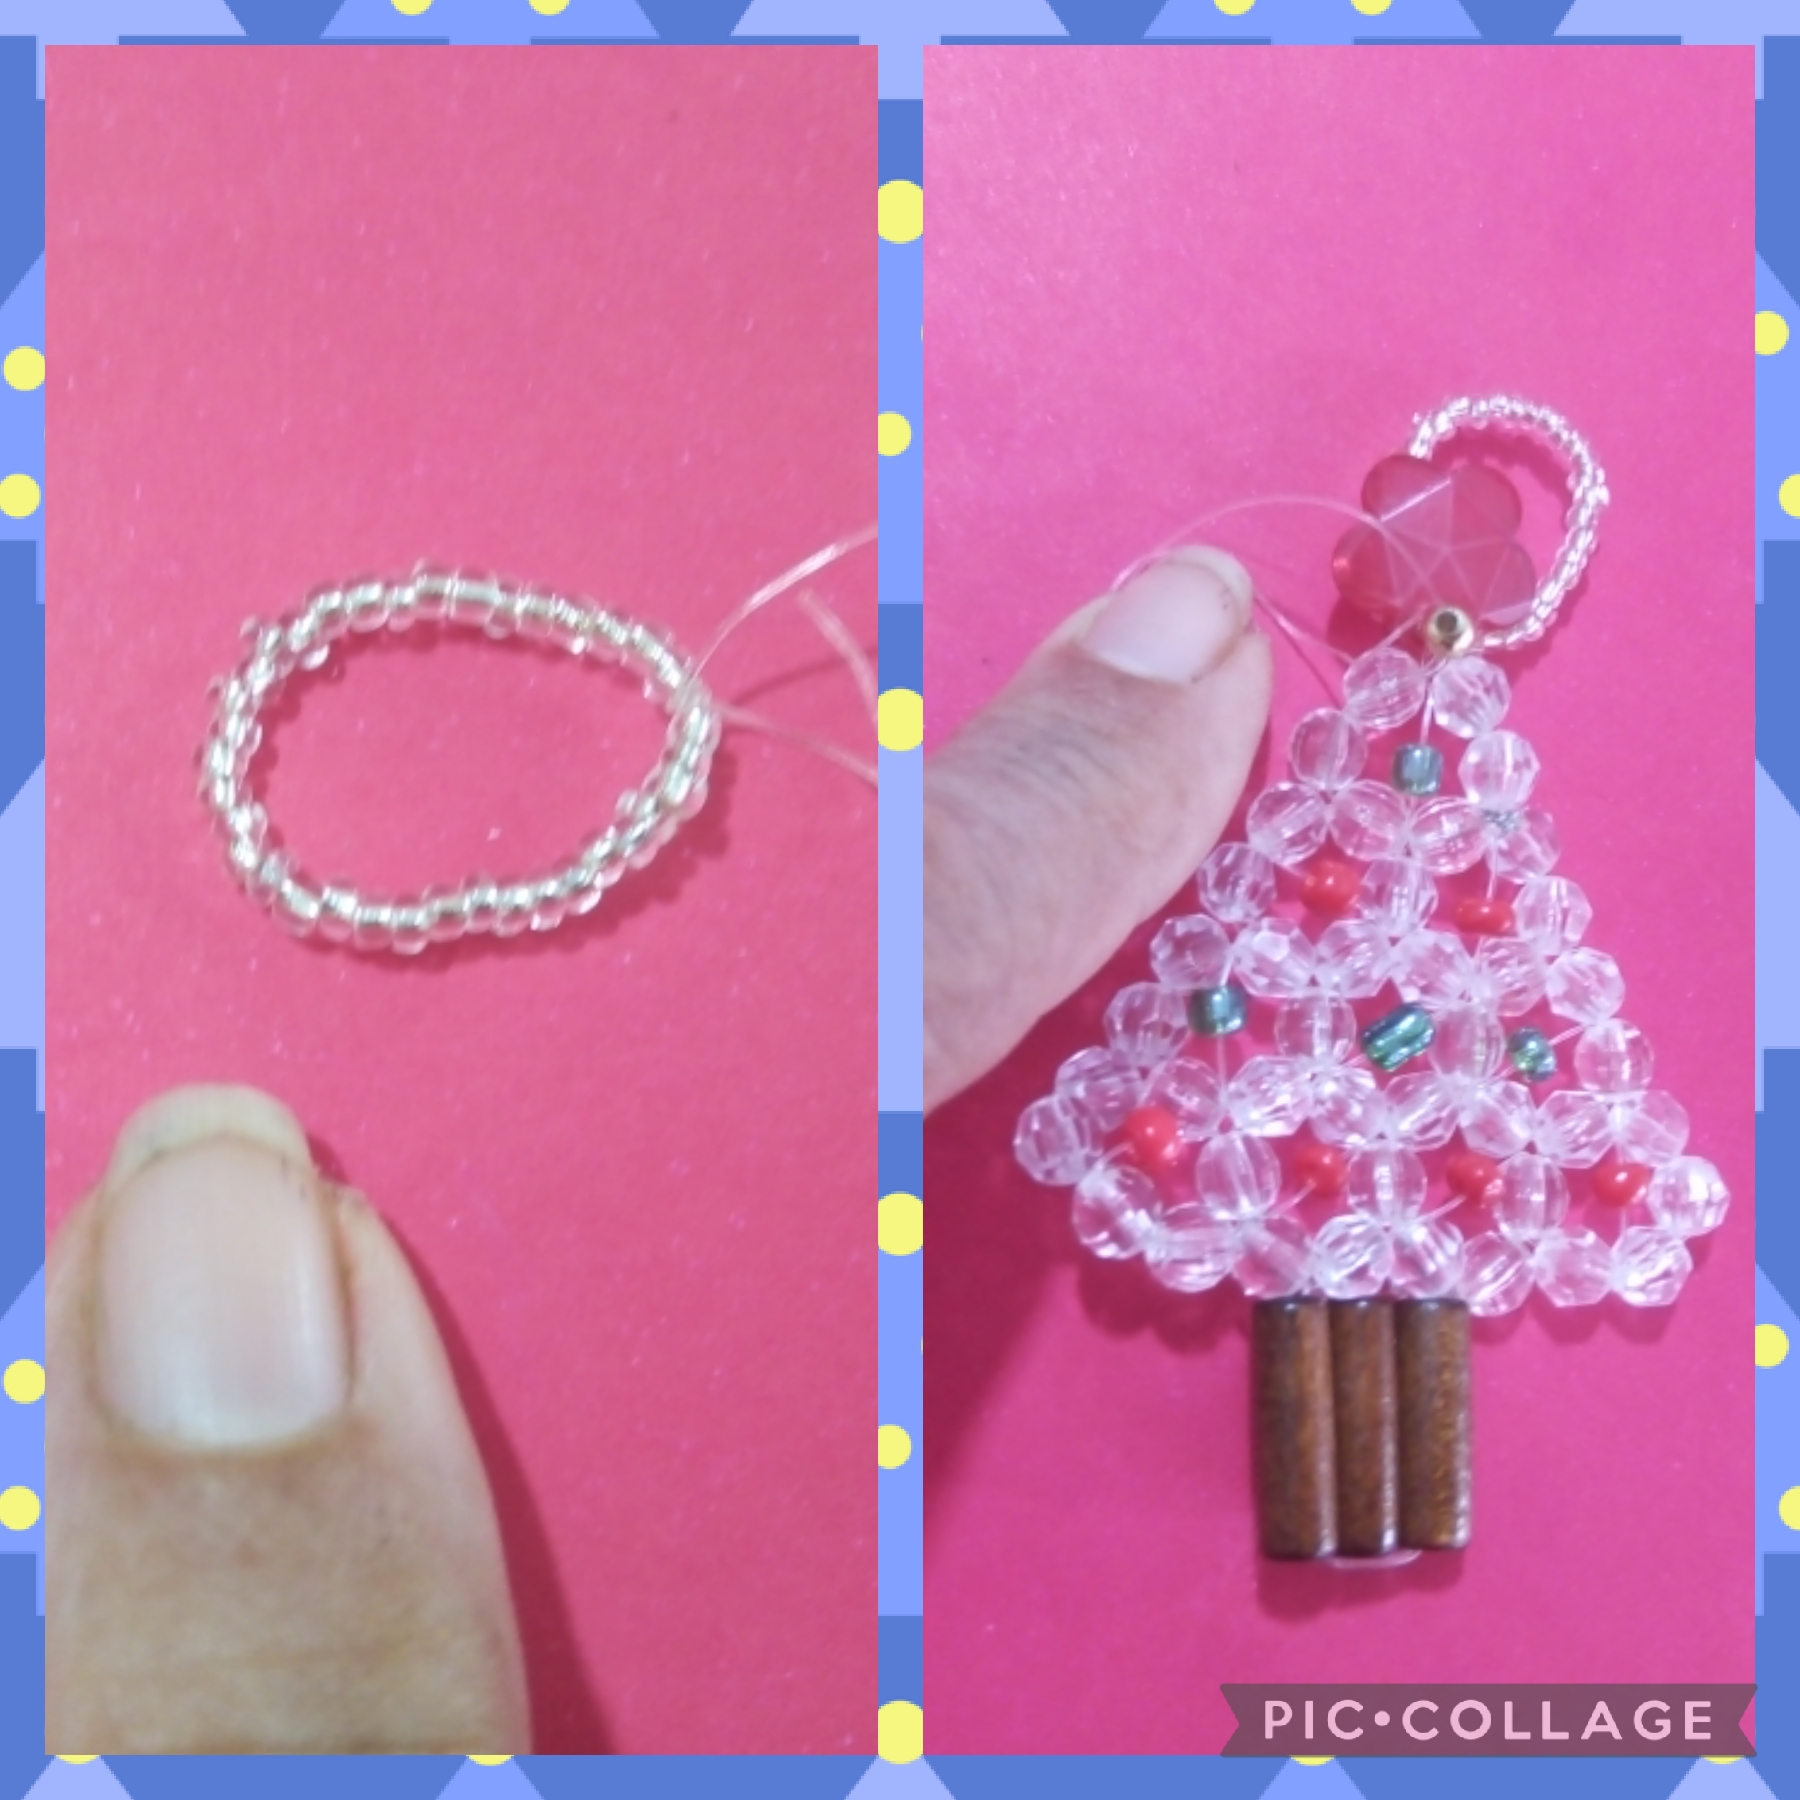
Ahora elaboró tres círculos encima de los cuatros, para ello saco las puntas del hilo de nylon por las dos cuentas del medio que forman dos de los círculos de la base, ahora introduzco cuatro zafetas y de nuevo tengo un círculo de seis cuenta, hago lo mismo con los círculos siguientes y así formo los tres círculos como se ve en las fotos. Formo de igual manera dos círculos más encima de los tres realizados y uno encima de los dos y así se va viendo mi arbolito.
FOURTH STEP:
Now he made three circles on top of the four, for this I remove the ends of the nylon thread through the two beads in the middle that form two of the circles at the base, now I introduce four zafetas and again I have a circle of six beads, I do the same same with the following circles and thus I form the three circles as seen in the photos. I form in the same way two more circles on top of the three made and one on top of the two and this is how my little tree looks.

QUINTO PASO:
Ahora tomo la flor acrílica roja y con un trocito del hilo de nylon que introduzco por su orificio lo ato a las dos zafetas que están en el medio del último círculo de la parte de arriba; con las piezas tubulares de madera las ato entre si con hilo de nylon y para simular el tronco de mi arbolito lo coloco como se ve en las fotos.
FIFTH STEP:
Now I take the red acrylic flower and with a small piece of the nylon thread that I introduce through its hole I tie it to the two zafetas that are in the middle of the last circle on the top; With the tubular pieces of wood I tie them together with nylon thread and to simulate the trunk of my little tree I place it as seen in the photos.

SEXTO PASO:
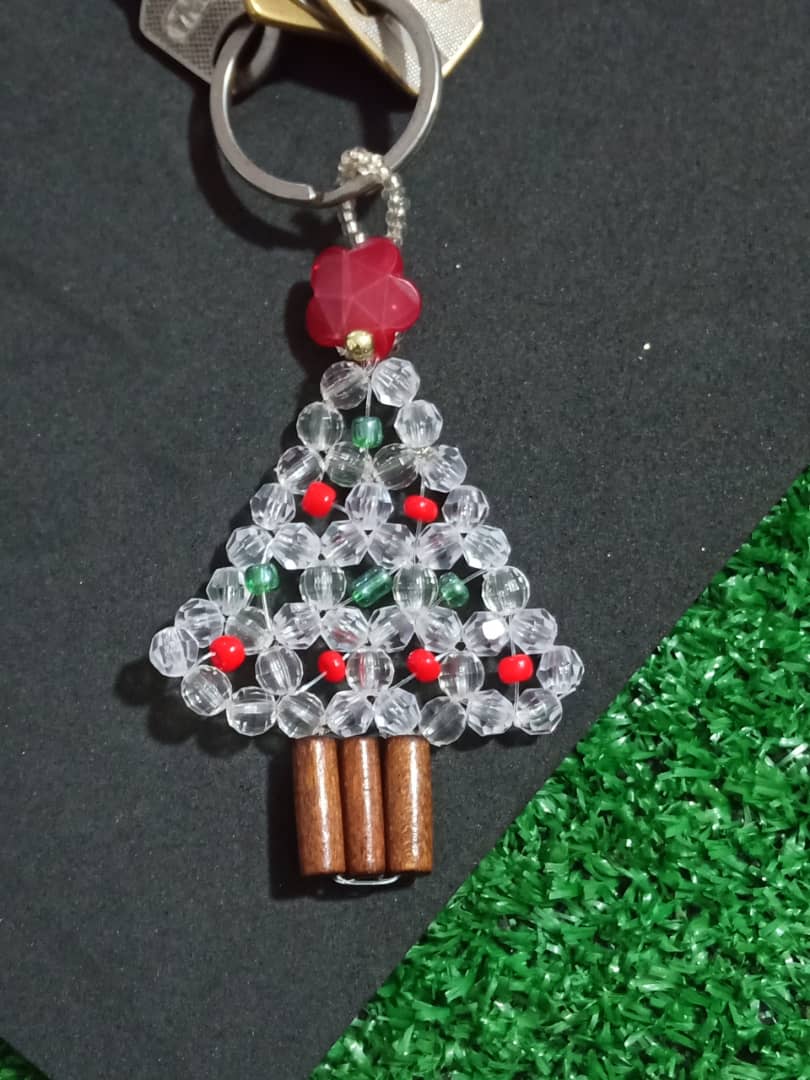
En este paso decoro mi arbolito colocando Mostacillas rojas y verdes que fui colocando con el hilo de nylon y las coloqué en cada círculo del arbolito, ya para terminar hago un anillo con Mostacillas que pongo detrás de la flor y fijo con una perla dorada; igual que en las fotos.
SIXTH STEP:
In this step I decorate my tree by placing red and green Beads that I placed with the nylon thread and placed them in each circle of the tree, and to finish I make a ring with Beads that I put behind the flower and fix with a golden pearl; same as in the photos.
Artistas Creativos de la joyería, así quedó mi hermoso llavero con motivo de arbolito navideño, espero que les guste y lo reciban con mucho cariño pues quise dedicarselo a ustedes, gracias por ver y leer mis publicaciones, nos vemos en la próxima manualidad, bye, bye.
Creative jewelry artists, this is how my beautiful Christmas tree keychain turned out, I hope you like it and receive it with love because I wanted to dedicate it to you, thanks for viewing and reading my publications, see you in the next craft, bye, bye.
Las imágenes de este tutorial son de mi propiedad, las fotos fueron tomadas con mi celular Motorola E6 y las edite con una aplicación gratis del mismo.
Para traducir texto usé geogle traduuctor.
The images in this tutorial are my property, the photos were taken with my Motorola E6 cell phone and I edited them with a free application of the same.
To translate text I used geogle translator.

The rewards earned on this comment will go directly to the people( @mariajcastro28 ) sharing the post on Twitter as long as they are registered with @poshtoken. Sign up at https://hiveposh.com.
Genial. Me sorprende como vas organizando los cristales hasta dale la forma del árbol. Es un muy bonito trabajo.
Felicidades y mucho éxito a tu publicación.
Gracias, @artsugar que bueno que te gustó porque aunque sea virtual uno es para ti, que estés muy bien saluditos.
Jajajajaja... gracias. Que bonito gesto. Eso es lo importante.
Abrazos.
Me encantó el resultado amiga @nhaydu, maravilloso trabajo quedó hermoso te felicito 👏👏💖 Suerte!!
Agradecida por tan hermoso comentario @delvallecedeno, por eso te ganastes tu llavero virtual, jaja saluditos pues.
@nhaydu excelente creación, te ha quedado muy hermoso, digno de esta época decembrina, saludos 🤗
Me encanta tu comentario @anamariag, porque es mi souvenir navideño virtual para ustedes y lo hice con mucho cariño, así que puedes disponer del tuyo como recuerdo de éstas fechas, un abrazote, feliz noche.
Muy lindo amiga, para llevar la navidad a todos lados! ♥️
Muchísimas gracias, @mariajcastro28, la navidad es como un punto de encuentro para compartir el entusiasmo y la alegría que sentimos y si , debemos llevarla a todas partes. Un abrazote.
Thank you for sharing this post on HIVE!
Your content got selected by our fellow curator jasonmunapasee & you just received a little thank you upvote from us for your great work! Your post will be featured in one of our recurring compilations which are aiming to offer you a stage to widen your audience within the DIY scene of Hive. Next time make sure to post / cross-post your creation within the DIYHub community on HIVE and you will receive a higher upvote ;) Stay creative & HIVE ON!
Please vote for our hive witness <3
WoW 💕💕💕💕💕💕💕💕 @nhaydu este llavero te ha quedado precioso, es maravilloso ver el paso a paso y el resultado, poco eh trabajado con cuenta un trabajo muy bello gracias por compartirlo amiga. 🙂💕☺️
Me encanta ver cómo aprecias tu llavero, @mili2801 ese si es un bonito gesto, gracias por ese comentario tan halagador, un abrazote.
Bello trabajo como siempre @nhaydu, te quedo genial lo mejor es que no sólo tendré uno virtual jajaja seguro que podrás regalarme uno físico. 😘
Jaja, por supuesto mi bella @lorennys, podrían decir que no se vale, que es trampa, pero eso es la ventaja para ti, por estar siempre a mi lado.🥰😘
Que delicado este pequeño llavero, haría varios para regalar me gusta que sea practico de hacer, hermoso tu tutorial.
Claro que puedes realizar muchos llaveritos, @jennyzer son muy fáciles de hacer, un poco de paciencia es la clave, gracias por comentar, saluditos.
Un espectáculo de llavero, la forma como hiciste el árbol es increíble amiga @nhaydu siempre nos sorprendes, gran trabajo 👏
Les cuento hive-189504 que yo estoy más sorprendida con la multitud que espera por mi llavero en físico, hasta @lorennys se puso en la cola, que tal? Pero claro que voy a tratar de complacerlos, gracias por ese valioso apoyo que cada vez me entusiasma más, un abrazote.
Muchas gracias por este bello regalo virtual 🙋 la verdad es que me encantó. Las pelotitas que usaste están bellísimas, siempre me gustó lo transparente y con algo de color.
Espero que luzcas tu llavero todo lo que queda de año y los que vienen. Saludos.
Agradecida @creacioneslelys por aceptar tu llaverito, lo hice con bastante cariño y estoy muy contenta por todos los que le han comentado bonito, un abrazo grande, saluditos.
Hola, que lindo arbolito de navidad me gustó mucho, si la verdad creo que con alambre también se vería espectacular aunque así también se mira muy lindo trataré de hacer el mío y te mostrare como quedo😉 muchas gracias feliz tarde ♥️♥️♥️♥️♥️
Gracias @alexanderflx, es un honor que te haya gustado mi llaverito; y seguro que cuando hagas el tuyo se verá hermosísimo,un abrazote.