The Swagman by Helikon-Tex is a versatile piece of kit. I use it mainly as a top-quilt and as a watch coat. This post shows how I use the Swagman Advanced and Basic together to create a three-season quilt. If you want to know the differences between the two poncho liners, then read my previous post.
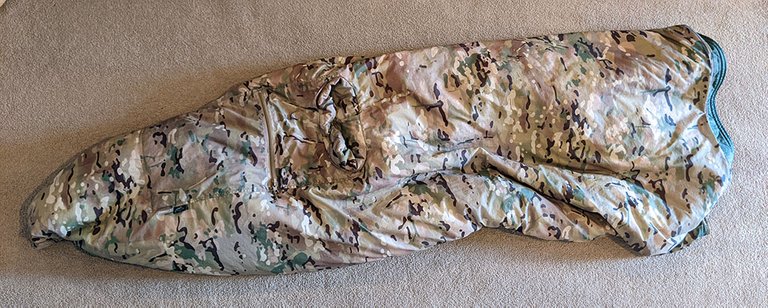
Pictured: the two liners joined together with a foot box to the left. The Basic liner goes inside the Advanced liner because the Basic's single quilting creates air pockets, and the Advanced provides better weather protection. The stiffer nature of the Basic also drapes less closely to the body, and so forms internal air voids.
I use both of these quilts together for the spring and autumn seasons. I sleep with my head under covers, and I need to regulate my sleeping temperature. The quilt should easily convert to and from use as a watch coat. How do I do this?
Instructions
Form a foot box by closing the zippers from the bottom to the level of the lower buckles. Twist the zipper pulls inside each other to encourage them to stay together. The clips are attached with the Advanced to the Basic to make the conversion to watch coat easier. If you want a deeper foot box, leave the buckles unattached or clip them to the same liner, and then the zip will go higher. You can make the foot box smaller/mummy-style by tensioning the hammock shock cords at the bottom of the advanced liner.
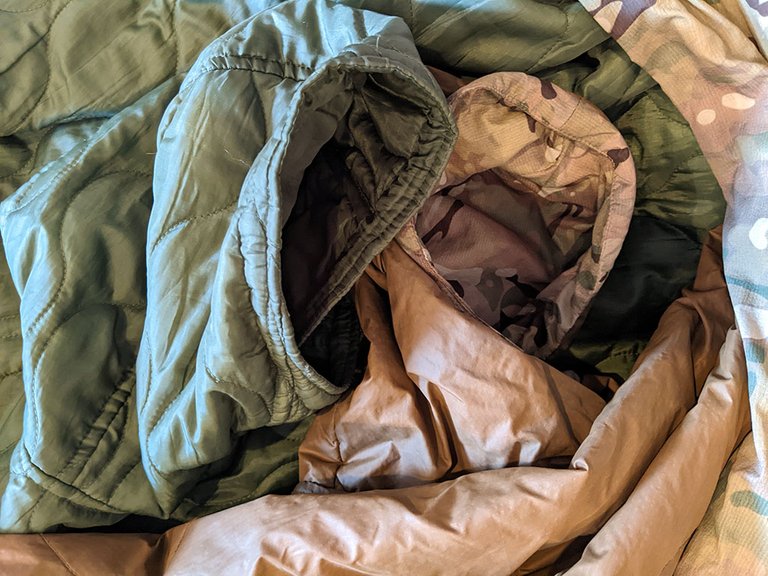
Tuck the hoods between the two layers without sinching up the hoods or tucking the Advanced Hood into its pockets. Cinching was barely better at heat retention but was more inconvenient when converting to a watch coat.
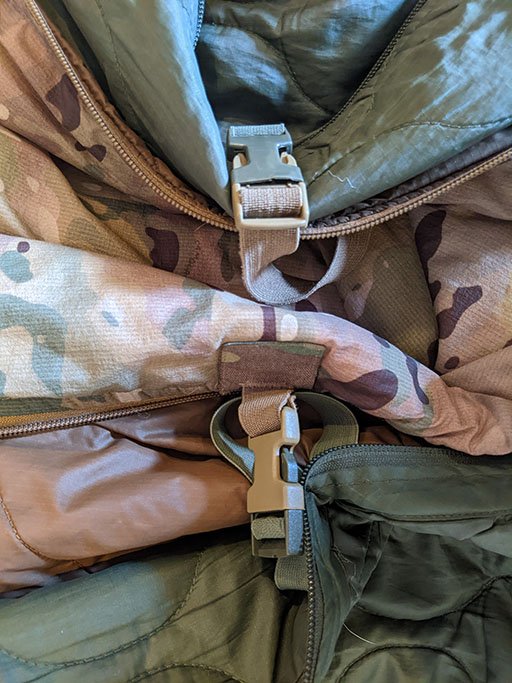
Form the top of the quilt by attaching the buckles to hold the Basic to the Advanced. Next, pull the elastic straps in. Finally, round the quilt by tensioning the hammock shock cords at the top.
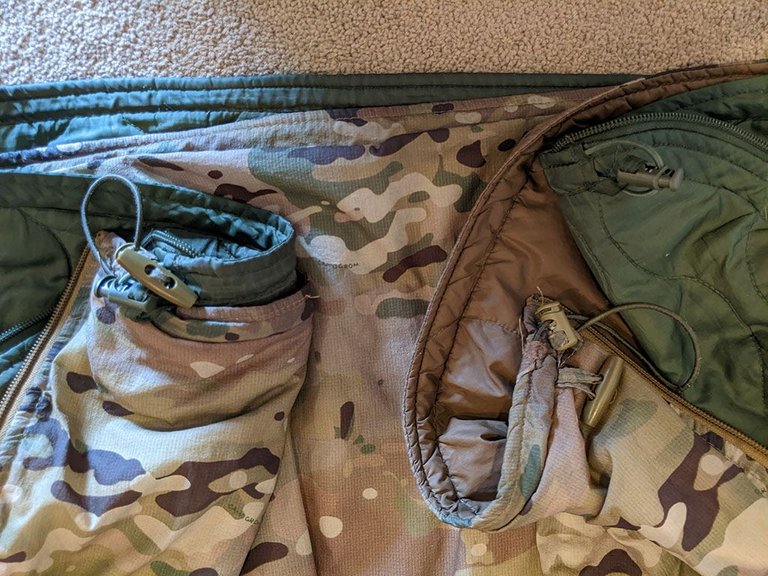
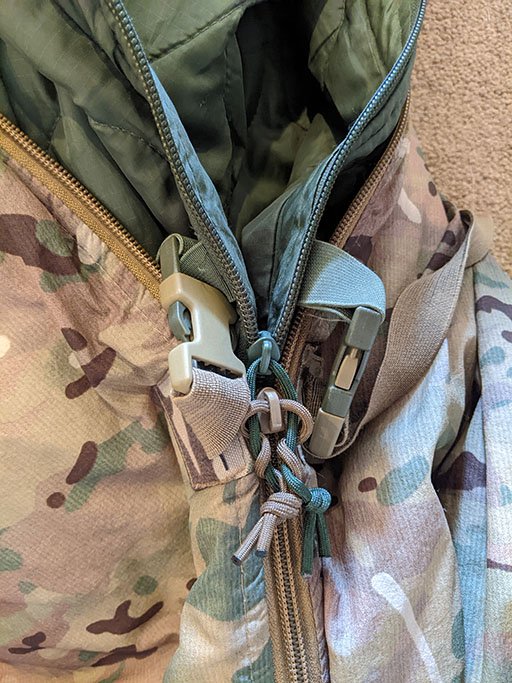
Here are the two upper corners. Use the grommet toggle on the Advanced liner on the top left (right when laying underneath) to attach the corners. I place the toggle between the cable keeper and the cable sleeve.
I leave the right corner unattached to make it easier to move a layer of the quilt to one side for heat control. When you want to move a layer, unclip the top buckles on the same side. I prefer to move the Basic liner underneath the Advanced because I can kick out of the foot box too.
Converting to a watch coat.
Unzip the two-foot boxes, loosen the hammock shock cords if necessary and push the hoods out. Once the coat is on, use the buckles as required to control airflow. To convert from watch coat, reverse the steps: Push the hoods back in between the two liners, form the foot box and tension the hammock shock cords. Easy!
My Experience
For the first winter, when the temperature was too cold for the Advanced Swagman alone, I used a woobie (US Milsurp poncho liner) inside the Swagman. I used the ties on the woobie to create a foot box. I added a lightweight blanket on the rare nights when that setup was too cold. The Swagman made an excellent watch coat to add over whatever I was wearing.
In the second winter, after the Basic arrived, I combined the two Swagmen into a quilt set up for easy conversion to and from the watch coat configuration. Two Swagmen liners were warmer than using the Advanced liner with a woobie, and I was only cold enough to use an additional blanket once or twice when the temperatures dipped below freezing.
Quilt tip and Conclusion
My top tip for using quilts as a side sleeper is to rock forward and back slightly when first laying down. Rocking encourages the quilt to drape around the body and eliminates draft spots.
I find it's the combination of many small tips that makes versatile gear work best. That maxim certainly holds for using the Basic and Advanced poncho liners. Until next time.
Swagmans is one of the best wild camping piece of kit out there for someone who's looking for an ultra light rambo style set up.
I'm finding it kinda difficult to get my hands on one since i live in England. But i will keep trying!
Yeah, I had to get mine into NZ via an importer. I think it was an Australian company for my Advanced. Then, I ordered online directly from Helikon-Tex in Poland.
Thanks for the heads up!
Hope this message finds you well man. Keep swaggin ya dig?
😂
I think this and the poncho from your other post might serve me well for some hiking and overnights sleeping on the roof of my car or in hostels of questionable hygiene.
Thanks
The combination of a poncho and pocho liner is often called a "Ranger Roll". Modern version add a mylar blanket between the poncho and the liner. It's okay for mild temperatures. As it gets colder, you'll need a bit more.
I love your profile pic! Haha! Is it #misosoup or #doenjang soup? Haha! I love both of them so much 😉👍 Well, I love the post as well tho.
🥦 !LUV 🥦
Hey! Thanks! it's #misosoup. Apparently null pics aren't trusted so I just picked the first thing from my camera roll that wasn't a meme or my dog.
Oh, really miso soup then! Cool! Love it so much! 🤩👍
🥦 !LUV 🥦
@mizuosemla(6/10) gave you LUV. H-E tools | connect | <><
You're invited! - LUV's 1st birthday celebration!
@mizuosemla(6/10) gave you LUV. H-E tools | connect | <><
You're invited! - LUV's 1st birthday celebration!
Have a !PIZZA
PIZZA Holders sent $PIZZA tips in this post's comments:
@steem82868(8/10) tipped @eturnerx (x1)
You can now send $PIZZA tips in Discord via tip.cc!
@tipu curate
Upvoted 👌 (Mana: 67/87) Liquid rewards.
Congratulations @eturnerx! You have completed the following achievement on the Hive blockchain and have been rewarded with new badge(s):
Your next target is to reach 82000 upvotes.
You can view your badges on your board and compare yourself to others in the Ranking
If you no longer want to receive notifications, reply to this comment with the word
STOPCheck out the last post from @hivebuzz:
!luv
!hivebits