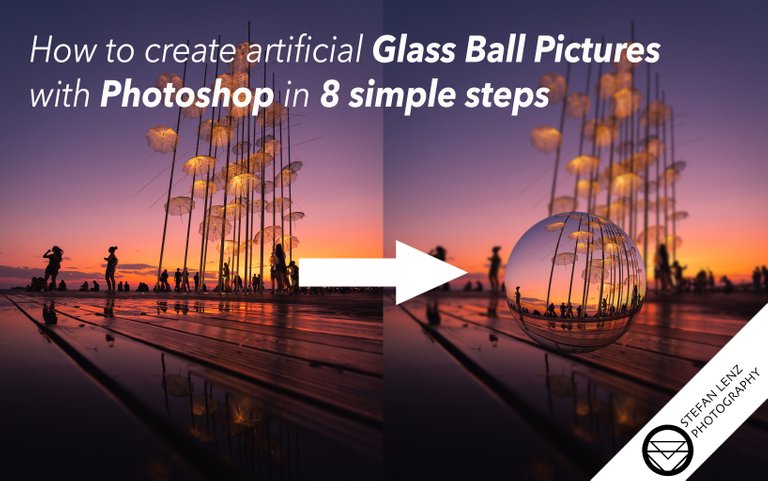
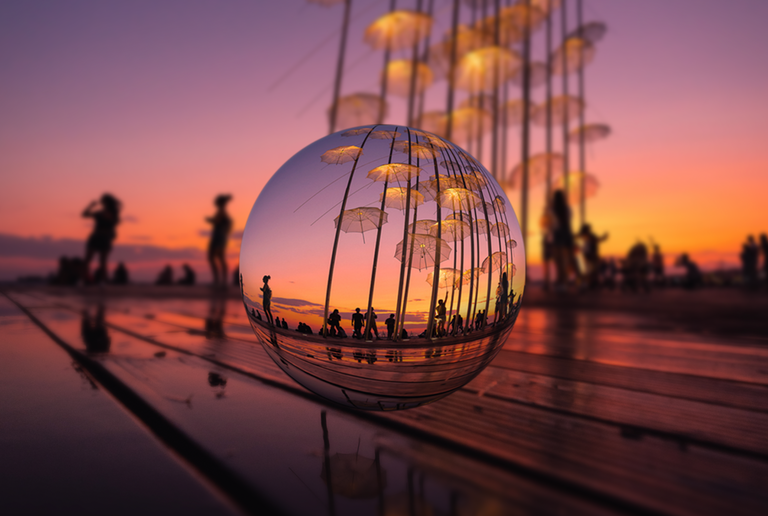
Hey guys! This post is once again about my specialty, crystal ball photography. I want to show you how it' possible to create fascinating glass ball photos even without using a glass ball at all. This way you can turn your normal photos into very realistic looking crystal ball shots. Sounds incredible, but Photoshop makes it possible and it's even pretty easy. For the 8 steps I'm going to show you now, you should hardly need more than 5 to 10 minutes. Just open the photo you want to edit in Adobe Photoshop and you're ready to go!
Hallo Leute! In diesem Beitrag geht es wieder einmal um mein Spezialgebiet, die Glaskugel-Fotografie. Ich möchte euch zeigen, wie es möglich ist, ohne überhaupt eine Glaskugel zu verwenden, faszinierende Glaskugel-Fotos zu erzeugen. So könnt ihr eure ganz normalen Fotos auch nachträglich in sehr realistisch wirkende Glaskugel-Fotos verwandeln. Klingt unglaublich, doch Photoshop macht es möglich und es ist sogar relativ einfach. Für die 8 Schritte, die ich euch nun zeigen werde, solltet ihr kaum länger als 5 bis 10 Minuten brauchen. Öffnet einfach das gewünschte Bild in Adobe Photoshop und schon kann es losgehen!
Step 1/Schritt 1
We start by creating a copy of the background layer. To duplicate the layer, we select it and simply press the shortcut "Ctrl + J".
Wir beginnen damit, dass wir uns eine Kopie der Hintergrundebene anlegen. Um die Ebene zu duplizieren, markieren wir sie drücken einfach die Tastenkombination „Strg + J“
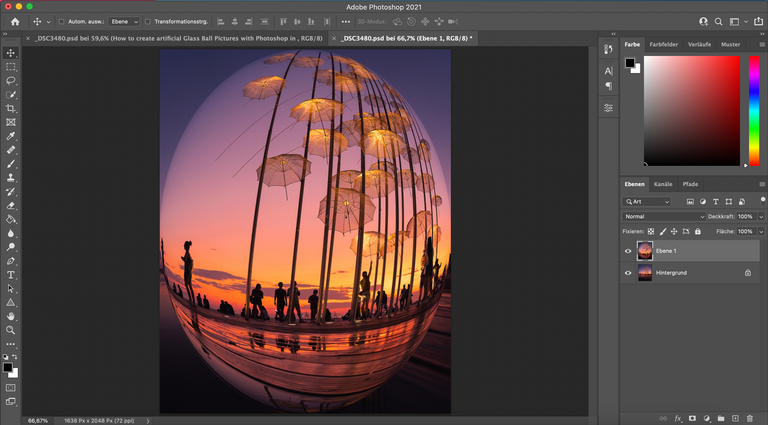
Step 2/Schritt 2
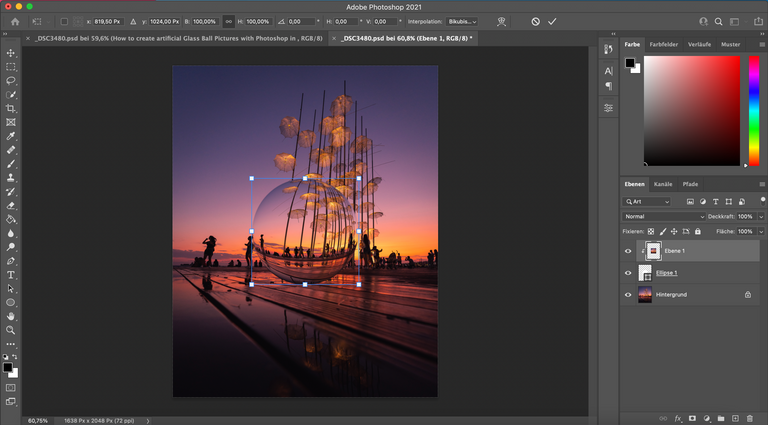
In the second step we distort the image to get a spherical effect. To do this, we simply go to the menu and select "Filter" - "Distort" and "Spherize". The amount should be 100% and "normal" must be selected as the mode. Then we click on "OK" and repeat this step once again to get a stronger distortion. The result should look something like this now:
Im zweiten Schritt verzerren wir das Bild, um einen kugelförmigen Effekt zu erhalten. Dazu gehen wir einfach im Menü auf „Filter“ - „Verzerrungsfilter“ und „Wölben“. Die Stärke sollte 100% betragen und als Modus muss „normal“ ausgewählt sein. Dann klicken wir auf „OK“ und wiederholen diesen Schritt nochmals um eine stärkere Wölbung zu erhalten. Das Ergebnis sollte dann ungefähr so aussehen:
Step 3/Schritt 3
Now we create a new layer by pressing the shortcut "Shift + Ctrl + N".
Nun legen wir durch die Tastenkombination „Shift + Strg + N“ eine neue Ebene an.
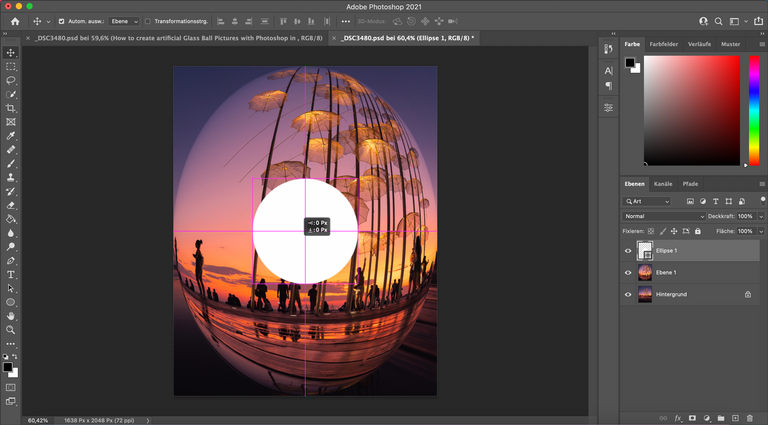
Step 4/Schritt 4
Next, we select the Ellipse tool in the Toolbox and draw a circle while holding down the Shift key.
Als nächstes wählen wir in der Toolbox das Ellipse-Werkzeug aus und ziehen mit gedrückter Shift-Taste einen Kreis auf.
Step 5/Schritt 5
In the properties we set the outline to 0px and optionally select a soft edge of 1px to get a more realistic result.
In den Eigenschaften stellen wir die Kontur auf 0px und wählen optional eine weiche Kante von 1px aus, um ein realistischeres Ergebnis zu erhalten.
Step 6/Schritt 6
Now we drag the circle to the center of the image, using the pink lines as a guide to center it horizontally and vertically:
Den Kreis ziehen wir nun in die Mitte des Bildes und orientieren uns dabei an den pinken Linien, um ihn horizontal und vertikal zu zentrieren:
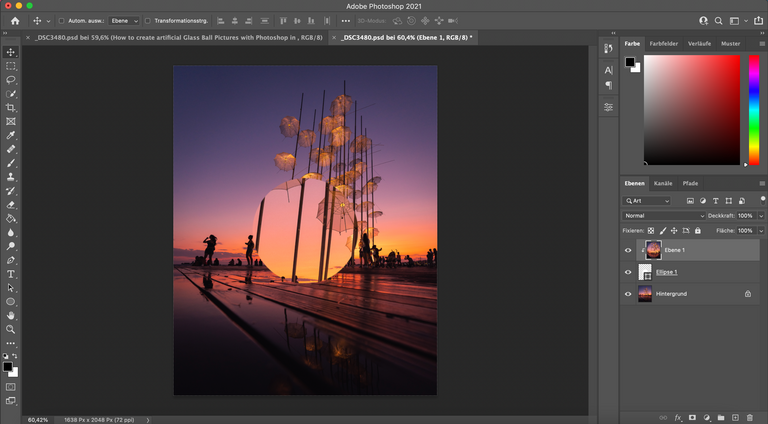
Step 7/Schritt 7
Next, we drag the layer with our spherical image to the first position and click between the first and second layer while holding down the Alt key. With this we are almost done and we can already see a circular image of the distorted layer.
Nun ziehen wir die Ebene mit unserem gewölbten Bild an die erste Position und klicken mit gedrückter Alt-Taste zwischen die erste und zweite Ebene. Damit sind wir bereits fast fertig und sehen schon eine kreisförmige Abbildung der gewölbten Ebene.
Step 8/Schritt 8
To finish, we transform the distorted layer by pressing "Ctrl + T" to adjust it to the size of the circle and we finally have our finished glass ball in the image.
Zum Schluss transformieren wir die gewölbte Ebene durch die Tastenkombination „Strg + T“, um sie an die Größe des Kreises anzupassen und haben unsere fertige Glaskugel im Bild.
Fine Tuning/Feintuning
To adjust the result according to your wishes, you can optionally add the following steps:
• If you select the two top layers, you can drag the sphere to any position, change its size, or rotate it by 180°.
• Using the brush tool (soft edge and low opacity) you can lighten and darken individual areas of the sphere to make it look even more natural.
Um das Ergebnis nach euren Wünschen anzupassen, könnt ihr optional noch folgende Schritte durchführen:
- Wenn ihre die beiden obersten Ebenen markiert, könnt ihr die Kugel an eine beliebige Stelle ziehen, ihre Größe ändern oder sie auch um 180° drehen.
- Durch das Pinsel-Werkzeug (weiche Kante und geringe Deckkraft) könnt ihr einzelne Bereiche der Kugel aufhellen und abdunkeln, um sie noch plastischer wirken zu lassen.
• You can also adjust the brightness and contrast of the sphere by using a new adjustment layer.
• Add a background blur to the bottom layer via "Filter - Blur - Gaussian Blur" to make the sphere pop out a bit more from the background.
• If you let the sphere float in the air, don't forget to create a shadow on the ground using the Elipse tool in combination with the Gaussian Blur. You can adjust the strength of this shadow by using the layer opacity.
- Über eine neue Einstellungsebene könnt ihr noch die Helligkeit und den Kontrast der Kugel anpassen.
- Fügt über „Filter – Weichzeichnungsfilter – Gaußscher Weichzeichner“ eine Hintergrundunschärfe für die unterste Ebene hinzu, um die Kugel stärker vom Hintergrund abzuheben.
- Wenn ihr die Kugel in der Luft schweben lässt, vergesst nicht, über das Elipse-Werkzeug in Kombination mit dem Gaußschen Weichzeichner, einen Schatten auf dem Boden zu erzeugen. Wie stark dieser Schatten ist, könnt ihr über die Ebenen-Deckkraft einstellen.
More about this topic?/Mehr zu diesem Thema?
If you want to take photos with a real glass ball and get some inspiration, I'd like to recommend you my book “Crystal Ball Inspiration”, in which I have summarized all worth knowing information about the photographic work with crystal balls and many creative ideas about how to use it in various situations. You can get it both as an ebook or a paperback version. The book is available in 5 languages. Just click on your language if you are interested:
Wenn ihr mit einer echten Glaskugel fotografieren und euch inspirieren lassen wollt, möchte ich euch mein Buch "Glaskugel Inspiration" empfehlen, in dem ich alles Wissenswerte über die fotografische Arbeit mit Glaskugeln und viele, viele kreative Ideen, wie man sie in verschiedenen Situationen einsetzen kann, zusammengefasst habe. Ihr könnt es sowohl als Ebook als auch als Taschenbuchversion erwerben. Das Buch ist in 5 Sprachen erhältlich. Klickt einfach auf die gewünschte Sprache, wenn ihr interessiert seid:
See you!/Bis bald!
Stefan
@tipu curate
Posted using Dapplr
Upvoted 👌 (Mana: 65/78) Liquid rewards.