¡Hola, Mundo!
Si queréis entrar en el mío, estáis invitados.
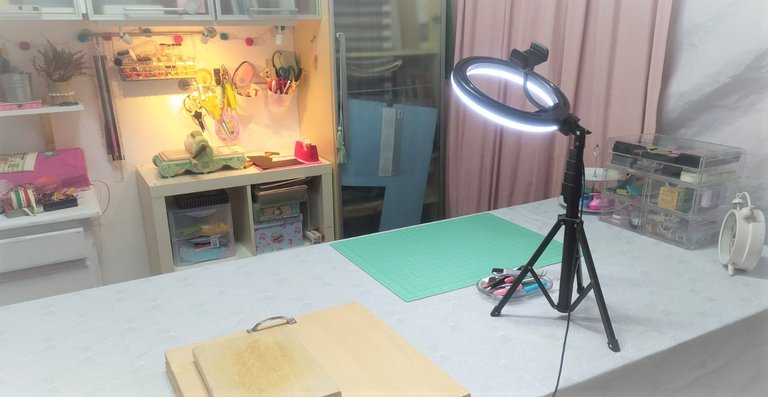
Esta es mi mesa de trabajo. Además de una potente luz cenital, dispongo de otras auxiliares (¡mi vista ya no es lo que era!), como el aro de luz que alumbra directamente el tapete de corte, los leds articulados que iluminan la mesa auxiliar trasera u otro flexo sobre la mesa.
Efectivamente, no hay silla. Suelo estar de pie casi todo el rato. A veces me siento un poco, para descansar, pero normalmente trabajo de pie, no puedo estarme quieta. Además, estaría continuamente levantándome y sentándome para coger todo lo que me va haciendo falta. Estoy pensando en hacerme con un buen taburete, que me resulte cómo además de funcional, pues necesitaría que pudiese moverme sobre él con facilidad, también que me permitiera apoyar los pies, o inclinarme sobre la mesa sin levantarme del todo. Si algún lo compro, os lo mostraré, por supuesto.
Hi, World!
If you want to enter mine, you are invited.
This is my work table. In addition to a powerful overhead light, I have other auxiliary lights (my eyesight is not what it used to be!), such as the ring of light that directly illuminates the cutting mat, the articulated LEDs that illuminate the back side table or another flexo lamp on the table.
Indeed, there is no chair. I tend to stand most of the time. Sometimes I sit down a bit, to rest, but I usually work standing up, I can't stand still. Besides, I'd be constantly getting up and sitting down to pick up whatever I need. I'm thinking of getting a good stool, which is not only functional, because I would need to be able to move on it easily, but also to allow me to rest my feet, or lean on the table without getting up at all. If I buy one, I will show it to you, of course.

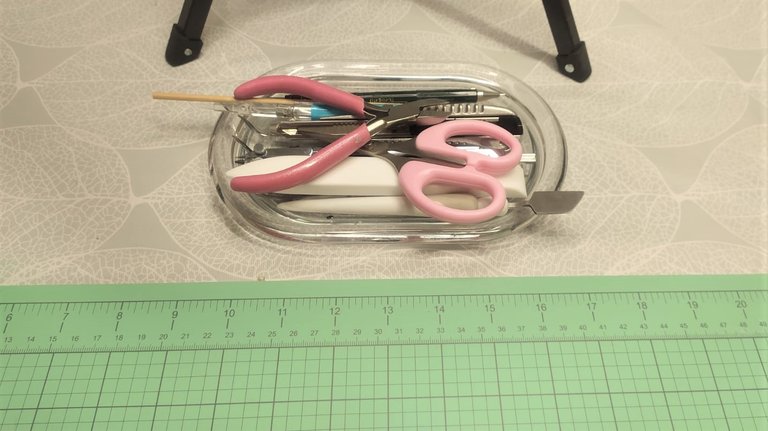
Las herramientas más habituales las tengo en una bandejita de cristal justo enfrente de mí:
I keep the most common tools in a little glass tray right in front of me:
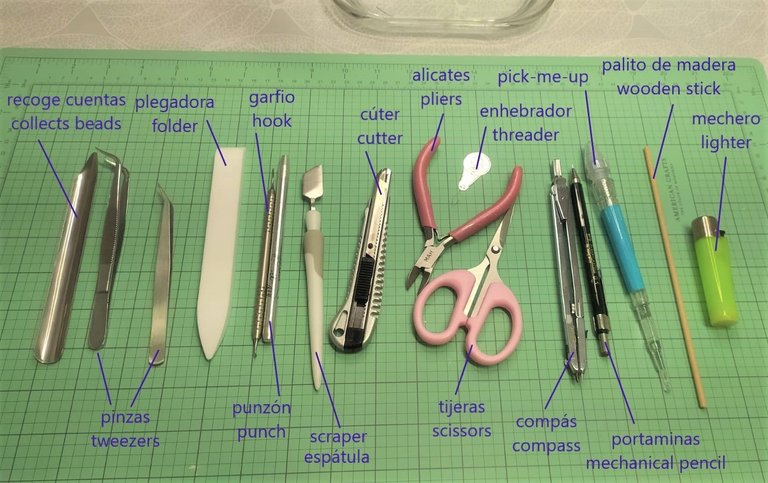
Estas son las básicas que uso en cualquier proyecto:
These are the basic ones I use in any project:
- El recoge cuentas: cuando estás decorando con elementos muy pequeños, este recogedor te ayuda a guardar de nuevo las pequeñas piezas en sus recipientes.
- Las pinzas de precisión: igualmente son necesarias para objetos de pequeño tamaño, principalmente cuando debes pegar algo con precisión y seguir manteniendo la visión en todo momento. También resultan útiles para mantener el objeto inmóvil hasta que queda firmemente pegado.
- La plegadora: ya hemos hablado de ella en multitud de ocasiones. Imprescindible para marcar la línea de doblez y presionar luego el papel al doblarlo. También se usa para presionar el papel cuando estamos encolando, para que quede bien adherido a la base.
- El garfio, herramienta multifuncional: tan válida para desatascar una troqueladora como para mover un objeto pequeño o marcar una doblez en el papel. Se usa habitualmente cuando trabajamos con vinilo, para retirarlo de la base una vez ha terminado el plotter de corte.
- El punzón: para hacer agujeros de pequeño tamaño de forma precisa y firme. Usado siempre sobre una superficie protegida, para no dañarla, es capaz de agujerear un cartón grueso o un tejido.
- La espátula: muy útil para retirar el vinilo del tapete de corte.
- El cúter: con ayuda de la regla metálica, nos ayudará a realizar los cortes mas rectos y precisos.
- Alicates: principalmente se usan para cortar elementos metálicos, como pueden ser los alambres de las espirales de encuadernación o alambres decorativos. También para manipularlos y doblarlos.
- Tijeras: herramienta básica de corte. Estas son de precisión, de hojas y mangos pequeños, para cortar elementos de menor tamaño o que requieran más exactitud en el acabado.
- Enhebrador: usado normalmente en costura para introducir el hilo en el ojal de la aguja, yo lo uso para introducir los hilos en las cuentas de madera o similar.
- Compás: el mejor amigo para dibujar círculos.
- Portaminas: lápiz con minas de 0,5mm para marcar las mediciones con precisión.
- Pick-me-up (marca registrada de Silhouette), por eso no lo he traducido: es un "recogedor" de piezas muy pequeñas. Lleva un producto gomoso en la punta (que puedes ir sacando más cantidad conforme lo vayas necesitando, haciendo girar una rosca) donde se quedan adheridos las piezas pequeñas como pedrería, lentejuelas o trocitos de papel, y que podrás colocar con precisión. En el otro extremo del "lápiz" hay una espátula muy pequeñita en plástico transparente que también resulta de gran utilidad para manipular y retirar objetos de pequeño tamaño.
- Palito de madera: este objetos tan rústico como sencillo lo uso tanto para mover y mezclar cola adhesiva o pintura, como para ayudarme a realizar las curvas en el papel cuando quiero darle volumen o realizo quilling (una técnica que consiste en enrollar tiras estrechas de papel y crear diseños para decorar trabajos de scrapbooking, por ejemplo).
- Mechero: lo uso exclusivamente para quemar los extremos de los lazos de raso cuando los corto, para que no se deshilachen. Jamás usaría un mechero en mi taller ni encendería nada, ¡qué miedo!.
-The bead catcher: when you are decorating with very small items, this catcher helps you to put the small pieces back in their containers.
- The precision tweezers: they are also necessary for small objects, especially when you have to glue something precisely and still keep your eyes on it at all times. They are also useful for holding the object still until it is firmly glued.
- The folder: we have already talked about this on many occasions. Essential for marking the folding line and then pressing the paper when folding. It is also used to press the paper when gluing, so that it sticks well to the base.
- The hook, multifunctional tool: as valid to unblock a die-cutting machine as to move a small object or to mark a fold in the paper. It is usually used when working with vinyl, to remove it from the base once the cutting plotter has finished.
- The punch: to make small holes in a precise and firm way. Always used on a protected surface, so as not to damage it, it is able to make holes in thick cardboard or fabric.
- The spatula: very useful to remove the vinyl from the cutting mat.
- The cutter: with the help of the metal ruler, it will help us to make the straightest and most precise cuts.
- Pliers: mainly used to cut metallic elements, such as the wires of the binding spirals or decorative wires. Also for manipulating and bending them.
- Scissors: basic cutting tool. These are precision scissors, with small blades and handles, for cutting smaller items or those requiring a more accurate finish.
- Threader: normally used in sewing to introduce the thread into the needle's eyelet, I use it to introduce the thread into the wooden beads or similar.
- Compass: best friend for drawing circles.
- Mechanical pencil: pencil with 0.5mm leads to mark measurements accurately.
- Pick-me-up (registered trademark of Silhouette), that's why I haven't translated it: it's a "pick-me-up" for very small pieces. It has a rubbery product at the tip (which you can remove more as you need it, by turning a thread) where small pieces such as rhinestones, sequins or bits of paper stick, and which you can place with precision. At the other end of the "pencil" there is a very small transparent plastic spatula that is also very useful for handling and removing small objects.
- Wooden stick: I use this rustic and simple object both to move and mix glue or paint, and to help me make curves in the paper when I want to give it volume or do quilling (a technique that consists of rolling narrow strips of paper and creating designs to decorate scrapbooking works, for example).
- Lighter: I use it exclusively to burn the ends of satin ribbons when I cut them, so they don't fray. I would never use a lighter in my workshop or light anything, how scary!
Como ya he mencionado, en estas herramientas básicas estaría mi regla metálica, de 30cm, la medida más práctica para los papeles de scrapbooking, que llegan normalmente a las 12 pulgadas (algo más de 30 centímetros).
As I have already mentioned, among these basic tools would be my metal ruler, 30cm, the most practical size for scrapbooking papers, which normally reach 12 inches (just over 30 centimetres).
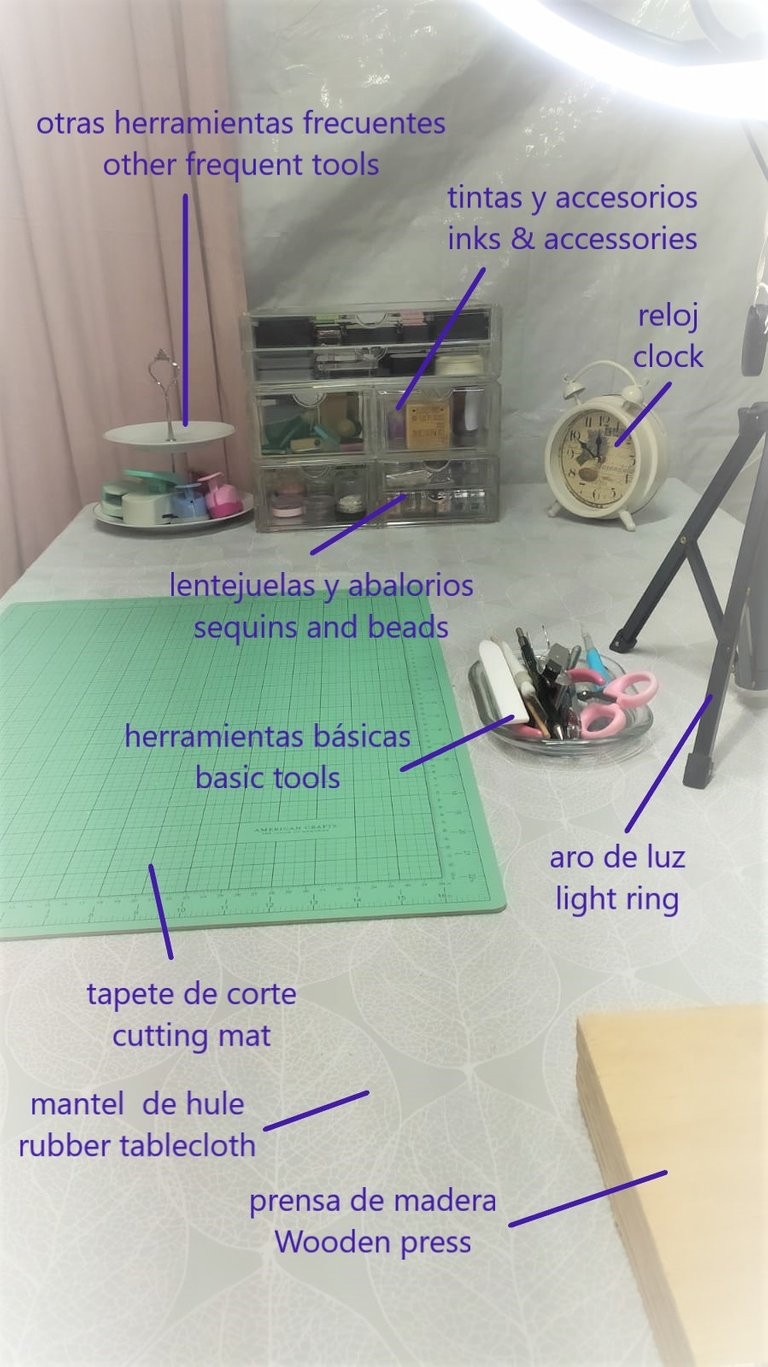
También hay que nombrar la base de corte autocicatrizante. Esta es de 60x90cm. Está cuadriculada en centímetros por una cara y en pulgadas por otra, aunque aparecen las medidas en centímetros y en pulgadas en ambas. Además, el color verde claro es ideal para trabajar (aunque en fotos deje mucho que desear, la verdad).
It is also worth mentioning the self-healing cutting base. This is 60x90cm. It is gridded in centimetres on one side and in inches on the other, although the measurements appear in centimetres and inches on both sides. Besides, the light green colour is ideal to work with (although in photos it leaves a lot to be desired, to be honest).
Tengo una bandeja para tartas a mi izquierda para colocar otras herramientas habituales que pueda necesitar en algún trabajo en concreto. Normalmente siempre tengo a mano la troqueladora de círculos, la de corazones, una troqueladora para redondear esquinas y otra para hacer esquineras portafotos.
I have a cake tray to my left to hold other common tools that I might need for a particular job. I usually always have a circle die cutter, a heart die cutter, a corner rounding die cutter and another one to make photo corner holders.
En una cajonera transparente guardo todas las tintas (cuando las véais quizás penséis que son muchas, pero nada más lejos: yo sólo tengo una pequeña muestra en comparación con mis colegas escraperas). También guardo aquí los sellos que uso a diario: como el de miAu!. También algunos fechadores y por supuesto los recambios de las almohadillas para entintar.
In a transparent drawer I keep all the inks (when you see them you might think that there are a lot of them, but nothing further: I only have a small sample compared to my colleagues). I also keep here the stamps I use every day: like the miAu! one. Also some daters and of course the ink pad refills.
Las tintas están almacenadas en horizontal, creo que es como mejor se mantienen
En esta cajonera hay espacio también para mi pequeña colección de lentejuelas y abalorios.
The inks are stored horizontally, I think that's the best way to keep them.
In this drawer there is also space for my small collection of sequins and beads.
También he de tener muy a mano la prensa de madera: esta no puede ser más básica, pues son dos piezas de tablero marino, el de arriba con unas asas atornilladas para manejarlo cómodamente. Para mí es un imprescindible, pues suelo encuadernar encolando (no uso cinta de doble cara), entonces debes asegurarte cada vez que encolas un papel, que se mantendrá plano y recto hasta que se seque perfectamente. Por lo que tener la prensa justo delante de ti cuando trabajas, permite ir metiendo los trabajos inmediatamente cuando los encolas.
Y por supuesto: ¡el reloj! De verdad, os lo aseguro, en este taller el tiempo se detiene. Tengo que programar alarmas para asegurarme que no me dejaré a mi hijo esperándome en el cole o que subiré a cenar a una hora decente (jajaja).
I also have to have the wooden press at hand: this one couldn't be more basic, as it is two pieces of marine board, the top one with screwed handles to handle it comfortably. For me it's a must-have, as I usually bind by gluing (I don't use double-sided tape), so you have to make sure every time you glue a paper, that it will stay flat and straight until it dries perfectly. So having the press right in front of you when you work, allows you to get your work in immediately as you glue it.
And of course: the watch! Really, I assure you, time stands still in this workshop. I have to set alarms to make sure I won't leave my son waiting for me at school or that I'll be up for dinner at a decent time (hahaha).
Creo que la mejor manera de mostraros todos los rincones de mi taller es que me acompañéis en la elaboración de un libro miAu! ¿Qué os parece? ¿Queréis ver cómo se crea desde cero? seguidme por aquí, que mañana continuamos....
I think the best way to show you all the nooks and crannies of my workshop is for you to join me in the making of a miAu! book... What do you think? Do you want to see how it is created from scratch? Follow me here, tomorrow we continue...
Gracias por leerme.
Te doy la bienvenida a miAu!
Thank you for reading me.
I welcome you to miAu!
Traducido gracias a la versión gratuita de www.DeepL.com/Translator
Translated with www.DeepL.com/Translator (free version)
¡Gracias, @sancho.panza y proyecto @cervantes por el apoyo a mi publicación!
Congratulations @marguimiau! You have completed the following achievement on the Hive blockchain and have been rewarded with new badge(s):
Your next target is to reach 30 posts.
You can view your badges on your board and compare yourself to others in the Ranking
If you no longer want to receive notifications, reply to this comment with the word
STOPTo support your work, I also upvoted your post!
Check out the last post from @hivebuzz:
Support the HiveBuzz project. Vote for our proposal!