
Seguramente te has preguntado ¿Cómo lograr la intensidad de un pastel sin exceder el uso de colorantes?
Si tu respuesta es afirmativa te invito a quedarte disfrutando de la siguiente publicación.Me gusta disfrutar de la repostería y aprender cada día consejos muy útiles al momento de preparar un pastel especial, pero siempre había querido saber cómo lograr colores tan vibrantes (rojo, negro, azul,) sin exceder el uso de colorantes, ciertamente aunque sean de muy buena calidad siempre hay que aplicar técnicas de colorimetría o algunos tips extras para terminar obteniendo un buen resultado.
Particularmente, se me hace un poco tedioso cuando me piden algún pastel con colores muy fuertes ya que, en su mayoría suelen manchar muchísimo la boca al momento de ingerir o simplemente la elaboración de cremas de estos colores ameritan tiempo en reposo para intensificar. En mi búsqueda de alternativas y crecimiento en esta área he participado en algunos cursos online que me han servido a un 100%, todo depende de la dedicación y practica que apliques.
Hace algunos días durante el desarrollo de una clase, pude aprender una técnica que en tan poco tiempo termine amando ¡Muy fácil de aplicar! Consiste en usar atomizadores (los que usamos para desinfectarnos las manos), colorantes líquidos o en gel y vocka.
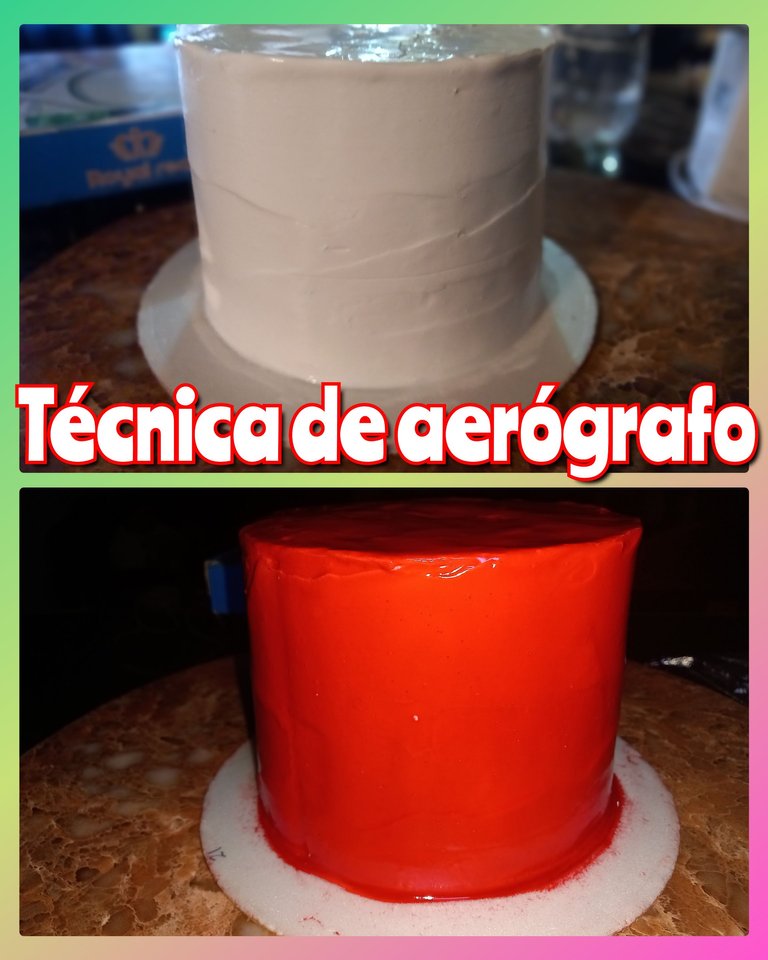
Las cantidades dependerá del tamaño de tu torta y también de los que desees cubrir, por ejemplo si lo haras en todo el pastel será necesario una o dos aplicaciones. Las siguientes fotografías son parte de un proceso evaluador en cuanto a la técnica descrita, sin embargo me llena de emoción poder compartir con ustedes cada aprendizaje.

Surely you have wondered how to achieve the intensity of a cake without exceeding the use of colorants?
If your answer is yes, I invite you to stay and enjoy the following publication.I like to enjoy baking and learn every day very useful tips when preparing a special cake, but I had always wanted to know how to achieve such vibrant colors (red, black, blue,) without exceeding the use of dyes, certainly even if they are of very good quality you always have to apply colorimetric techniques or some extra tips to end up getting a good result.
Particularly, I find it a little tedious when I am asked for a cake with very strong colors because, most of them tend to stain the mouth a lot at the moment of ingesting or simply the elaboration of creams of these colors need time in repose to intensify. In my search for alternatives and growth in this area I have participated in some online courses that have served me 100%, it all depends on the dedication and practice that you apply.
A few days ago during the development of a class, I was able to learn a technique that in such a short time I ended up loving very easy to apply! It consists of using atomizers (the ones we use to sanitize our hands), liquid or gel dyes and vocka.
The quantities will depend on the size of your lathe and also on what you want to cover, for example if you are going to cover the whole cake you will need one or two applications. The following pictures are part of an evaluation process regarding the described technique, however I am very excited to share with you every learning process.

• Vocka
• Colorante de referencia
• Atomizador
• Pastel cubierto con la crema de preferencia
- Vocka
- Reference colorant
- Atomizer
- Cake covered with cream of choice

• La torta debe estar cubierta y reposada al menos 10 minutos, en este caso cubrí con merengue suizo color blanco (quería probar la intensidad del color usado)
• Utensilios limpios y desinfectados
• Colocamos pequeñas cantidades de vocka (aproximadamente 6 cucharadas) y 4 gotas de colorantes (preferencias) agitamos hasta que esté totalmente mezclado.
• Usamos preferiblemente desde arriba hacia debajo de manera uniforme, entre capa y capa dejamos secar (refrigerando por 5 minutos)
• Repetimos el procedimiento cuantas veces sea necesario.
• Ten como referencia una luz clara si trabajas en un lugar con poca iluminación, de esta manera podrás observar si hay espacios que no hayas cubierto.
Ventajas:
• Ahorro de colorantes
• Uniformidad e intensidad en el color
• Fácil aplicación
• Sirve para tortas, cupcakes entre otros
• No queda sabor a licor
• Buena cobertura
• Simplifica la técnica de colorimetría
Desventajas:
• Si no posees control al expandir el color tendrás un desorden de color en tu base.
• Cambiar el pastel a una base limpia
• Comprar atomizadores para varios colores y agilizar el trabajo.
The cake must be covered and rested for at least 10 minutes, in this case I covered it with white Swiss meringue (I wanted to test the intensity of the color used).
Clean and disinfected utensils.
We put small amounts of vocka (about 6 tablespoons) and 4 drops of coloring (preferences) stir until it is completely mixed.
We use preferably from top to bottom in a uniform way, between each layer we let it dry (refrigerate for 5 minutes).
Repeat the procedure as many times as necessary.
Have a bright light as a reference if you work in a place with poor lighting, this way you will be able to observe if there are spaces that you have not covered.
Advantages:
- Saving of colorants
- Uniformity and color intensity
- Easy application
- Suitable for cakes, cupcakes, among others.
- No liquor taste
- Good coverage
- Simplifies the colorimetry technique.
Disadvantages:
- If you do not have control when expanding the color you will have a mess of color in your base.
- Change the cake to a clean base
- Buy sprayers for various colors and speed up the work.


Nota: Debes cuidar detalles de estética (bordes, alisado, base) para que tu pastel quede más prolijo al momento de entregar. Estas fotografías representan una practica en color mas no una entrega formal. .
Note: You must take care of aesthetic details (edges, smoothing, base) so that your cake will look neater at the time of delivery. These pictures represent a color practice but not a formal delivery .
Note: You must take care of aesthetic details (edges, smoothing, base) so that your cake will look neater at the time of delivery. These pictures represent a color practice but not a formal delivery .
Todas las imágenes son de mi propiedad.
Utilicé traductor DeepL versión gratuita
Imágenes, separadores, banner hechos en Canva
Contenido original de @marytp20

Me parece genial. Con esta técnica el acabado en la pintura de las tortas quedarán mucho mejor y más bonitos.
Gracias por dejarnos este tips. ✍️🙋😉
Gracias a ti por tu visita!
Valioso apoyo!
Yum! You have been curated @sirenahippie on behalf of FoodiesUnite.net on #Hive. Thanks for using the #foodie tag. We are a tribe for the Foodie community with a unique approach to content and community and we are here on #Hive.
Join the foodie fun! We've given you a FOODIE boost. Come check it out at @foodiesunite for the latest community updates. Spread your gastronomic delights on and claim your tokens.
Join and Post through the Community and you can earn a FOODIE reward.
Aprecio su apoyo @foodiesunite
Your content has been voted as a part of Encouragement program. Keep up the good work!
Use Ecency daily to boost your growth on platform!
Support Ecency
Vote for new Proposal
Delegate HP and earn more
Gracias 😊
Agradecida 🫂