Hello there, as you may or may not know the server requirements for hosting a witness server is growing very fast. To combat this, with the recent hardforks to the blockchain MIRA was introduced.
MIRA caches the data on RocksDB files rather than the random acces memory, RAM. Which means you will require a higher storage with fast R/W speeds like SSDs for example. Instead of 64 GB of RAM.
Right now, as of today (02.04.2020) the absolute minimum requirements for a MIRA node is 8 Gigabytes of RAM, 400GB SSD Storage, 4 cores, 100 Mbps DL/UL speed.
The recommended specifications for a MIRA witness/seed node is 32 Gigabytes of RAM, 500GB SSD Storage, 4 cores, 1 Gbps DL/UL speed.
Block logs currently take about 258 GB of space while RocksDB takes about 37 GB.

Witnesses are of course, crucial to the longevity, stability and decentralization of the chain. If you wan to create a witness server and become a witness, good for you and thank you for volunteering! Managing servers and keeping tabs on them is no easy feat. Lets not forget to mention, cheap.
Start Setting Up Your Witness On A Fresh Install [DIY]
So you have decided on setting up a witness server using MIRA. You have your server ready, freshly installed. Preferably Ubuntu or Debian, but that's just my taste.
For the setup, we will be using steem-docker made by someguy123 and RocksDB files provided by Privex.io
Let's get started. Throughout this tutorial, I will be assuming you are root.
First, we have to install git so we can use git clone to get the necessary files from GitHub.
apt install git -y
Now, we clone the repository from GitHub.
git clone https://github.com/someguy123/steem-docker.git
Now that git has downloaded the repository to your server, we have to cd into the folder.
cd steem-docker
Next, we are going to use the custom-made script to install docker for us.
./run.sh install_docker
This will probably take a minute.
Next, we will be installing the necessary docker package.
./run.sh install someguy123/hive:latest-mira
Next, we will be setting up the .env for docker.
nano .env
DOCKER_NAME=witness
PORTS=
Paste these in the .env file and save it by pressing CTRL+X and then Y.
Next step is to download the block_log.
mkdir root/data/witness_node_data_dir/blockchain
cd root/data/witness_node_data_dir/blockchain
curl -fsSL http://files.privex.io/hive/block_log.lz4 -o - | lz4 -d - block_log
As the block_log is quite big, this is going to take anywhere from 20 minutes to several hours depending on the internet connection of your server.
After the block_log has been installed, we have to download the RocksDB files from Privex.io
For HIVE,
rsync -av --progress --delete rsync://files.privex.io/hive/rocksdb/ /root/steem-docker/data/rocksdb/
Now that our RocksDB is downloaded, we must generate a brain key for security.
cd root/steem-docker
./run.sh remote_wallet
suggest_brain_key

This will generate a key pair for your witness. Copy the output and save it.
After generating your witness keys we must edit config.ini which is the main configuration for the witness server.
nano root/steem-docker/data/witness_node_data_dir/config.ini
On the first line, you will see p2p-endpoint we should comment this out as our goal is to make a witness server, if you are looking to host a seed node rather than a witness server, you can keep this on.
You can comment this out by putting a pound (#) in front of the line. So it should look like this,
#p2p-endpoint = 0.0.0.0:2001
Next, a few lines below that you will see,
shared-file-size = 64G
Please change this to your server memory, if your server has 16 gigabytes of RAM, change this to 16G and so on.
Next, scroll down until you see witness and private-key lines.
For the witness part, put in your username with "" it should look like this,
witness = "deathwing"
Next, for the private key put in your previously saved private key without any quotation marks.
private-key = 5thisisyourpreviosulygeneratedprivatekey

Again, press CTRL+X and then Y to save the file and exit.
You are almost done!
Our next step is to replay the chain, this is going to take quite a long time as this process is single-threaded and can't take advantage of multi-core CPUs, so depending on your processors' single-thread performance, the amount of time it takes will vary. Very likely for it to take an hour if not more.
./run.sh replay
After the replay is complete, we can start our server and let it sync with the network.
./run.sh start
You can then use ./run.sh logs to view the log output. It is very normal to see errors appearing here from time to time. You should check it every 20-30 minutes until you see something like this:
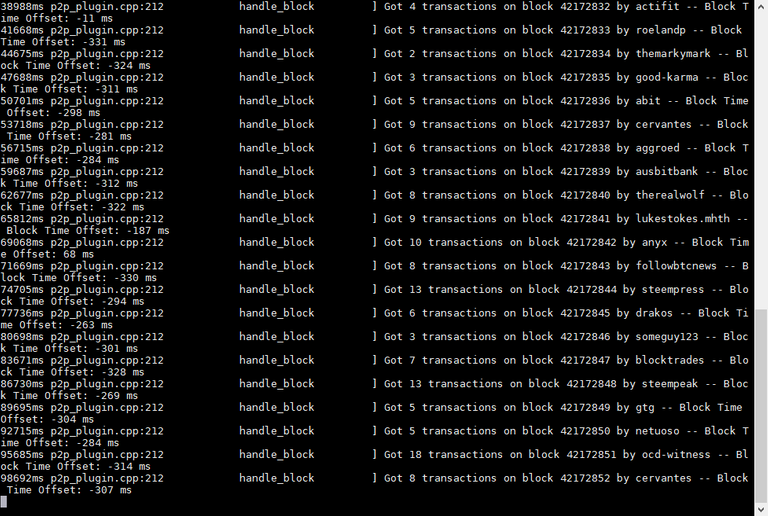
When you start seeing these messages, you can press CTRL+C to leave the logs.
Now that our witness server is synced up and ready to go, we can update our witness account and broadcast it to the network. To do that, we need to run wallet.
./run.sh wallet
The wallet will prompt you to set a password.
set_password hunter2 (set your own password)
unlock hunter2
import_key 5yourwitnessaccountsactiveprivatekey
You can find your private key on PeakD - https://peakd.com/@yourusername/permissions
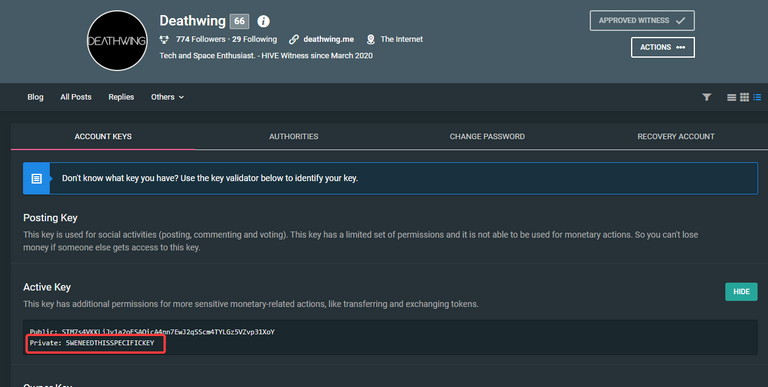
Remember that for import_key you need to put in the private key of the account that will be witnessing on the chain not the one previously generated in this tutorial.
Now, we can update our witness and start our journey on supporting the stability, longevity and decentralization of the blockchain.
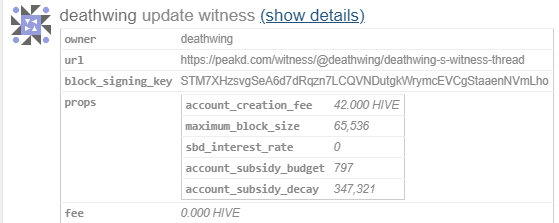
update_witness "WITNESSNAME" "WITNESSURL" "STMxxxxxxx" {"account_creation_fee":"3.000 HIVE","maximum_block_size":65536,"sbd_interest_rate":0} true
WITNESSNAME = Your Witness account.
WITNESSURL = Preferably, your witness announcement post.
STMxxxxxxx= Paste the key that we previously generated.
You can check hiveblocks.com/@yourusername now, if everything worked you should see a transaction like this;
Congratulations! You are now a witness. Thank you!
I want to become a witness but I don't know a thing about servers!
Best way to become a witness in a situation like this is probably purchasing a pre-replayed witness node from privex.io who provided both the scripts and files used in this tutorial. This option is the best for users who do not have a good server knowledge and want excellent customer support and during their journey on becoming a witness.
After you order your VPS-HIVE server from, you should receive a mail containing the information you need to connect and login to the server.
After you log in, what you have to do is first, switch from the user ubuntu to root, to do this type,
su
Then, we will be generating a key pair using
./run.sh remote_wallet
suggest_brain_key
then, edit the config.ini file with nano data/witness_node_data_dir/config.ini 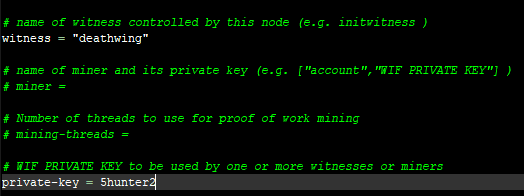
then start the witness server with
./run.sh start wait for it to sync,
then run wallet with ./run.sh wallet and update your witness as shown previously.
Let me know if you have any questions!
post scriptum

Remember voting for witnesses is important. I would appreciate if you could vote for me.
Use Peakd's voting page by clicking here.
Use Hivesigner by clicking here.
Thank you!
Very informative write up that will hopefully spur new users to take on the responsibility. Excellent work!
@tipu curate
Brilliant mate and not as much of a black art than I thought it would be!!
Saved for future use and thank you :-)
One question please. As regards CPU choice. I know that a Xeon would be more scalable, has more cache and supports ECC Memory but would a decent 8 or 12 core i7 be OK as it would run cooler and use less power. Thanks ?
You can use a Xeon processor, however, it will definitely struggle during replay as it is a single-threaded process and Xeon's are notoriously bad when it comes to single-threaded applications. As long as it is made in the recent 5-6 years and that you don't really load it with anything besides the node app. It should be able to handle everything. However, just because I can, I would recommend a Ryzen 3xxx series CPU. Cheap, superb single-threaded and multi-threaded performance.
Thanks for sharing your creative and inspirational post on HIVE!
This post got curated by our fellow curator @tibfox and you received a 100% upvote from our non-profit curation service!
Join the official DIYHub community on HIVE and show us more of your amazing work!
Awesome post, thanks! I’ve always wondered what it took to set one up. May try my hand at it someday, though not soon lol
nice write up.
Which all plugins are activated ?
By default:
witness condenser_api network_broadcast_api rc_api account_by_key database_api
It will be great if you can mention that too as many are using non-MIRA and only
witnessplugin. (rc_api gets activated auto-magically)I deliberately refrained from adding things such as plugins as they are relatively complicated, the whole tutorial is somewhat aimed at people who don't have enough knowledge when it comes to servers, GitHub and Linux. I believe adding in a specific section for plugins would be confusing.
Congratulations @deathwing! You received a personal award!
You can view your badges on your board and compare to others on the Ranking
Vote for @Steemitboard as a witness to get one more award and increased upvotes!
Very helpful, thanks! Finally finding time to switch the @travelfeed witness to Hive, I used to build manually from Github but this is way more convenient. One small thing: Since many users wouldn't want to run on root, you could replace the path
/rootwith/~for the current userSome of the files (like Docker) require root permission to install, also to make it more accessible and easy for someone who does not know anything about Linux (especially permissions).
Thank you for your comment and feedback!
You made me question wanting to be a witness now. Until now, it was a "no", but now it's a maybe. Depending on how many people I know would support me and if I could help justify the cost.