Holaaa, artistas de hive! El día de hoy les voy a mostrar como logré realizar la ilustración de una boca. El paso a paso es sencillo y me encargaré de explicárselo lo más detallado posible. Espero les guste y lo practiquen. Los dejo con el tuto✨️
Hi there, hive artists! Today I'm going to show you how I managed to make the illustration of a mouth. The step by step is simple and I will explain it as detailed as possible. I hope you like it and practice it. I leave you with the tuto✨️

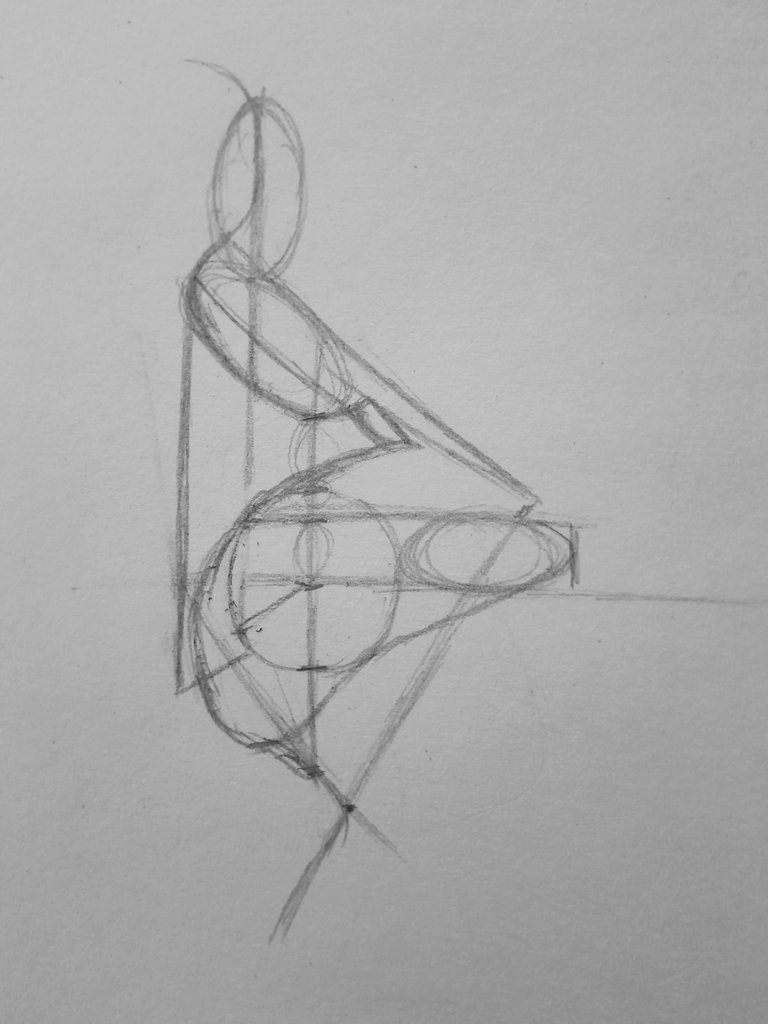
PROCESO // PROCESS
Lo primero que haremos será un círculo el cual dividiremos horizontal y verticalmente. Luego haremos dos líneas paralelas (son las que se pueden ver al lado izquierdo del circulo), una más larga que la otra.
Cuando ya tenemos lo anterior, haremos una especie de triángulo invertido en la parte inferior de dibujo y dibujaremos un ovalo al lado del circulo, otro diagonal 1cm más arriba del circulo y otro de manera vertical encima de este.
En la siguiente imagen se ve todo más detallado:
The first thing we will make is a circle which we will divide horizontally and vertically. Then we will make two parallel lines (they are the ones that can be seen on the left side of the circle), one longer than the other.
When we have the above, we will make a kind of inverted triangle in the lower part of the drawing and we will draw an oval next to the circle, another diagonal 1cm above the circle and another one vertically above it.
In the following image you can see everything in more detail:

Luego de haber hecho todos los pasos anteriores, vamos a buscar la forma de los labios y como pueden ver, no está nada difícil de encontrarlos:
El óvalo de la parte de arriba vendría siendo el arco de cupido, el óvalo en diagonal,el labio superior y por último, el circulo y el óvalo que le sigue, conformarían el labio inferior.
Como pueden ver, el labio superior es mucho más delgado que el inferior.
After having done all the previous steps, we are going to look for the shape of the lips and as you can see, it is not difficult to find them:
The oval at the top would come to be the cupid's bow, the oval diagonally, the upper lip and finally, the circle and the oval that follows it, would make up the lower lip.
As you can see, the upper lip is much thinner than the lower lip.
El siguiente paso será remarcar las líneas del dibujo en sí y borrar las que nos sirvieron de guía. Debe quedar algo así:
The next step will be to highlight the lines of the drawing itself and erase the lines that served as a guide. It should look something like this:

El siguiente paso consiste en agregar luces y sombras, pero, primero empezaremos haciendo estas pequeñas líneas en la base del dibujo con el lápiz, las cuales nos servirán de guía para colorear todo.
The next step is to add lights and shadows, but first we will start by making these small lines at the base of the drawing with the pencil, which will serve as a guide for coloring everything.

Coloreamos los labios guiándonos de las líneas anteriores, teniendo en cuenta donde debemos pintar con más intensidad y donde no.
Como pueden ver, voy dejando las zonas de luz visibles y remarcando las sombras (en las comisuras). Si se pasan con el lápiz y sombrean una zona de luz, también se vale borrar.
We color the lips following the previous lines, taking into account where we should paint more intensely and where we should not.
As you can see, I am leaving the light areas visible and highlighting the shadows (at the corners). If you overdo it with the pencil and shade a light area, you can also erase it.

El último paso seria darle sombra a la piel, difuminar, agregar textura y por último remarcar donde sea necesario.
The last step would be to shade the skin, blend, add texture and finally highlight where necessary.
Thanks for reading and watching.
