
WELCOME

ENGLISH
Very good evening friends of Hive Motors I hope you are very well, today I want to talk about a modification in the croche or clutch system that I did to my toyota samuray truck of the year 85, a little over two years ago I changed the automatic gearbox that brought the truck because it began to have problems and a nephew who is a mechanic sold me a synchronized 5-speed 4.5 which he had bought to mount it to a bubble truck that he had, but he sold it before making the change.
He offered it to me at a good price and he made the adaptation, I bought the two pumps and the disc and pressure plate, it was mounted and everything was working properly.
But about six months after I had mounted it, my ordeal with the blessed crochet cylinders began, it did not pass fifteen days or a month without damaging the rubbers, once I called my daughter who lives in Chile and asked me for a photo to buy new cylinders and send them to me, She sent them to me and I was happy, but after three months the problem with the rubber bulbs started again and so between damaging the rubber bulbs again and again I became an expert in disassembling and reassembling the crochet bulbs.
Tired of this for more than a year I decided to change the cylinder system to the linkage system.
I started by mentally making the shape of the operation since I had seen the one of other models of vehicles and it was difficult to adapt it to my truck because it had to pass through the same side of the exhaust pipe and so I started to ideal the shape between error and trial I managed to find my model of Rods.
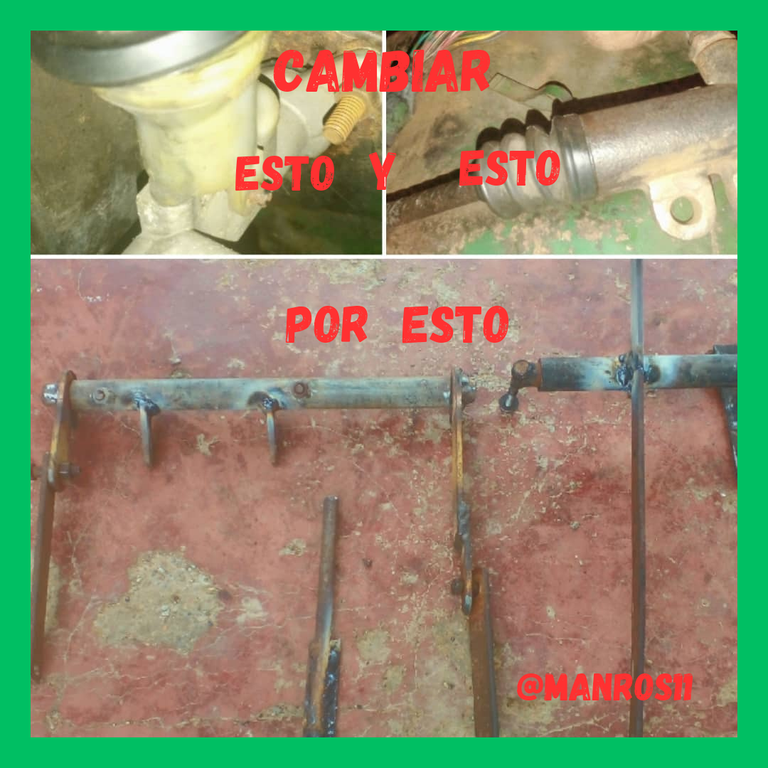
First I made the inside base for which I used a 3/4 inch galvanized pipe of thirty centimeters, a 5/8 inch bar of thirty five centimeters and two 1 and 1/4 inch plates of 10 centimeters, pass the bar through the inside of the 3/4 inch pipe and then I put two screws to fix it to the lower part of the board and two 1 inch plates of 6 centimeters long to fix it and give more strength, I made a hole on both sides to two 1 inch plates of 10 and 20 centimeters to fix one in the pedarl and one at the other end of the base piece that I made, the 20 centimeter plate is the one that goes to the outside that will join with the other piece that goes to the bottom and is fixed to the chassis and from there to the fork of the box I show the photos so you can see the system.
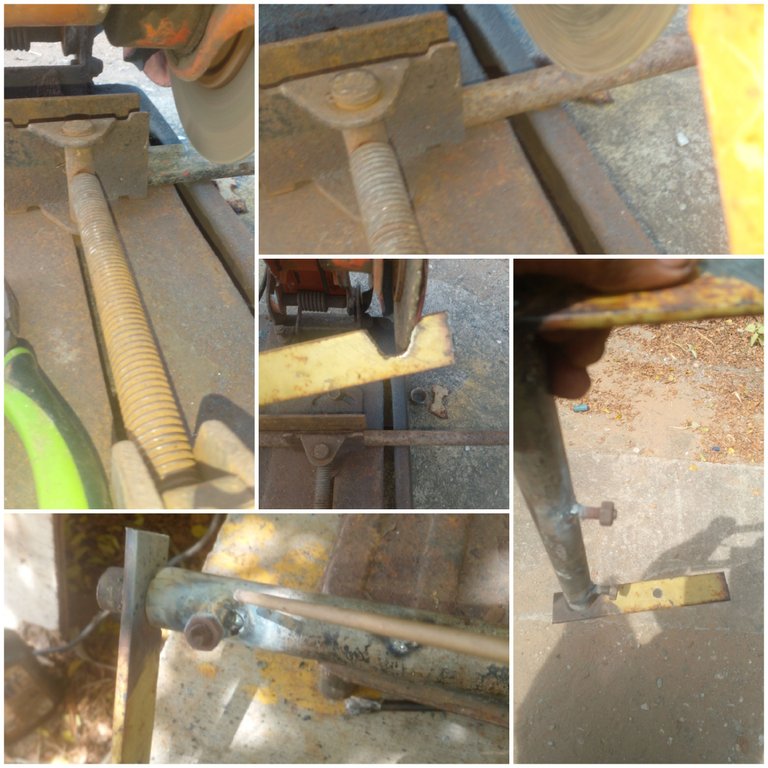
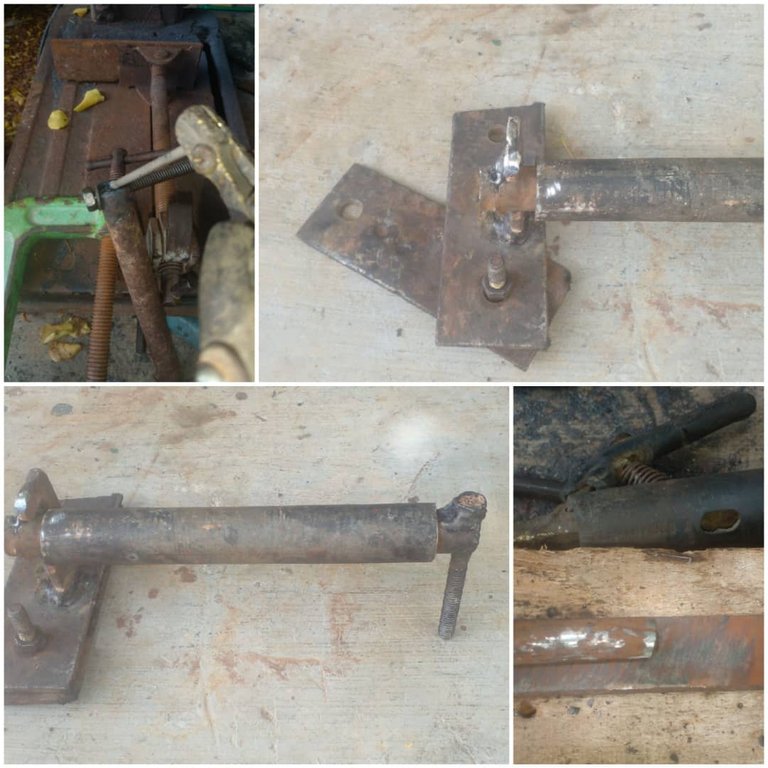
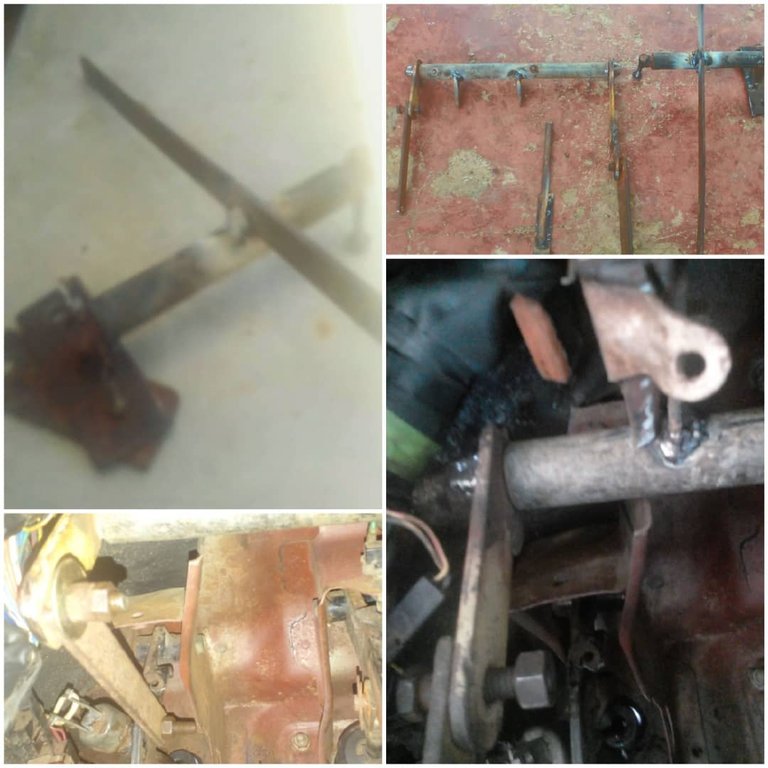
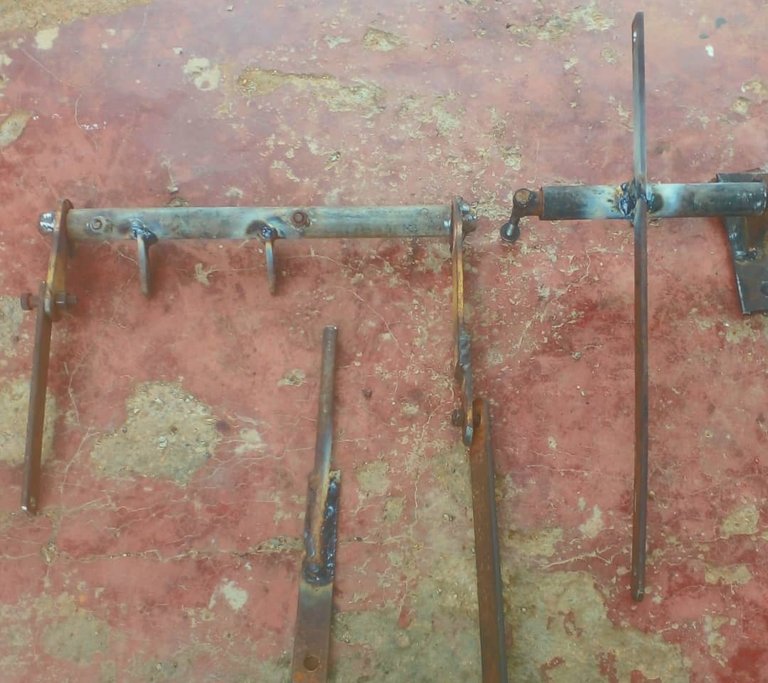
It is worth to say that the materials that I use are from recycling that I have at home, for now it is in trial period and it is working well I hope it continues like this.
So far this post today, I hope it serves as an example to solve any problem with your vehicle, sometimes you have to improvise especially when there is not much money to solve.
Thanks for your attention and support.
The photos used here were taken with my Samsung galaxy A02 cell phone.
Use Deelp translator
Cover edited in canva

BIENVENIDOS
ESPAÑOL
Muy buenas noches amigos de Hive Motors espero se encuentren muy bien, hoy quiero hablarles de una modificación en el sistema de croche o embrague que le hice a mi camioneta toyota samuray del año 85, hace poco más de dos años yo le cambie la caja automática que trajo la camioneta porque empezo a tener problemas y un sobrino que es mecánico me vendió una caja sincronica de 5 velocidades de 4.5 la cual el había comprado para montarsela a una camioneta burbuja que el tenía, pero la vendió antes de hacer el cambio.
Me la ofreció a buen precio y el le hizo la adaptación, compre los dos bombines y el disco y plato de presión, se monto y todo quedo funcionando correctamente.
Pero como a los seis meses de haberla montado empezó mi calvario con los benditos bombines de croche , no pasaban quince días o un mes que no se le dañaran las gomas, una vez llame a mi hija que vive en Chile y me pidió una foto para comprarme los bombines nuevos y enviarmelos, los envió los monte y que bueno yo feliz pero después de tres meses empezó otra vez el problema con las gomas de los bombines y así entre dañarse las gomas una y otra vez me volví un experto en eso de desarmar y armar los bombines de croche.
Ya cansado de esto por más de un año decidi cambiar el sistema de bombines a el de varillaje.
Empecé por hacer mentalmente la forma de el funcionamiento ya que había visto el de otros modelos de vehículos y se hacía dificil la adaptación en mi camioneta porque tenía que pasar por el mismo lado del tubo de escape y así empecé a ideal la forma entre error y ensayo logre dar con mi modelo de varillaje
Primero hice la base de adentro para la cual utilice un tubo galvanizado de 3/4 de treinta centímetros , una barra de 5/8 de treinta y cinco centímetros y dos platinas de 1y1/4 de 10 centímetros, pase la barra por dentro del tubo de 3/4 y le sorde las platinas una en cada punta de la barra, luego le coloque dos tornillos para fijarla a la parte inferior del tablero y dos platinas de 1 pulgada y 6 centímetros de largo para fijar y dar más fuerza , le hice hueco a ambos lados a dos platinas de 1 pulgada de 10 y 20 centímetros para fijar una en el pedarl y una en la otra punta de la pieza base que hice, la platina de 20 centímetros es la que va hacia la parte de afuera que va a empalmar con la otra pieza que va hacia la parte de abajo y va fijada en el chasis y de alli a la horquilla de la caja les muestro las fotos para que puedan ver el sistema.
Vale decir que los materiales que use son de reciclaje que tengo en la casa , por ahora esta en periodo de prueba y esta funcionando bien espero que siga así.
Hasta aquí este post de hoy, espero les sirva como ejemplo para resolver algún problema con su vehículo, a veces hay que improvisar sobre todo cuando no hay mucho dinero para solucionar
Gracias por su atención y apoyo.
Las fotos aqui usadas fueron tomadas con mi celular Samsung galaxy A02
Use Deelp traductor
Portada editada en canva

Sé muy bien de lo que está hablando porque mi hermano en Caracas es mecánico especialista Toyota. Resulta que el problema de los bombines es consecuencia del uso incorrecto del “tipo de liga”. Lo mismo sucede con la bomba de liga para los frenos. Cada material con que están hechos los bombines soporta UN TIPO DETERMINADO DE LIGA Y CUANDO ESTE SE COMPRA, EN LA CAJA DEBE INDICAR CON UN NÚMERO, CUÁL ES LA LIGA ADECUADA. Suerte con la adaptación.
!gifs hive
Via Tenor
Ya me habían dicho eso y utilice la indicada y no resultó yo creo que el problema es la mala calidad de las gomas o un problema mecánico en la adaptación de la caja , gracias por su comentario y apoyo
Congratulations @manros11! You have completed the following achievement on the Hive blockchain And have been rewarded with New badge(s)
Your next target is to reach 700 upvotes.
You can view your badges on your board and compare yourself to others in the Ranking
If you no longer want to receive notifications, reply to this comment with the word
STOPCheck out our last posts:
Thank you Hivebuzz
Go for it, @manros11! Set your sights on that new target and keep pushing forward. Remember, every small step brings you closer to your goal.
BTW, we noticed we miss your support for our proposal. Mays we ask you to check it out and consider supporting it?
All you need to do is to click on the "support" button on this page: https://peakd.com/proposals/248.
Thank you!
Thank you hivebuzz