Hello, Hive Motors! I'm happy to finally bring another post about some DIY auto repair to this wonderful community! In this post I'll be sharing sharing some work I've done as a freelance mechanic. I'll also talk about safely lifting a vehicle, and probably some other general mechanic knowledge.
This vehicle was brought to me to have the rear brake pads and rotors replaced, but in the course of that work I discovered that some of the slide pins on the brake caliper brackets had seized up. Repair kits for these slide pins are usually around $10, but you'll most likely have to order them online. The entire caliper bracket, with slide pins, can often be bought at the local auto parts store, but will usually cost $100 or more. I'll let you work out your own math on that, but obviously this can be a very lucrative (or money saving!) repair.

My work space is a dirt driveway that isn't particularly flat or level, so I always make sure to block both sides of a wheel opposite of the side I'll be raising with the jack. Because I'll be removing the rear wheel rotors, I cannot set the parking brake while working on this car, so the wheel blocks are the only things preventing it from rolling.
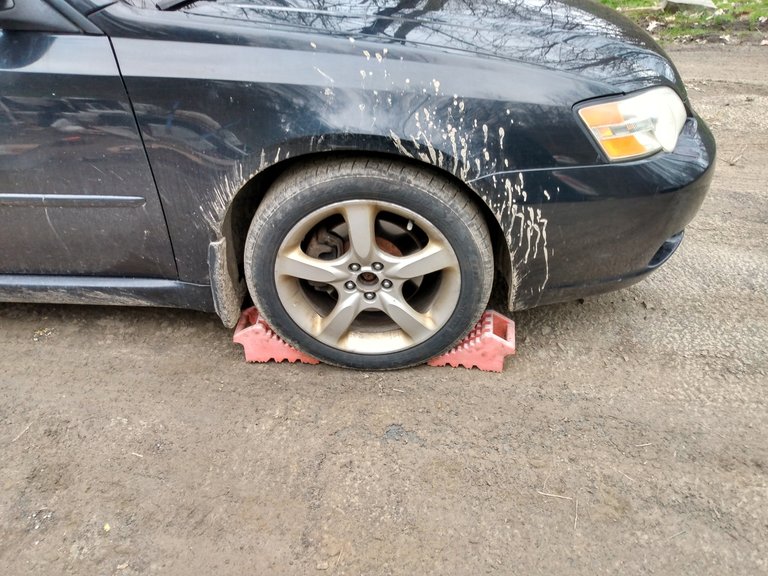
I have a small but sturdy rolling floor jack that I like to use when working on cars. It doesn't roll well on the dirt, so I place on old stop sign underneath to give it a smooth surface. If the jack can't roll forward as it raises, it will pull the vehicle slightly to the side, which will cause it to be less stable.
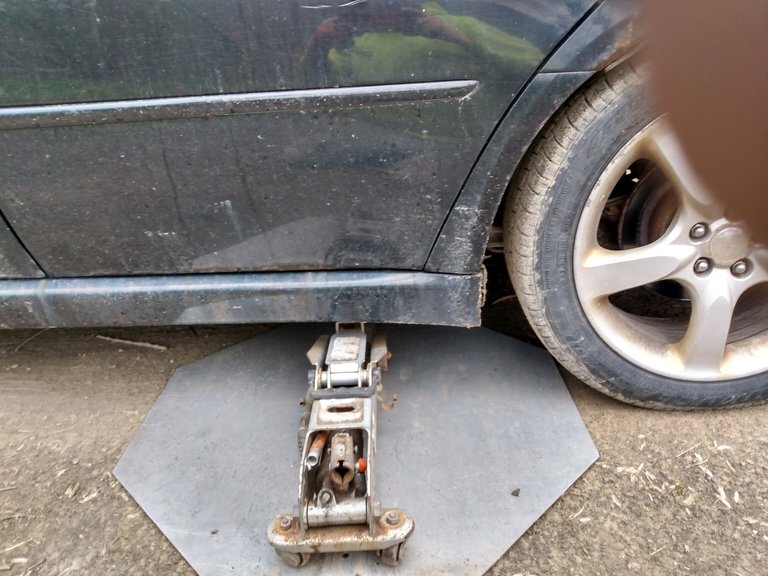
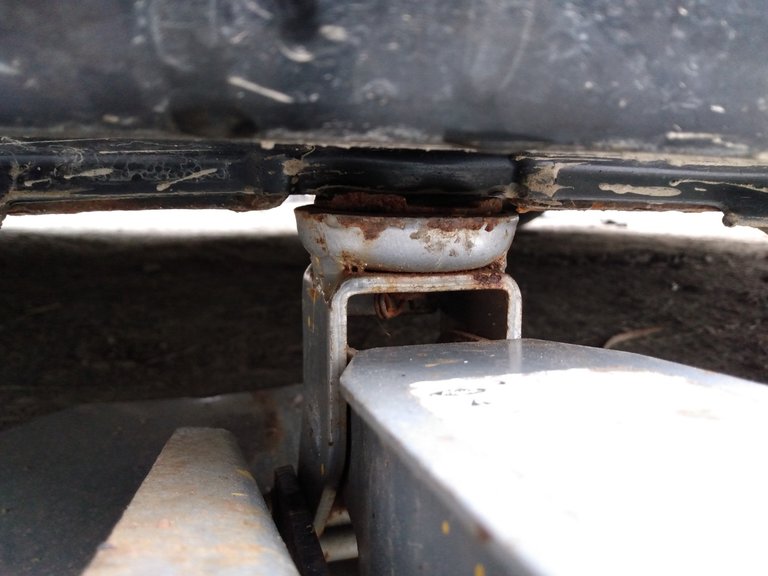
Most cars made after 1990 have specific spots where the jack should be placed, and it's important to use them. Other areas of the frame may appear solid, but will crumple after the vehicle is raised.
This floor jack is well over 20 years old now, and could use some minor repairs. I actually have to lift the hydraulic plunger that raises the jack each time I pump it.
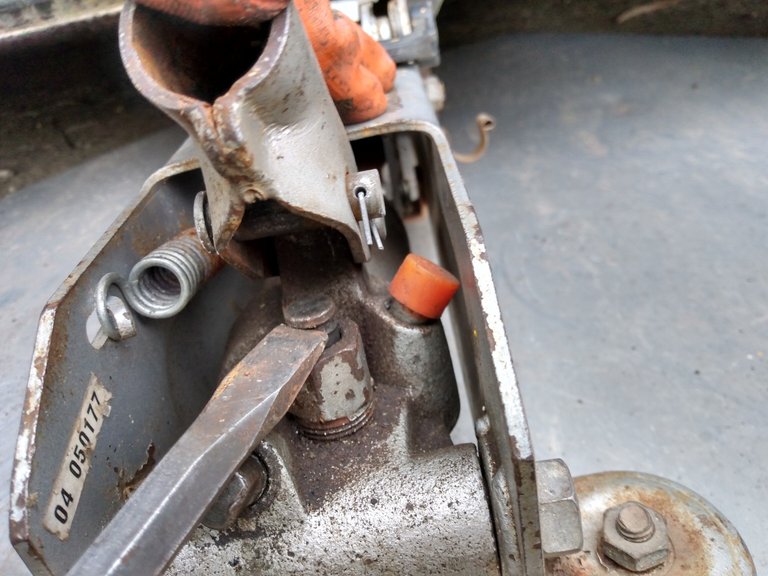
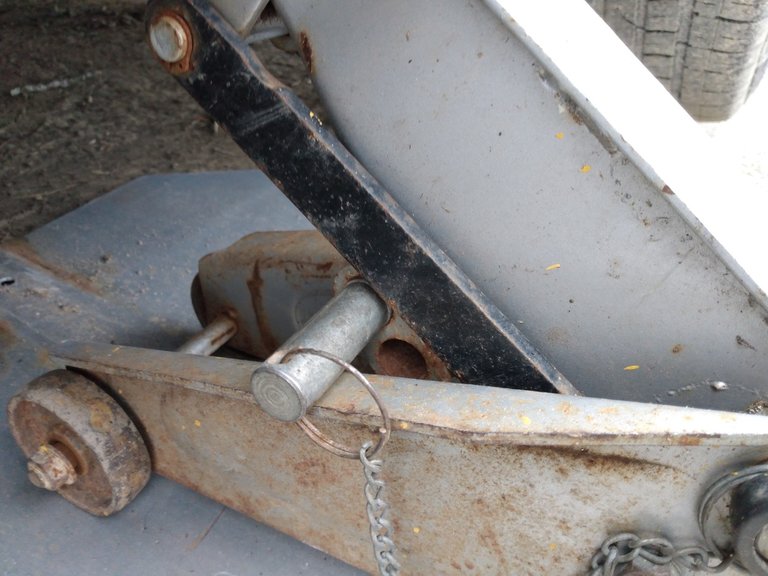
The extra work is cumbersome, but I like using this jack because it has this safety pin feature that I haven't found on any other jack. This lets me lock the jack in place after it's raised, so it won't collapse if it suddenly loses hydraulic pressure.
I describe how to remove the wheel, caliper, and bracket in this post from long ago. On this particular vehicle, I wasn't replacing the caliper, so I left the banjo bolt connected, which saved me from having to bleed the brake lines after the repairs.
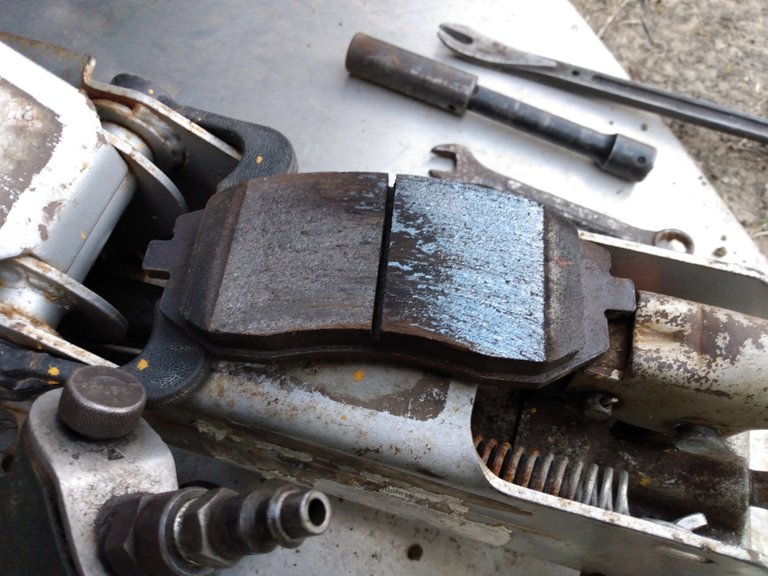
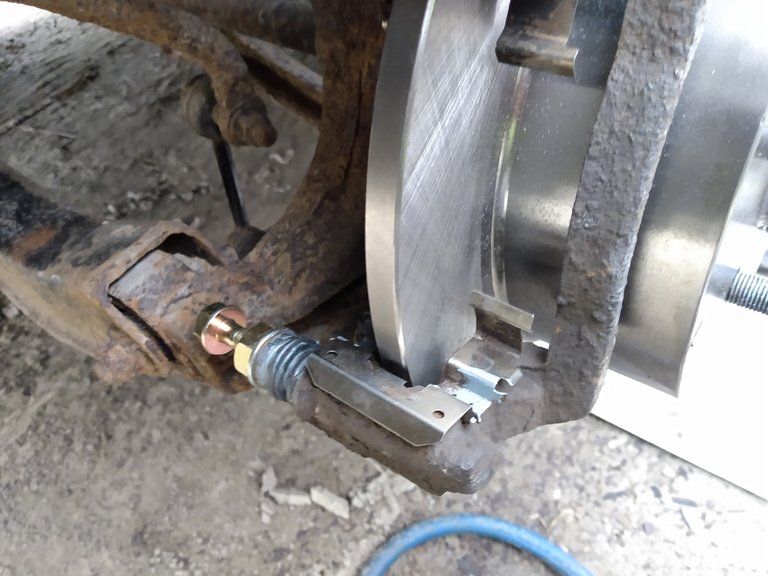
I could tell as soon as I removed the brake pads that one of the slide pins was seized. When one pin is seized, is causes the outer brake pad to pull in against the rotor on only one side when the brake is engaged. This causes the uneven wear you see on the pad in the photo below.
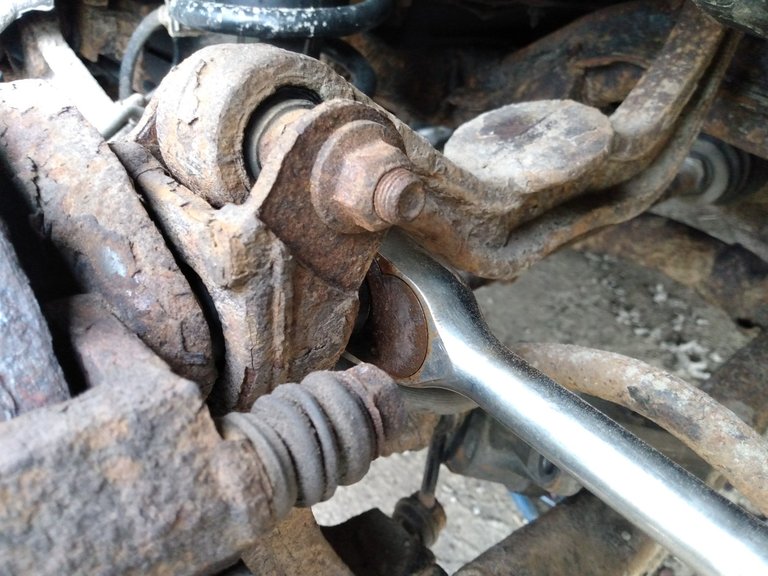
This vehicle had very difficult access to the upper caliper bracket bolt. It took me a while to figure out that this combination of 1/2" ratchet, 1/2" to 3/8" reducer, and 14mm(?) socket were what I needed to get...
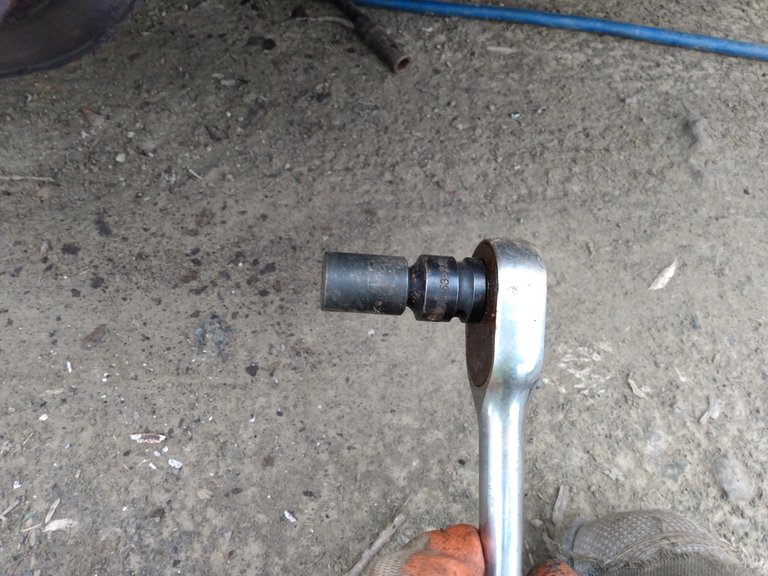
...into THIS little space. I tapped the handle of the ratchet of the ratchet with a hammer a few times, and fortunately the bolt came loose without having to apply any heat.
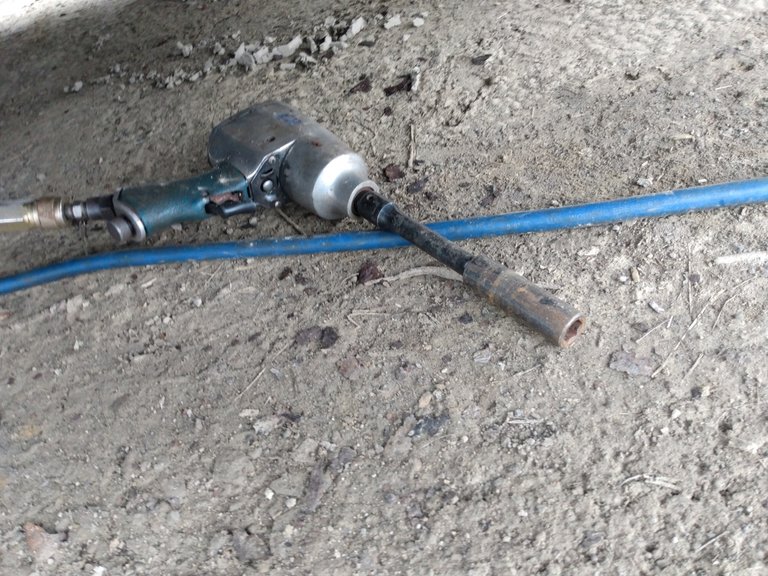
I was able to get at the lower bolt with an extension on the impact hammer. This impact hammer was less than $30 when I bought it brand new, about 15 years ago. I use it all the time, and it has never needed any service. These tools are absolute lifesavers if you do a lot of work on older vehicles.
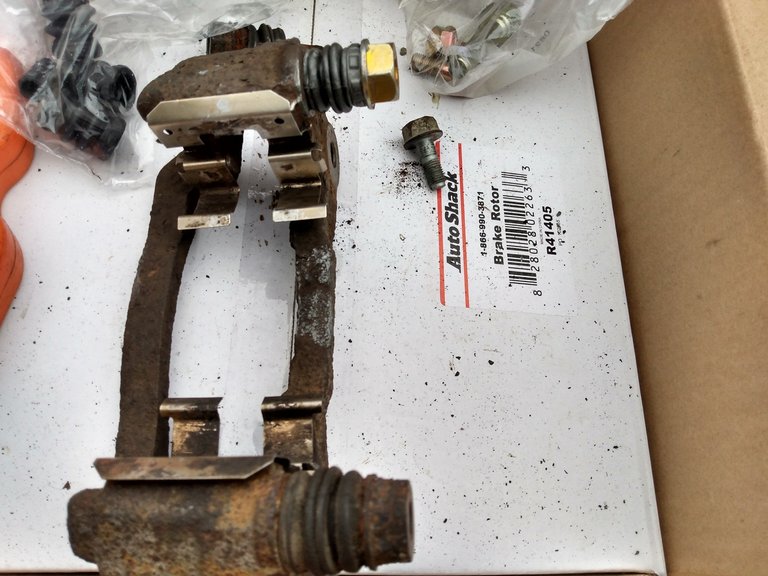
With the caliper bracket removed, it was pretty easy to see which slide pin I was going to have a problem with. You can see where the rubber boot has slipped off its seals, and the exposed metal underneath is thick with corrosion.
Often, the upper ends of these slide pins will have a hex head on them, which makes it easy to work them loose when they get stuck. You simply fit a socket on the end, and run the impact hammer on it until the pin starts to turn. Once it turns freely, it will usually pull right out. This one did not have a hex head, so I thought I would be clever and just use the caliper retainer bolt to get the necessary grip.
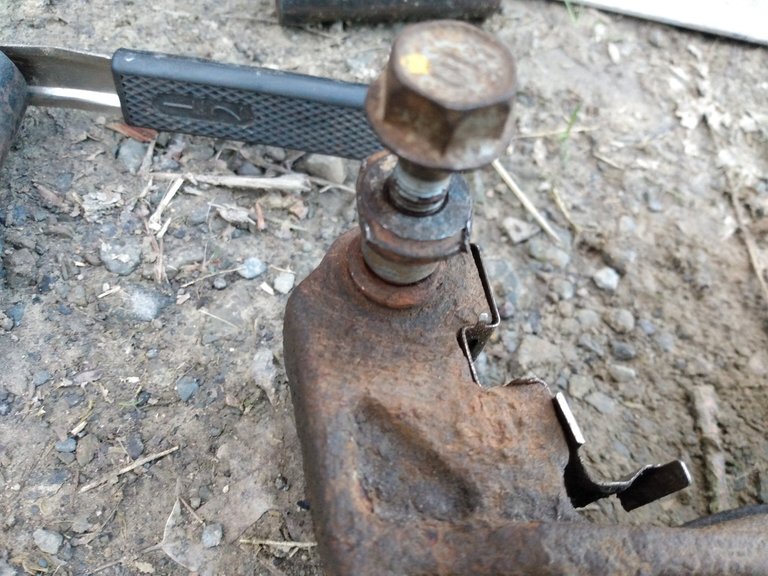
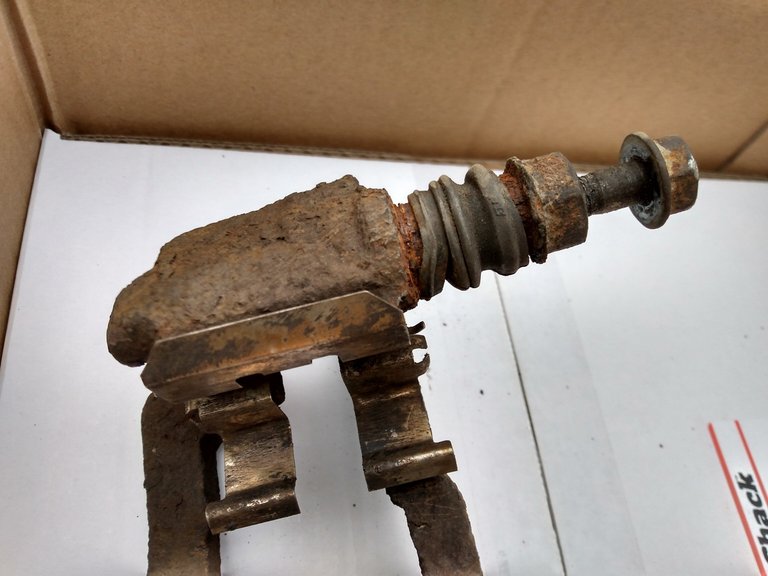
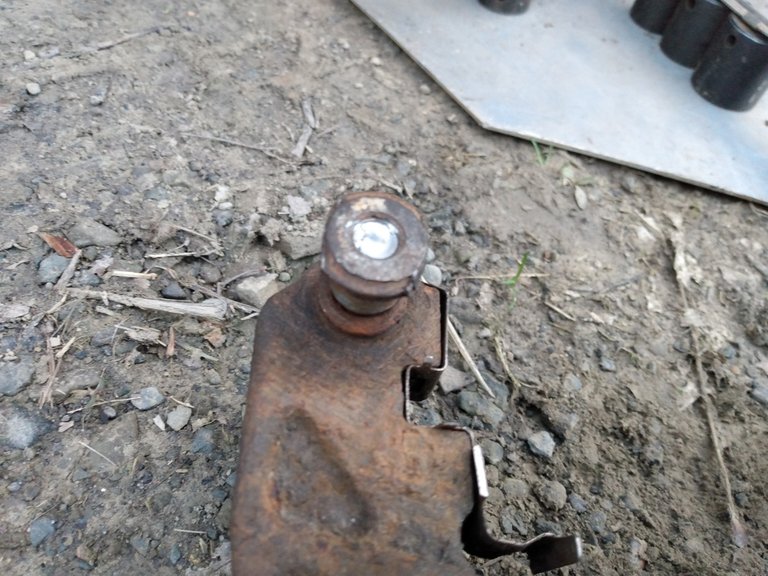
That plan quickly backfired, and the head of the caliper retainer bolt just broke off. On the bright side, I'm replacing this caliper slide pin anyway, so at least I don't have to worry about getting the broken bolt out of it!
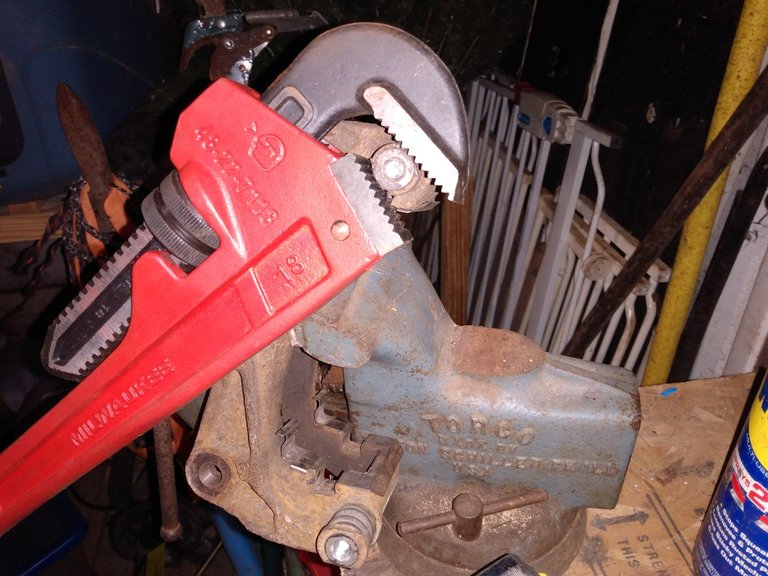
Since that didn't work, I'm stuck removing the old pin the hard way... with a vice and a pipe wrench. A little torch heat is sometimes necessary to get the pin to work loose. These pins often have rubber boots inside, so if you have to heat it with a torch, be prepared for a lot of smoke!
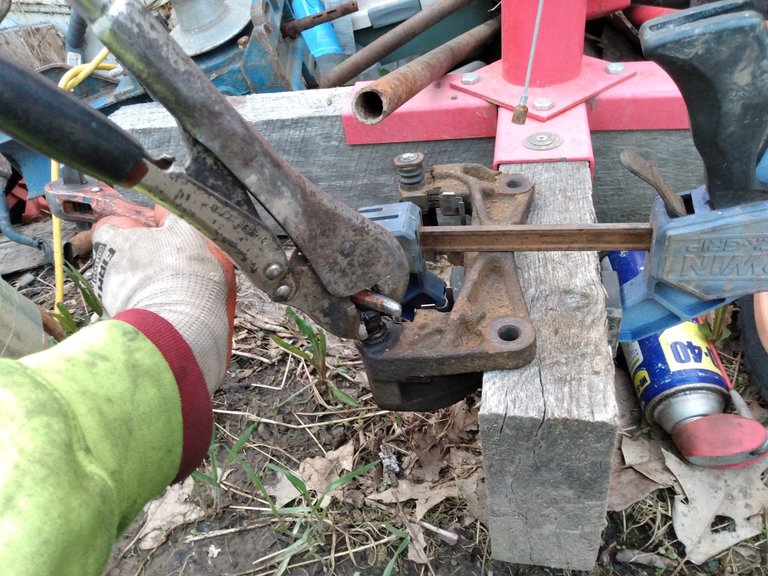
This turned out to be a case where torch heat was necessary, so I had to move things back outdoors. I was able to create a makeshift vise with my quick clamp. By clamping on to the end of the stuck slide pin with these old vise grips, and inserting a handle into the gap between the vice grip jaws, I was able to heat the pin and work it back and forth while pulling up on the vise grips. It took quite a while to get the stubborn old thing out, but I proved to be more stubborn in the end!
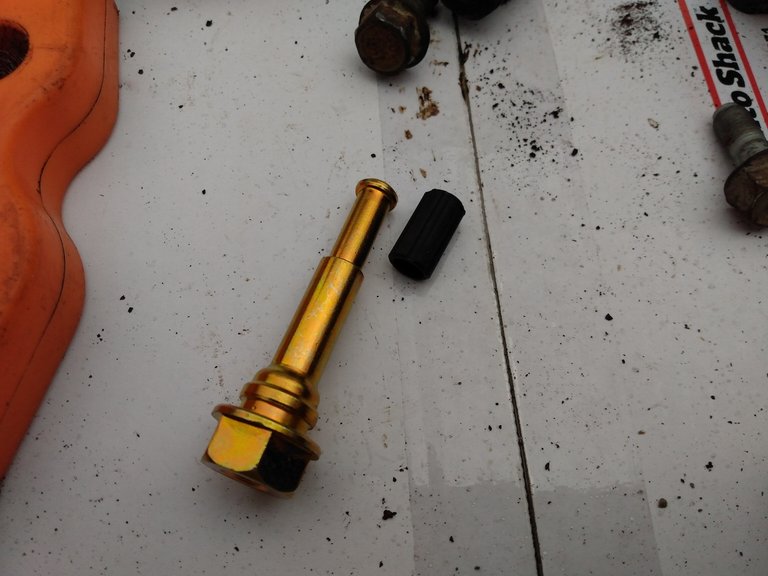
Below you can see the mangled old slide pin, with a bunch of rubber from the inner seal burned onto it.
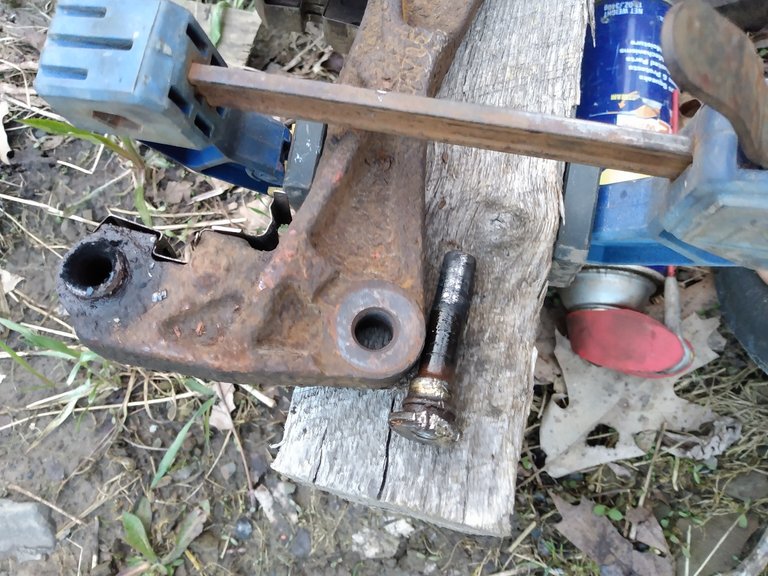

In the photo above, you can see one of the front caliper brackets, with both slide pins removed. The ones on the front had hex heads, and I was able to easily spin them loose with the impact hammer.
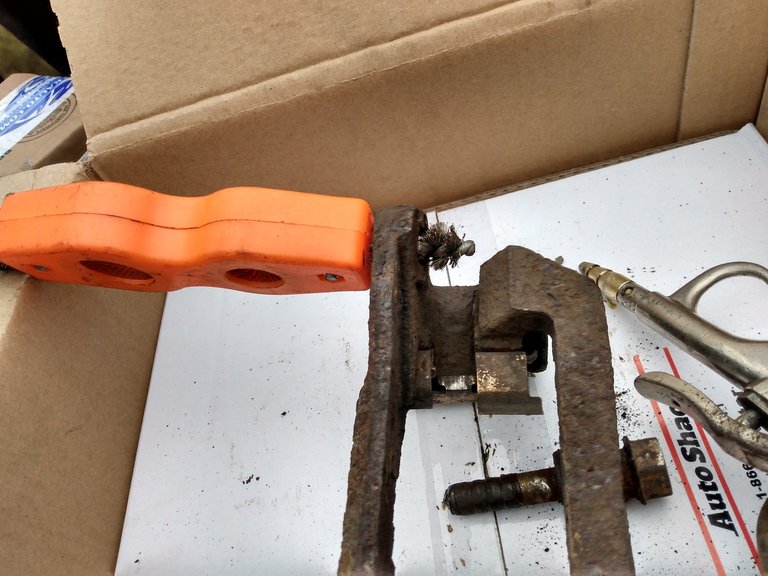
It's very important to thoroughly clean the holes for the slide pins, or else they will quickly seize again. I like to use the wire brushes that are made for cleaning copper pipe; similar ones are made for cleaning battery terminals. Scrub with the wire brush, blow out with airgun, and repeat, until the inside is as shiny as an engine cylinder. There will also be a little lip around the top of the hole for the slide pin, where the slide pin boot locks into place. It's important to get this clean enough for a good seal on the slide pin boots. (In the photo, the brush isn't actually inserted into the hole for the slide pins... that's the threaded hole that the caliper bracket bolts screw into. It's also a good idea to clean these threads.)
If your slide pins have internal rubber seals, these will need to be assembled before inserting the slide pins. Some slide pins don't have this extra rubber inside (as seen in the earlier photo).
Once you're ready to install the new slide pin, start by installing the slide pin boot (cover) on the caliper bracket. Most of these boots can be installed in either direction, but some of them will have a larger diameter at one end, so pay attention.
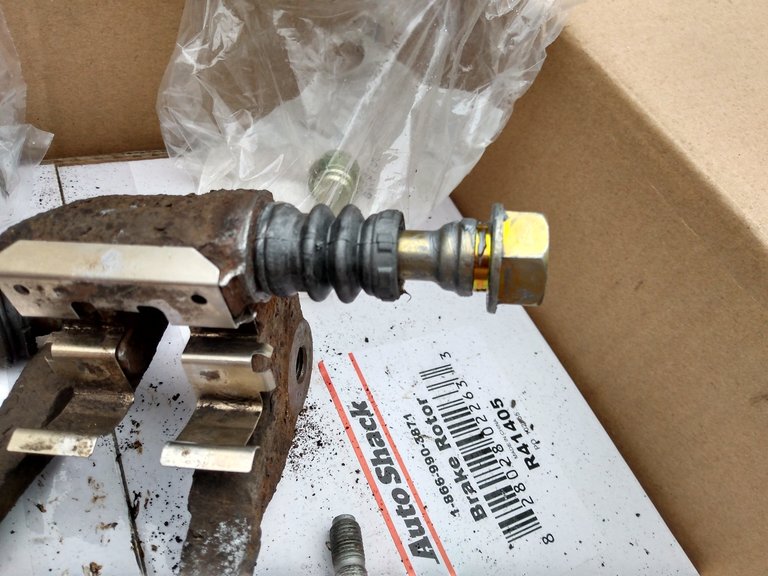
Next, just push the slide pin in until it the boot locks into place around it. The silver stuff you see all over things is anti-seize lubricant, which is what I prefer to use for brake assemblies. Many people use grease as a lubricant, and that's just fine, but higher temperature grease is better.
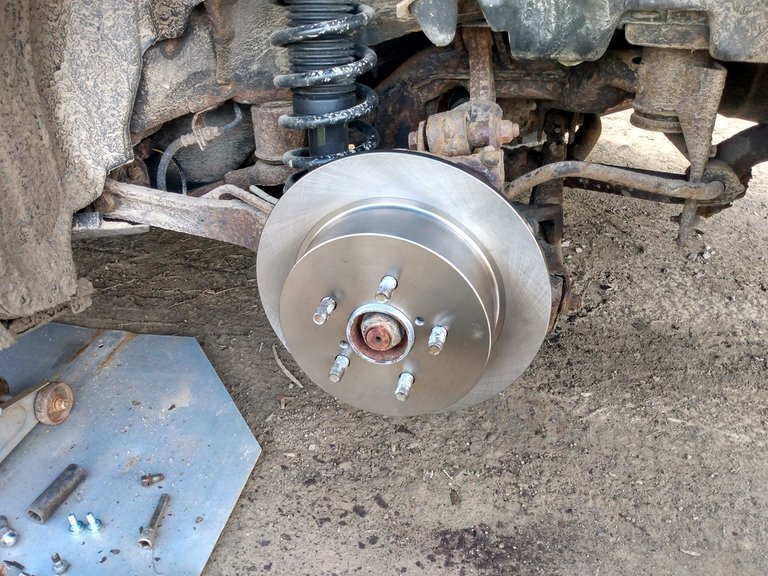
I also like to use anti-seize lubricant pretty liberally on the wheel hubs before installing the new rotors. This helps prevent the rotors from becoming stuck to the wheel hubs over time, which will make the next replacement that much easier.
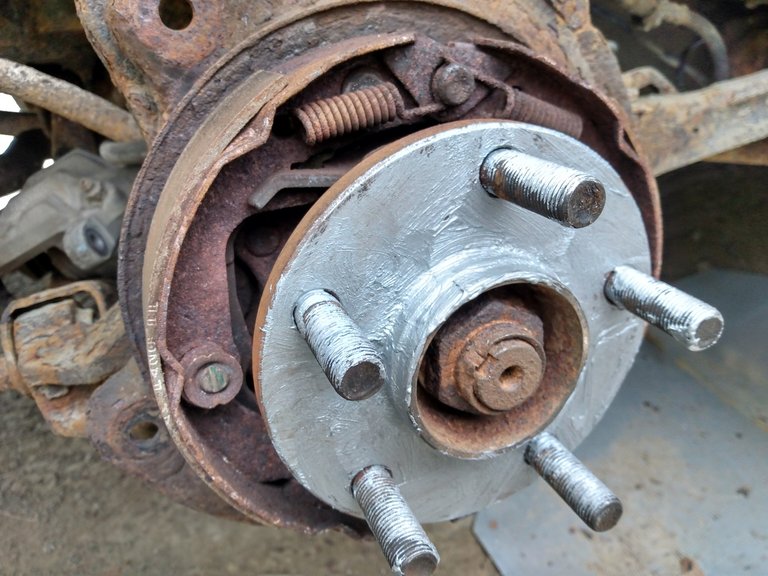
Nothing pretties up your wheels quite like new rotors! Okay, maybe new wheels will pretty up your wheels a bit more :D
Fortunately, the new slide pins also came with new caliper bolts, so I didn't have to find a replacement for the one I broke while trying to loosen up that stubborn slide pin!
This vehicle had double piston brake calipers on the front, like a truck. To compress these pistons I use one of the old brake pads, and in this case, my quick clamp.

If you made it this far, the rest of the reassembly should need no explanation 😂
It's always a good idea to test the brakes after a job like this, before doing any real driving. No matter how careful you are, there's always a chance that you've forgotten something simple, or a chance that a brake line was damaged during repairs. Make sure your brakes build proper pressure, and stop the vehicle as they should!
Thanks for taking the time to read my post! I hope you learned something new, or were at least a little entertained!
I do want to mention quickly, to whoever does the curation for this community, please DO NOT submit this for an OCD upvote... as a curator for Homesteading community, I'll submit this post to OCD in the share-your-post room.
Thanks for reading!

In that part of the car there is a great amount of rust in my country in the coastal cities they put a special product to avoid these problems, they deteriorate very fast if they are not maintained.
Every time I've lived in a coastal city, I didn't have a car 😄. They salt the roads here in the winter, which causes a lot of rust on the undercarriage. Brake calipers, rotors, and brackets will have a tendency to rust anyway, no matter where you live, because of the heat. I try to clean them as well as I can every time I take a wheel off.
Well first I must congratulate you for using safety implements to work, that speaks very well of you. As for the job, that caliper definitely needed to be repaired, the rust did its job, it looks like a typical case of a vehicle from a coastal city, that because of the saltpeter has so much rust.
We're not coastal here, but we salt the roads in the winter, so undercarriages take a real beating.
Thanks for taking the time to read and comment!
I see, that's the reason, what happens is that in my country we don't have winter and we see these cases with cars from the coast, good job.
Anti-seize… one little dab and next thing you know it’s all over your face, clothes and everywhere!! Lol
Look at them shiny rotors!! Daaaang!!

I've gotten to a point in my life where if everything isn't covered in anti-seize, I feel like the job isn't done!
🤣
I no longer hear about Subaru repairs now my husband is gone. The mechanic I now have to use is not a good at explaining what he's been doing.
My husband had done a lot of brake work on the cars, but this is the first time I saw this particular repair.
I liked how you put so many tips in to prevent future work.
Thanks! I try my best to make my repair posts easier to understand than the manuals I used to spend hours deciphering. I also try to share the stuff I've learned over the years that isn't in those manuals!
Most people wouldn't see this kind of repair, even mechanics will usually just buy a new caliper bracket. Labor on a job like this can be hard to estimate, and this procedure isn't in any of the manuals. Parts can also be hard to order, if you don't know how and where to look for rebuild parts.
Subarus are my favorite car to work on, for many reasons. Any time your mechanic isn't doing a good job explaining something, feel free to ask me about it in the comments of any of my posts.
Ok, I will take you up on it:
It's a 2014 Outback Limited. It's been doing this for quite a while. When driving along it will hesitate, sometimes nothing happens when you press the accelerator. Then slowly it responds. Tom seems to think it's tied to the program that runs the transmission. But the mechanic an find no code for the problem. It's an intermittent problem. The mechanic kept the car for a week and drove and it did happen to him a couple times.
He's telling me the newer Subarus have a new fuel delivery system (My words here, not his) where by the fuel does go into the valve cylinders the way it used to. It used to burn away carbon but now it doesn't and so it builds up around the valves and they don't seat right. Requires taking off the cover, cleaning valve and area and putting cover back. $500
Tom thinks that's not right, but he's been sick and not so able to research it. Tom's also just learning, via YouTube, about repairing cars since my husband died. My husband did all the work on all our cars over the last 40 years.
So without driving it, what do you think?
I agree with Tom, this almost definitely NOT a problem with buildup on the valves. Valves that stick or don't seat right are almost never an intermittent problem, they just get worse until you fix it or the engine quits running. They are also ALWAYS accompanied by some kind of 'backfire' noise, which you definitely would have noticed.
This sounds like you have a problem with your fuel/air mixture which is dependent on a number of sensors in the engine and powertrain. Tom might be close with his idea about the program that controls the transmission, but I think it's more likely a problem with an engine sensor, or with the program that controls the engine. These programs share information, so it can be hard to pinpoint exactly where the problem is.
A bad knock sensor, or MAF sensor, or throttle position sensor could cause this problem. If the check engine light is on, it would be good to see if any of the codes relate to these. A bad spark plug wire can also cause this, though if that's the problem you will usually see some flickering on the dash lights when the engine hesitates.
It could also be as simple as a fuel pump getting sluggish, if this still has the original in it, or as simple as a fuel filter, if you've been paying mechanics to change things like that. I once fixed a Suzuki for a person that was stalling every time they came to a stop... it turned out that the vehicle had a non-standard air filter, so when she took the vehicle for service, they just weren't changing it. When I pulled the old air filter out, it looked like a brick made of dirt!
I might be able to give you a clearer idea if you can tell me what (if any) OBD trouble codes came up when they ran the engine scan, and what the mileage is on this vehicle. I'm assuming you get regular maintenance done (oil changes, etc.), but again, it can be hard to trust people to do the simplest things correctly when you hire them out!
It's only been sent out twice, once to the mechanic my husband selected before he died, and then to this new one, who's business name is John's Suby Repair.
He said that no codes came up when they checked. Mileage around 99,990. Yes, regular maintenance as long as he owned it, from November 2018.
I've been researching this more, and it seems to be a very common problem on 2013-2015 models. There doesn't seem to be an agreed upon 'fix' for this, though a couple people have reported that the problem went away after having the dealership clear/reprogram the engine and powertrain modules.
I have found a popular work-around... many people have noted that this seems to be a problem with the transmission not shifting into a low enough gear when slowing down, and that shifting the car down into "L" when coming to a stop, then leaving it in "L" when starting until the engine reaches 2000-2500 rpm, seems to take care of the hesitation. Of course, this will only work if your vehicle has an automatic transmission, and seems to work best on cars with CVT transmissions.
It looks like this is a recurring software issue either way, that Subaru either can't fix, or is choosing to ignore. I'll keep my eyes open, and if I see anything that looks like a real fix for this, I'll send you the link.
It doesn't happen with acceleration from a stop but when one is just riding down the road. Tom says this car has the automatic CVT transmission. We've also done the disconnect the battery to reset thing, which helped briefly.
Thank you for putting the time into this! It's a help to know what you found.
sabes en ocasiones las viejas piezas pueden en ves de mejorar nuestro trabajo y hacerlo mas efectivo lo hacen mas difícil. Es eso lo que tienes que evaluar con ese gato hidráulico si las mañas de el hacen tu trabajo perdida de tiempo o a pesar de esas mañas siegue siendo efectivo. Gracias por compartir tu post
The safety features on the jack make it worth the extra time. Newer jacks not only lack the lock pin, but tend to be much lower quality steel. Eventually, I will repair the jack, and post about it here!
https://leofinance.io/threads/@paradoxtma/re-leothreads-2gyt5qbnn
The rewards earned on this comment will go directly to the people ( @paradoxtma ) sharing the post on LeoThreads,LikeTu,dBuzz.
~~~ embed:1629636921449119744 twitter metadata:NzUzNDM3MjMzNzg1NTQwNjA4fHxodHRwczovL3R3aXR0ZXIuY29tLzc1MzQzNzIzMzc4NTU0MDYwOC9zdGF0dXMvMTYyOTYzNjkyMTQ0OTExOTc0NHw= ~~~
The rewards earned on this comment will go directly to the people( @paradoxtma, @josuerr29 ) sharing the post on Twitter as long as they are registered with @poshtoken. Sign up at https://hiveposh.com.