Saludos cariñosos amigos de @Hivediy 🤗
De nuevo por acá estuve ausente por un largo tiempo, ya que mi perrijo Scotty 🐶 se me volvió a enfermar y cruzo el arcoíris a sus 14 años 😥 esto ya hace un mes y una semana, esto me causo una enorme tristeza me he sentido muy deprimida no ha sido fácil aceptar su partida😞 y hasta las ganas de crear las había perdido 😭 😭. Pero se que el no le gustaría verme así por eso estoy tratando de animarme y recordarlo con alegría ya que el fue el mejor perro del mundo 🐶❤️.
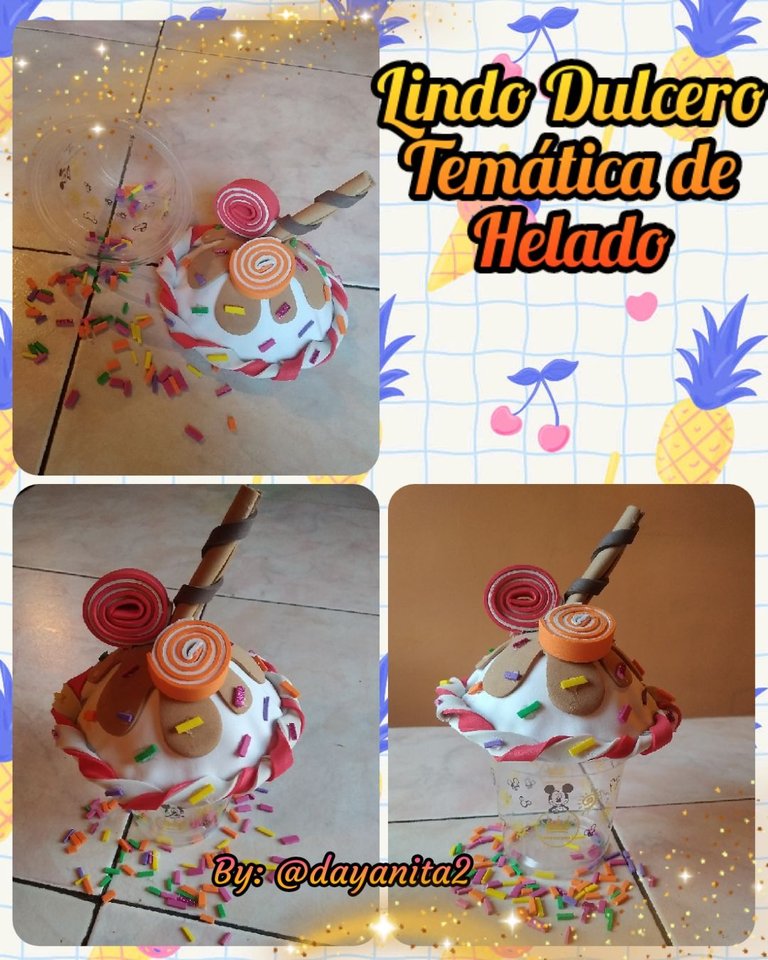
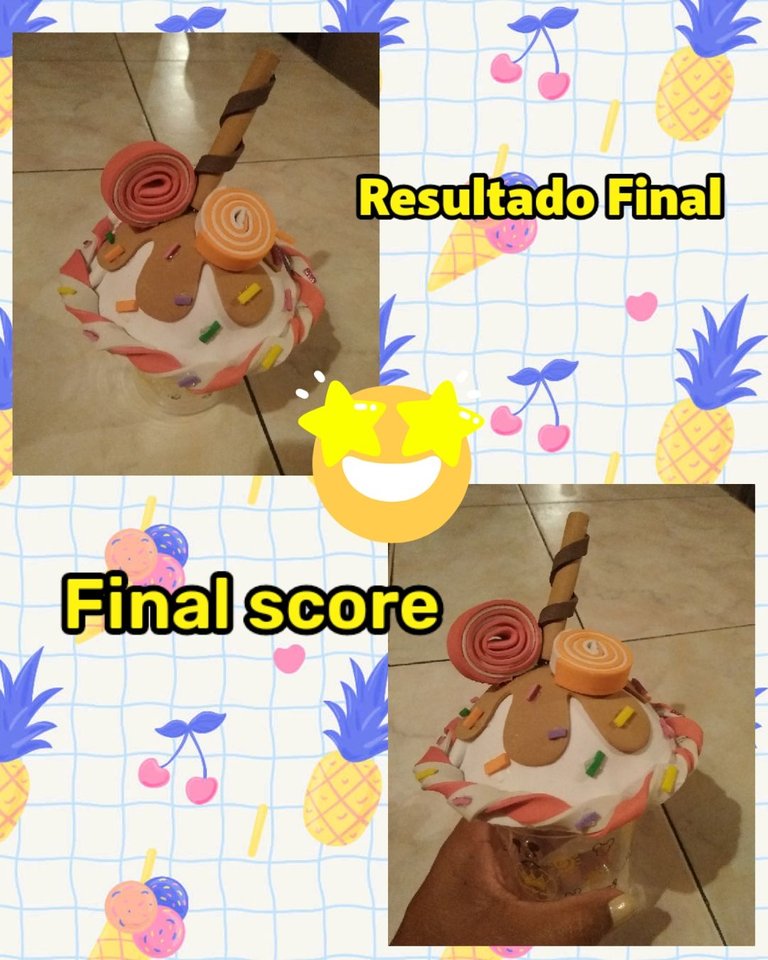
Y bueno el proyecto de hoy lo realice para llevarlo de muestra al preescolar donde laboro, ya que soy maestra en anteriores post lo he comentado, y como se acerca la época de fin de año escolar en mi país Venezuela, ya comenzamos a buscar opciones para la realización de los cotillones para entregarlos en la fiesta de los niños y cada docente lleva su propuesta y la mejor de todas es la que se elige para ser realizada, a mis colegas les encanto la mía por lo sencillo, se usa poco material, se recicla, y sabemos que a los niños les encantara porque es un lindo dulcero temática de helado 🍦, a mi me encantan los helados por eso lo realice espero que a ustedes también les gustes, ahora acompáñenme al paso a paso.
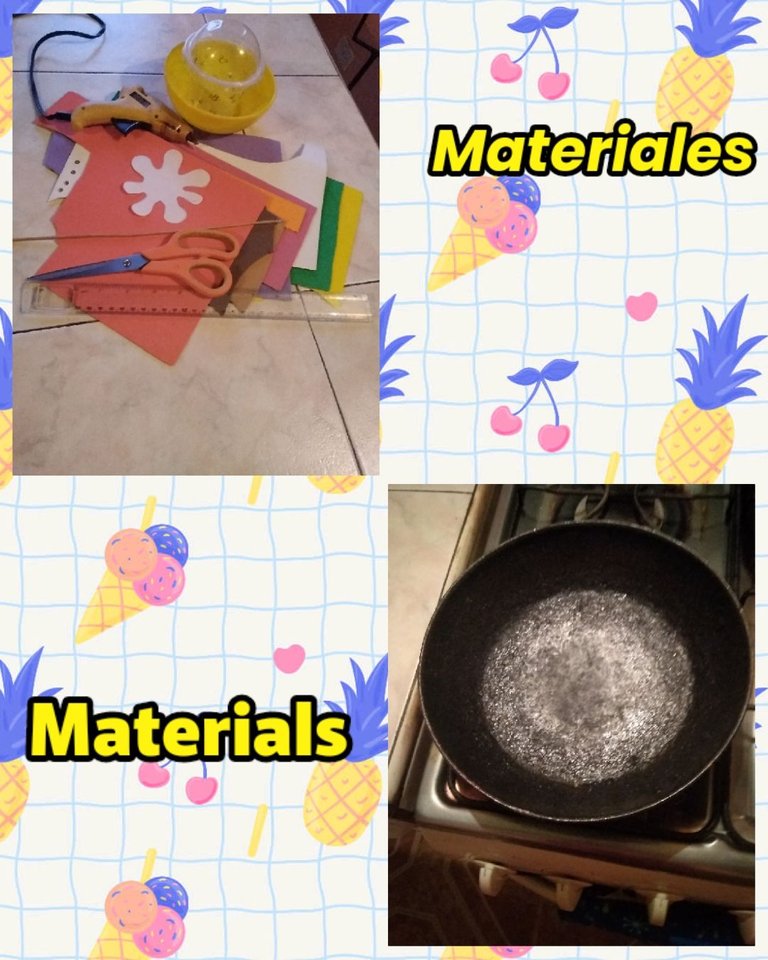
MATERIALES A USAR 📝:
🍧 1 Envase plástico tipo domo mediano
🍧 1 Envase plástico para usar como molde circular que sea mas grande que el domo
🍧 Foami (goma eva): rojo, blanco, marrón claro y oscuro,retazos de color morado, verde, fucsia, naranja y amarillo
🍧 Pistola de silicón, tijera, regla y un palito de altura.
🍧 sartén
🍧 Molde
Greetings dear friends of @Hivediy 🤗
Here again I was absent for a long time, since my dog Scotty 🐶 got sick again and crossed the rainbow at 14 years old 😥 this has been a month and a week ago, this caused me enormous sadness and I have felt very depressed it hasn't been easy to accept her departure 😞 and even the desire to create had lost them 😭 😭. But I know he wouldn't like to see me like this, so I'm trying to cheer myself up and remember him with joy since he was the best dog in the world 🐶❤️.
And well, I did today's project to take it as a sample to the preschool where I work, since I am a teacher in previous posts I have commented on it, and as the end of the school year approaches in my country Venezuela, we already began to look for options for the making of the cotillions to deliver them at the children's party and each teacher brings their proposal and the best of all is the one that is chosen to be made, my colleagues loved mine because it is simple, little material is used, it is recycle, and we know that the children will love it because it is a cute ice cream-themed candy box 🍦, I love ice cream, that's why I did it, I hope you like it too, now follow me step by step.
MATERIALS TO USE 📝:
🍧 1 Medium dome-type plastic container
🍧 1 Plastic container to use as a circular mold that is larger than the dome
🍧 Foami (eva rubber): red, white, light and dark brown, pieces of purple, green, fuchsia, orange and yellow
🍧 Silicone gun, scissors, ruler and a tall stick.
🍧 skillet
🍧 Mold
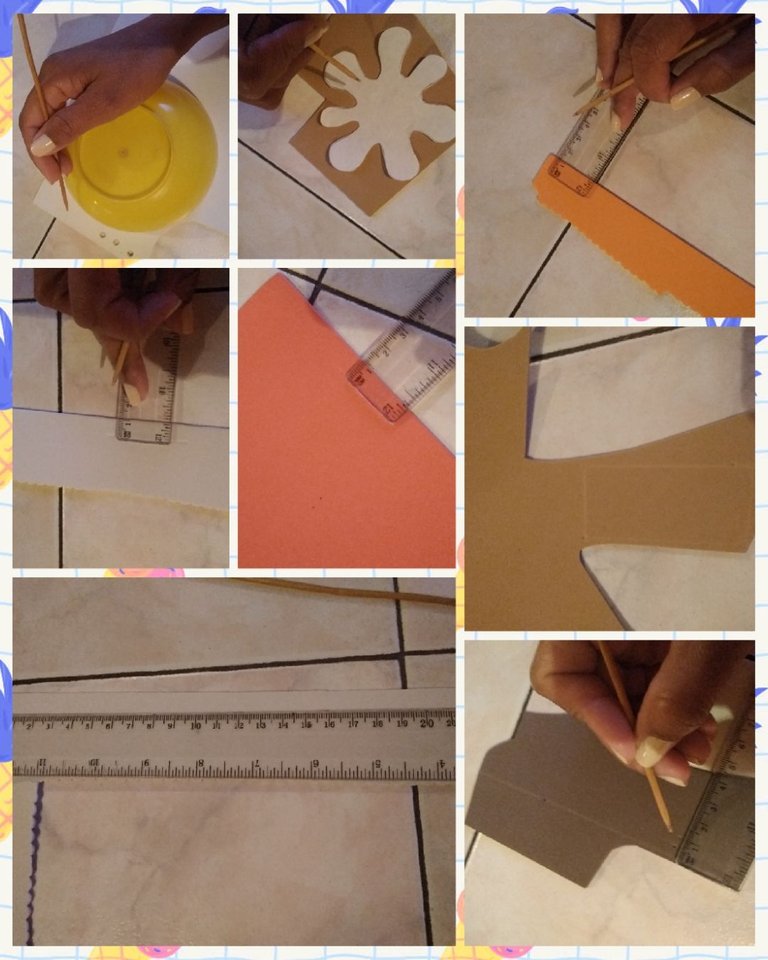
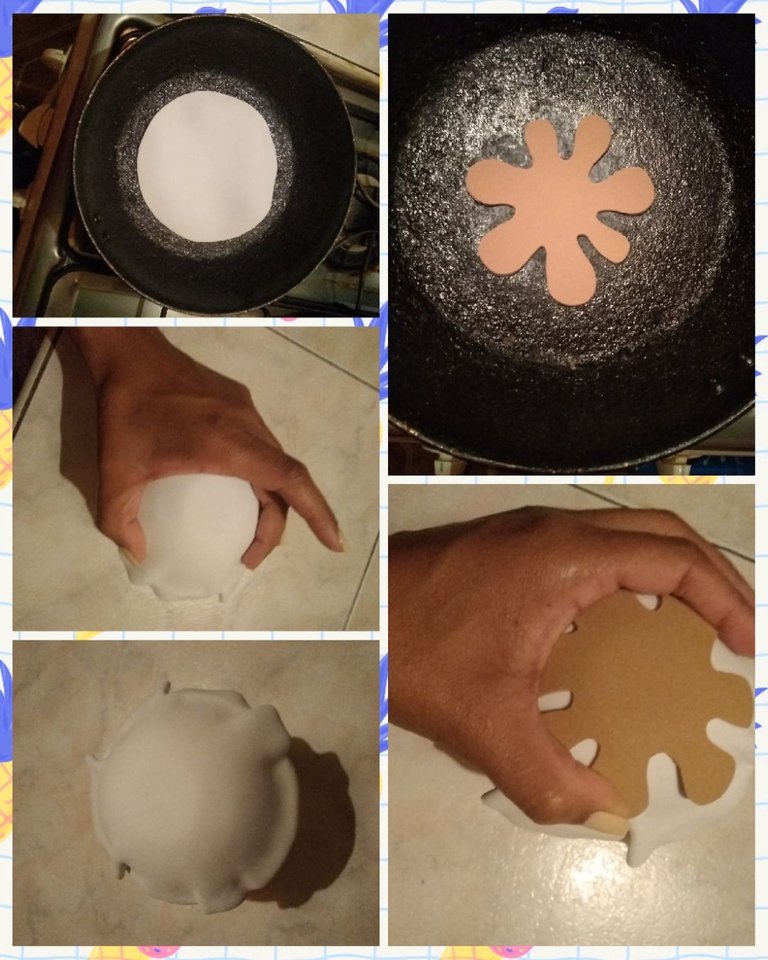
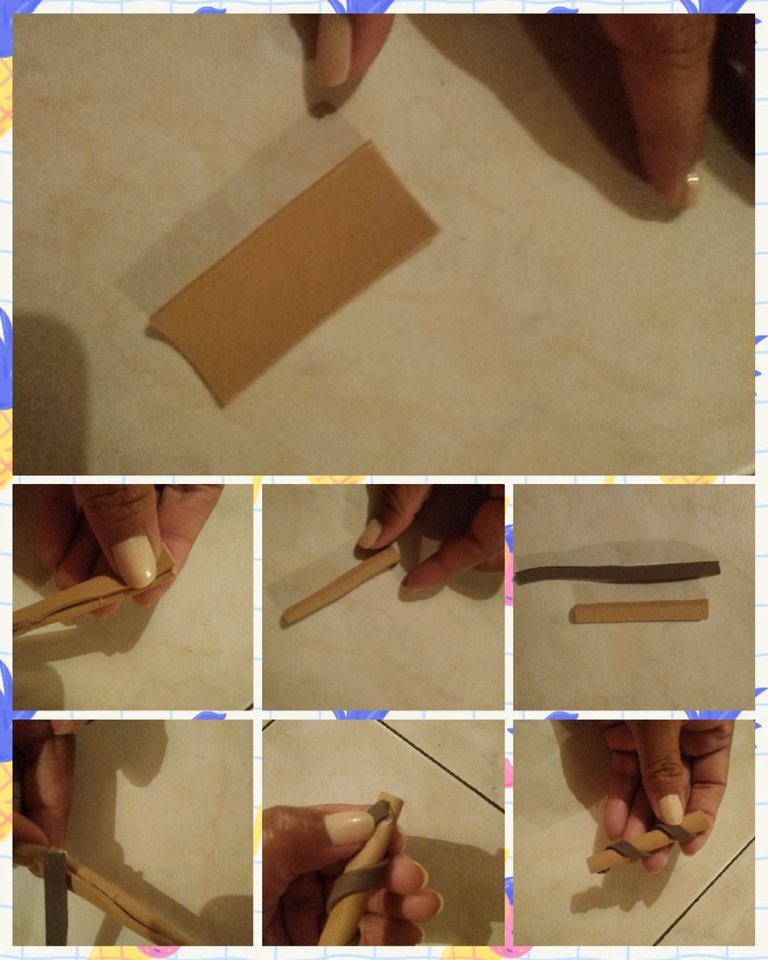
Paso 1
🍧 Tomamos el foami (goma eva) blanco y en el marcaremos usando el palito de altura un circulo para ello usaremos el envase circular. También marcaremos dos tiras de 1cm de ancho X 26cm de largo.
🍧 En el foami marrón claro marcaremos el molde eso será el chocolate derramado en nuestro helado y una tira de 0,5cm de ancho X 6cm de largo.
🍧 En los foami blanco y rojo marcaremos dos tira de 1cm de ancho X 26 cm de largo.En el naranja se marcara una tira de 1cm de ancho X 26cm de largo.
🍧 En el foami marrón claro se marcara un pequeño rectángulo de 3cm de ancho X 3cm de largo.
🍧 En los retazos de foami naranja, fucsia, naranja verde marcaremos tiras largas de 0,5cm de ancho.
Step 1
🍧 We take the white foami (eva rubber) and in it we will mark a circle using the height stick, for this we will use the circular container. We will also mark two 1cm wide X 26cm long strips.
🍧 In the light brown foami we will mark the mold that will be the chocolate spilled on our ice cream and a strip of 0.5 cm wide X 6 cm long.
🍧 In the white and red foami we will mark two strips of 1 cm wide X 26 cm long. In the orange one a strip of 1 cm wide X 26 cm long will be marked.
🍧 In the light brown foami, a small rectangle 3cm wide X 3cm long will be marked.
🍧 In the pieces of orange, fuchsia, orange-green foami we will mark long strips 0.5 cm wide.
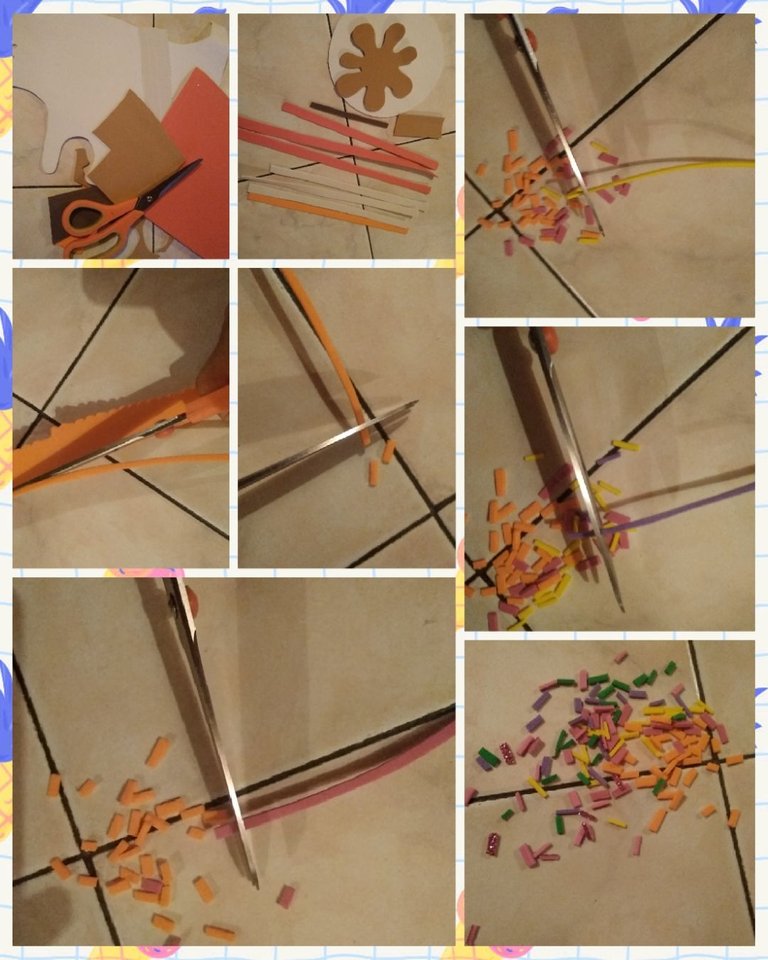
Paso 2
🍧 Haciendo uso de la tijera recortaremos lo marcado en el foami (goma eva), las tiras maracadas en los colores fucsia, amarillo, naranja, verde y morado se recortaran tiritas pequeñas para que sean las chispas de caramelo de nuestro helado.
Step 2
🍧 Using the scissors we will cut what is marked on the foami (eva rubber), the strips marked in the colors fuchsia, yellow, orange, green and purple will be cut into small band-aids so that they are the caramel sprinkles of our ice cream.
Paso 3
🍧 Se calentara el sartén en el se colocara la pieza circular marcada en el foami (goma eva) blanco, se dejara unos segundos hasta que veamos que comienza a inflarse, la retiramos con mucho cuidado de no quemarnos porque se calienta, seguidamente la colocamos encima del domo se presiona por unos segundos hasta que se enfrie, de esta manera el foami(goma eva) tomara la forma del mismo.
🍧 Ahora tomamos la pieza que sacamos en el foami marrón claro la dejamos igualmente unos segundos la retiramos y la colocamos encima del domo sobre la pieza que dimos forma en el paso anterior, presionamos unos segundos hasta que se enfríe.
Step 3
🍧 The pan will be heated in which the circular piece marked in the white foami (eva rubber) will be placed, it will be left for a few seconds until we see that it begins to inflate, we remove it very carefully so as not to burn ourselves because it heats up, then we place it on top of the dome is pressed for a few seconds until it cools, in this way the foami (eva rubber) will take its shape.
🍧 Now we take the piece that we took out in the light brown foami, we leave it for a few seconds, we remove it and place it on top of the dome on the piece that we shaped in the previous step, we press for a few seconds until it cools.
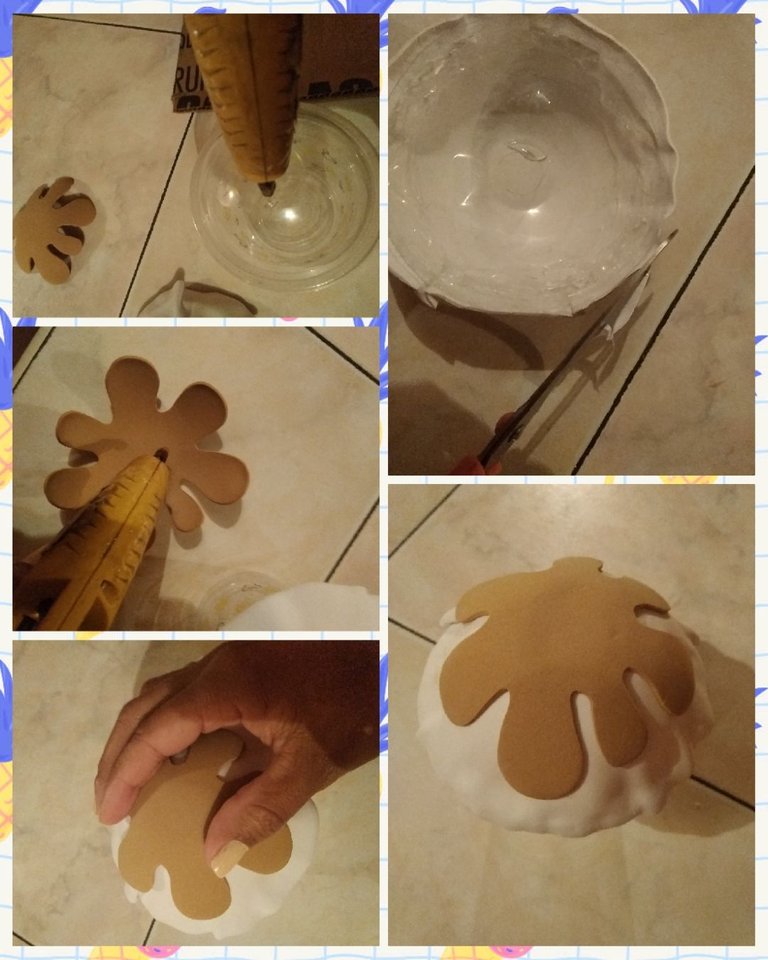
Paso 4
🍧 Con ayuda de la pistola de silicón pegaremos las piezas que moldeamos en el paso 3, para ello en el domo se le colocará abundante silicón y primero se pega la pieza blanca si nos queda un sobrante se recortará para que quede a medida del domo y encima de esta se pega la pieza marrón claro.
Step 4
🍧 With the help of the silicone gun we will glue the pieces that we molded in step 3, for this, abundant silicone will be placed in the dome and first the white piece will be glued if we have a surplus, it will be cut to fit the dome and on top of this the light brown piece is glued.
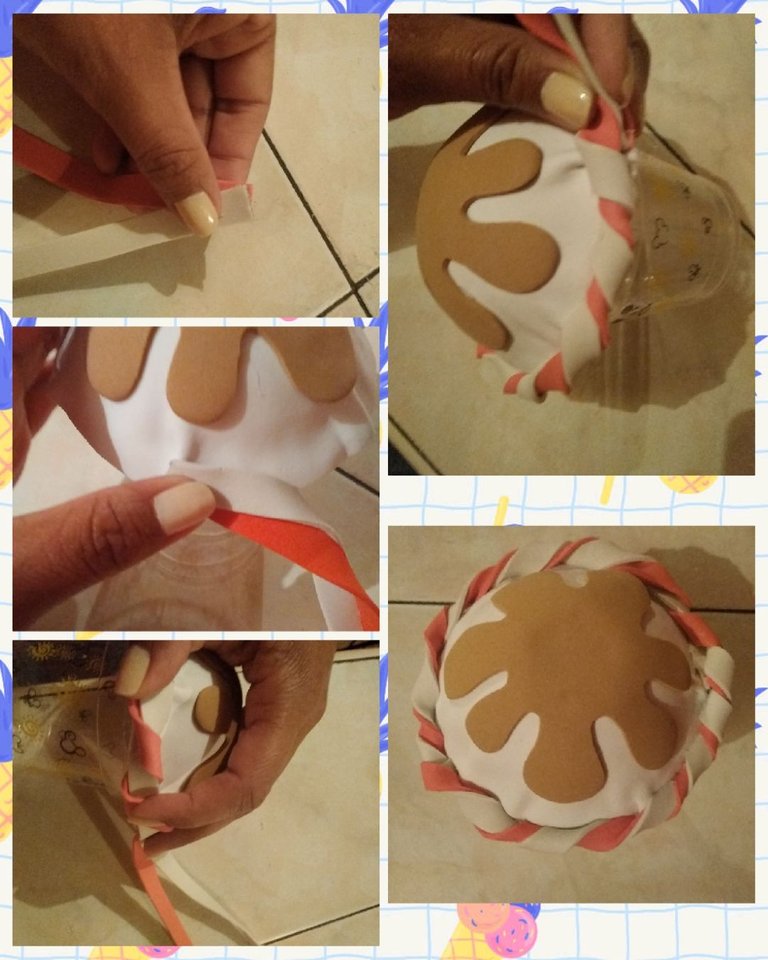
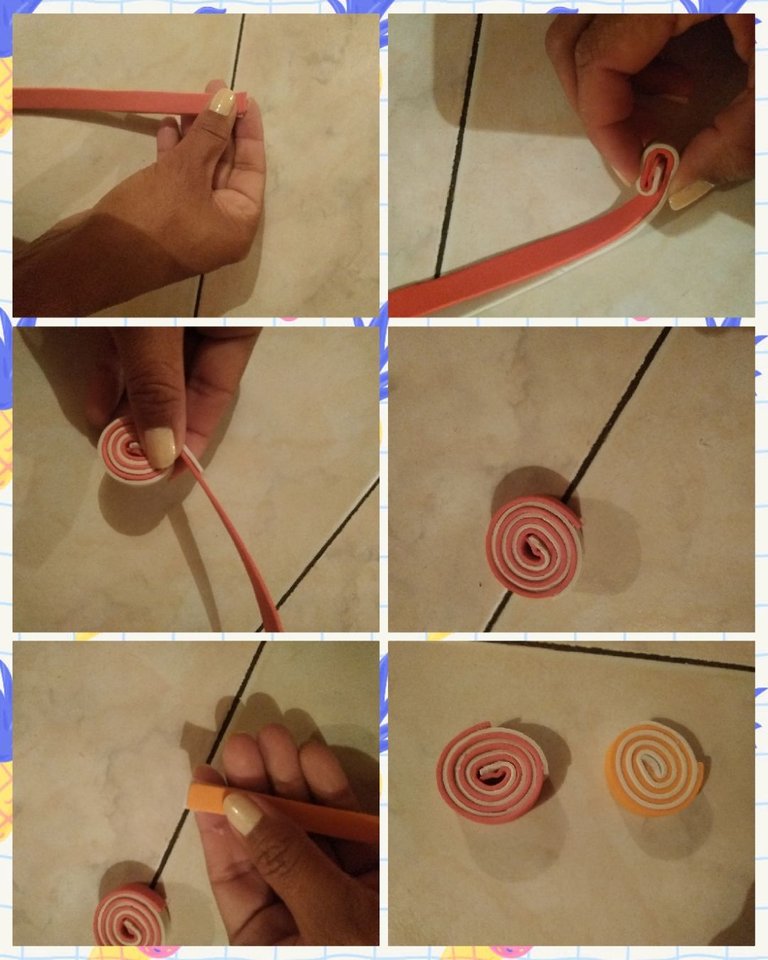
Paso 5
🍧 Ahora tomaremos las tiras que sacamos en el foami (goma eva) blanco y rojo, tomamos la punta de ambos y las pegamos con silicón y lo vamos a entochar o torcer y se pegara poco a poco en el borde del envase hasta terminar en el extremo donde se comenzo.
🍧 Para hacer los dulces o chupetas tomamos la tira de foami blanco y rojo unimos sus puntas las pegamos, luego vamos enrollando ambas tiras hacia adelante formando un círculo cuando llegues a la punta sellalas con silicón, este paso se repetirá con las tiras blancas y naranjas y listos ya tenemos nuestros dulces.
Step 5
🍧 Now we will take the strips that we took out in the white and red foami (eva rubber), we take the tip of both and glue them with silicone and we are going to wrap or twist it and it will stick little by little on the edge of the container until it ends at the end where it started.
🍧 To make the sweets or lollipops, we take the white and red foami strip, join their ends, glue them together, then roll both strips forward forming a circle. When you reach the end, seal them with silicone, this step will be repeated with the white and orange strips and ready we already have our sweets.
Paso 6
🍧 En este paso haremos un pirulin (en mi pais es un tubito hecho de galleta y relleno de chocolate y con un borde del mismo) para nuestro helado tomamos el rectángulo que marcamos en el foami (goma eva) marrón claro, le colocamos silicón en todo el borde y lo pegamos al otro borde formando un tubo, seguidamente se toma la tirita que sacamos en el foami marrón oscuro lo pegaremos al tubito que realizamos, comenzando desde la punta lo vamos llevando alrededor del mismo hasta llegar al otro extremo y se pega con silicón y listo tendremos un pirulin.
Step 6
🍧 In this step we will make a lollipop (in my country it is a tube made of biscuit and filled with chocolate and with an edge of it) for our ice cream we take the rectangle that we mark in the light brown foami (eva rubber), we place silicone in it the entire edge and glue it to the other edge forming a tube, then take the band-aid that we took out in the dark brown foami, we will glue it to the tube that we made, starting from the tip we take it around it until we reach the other end and it sticks with silicone and ready we will have a lollipop.
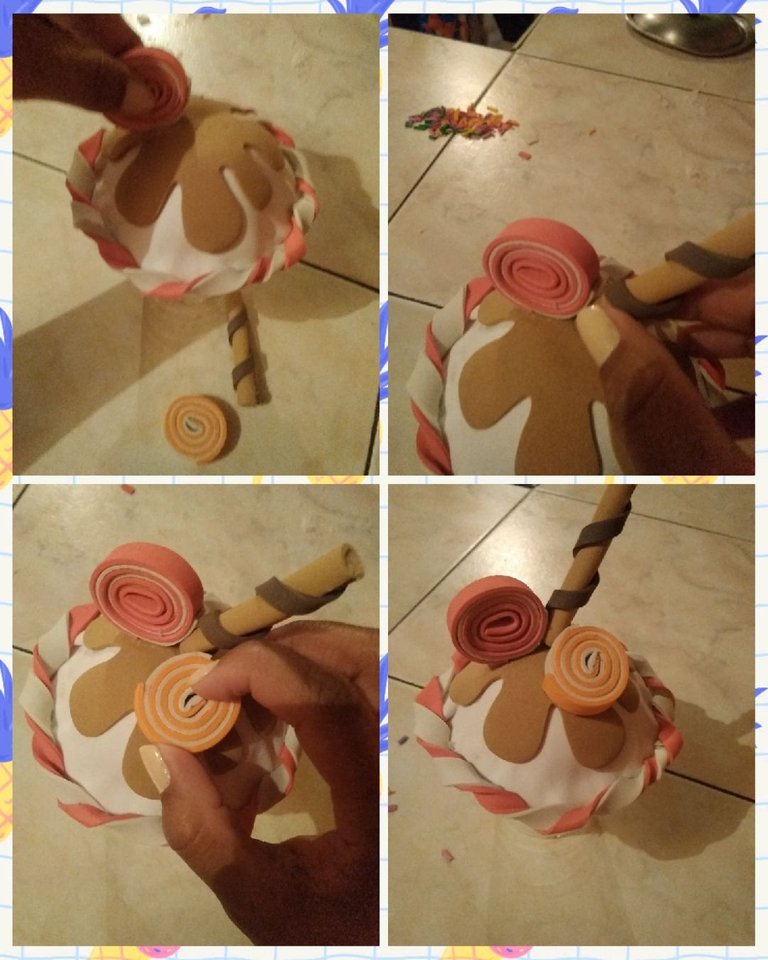
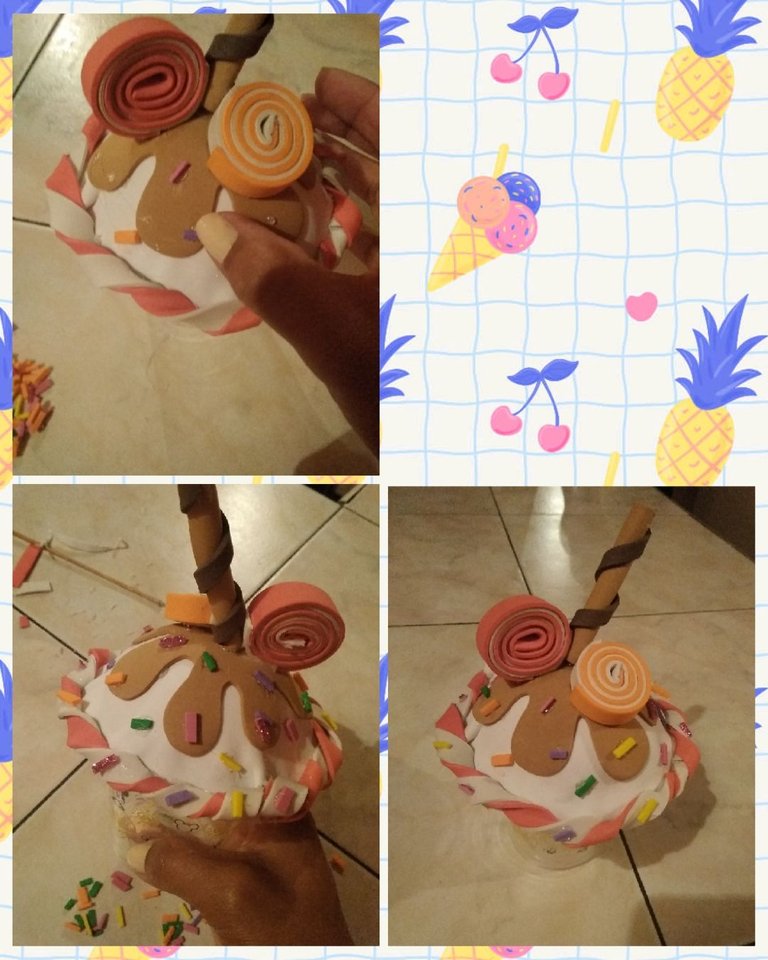
Paso 7
🍧 Hora de terminar de armar nuestro helado para ello tomaremos los caramelos que hicimos en el paso 5, esto los pegaremos con silicón encima del chocolate el blanco con rojo lo peguaremos paradito, al lado se pega el pirulin y al ladito del pirulin el caramelo blanco con naranja este se pegara acostado y listo.
🍧 Como último paso le pegaremos el foami que cortamos en tiritas pequeñas de colores, esto será las lluvia de caramelo, para ello colocaremos puntitos de silicón aletorios por todo el helado allí pegaremos los mismos de diferentes colores.
Step 7
🍧 Time to finish assembling our ice cream, for this we will take the candies that we made in step 5, we will glue this with silicone on top of the chocolate, the white with red, we will glue it standing, next to the lollipop and the white caramel to the side of the lollipop with orange it will stick lying down and that's it.
🍧 As the last step we will paste the foami that we cut into small colored strips, this will be the candy rain, for this we will place random silicone dots all over the ice cream there we will paste the same ones of different colors.
Gracias a ti que te detienes a leer cada uno de mis post que tengas un lindo y bendecido día 🤗🙏.
Las fotos fueron tomadas y editadas con mi celular
use la aplicación "Foto Collage"
La traducción la realice con el traductor de google
Hasta un Próximo Encuentro!!!
🤗😘
Thanks to you who stop to read each of my posts, have a nice and blessed day 🤗🙏.
The photos were taken and edited with my cell phone.
use the "Photo Collage" app
The translation is done with google translator
Until a Next Meeting!!!
🤗😘
https://leofinance.io/threads/@dayadam/re-leothreads-2kcyxm8wx
The rewards earned on this comment will go directly to the people ( dayadam ) sharing the post on LeoThreads,LikeTu,dBuzz.
~~~ embed:1646859999765753856 twitter metadata:MTQ4NDI4MTAxMzQxMzAyMzc1Nnx8aHR0cHM6Ly90d2l0dGVyLmNvbS8xNDg0MjgxMDEzNDEzMDIzNzU2L3N0YXR1cy8xNjQ2ODU5OTk5NzY1NzUzODU2fA== ~~~
The rewards earned on this comment will go directly to the people( @dayanita2, @dayadam ) sharing the post on Twitter as long as they are registered with @poshtoken. Sign up at https://hiveposh.com.
Te quedo muy cuchi y tierno ese dulcerito, me gusto mucho. Excelente manera de reciclar. Gracias por compartir tu proceso creativo. Saludos @dayanita2 lindo día para ti ✨
Hola @dayadam gracias me alegra saber que te gusto.
Un abrazo 🤗🌞
Ay yo mio! Está tan lindo que parece comestible <3
Jajajaja si a la vista engaña 🤗
Gracias @equipodelta
Congratulations @dayanita2! You have completed the following achievement on the Hive blockchain And have been rewarded with New badge(s)
Your next payout target is 1000 HP.
The unit is Hive Power equivalent because post and comment rewards can be split into HP and HBD
You can view your badges on your board and compare yourself to others in the Ranking
If you no longer want to receive notifications, reply to this comment with the word
STOPCheck out our last posts:
Support the HiveBuzz project. Vote for our proposal!
🤗🙏 @hivebuzz