YouTube is evil, but it can be productive at times too.
A couple days ago I found a video in my feed about making headlights shiny. I don't look at my headlights very often but seeing as I'm embarking on restoring my car bit by bit, I figured it's probably not a bad idea to have a look at how bad mine are.
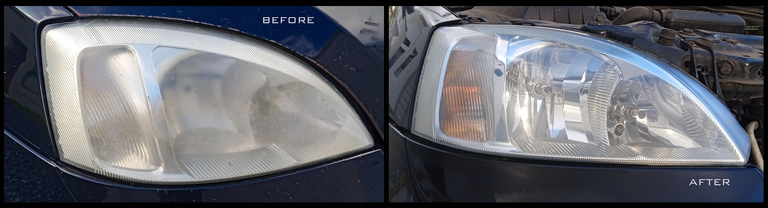
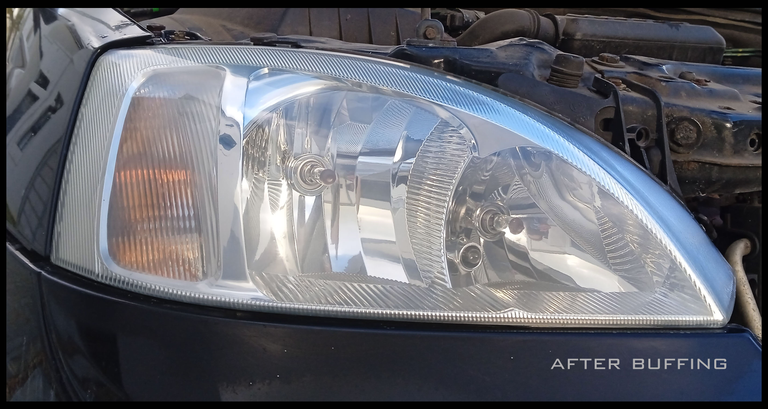
Hmmm. They were pretty bad. In the top left you can see the yellow oxidizing of what's left of the clear coat that covered my headlight originally - many years ago.
So what's the process?
LOT
HANDSANDING!
It's not for the faint of hand or those who have short attention spans when it comes to projects like this and I had to do this over two days because there were other priorities as well.
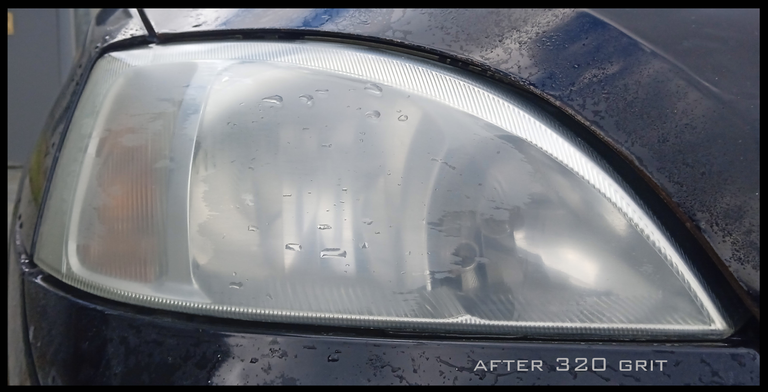
To do it well, you need to go through a lot of different grits. I started at 320 and worked my way through to 2000.
I only ever use Klingspor water paper for this kind of thing. The water acts as a lubricant and seeing as I was working on a polycarbonate plastic, I chose to do it by hand for a few reasons. You have far more control over the sanding paper, you can vary the speed, you don't run the risk of electrocuting yourself (a big bonus!) and you can feel the surface of the plastic as you sand it.
Starting at 320 then 600, 800, 1200 and lastly 2000. I sanded it in a circular motion and the first very important step is to remove all of the clear coat so that you're down to the plastic. Once you are done with that grit in a circular motion, then sand in a horizontal direction before moving on to the next grit. Below is what it looked like after 800 grit. It is going to look hazy like this until you buff it. At this point you can just take a short cut and spray it with UV resistant, polycarbonate friendly clear coat that's specifically designed for headlights. You don't sand it super fine when using clearcoat as it needs to be able to grip the plastic. I didn't do that though. Sucker for punishment? Yup. I am.
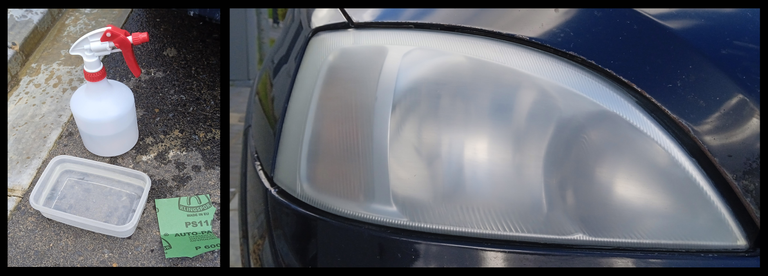
As far as the water goes, I used both a spray bottle to keep the surface of the lens wet and a container of water as well. The spray bottle can be used to wash down any grit and plastic that comes off from the sanding, while the container is what I used to rinse the gunk off my waterpaper as I went along. Then it doesn't get gummed up.
After each sanding, it's good practice to throw the water from the container out. Why? Because it contains sanding grit from the previous sand which is a much lager size than what you're going to use next. This could make deep gouges in your work when you go to the next finer sand. Also, wash off the lens really well between sanding grits.
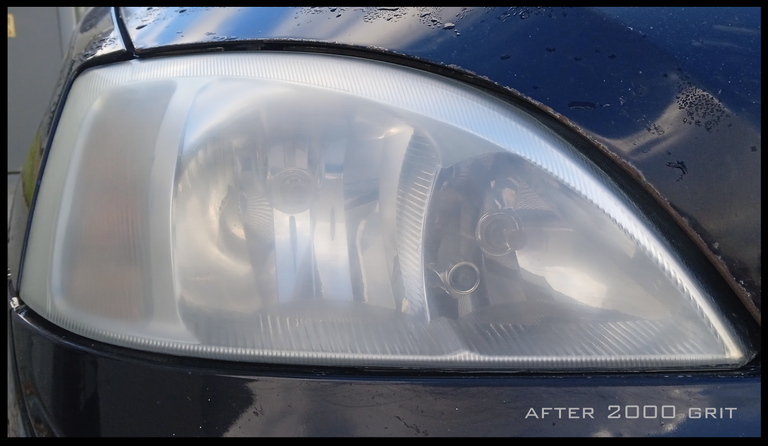
Once all the sanding is done and your fingers are raw, you can blast out the rotary buffer and buff it a bit with the wool pad and a touch of polish, then follow that up with the foam disc. You don't want to do this at a high speed (plastic melts when hot and you're creating friction on the surface), so keep it at low revs (1200 to 1500rpm). I moved across the surface in a horizontal direction and relatively slowly. Once I was pretty sick and tired of this and it seemed like there was a lot more clarity, I buffed it up with a microfibre cloth. I was well impressed with the end result and while I know that it's not going to last forever, it's still a whole lot better than it was the day before. I've now done the other one as well and the difference in the light it emits at night is insane.
The other fun part of this? Because you've now lost some of your fingerprints to this process, you'll be driving down the road and judging everyone else's lights 🤣 Enjoy the process, it will make you feel victorious having made something look this pretty...
Let me know what you thought of this self inflicted torture and what you would have done differently.
Amzing work, dear @emma-h2 - and a great example of doing something right by taking a long time and much effort to do it! I applaud you, and thank you for sharing the steps, as I can imagine it'd be easy to do a job like this quite badly 😋 I love how perfect it looks at the end; totally my kind of DIYing!
Hello Clare! Thanks so much for your words of encouragement, I do so enjoy these DIYs, even when they make my fingers bleed 🤣 Sending you much love and hugs 🦋
Amazing job. I am sure Mr. Miyagi would be very proud (Karate Kid reference) YouTube is an excellent source of these DIY tips. As I add a wood burning boiler stove to my house I spend every evening learning new skills. I am now a plumber, bricklayer, electrician and tiler.
I am amazed at how my father built our house and everything in it without Youtube.
Must do my own car lights when I get some time.
Hi Daniel. Thanks for coming around. I remember Karate Kid, yes, I'm THAT old lol.
YouTube is like Encyclopedia Britannica was back in the day but even better, it's quite an uplifting and empowering feeling teaching yourself new skills so I totally get it. Your dad sounds like he was an incredible person and sounds like you're following in those footsteps. My dad was like that too, always wanted to do everything himself first, which ultimately led to many unfinished projects all over the house but hey, I learned from that too.
Bricklaying : ✅
Tiling: ✅
Plumbing: Not so much
Electrical: Some
Car respraying: In the works 😁
Looking forward to seeing that wood boiler stove installation DIY post!
Have an awesome weekend coming up!
I end up having to go through this torture at lest once a year...I miss glass headlights
It's a damn pain, I know! Glass headlights were brilliant. You could just take them out, wash them off, stick 'em back in and voila! We should petition the house of commerce 🤣
Oh Damn! That looks as good as new. Job well done, Emma.
To be honest, it really looks like a brand new headlight.
Thanks Riz, I must admit it came out better than I thought it would. The buffing at the end does wonders. For the amount of time it took to sand these babies down and buff them out (if I was charging my hourly rate), I probably could have bought a new set 🤣 but it's always good to test skills and see what happens.
Pity you can't do this with windscreens though, I got a massive crack running through mine a few weeks back while travelling cross country thanks to a truck in front of me. Maybe I'll test my hand at replacing my windscreen the DIY way next.
I bet you could. I'm not even exaggerating, this is some really good work. You deserve a big tip, so go ahead and treat yo self. 😎
We have a crack on our family car's windscreen too, the crack is over a decade old, and so far we've found no fix. Even the original windscreen isn't available in the country. I guess we'll have to cut out some cheap windscreen and get it fitted, and that's something we'd rather not do. Because even with the crack, the windscreen still does its job quite well.
Give us an update if you choose to do so. 🤔
Lol, I had a cappuccino today, I think that counts 😁
Oh gosh that's not cool, you'd have to import the windscreen? To be fair though, a proper one made for your particular vehicle will still be better than getting one to fit. If it's lasted this long though and it doesn't shine the sunlight into your eyes and burn sunspots in your retina, then I reckon keep it until you can't. I'm going to see how long I can get away with driving with the crack before the police impound my car 🤣
If it was a good cuppa, then it does count haha.
That's the plan I'd say. 😎
Fortunately, and unfortunately, the "law" and the popo aren't as rigorous here. 😬
The DIY and hacks are amazing to watch.. Sometimes life saver hehe..
I get so hooked on them though, it's so bad 🤣 but when you can put them into practice, it's an amazing feeling. Thanks for coming round and reading my post Jane. Have a wonderful midweek!
This is something we need to do, but every time we have the time, the car has to go into the shop. I wonder if those headlights are telling us something...
It's not as hard as people make us believe. It just takes patience. I have some nasty blisters on my fingers, but it was totally worth it. Give it a try, it really is worth it and saves you some cash to do it yourself. Thanks for the comment and for stopping by, I hope you are doing well 🙂
I actually don't have any idea about it but I just want to say that the process is very long
It is too long...
The process is stupidly long - hours worth of work, but I think when it comes to safety, it's worth it. I'm so freaking night blind that having good beams helps a shit ton! Thanks for your comment.
Congratulations @emma-h2! You have completed the following achievement on the Hive blockchain And have been rewarded with New badge(s)
Your next target is to reach 700 comments.
You can view your badges on your board and compare yourself to others in the Ranking
If you no longer want to receive notifications, reply to this comment with the word
STOPTo support your work, I also upvoted your post!
Check out our last posts: