Hola gente linda, les deseo un hermoso día, lleno de energía, positivismo y buena onda. Hoy, por 1ra vez, voy a compartir con ustedes parte de lo que amo y hago día a día, en esta hermosa comunidad que es #hivediy.
Hello beautiful people, I wish you a beautiful day, full of energy, positivity and good vibes. Today, for the 1st time, I'm going to share with you part of what I love and do day by day, in this beautiful community that is #hivediy.

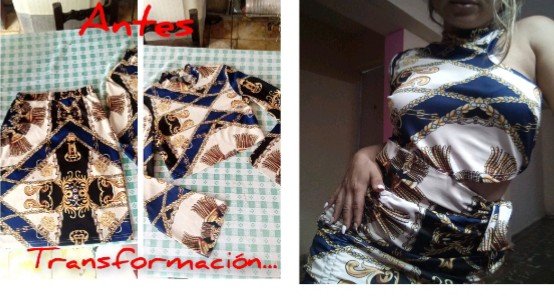
Me emociona mucho ver tanta creatividad y creaciones tan bellas, por parte de todos, y tambien el mostrarles la mia, en este caso una linda transformacion de un conjunto pasado de moda, a un conjunto fresco, juvenil y sensual. Permiento darle nuevamente un buen uso a aquella ropita que tanto te gustaba, y ya no usabas.
I am very excited to see so much creativity and beautiful creations from everyone, and also to show you mine, in this case a nice transformation of an old fashioned outfit, to a fresh, youthful and sensual outfit. I know how to give again a good use to those clothes that you liked so much, and no longer used.
Este ha sido un gran reto para mi, debido a algunos detallitos que en mi criterio personal, no es mi fuerte, ya que al no tener una base solida en este mundo de las confecciones textiles, se me dificulta mucho. Pero todo es cuestion de proponerselo, tener fe y sobre todo mucha pasion y entrega. Solo asi he logrado crecer, y perfeccionarme en cada nuevo reto.
This has been a great challenge for me, due to some little details that in my personal criteria, is not my forte, since not having a solid base in this world of textile confections, it is very difficult for me. But everything is a question of proposing it, having faith and above all a lot of passion and dedication. This is the only way I have been able to grow and improve myself in each new challenge.
Los invito a acompañarme en este mini tutorial de reciclaje de ropa. Donde remodelo paso a paso, de una manera sencilla, y practica, este hermoso outifs.
I invite you to join me in this mini tutorial on recycling clothes. Where I remodel step by step, in a simple and practical way, this beautiful outifs.

Materiales / Materials
A set of skirt with sleeve blouse and collar.
Scissors
Thread and needle
Elastic
Measuring tape
Pins
Sewing machine

Procedimiento:
Paso 1
Parti de lo mas sencillo a lo mas complejo. Como la falda en cuestion ya estaba confeccionada, solo la voltee x la cara de adentro, o sea la vire al reves. Luego , marque 10 cm con ayuda de la cinta metrica, de la costura lateral hacia adentro, por todo el borde de la falda. Marque un punto x todo ese borde para unirlos trazando una linea. De una de las mangas que quitamos( mas adelante explicare ese proceso), recorte dos tiras, una del largo de la falda y de 8cm de ancho; y la otra de 4cm de ancho y un poco mas larga que la falda, para que sobresalga de la misma. La tira mas ancha ira cosida por la parte de adentro de la falda. Dandoles en total tres costuras a todo lo largo. Una en el mismo centro de la tira y las otras dos en los costados. Y finalmente pasando por esos costados la tirita ya cosida y volteada al derecho.
Procedure:
Step 1
I started from the simplest to the most complex. As the skirt in question was already made, I only turned it inside out, that is, inside out. Then, mark 10 cm with the help of the tape measure, from the side seam inwards, along the entire edge of the skirt. Mark a point along that edge to join them by drawing a line. From one of the sleeves that we removed (I will explain this process later), cut two strips, one the length of the skirt and 8cm wide; and the other 4cm wide and a little longer than the skirt, so that it protrudes from the skirt. The wider strip will be sewn on the inside of the skirt. Giving them a total of three seams along the entire length. One in the very center of the strip and the other two on the sides. And finally passing through those sides the strip already sewn and turned right side out.

Paso 2
Para la remodelacion de la blusa lo dividi en 4 pasos sencillos:
Lo primero que hice fue elegir el diseño que queria recrear; y que ubiese la cantidad adecuada de tejido para su confeccion.
Step 2
For the reshaping of the blouse I divided it into 4 simple steps:
The first thing I did was to choose the design I wanted to recreate; and that there was the right amount of fabric to make it.

Descoser la manga sobrante y recortar la otra hasta por encima del codo ( lo marcado con rojo, es todo lo sobrante y de alli se recortan las tiras que se necesitan)
Unpick the excess sleeve and trim the other sleeve to above the elbow(the red marked is all the excess and from there you cut the strips you need).

De la manga sobrante y parte de la otra que se pico, recorte dos listones uno mas ancho que corresponde a la cintura y uno mas fino que ira por todo el borde que queda descubierto el hombro.
From the excess sleeve and part of the other sleeve that was peaked, cut two strips, a wider one that corresponds to the waist and a thinner one that will go around the edge of the shoulder that is uncovered.

Colocar los alfileres en las zonas donde se va a colocar los listones de telas mencionados anteriormente, y finalmente coserlos.
Place the pins in the areas where the aforementioned fabric strips are to be placed, and finally sew them.

Nota: Siempre a la hora de iniciar o terminar una puntada, se bede rematar la misma; es decir; darle hacia adelante y atrás, y nuevamente adelante. De esta manera se puede evitar que se descosan la esquinas o alguna costura de las piezas confeccionadas.
Note: When starting or finishing a stitch, it is always necessary to finish the stitch, that is to say, to stitch back and forth, and then forward again. In this way you can avoid unpicking the corners or any seam of the seams of the sewn pieces.
RESULTADO / RESULT


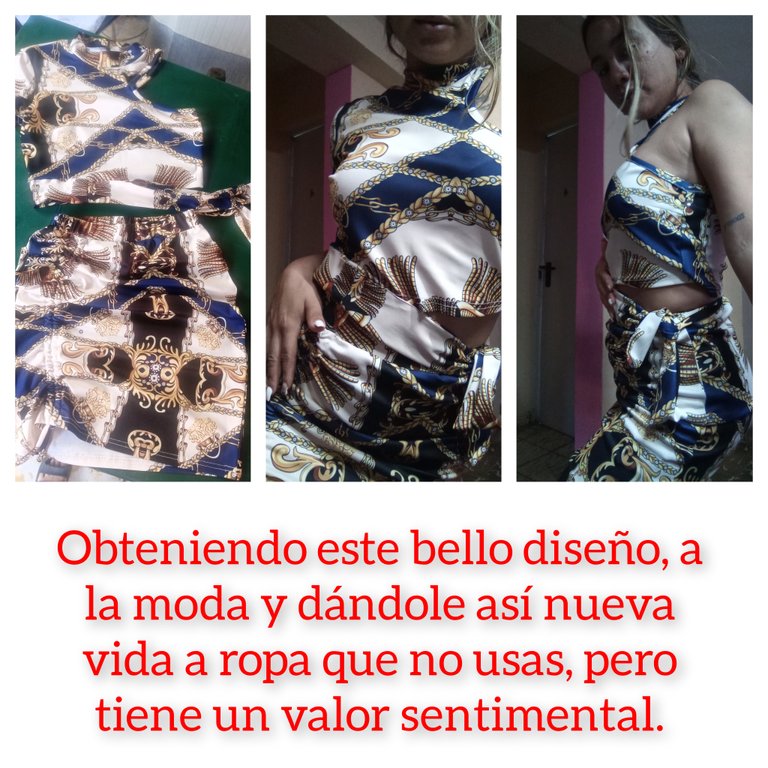
Es un conjunto practico para cualquier ocasión. Prenda la cual haria juego con unos zapatos altos, o unas lindas cocalecas. Dejando al descubierto las piernas y resaltando la hermosa silueta de tu cuerpo. Me gusto mucho expirimentar y compartir con ustedes todo este proceso, ha sido el 1 ro de muchos mini tutoriales mas. Espero y les guste mi post, millones de gracias por leer todo mi trabajo y agradeceria, poder responder a sus comentarios y apoyo. Bendiciones, mucha porsperidad para todos sus emprendimientos.
It is a practical set for any occasion. Garment which would match with high shoes, or a nice cocalecas. Leaving the legs exposed and highlighting the beautiful silhouette of your body. I really enjoyed sharing with you all this process, it has been the first of many mini tutorials. I hope you like my post, thank you so much for reading all my work and I would appreciate it if I could respond to your comments and support. Blessings and best wishes for all your endeavors.
El texto o resumen es totalmente de mi autoria.
The text or summary is entirely my own.
Old item became fresh and has fit model for you 😊
☺️
🤞
Congratulations @karoly! You have completed the following achievement on the Hive blockchain And have been rewarded with New badge(s)
Your next target is to reach 50 upvotes.
You can view your badges on your board and compare yourself to others in the Ranking
If you no longer want to receive notifications, reply to this comment with the word
STOPCheck out our last posts:
🙏
Es genial verte dando tus primeros pasos en Hive @karoly. ¡Avanza!
🙏