(ENG)
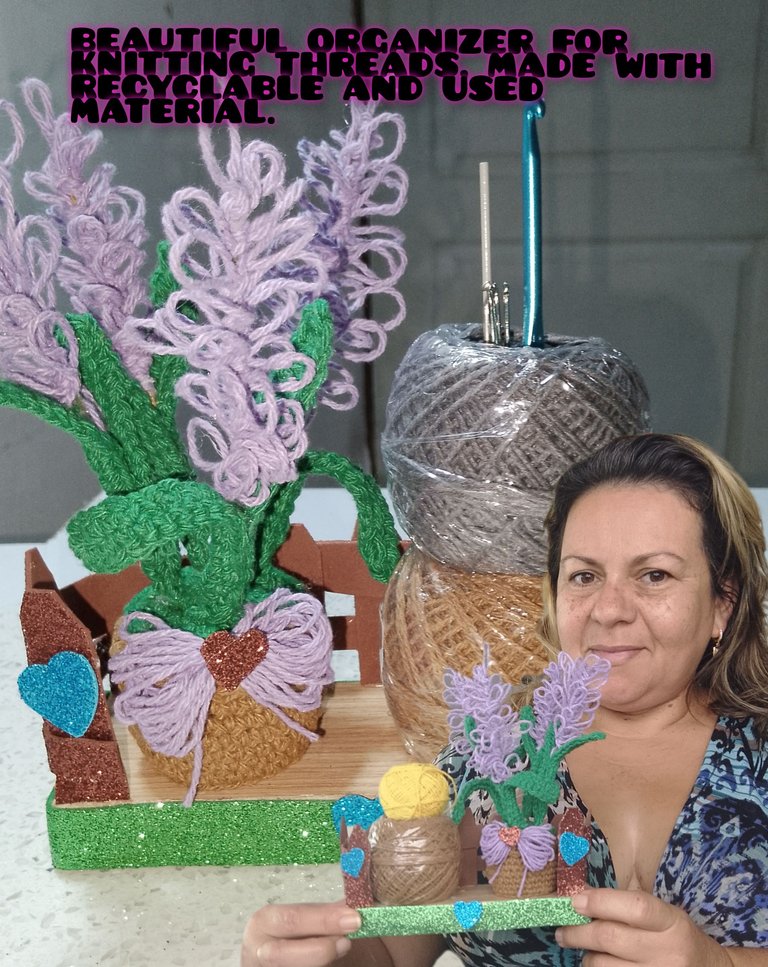
Hello everyone, I hope this day is nice and very useful for everyone at @hivediy, I am pleased to be with you today, starting this week, with a lot of enthusiasm and desire to do many beautiful things, to show you. Today I show you a very nice organizer, which is very useful for knitters when making our crafts, where you can place your threads and let them run easily, avoiding winding up, or making those knots, which many times It took away our time, and it can even cause us some stress. For me in particular, this situation has even made me abandon knitting for a few days. For them, I have used recyclable and useful material. The idea comes from how motivated I am, from my latest acquisition of threads. I invite you to follow me, welcome, everyone to my blog.
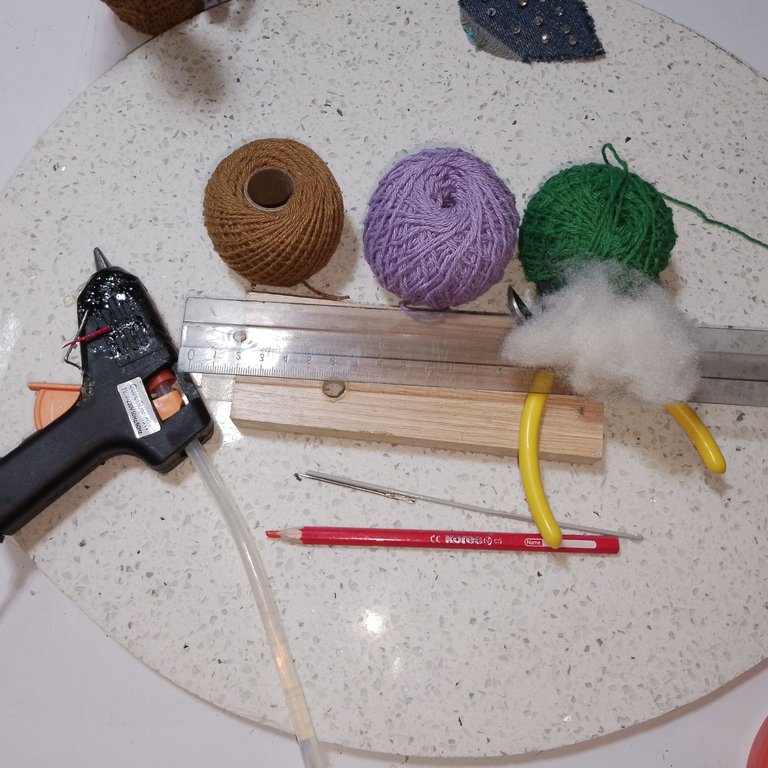
Materials:
. Pavilion threads for knitting. Colors (grass green, purple and brown)
. Knitting needle.
. Wool needle.
. Foam strips, colored (green and brown, both frosty)
. Piece of damaged wood, with some holes.
. Cardboard.
. Ruler. Pencil
. Hot silicone.
. Stuffed.
. Scissors. .
Florist wire.
Steps:
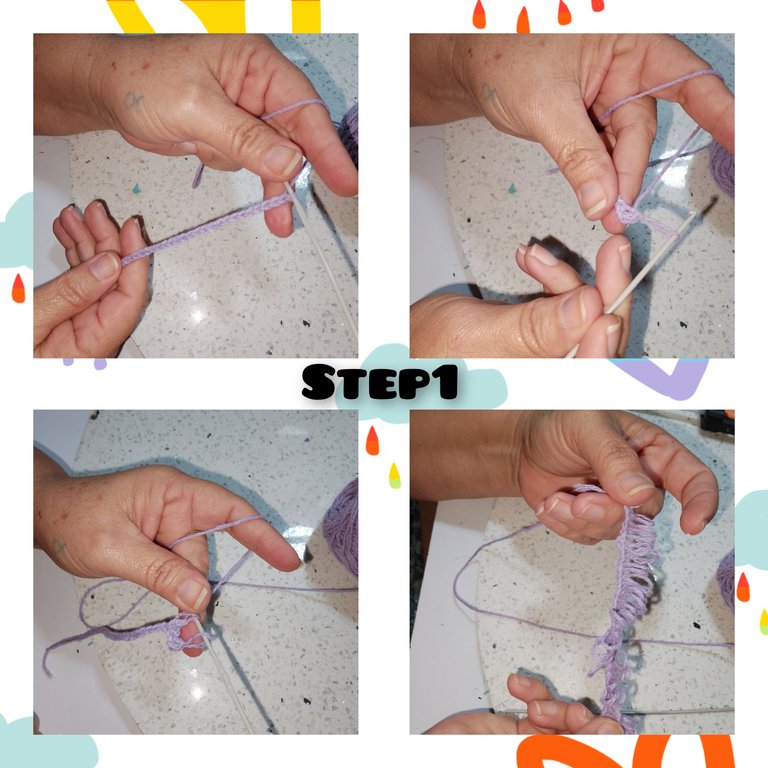
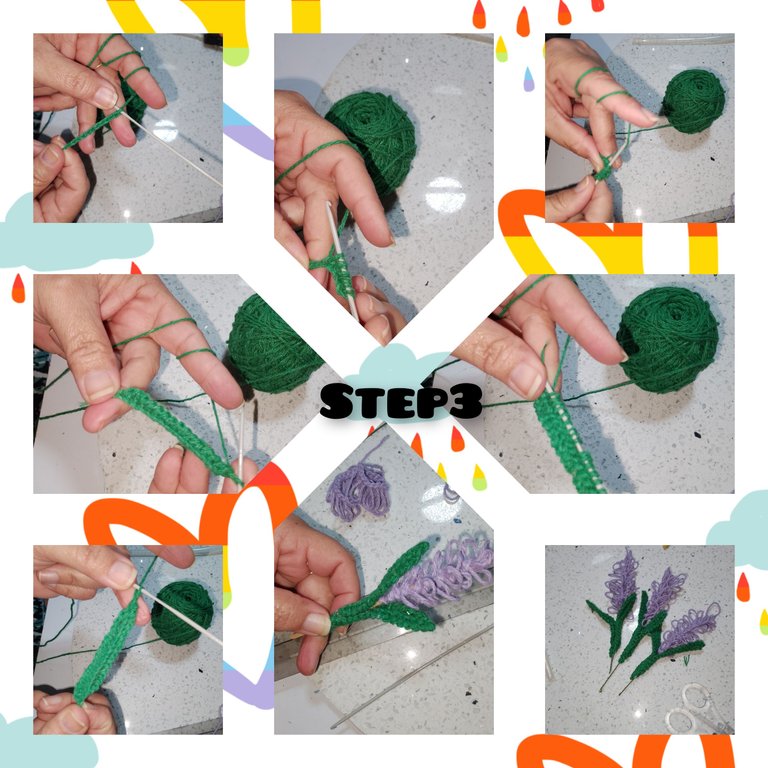
1.) Start knitting, 30 chain stitches, using the purple thread, then with half stitches in each of those, chain stitches, I take and take out a strand, always trying to make sure that you are close, of equal size. That's it, I kill myself and cut the thread.
2.) short, 15cm jewelry wire. He applied silicone to one of the ends of the wire and, turning it, glued the ribbon, made in the previous step.
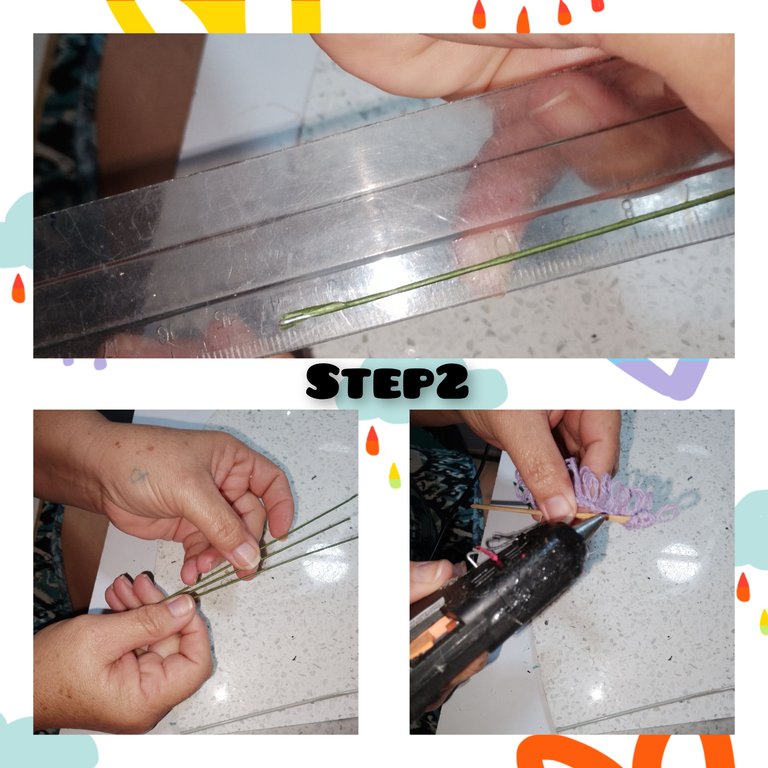
3.) I knit 15, chain stitches, I take out the loops on one side, and then I take out two by two, I turn and repeat on the other side and I knit an elongated leaf, from a lavender plant. He applied glue to the bottom and stuck it. Thus leaving my beautiful lavender flowers ready.
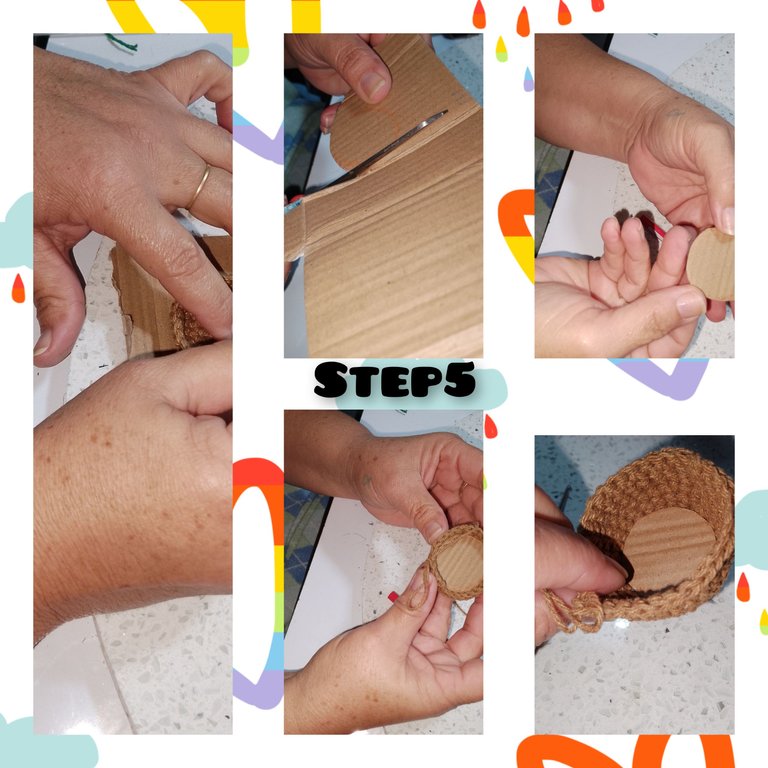
4.) Using the colored yarn, brown, I prepare to knit, a small pot. For them, I make a magic ring, inside it I knit six half stitches and pick up the ring, for the next round, I make an increase in each half stitch. For the next row, after half a stitch, I will make an increase. For the next row, after two half stitches, I will make an increase. In this way, I have already knitted the bottom of the pot. Next row, I will knit, half stitches. , taking the back strand, to achieve a small cut, to weave the height of the pot.

5.) On a cardboard cutout, frame and cut out the where of the small pot. After cutting this, I glue the part inside the pot to the bottom.
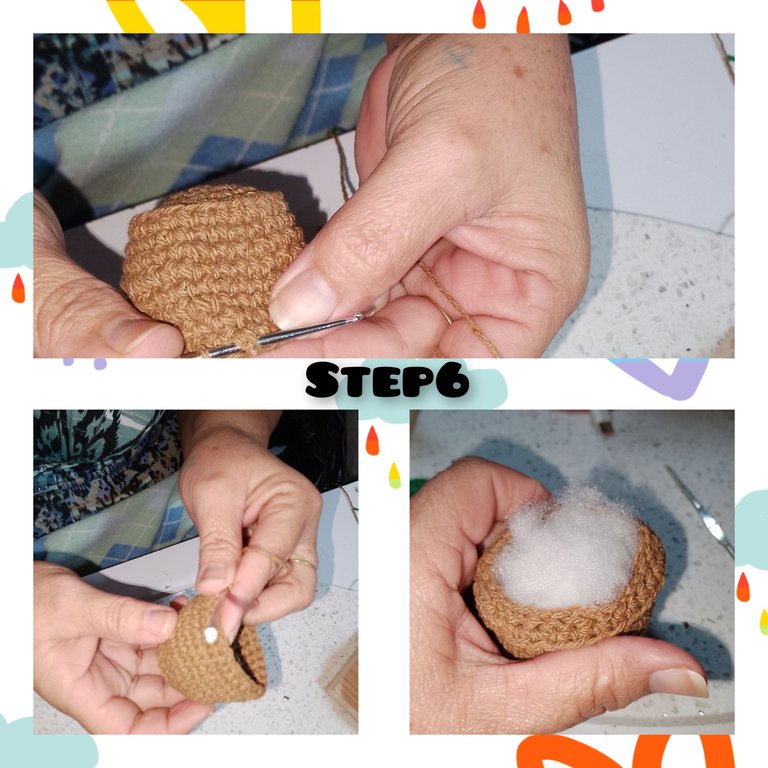
6.) I knit, two more turns to the pot, this time with gradient half stitches, on the outside, and then fold, and do the double on the outside. In this way I conclude by filling out theflowerpot.
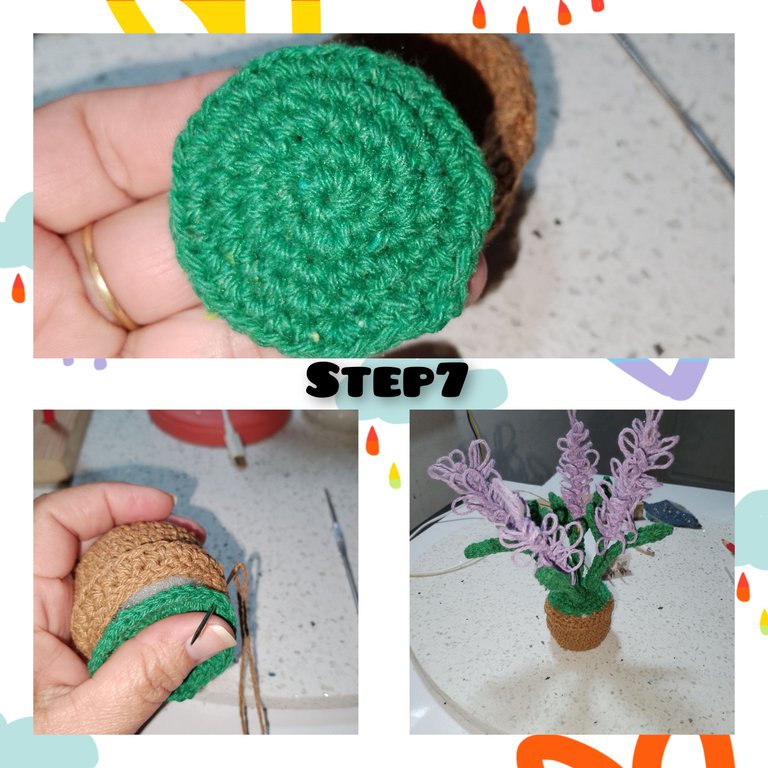
7.)In this step, I knit the lid to the pot, using the green thread. I make a magic ring, inside it six half points and close, then an increase in each half point. A third pass, making an increase, after two half points, and in the next, three half points followed by an increase. This is what this tour will be like. I finish off and cut the thread. I put thread on the wool needle, and sew the lid on the small pot.
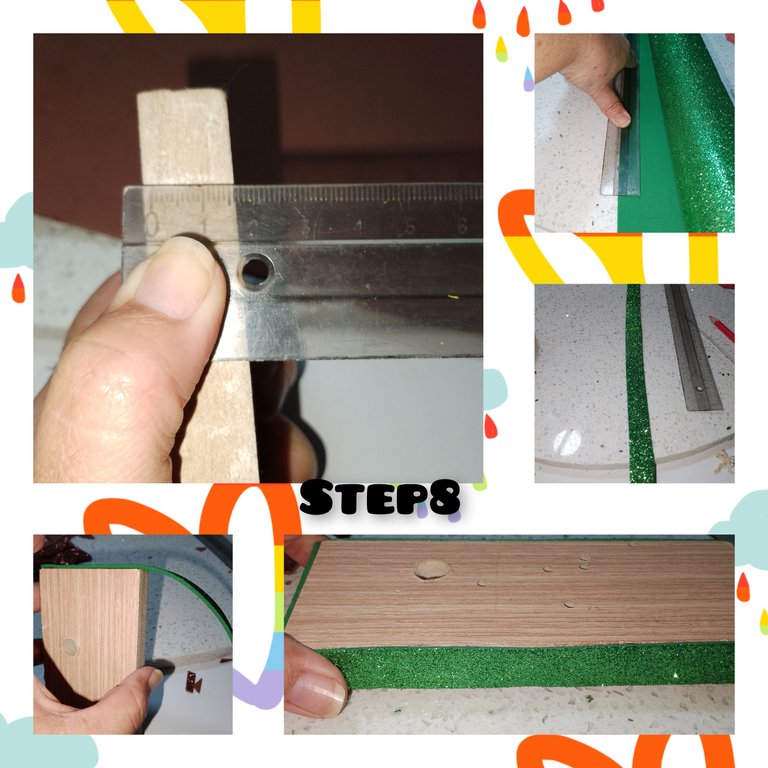
8.) I take the measurements at the edge of the piece of wood, and glue a strip of green, frosted foam.
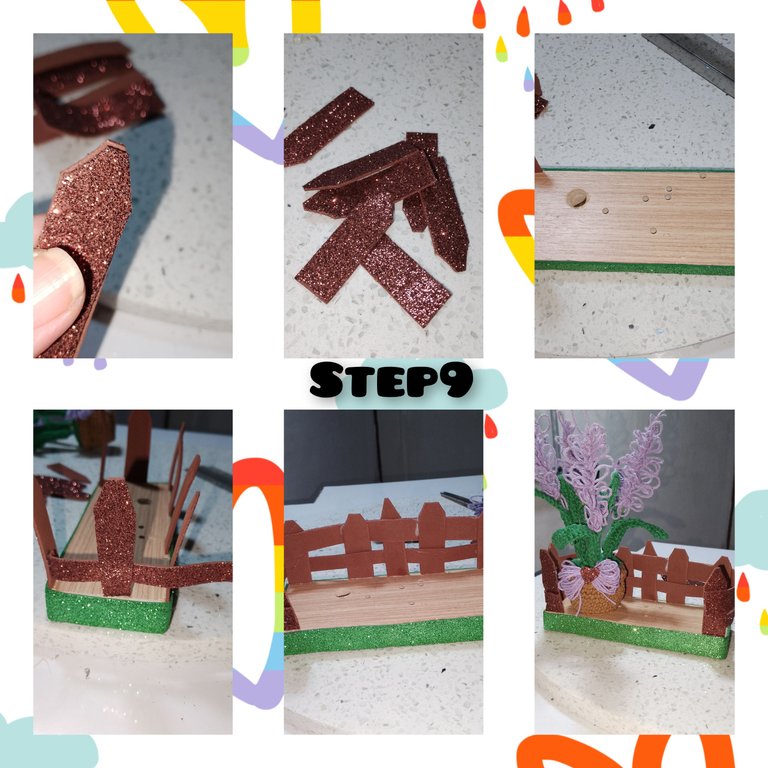
9.) short strips of brown foam, 5cm and a point, one of the ends, I begin to glue on the wood, to simulate a kind of corral, leaving the front part free. I glue the pot to one of the ends, to which I have also made a loop of threads, and glue it on the pot.
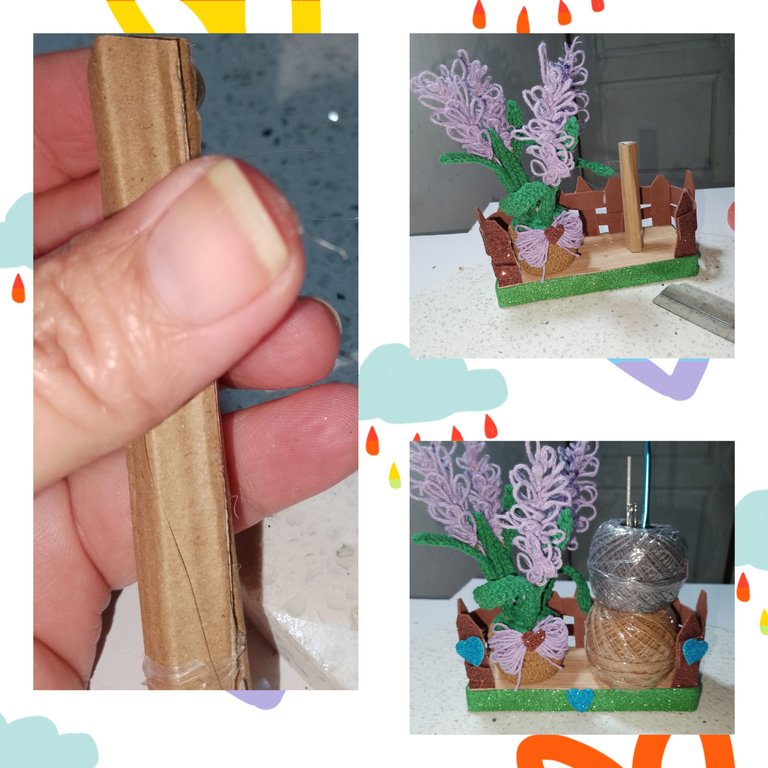
10.) assembled a thin cardboard tube, to which I glued right in the hole, which carried the wood, after being discarded. This tube is 12cm high, and will allow me to place the thread when knitting, and in the hole, I will be able to organize some knitting needles.
. All photos are my property.
. Use incollage
. Use language translator.
Grateful for following me to the end. It will be until an approximate opportunity.
(ESP)
Hola a todos, espero este día sea lindo y de mucho provecho para todos en @hivediy, me complace estar hoy con ustedes, iniciando esta semana, con mucho entusiasmo y ganas de realizar muchas cosas bonitas, para mostrarles. Hoy les muestro un muy bonito, organizador, que para las tejedoras es muy útil, al momento de realizar nuestras manualidades, donde, puedes colocar tus hilos y que estos corran, con facilidad, evitando de enrollen, o hagan esos nudos, que muchas veces nos quit tiempo, y hasta nos puede general cierto estrés, yo en particular, está situación me ha hecho, incluso, que abandone el tejido, por unos días. Para ellos, he usado, material reciclable y de provecho. La idea surge por lo motivada que estoy, por mi última adquisición de hilos. Les invito a seguirme, bienvenidos, sean todos a mí blog.
Materiales:
. Hilos pavilos para tejer. Colores (verde grama, morado y marrón)
. Aguja para tejer.
. Aguja lanera.
. Tiras de foami, de colores (verde y marrón, ambos escarchados)
. Trozo de madera dañada, con algunas perforaciones.
. Cartón.
. Regla.
Lápiz
. Silicón caliente.
. Relleno.
. Tijeras.
. Alambre de floristería.
Pasos:
1.) Inicio tejiendo, 30 puntos cadenas, usando el hilo color morado, luego con medios puntos en cada uno de esos, puntos cadenas, voy tomando y sacando una hebra, tratando siempre de que estás vallas, de igual tamaño. Listo esto, me mato y corto el hilo.
2.) corto, 15cm de alambre de bisutería. Aplicó silicón en uno de los extremos de el alambre y dando vueltas pego el listón, hecho en paso anterior.
3.) tejo 15, puntos cadenas, saco las lazadas por un lado, y luego voy sacando de dos en dos, doy vuelta y repito por el otro lado y tejo una alargada hoja, de planta de lavanda. Aplicó pegamento, en la parte inferior y pego. Quedando así lista mis hermosas, flores de lavanda.
4.) usando el hilo de color, marrón, me dispongo a tejer, un pequeña maceta. Para ellos, hago un anillo mágico, dentro de el tejo seis medios puntos y recojo el anillo, para la siguiente vuelta, hago un aumento en cada, medio punto. Para l a siguiente, luego de medio punto, haré un aumento,para la siguiente pasada, luego de dos medios puntos, hago un aumento, de esta forma, ya he tejido el fondo de la maceta.bpaea ña siguiente vuelta, tejere, medios puntos, tomando la hebra tracera, para lograr,un pequeño corte, para tejer la altura de la maceta.
5.) sobre un corte de cartón, marco y recortó el dónde de la pequeña maceta. Esto luego de cortado, pego en el fondo por la parte dentro de la maceta.
6.) tejo, dos vueltas más a la maceta, está vez con medios puntos degradado, por fuera, para luego doblar, y hacer el doblé por fuera. De esta forma concluyo rellenando la maceta.
7.)En este paso, tejo la tapa a la maceta, usando el hilo de color verde. Hago un, anillo mágico, dentro de el seis medios puntos y cierro, luego un aumento en cada medio puntos. Una tercera pasada, haciendo aumento, luego de dos medios puntos, y en la siguiente, tres medios puntos seguidos por un aumento. Así será este recorrido.
Remato y corto el hilo.
Coloco hilo a la aguja lanera, y coser la tapa sobre la pequeña macetas.
8.) tomo las medidas a el borde de el trozo de madera, y pego un listón de foami verde, escarchado.
9.) corto, tiras de foami color marrón, de 5cm y es punto, uno de los extremo, comienzo a pegar sobre la madera, para simular una especie de corral, dejando libre, la parte de el frente. Pego en uno de los extremos la maceta, A quien además he realizado un lazo de hilos, y pegue sobre la maceta.
10.) armó un delgado tubo de cartón, a quien he pegado justo en el orificio, que traía la madera, luego de ser desechada. Este tubo, tiene 12cm de altura, y será el que me permita, colocar el hilo al momento de tejer, y en el orificio, podré, tener organizado algunas agujas para tejer.
. Todas las fotos son de mí propiedad.
. Use incollage
. Use traductor lenguaje.
Agradecida me hayas seguido hasta el final. Será hasta un aproxima oportunidad.
Demasiado lindo y además útil. Me encanta como se ve el organizador. Podemos tejer sin preocupaciones de que el hilo se va a caer y ensuciar. Se ve bello!!!
Gracias linda amiga, así es...a tejer sin preocupaciones... gracias por comentar
Amazing work!