
Saludos con mucho cariño para todos los artesanos de esta hermosa comunidad Hive Diy. Hoy les comparto una idea más de lo que puedes hacer con botellas de plástico. Se trata de una linda gallina elaborada con botella de plástico y foami, útil y decorativa para la cocina.
Pronto tengo que hacer unas cuantas visitas a unos familiares y amigas, y como siempre que las visito les llevo algún detalle, esta vez les estoy haciendo unos con mis propias manos, sé que les va a encantar, me gusta ver sus caras emocionadas recibiendo sus regalos, eso me llena mucho el alma, saber que lo que hago es significativo para ellos, que lo aprecian y lo cuiden me hace feliz.
Las fotografías que verán a continuación, fueron tomadas con mi teléfono modelo TECNO SPARK GO 2024.
Greetings with much love to all the crafters of this beautiful Hive Diy community. Today I share with you one more idea of what you can do with plastic bottles. This is a cute hen made with plastic bottles and foami, useful and decorative for the kitchen.
Soon I have to make a few visits to some relatives and friends, and as always when I visit them I bring them some detail, this time I'm making them some with my own hands, I know they will love it, I like to see their excited faces receiving their gifts, that fills my soul, knowing that what I do is meaningful to them, that they appreciate it and take care of it makes me happy.
The pictures you will see below were taken with my TECNO SPARK GO 2024.

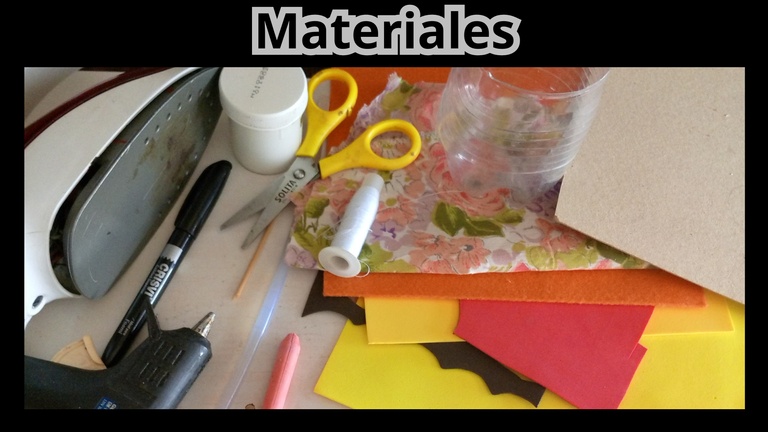
🐣 Botella de plástico
🐣 Foami, fieltro y tela
🐣 Aguja, hilo
🐣 Pintura al frío blanca
🐣 Marcador punta fina negro
🐣 Barra de silicona
🐣 Tijera
🐣 Plancha
🐣 Tiza rosada
🐣 Pistola para silicona
Plastic bottle
Foami, felt and fabric.
Needle, thread
White cold paint.
Black fine-tip marker
Silicone stick
Scissors
Iron
Pink chalk
Silicone gun
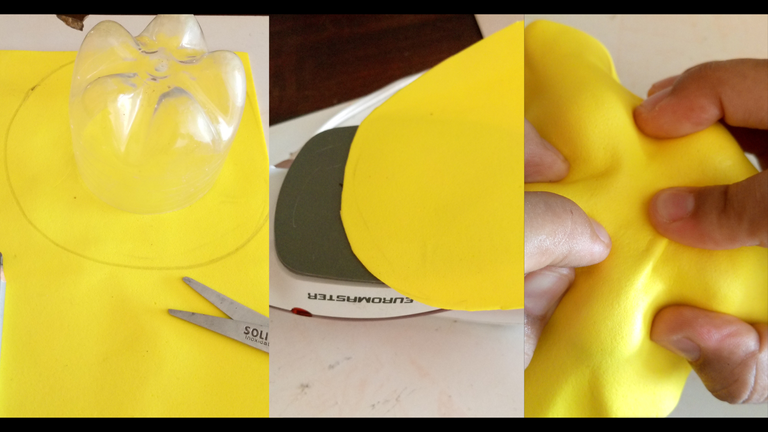
Lo primero que hice fue el cuerpo de la gallina, que está compuesto por parte de la botella de plástico forrada con foami, el mismo recorte en círculo, y lleve a la plancha caliente para hacerlo moldeable, para recortar el foami, coloque la pieza de plástico sobre el foami dejando unos centímetros de más para doblar.
Una vez caliente el foami, lo, coloque sobre la pieza de plástico, para que tomara la forma presionando con las manos.
The first thing I did was the body of the hen, which is composed of part of the plastic bottle lined with foami, the same cut in a circle, and take it to the hot plate to make it moldable, to cut the foami, place the plastic piece on the foami leaving a few extra centimeters to bend.
Once the foami is hot, place it on the plastic piece, so that it takes the shape by pressing it with your hands.
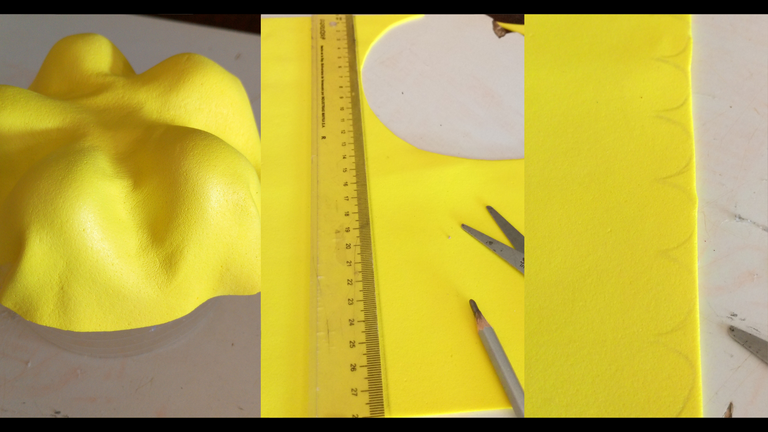
Después de tener la forma, dobla el foami sobrante, debido a que al calentarlo y moldearlo sobre una base tiende a estirarse, así que yo doblé los lados superiores de cada pico de la base de la botella para que no quedara tan arrugado, sin embargo, no se vería mal, también puedes hacer fruncidos, ya que sobre este se colocará una capa para terminar de cubrir el plástico, y cualquier imperfección.
After having the shape, fold the excess foami because when heated and molded on a base it tends to stretch, so I folded the upper sides of each peak of the base of the bottle so that it would not be so wrinkled, however, it would not look bad, you can also do puckering, since on this will be placed a layer to finish covering the plastic, and any imperfections.
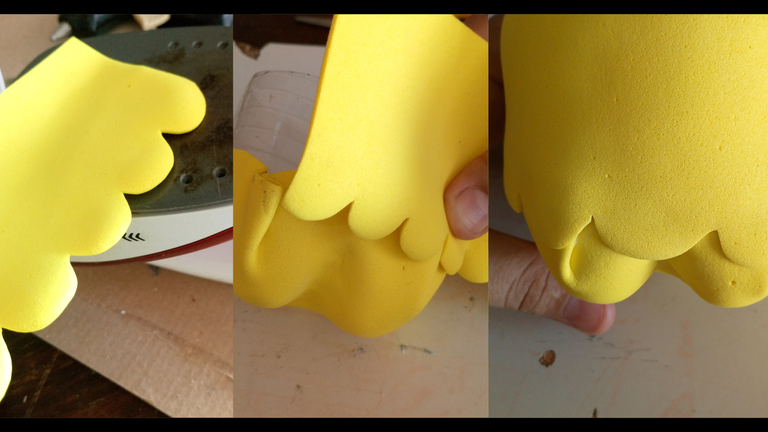
La capa que recorté, que terminará de cubrir el plástico, le hice unos cortes para crear un estilo pluma, la moldeé con la plancha caliente, luego la pegué con silicona para terminar de cubrir la pieza de plástico.
The layer that I cut out that will finish covering the plastic I made some cuts to create a feather style, I molded it with the hot iron and then glued it with silicone to finish covering the plastic piece.
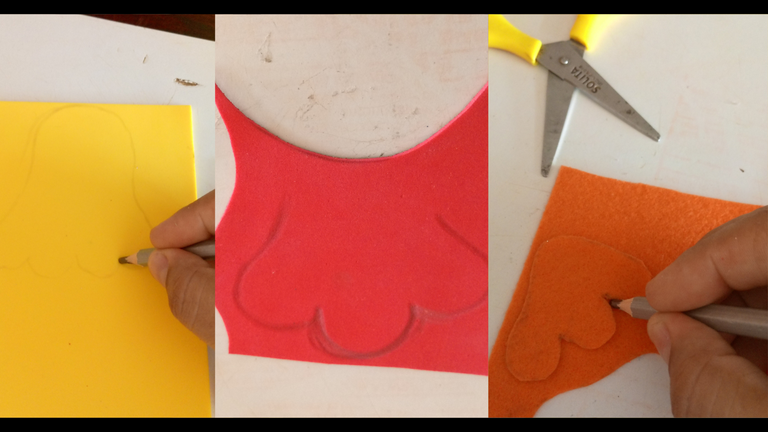
Después de haber cubierto la base de lo que será la gallina, dibuje y recorte otras piezas, como la parte delantera del cuerpo de la gallina, la cresta, las patas y el pico y recorte.
After you have covered the base of what will be the hen, draw and cut out other pieces, such as the front of the hen's body, crest, legs and beak, then cut out.
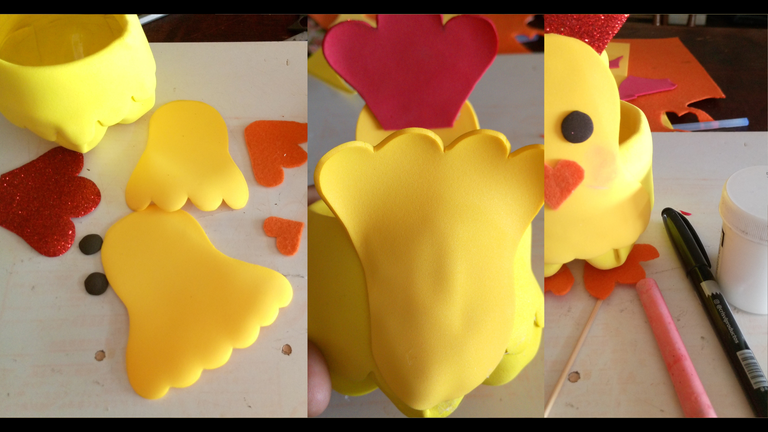
Estas piezas, la moldeé con la plancha y comencé a pegarlas al molde de inicio.
También le hice los detalles en los ojos con el marcador negro, y mejillas ruborizadas con la tiza de color rosado.
I molded these pieces with the iron and began to glue them to the starting mold.
I also made the details in the eyes with the black marker, and blushed cheeks with the pink chalk.
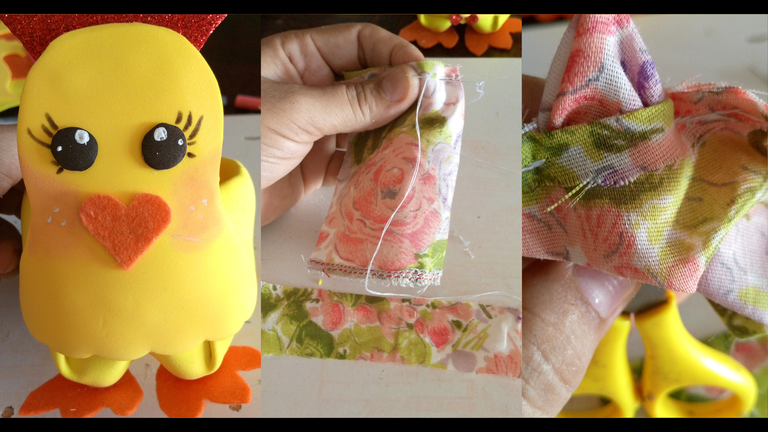
En ese punto solo me faltaba por hacer el lazo, que hice con un rectángulo de tela estampada, cosido por los laterales y centro inferior, dejando un orificio para voltear.
At this point I only needed to make the bow, which I did with a rectangle of printed fabric, sewn along the sides and bottom center, leaving a hole for turning.
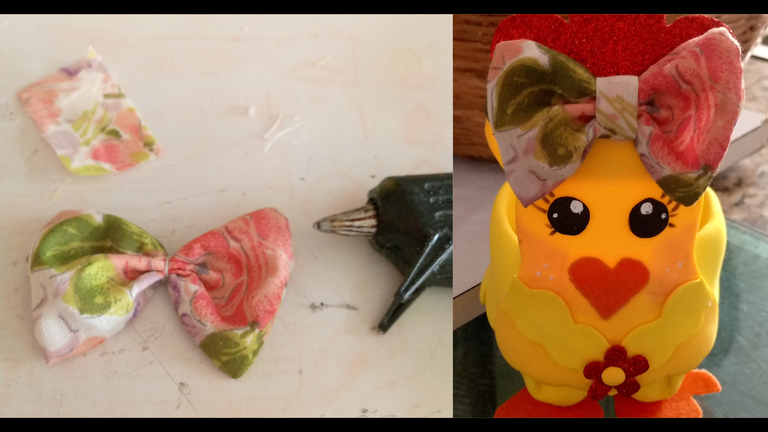
Al voltear el lazo doble por la mitad, marque el centro, y con un hilo doble sujete para hacer la forma de lazo, le pegue la cinta del centro para cubrir el hilo y lo pegue a la gallina con silicona caliente.
Quedando esta gallina decorativa y útil lista para adornar la cocina.
Entre las ideas útiles pensé que sería ideal para colocar cubitos, yesqueros, tijeras, entre muchas cosas.
Ha sido un placer haber compartido con ustedes una más de mis manualidades para decorar, espero que les haya gustado y puedan dejarme sus apreciados comentarios que para mí son muy valiosos, importantes y emocionantes.
Los adoro, espero que todos se encuentren bien de salud, y sabiendo que sus seres queridos estén bien.
Gracias por estar siempre atentos a mis publicaciones.😘😘😘💝
By turning the double loop in half, mark the center, and with a double thread fasten to make the loop shape, attach the ribbon in the center to cover the thread and attach it to the hen with hot silicone.
This decorative and useful hen was ready to decorate the kitchen.
It has been a pleasure to have shared with you one more of my crafts to decorate, I hope you liked it and you can leave me your appreciated comments that for me are very valuable, important and exciting.
I adore you, I hope you are all in good health, and knowing that your loved ones are well.
Thank you for always being attentive to my posts.😘😘😘💝

social networks / redes sociales
![]()
![]()
Traductor Deepl
Translated Deepl
Ediciones Canva
Editions Canva


imagine if real hens were this cute, lol.
Nice work
Congratulations @lauracraft! You have completed the following achievement on the Hive blockchain And have been rewarded with New badge(s)
Your next target is to reach 14000 upvotes.
You can view your badges on your board and compare yourself to others in the Ranking
If you no longer want to receive notifications, reply to this comment with the word
STOPAinsss pero que cuchitura está gallinita. Que bonito trabajo mi bella. Gracias por regalarnos tu buen trabajo y proceso creativo.
Abrazos linda...
!LADY
!DIY
!discovery 45
View or trade
LOHtokens.@dayadam, you successfully shared 0.1000 LOH with @lauracraft and you earned 0.1000 LOH as tips. (2/3 calls)
Use !LADY command to share LOH! More details available in this post.
Muchas gracias Daya, me alegra que te haya gustado. Abrazos!!
This post was shared and voted inside the discord by the curators team of discovery-it
Join our Community and follow our Curation Trail
Discovery-it is also a Witness, vote for us here
Delegate to us for passive income. Check our 80% fee-back Program
You can query your personal balance by
!DIYSTATSgreat thank you very much.
Que linda esta, me encantan las gallinitas ❤️ en mi familia a la unica que no le gustaban las manualidades era a mi abuela jaja como se enojaba cada vez que le dabamos una, nosotros nos reiamos, que malos 😂 pero el resto lo aceptaban con alegria 🦉
Te quedo muy bonita 🦉
Jajajaja @elbuhito qué malos con esa abuela, pero es parte de ese amor de bromas para los abuelos, en mi caso era con mi abuelo, él era demasiado obstinado y siempre le hacíamos bromas😀 Gracias por tu comentario cariño espero que estés bien, me alegra que te haya gustado, a mí también me gustan mucho las gallinas son tan lindas.
Eses muy tierna esa gallinita tus amigas y familiares estarán muy contentos cuando le des este bello obsequio tan cuchi
Hola @rosselena feliz día, Gracias por dejar tu lindo comentario, ya estoy ansiosa por ir a visitarlos y llevarles estas cositas tan tiernas, pero todavía me faltan unas cuantas 😁
Super creativo y original, me encantó el trabajo. Felicidades!!!
El personaje luce muy simpático, es un bonito trabajo de reciclaje.