La Navidad siempre ha sido mi época favorita del año, pero desde que nacieron mis hijos, mucho más. Amo las luces, los colores brillantes, la música, la comida, pero sin duda alguna, una de las cosas que más disfruto son las decoraciones navideñas.
Y aunque tengo muchas en casa, nunca son suficientes. Cada año compraba cosas nuevas, y sumaba adornos y detalles para la casa, pero debido a la situación país, hace bastante que no compro nada, salvo algunas luces, pero este año decidí incorporar algunas decoraciones hechas por mí, comenzando por esta linda guirnalda de estrellas que les comparto hoy.


Es una guirnalda bastante sencilla, y la idea la tomé dando vueltas por la red buscando ideas para decorar mi casa. La imagen que vi, era la de un árbol de navidad que tenía como adornos, corazones de fieltro con la costura a la vista. Tenían unos corazones rellenos y otros formados por una sola pieza, solo con las costuras por el borde.
Fue una idea que me encantó, y decidí que los haría, no solo para el árbol, y así incorporar decoraciones nuevas después de trece años, sino que podría hacer una guirnalda para mis ventanas, solo que en lugar de corazones usaría estrellas, y en lugar de blanco o beige, usaría dos de los colores tradicionales de la Navidad: rojo y blanco. Y sin más, vamos con los materiales.
MATERIALES
Fieltro rojo y blanco
Hilo rojo y beige
Guata o espuma para rellenar
Cinta blanca o roja
Molde de estrella
Tijera
Lápiz
PASO A PASO
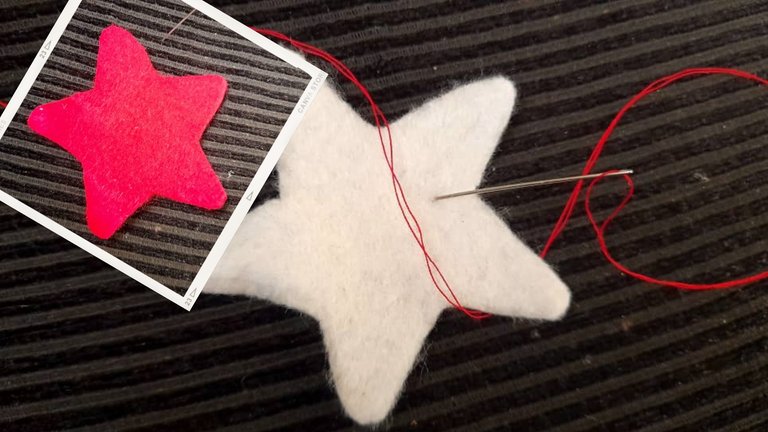
Usando el molde de estrella y con ayuda de un lápiz, traza sobre el fieltro rojo y blanco, la cantidad de estrellas necesarias.
En mi caso, realizaría cuatro de cada color, dos rellenas y dos lisas, para un total de ocho estrellas.
Si no tienes molde, no te preocupes, puedes realizar uno en cartulina y con eso estará resuelto. Yo aproveché y usé uno de mis moldes para galletas.

El siguiente paso será recortar todas las estrellas para comenzar a coser.

Una vez tengamos todas las piezas listas, comenzaremos a coser las estrellas que irán rellenas.
Para esto vamos a encontrar, las partes que tienen la marca de lápiz para que no queden a la vista, y coseremos alrededor de nuestra estrella, dejando un borde pequeño y haciendo puntadas separadas.
Para las estrellas rojas, usé el hijo beige y para las blancas, el rojo, y así crear un contraste bien lindo.


Una vez tengamos cosido casi todo el borde, con la guata, y ayudados por un lápiz vamos a rellenar la estrella, asegurando que la guata llegue hasta las puntas.

Finalmente, terminamos de rellenar, y cerramos la costura. Esto lo haremos con las cuatro estrellas que decidimos rellenar.

El siguiente paso es trabajar con las estrellas que no tendrán relleno, y para esto, solo tendremos que coser por todo el borde de las estrellas. En mi caso yo decidí tensar un poco el hilo para darle un poco de movimiento y que no quedaran rectas.


Una vez tenemos todas las estrellas listas, el siguiente paso es hacer dos especies de "asas" en cada lado de la cinta para poder colgarlas. Yo como siempre estoy inventando o yendo un poco más allá, la cinta blanca me pareció muy sencilla, así que quise darle algo de personalidad, y realicé puntadas con el hilo rojo en el centro y por todo el largo de la cinta.


Finalmente, con todos los componentes de la guirnalda lista, el siguiente paso era fijar las estrellas, para lo cual medí la distancia entre ellas e hice una pequeña marca con el lápiz, y para terminar, con hilo y aguja, cosí cada una de las estrellas.
Utilicé el siguiente patrón: en cuanto a los colores, intercalé rojo y blanco, y con respecto a las estrellas coloqué una rellena, seguida de dos lisas, y de esta forma la guirnalda estaba lista.


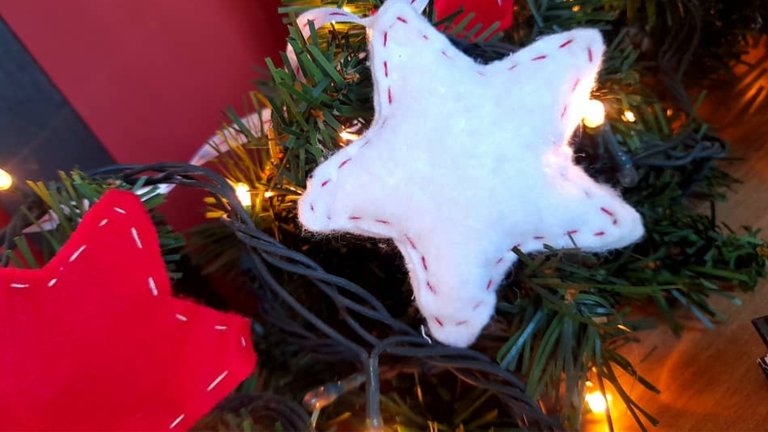

Como les dije al inicio, la idea era utilizarla para una ventana, pero conmigo nada termina como comienza, porque mi cabeza va a millón, y se me ocurren mil cosas en el desarrollo de un proyecto, y estaba decorando el mueble de la sala, me pareció que se vería linda como decoración en la guirnalda navideña. ¿Qué piensan ustedes?
Les leo en los comentarios.

Christmas has always been my favorite time of the year, but since my children were born, even more so. I love the lights, the bright colors, the music, the food, but without a doubt, one of the things I enjoy most are the Christmas decorations.
And even though I have a lot of them at home, there are never enough. Every year I used to buy new things, and add ornaments and details for the house, but due to the country situation, I haven't bought anything for quite a while, except for some lights, but this year I decided to incorporate some decorations made by me, starting with this pretty garland of stars that I share with you today.
It's a pretty simple garland, and I got the idea by going around the net looking for ideas to decorate my house. The image I saw was of a Christmas tree with felt hearts as ornaments with the stitching visible. They had some hearts stuffed and others formed by a single piece, only with the seams along the edge.
It was an idea that I loved, and I decided that I would make them, not only for the tree, and thus incorporate new decorations after thirteen years, but I could make a garland for my windows, only that instead of hearts I would use stars, and instead of white or beige, I would use two of the traditional Christmas colors: red and white. And without further ado, let's get to the materials.
MATERIALS
Red and white felt
Red and beige thread
Wadding or foam for stuffing
White or red ribbon
Star mold
Scissors
Pencil
STEP BY STEP
Using the star mold and with the help of a pencil, trace on the red and white felt, the number of stars needed.
In my case, I would make four of each color, two filled and two plain, for a total of eight stars.
If you don't have a mold, don't worry, you can make one in cardboard and that's all you need. I took advantage and used one of my cookie cutters.
The next step will be to cut out all the stars to start sewing.
Once we have all the pieces ready, we will start sewing the stars that will be filled.
For this we will find the parts that have the pencil mark so that they are not visible, and we will sew around our star, leaving a small border and making separate stitches.
For the red stars, I used the beige son and for the white ones, the red, to create a nice contrast.
Once we have sewn almost the entire edge, with the wadding, and with the help of a pencil, we are going to fill the star, making sure that the wadding reaches the tips.
Finally, we finish filling and close the seam. We will do this with the four stars we decided to stuff.
The next step is to work with the stars that will not have stuffing, and for this, we will only have to sew all around the edge of the stars. In my case I decided to tighten the thread a little to give it a little movement and not to leave them straight.
Once we have all the stars ready, the next step is to make two kind of "handles" on each side of the ribbon to hang them. As I'm always inventing or going a little further, the white ribbon seemed very simple, so I wanted to give it some personality, and I made stitches with the red thread in the center and along the entire length of the ribbon.
Finally, with all the components of the garland ready, the next step was to fix the stars, for which I measured the distance between them and made a small mark with the pencil, and to finish, with thread and needle, I sewed each of the stars.
I used the following pattern: as for the colors, I interspersed red and white, and with regard to the stars I placed a filled one, followed by two plain ones, and in this way the garland was ready.
As I told you at the beginning, the idea was to use it for a window, but with me nothing ends as it begins, because my head goes to a million, and a thousand things occur to me in the development of a project, and I was decorating the living room furniture, I thought it would look nice as decoration in the Christmas garland. What do you think?
I'll read you in the comments.
Amiga, qué bonita esta guirnalda, además, fácil de hacer. Me encanta la Navidad y ya se sienten las brisas navideñas que nos motivan a crear cosas tan lindas como estas. Un abrazo.
Hola amiga!! Yo también amo la Navidad! Este año me voy a activar a hacer algunas cosas porque tengo como 13 años con los mismos adornos y siempre todos los años se ve como igual. Así que vamos a ver como me va jeje
Abrazos
~~~ embed:1722044366745677860?t=n1R6OvhQsRO8tjU4xClyIg&s=19 twitter metadata:Ul9sYXRodWxlcmllfHxodHRwczovL3R3aXR0ZXIuY29tL1JfbGF0aHVsZXJpZS9zdGF0dXMvMTcyMjA0NDM2Njc0NTY3Nzg2MHw= ~~~
Ya somos dos, lo que mas me fascina de la Navidad son las decoraciones, son muy bonitas y brillantes 😍
Esta hermoso tu trabajo, necesito unas guirnaldas asi de tiernas jaja se ve facil de hacer, el unico problema que tendria seria la costura, soy malisima en eso jjaja
Amiga gracias, yo seria feliz con adornos hasta en la ducha.
De la costura no te preocupes, es tipo rústica, fijate que puse a mi niña a ayudar, y cogió unas, así que vamos que te quiero ver haciendo guirnaldas jaja
Abrazos
Amiga me encanta esta idea, es súper sencilla, fácil y económica de elaborar. Me gusta mucho como se le ve el hilo por el borde .
Es verdad, en casa también comprobamos cositas nuevas para navidad, pero de un tiempo para acá decidimos hacerlas nosotros mismos, así ahorramos un poco más porque realmente son bastante caras las decoraciones.
Gracias por compartir esta belleza amiga 💗
Es que para como están las cosas toca inventar, y hay tantas ideas que se pueden adaptar a nuestro gusto que hay que aprovechar.
Yo tengo capturas como de mil 8deas jaja voy a ir haciendo poco a poco.
Queda la casa linda y tengo contenido 🥰
Abrazos ami bella
amiga me encanta la creatividad que tuviste oara esta guirnalda te quedo bellisiiima, el detalle de pasar hilo rojo por el medio de la cinta lo amé jeje me encantan esos inventos hermosos😍😍
Gracias mi amorcito. No me gustan mucho las cosas simples, siempre le pongo un poquito más, aunque lleve más trabajo.
Esa guirnalda es súper fácil, la verdad, y entretenida de hacer ♥️
Chamaaaa pero explicame esto tn lindo? Me acabas de dar ideas jajaja
Te quedó mega fantástica 😍😍😍
Están perfectas para la decoración navideña, le da un toque. La verdad es que la navidad es una de las mejores épocas de todo el año, trae mucha nostalgia y siempre hay momentos únicos que compartimos con nuestros seres queridos.