
Yesterday we celebrated International Book Day, so in the educational field we took the initiative to encourage the children's creativity and let them make their own books at home, this turned out to be quite a challenge for my husband and me, since we had to accompany them in the process.
As we have 2 school age children we divided the work, my husband helped my princess with the design of her book using a technological tool, taking as references the ideas of our daughter and I focused on the design of the book of Joshua, who is in preschool.

The suggestion for my 3 year old's book had to be based on a story or tale created by him, so I started my guided conversation with my little boy so that he could tell me what he wanted to write his story about and here I share his unpublished book with you.
The materials we needed for its creation were sheets of 3 sheets of colored cardboard type office (actually was that I did not find letter type), scissors, glue stick, as I am not very practical with the drawings I looked for some images and printed them in color, but then I had to support me with my daughter to make and color some by hand, pencil, colors and a millimeter ruler.

Initially I began to cut out each of the drawings that were printed and it was right there where my son began to tell me that he wanted other images to accompany his story, it was already dark and the electricity service was out, so we improvised the elaboration of drawings at home with the help of my princess.

Once the drawings were cut out, I proceeded to fold the cardboard in half and in very equal parts, with the intense color towards the inside to make better use of it.
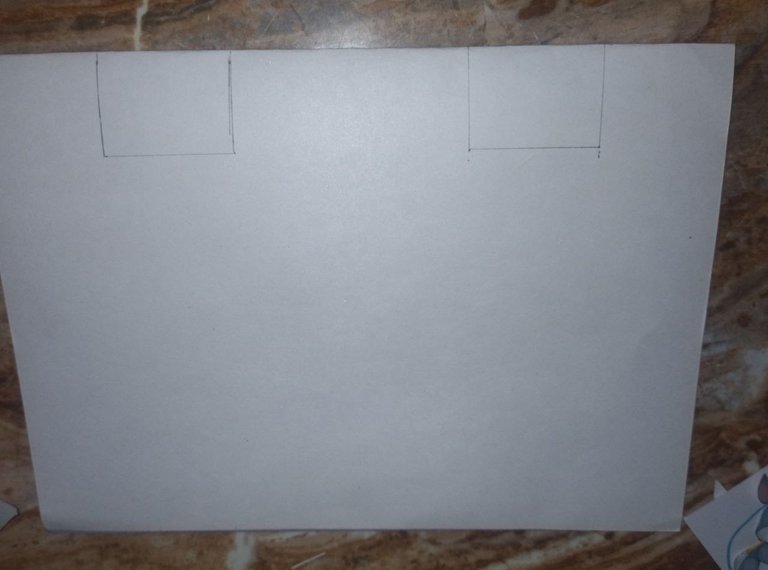
After folding the cardboard, I measured 5cm from the right end of the cardboard, on the part that is completely sealed and left that space and then measured 4cm more and in this margin measured 3cm upwards, I repeated this same procedure on the other left end and it was like this. It should be noted that these measures may vary according to the size of the image that will be folded inside.

Then I cut the folds just where I measured the 4cm and folded them in the following way on the outside in order to achieve a better result and it will be internally as you can see in the photo. I did this with the intention that the drawings would be with the pop up or 3D technique.

At this point I realized that I needed more folds so I had to improvise and make with some pieces of cardboard cutouts of 2cm wide by 3cm long, this will also depend on the image that you are going to support on it and after that fold them in half and leave a tab at the bottom so that it could be fixed as a base on the cardboard.

On the first page I fixed these images to make reference to the story that my child was telling, it should be noted that the images that are supported on the cardboard cutouts, must be glued before being fixed on the cardboard base.

Then I repeated the same procedure with the next cardboard to give continuity to the story and it was as you can see in the image.

The third cardboard was used as the cover so I folded it in half and glued the other sheets on the inside, luckily I had some images left over because I did not know how to decorate the cover, so here I just glued the images in an informal way and gave it this special title "The adventures of Joshua" we made the letters on a blank sheet and colored them orange to highlight them a little.
To highlight a little the drawings were going to be pasted on the cover which was green, first I pasted it on a blank sheet and then I cut them out leaving a tab to make it stand out more.

My child's teacher was delighted with the design used, but even more so with the didactic way in which my son tells his story.
Here I share an image of how the 2 books turned out, my son's and my princess's, for which I made this beautiful foam cover.

I thank you in advance for dedicating part of your valuable time to read my work and may God multiply the support you give to my publication. Blessings.
All photos used here are my property and were taken with the camera of my Redmi Note 9T phone. The design was made with the GridArt application./div>
VERSIÓN EN ESPAÑOL
ACOMPÁÑENME A CONSTRUIR UN LIBRO INÉDITO EN CASA [ENG-ESP]


El día de ayer celebramos el día internacional del libro, por lo que en el ámbito educativo se tomó la iniciativa de incentivar la creatividad de los niños y que ellos elaboraran en casa sus propios libros, esto resulto ser todo un reto para mi esposo y para mí, ya que nos tocaba acompañarlos en el proceso.
Como tenemos 2 hijos en edad escolar nos dividimos el trabajo, mi esposo ayudo a mi princesa de 8 años con el diseño de su libro usando una herramienta tecnológica, tomando como referencias las ideas de nuestra hija y yo me centre con el diseño del libro de Josué, quien está en preescolar.
Las sugerencia para el libro de mi niño de 3 años debía ser tomando en cuenta una historia o cuento creada por el mismo, por lo que inicie mi conversación guiada con mi pequeño a fin de que me contara sobre que quería escribir su cuento y por acá les comparto su libro inédito.
Los materiales que necesitamos para su creación fue hojas de 3 hojas de cartulina de colores tipo oficio (en realidad fue que no encontré tipo carta), tijera, pega en barra, como no soy muy practica con los dibujos busque algunas imágenes y las imprimí a color, pero después me toco apoyarme con mi hija para hacer y colorear algunos a mano, lápiz, colores y una regla milimetrada.
Inicialmente comencé a recortar cada uno de los dibujos que estaban impreso y fue justamente allí donde mi hijo me comenzó a decir que quería otras imágenes que acompañaran su cuento, ya era de noche se nos fue el servicio eléctrico, por lo que improvisamos la elaboración de dibujos en casa con ayuda de mi princesa.
Una vez los dibujos recortados, procedí a doblar a la mitad y en partes muy iguales la cartulina tipo oficio, con el color intenso hacia adentro para aprovecharla mejor.
Después de doblar la cartulina, medí 5cm desde el extremo derecho de la cartulina, por la parte que queda totalmente sellada y deje ese espacio para luego medir 4cm más y en este margen medir 3cm hacia arriba, repetí este mismo procedimiento en el otro extremo izquierdo y quedo de esta manera. Cabe destacar que estas medidas pueden variar de acuerdo al tamaño de la imagen que va ir plegada interiormente.
Luego recorte los pliegues justo en donde medí los 4cm y los doble de la siguiente manera por la parte externa a fin de lograr un mejor resultado y quedara internamente como lo pueden visualizar en la foto. Esto lo hice con la intensión que los dibujos quedaran con la técnica pop up o 3D.
En este punto me di cuenta que necesitaba más pliegues por lo que tuve que improvisar y hacer con unos trozos de cartulina recortes de 2cm de ancho por 3cm de largo, esto también va a depender de la imagen que vas a apoyar en él y después de ello doblarlos a la mitad y dejarle unas pestaña en la parte inferior para que se pudiera fijar como base en la cartulina.
En la primera página fije estas imágenes para hacer referencia de a la historia que mi niño contaba, cabe destacar que las imágenes que van apoyada en los recortes de cartulina, deben ser pegadas antes de ser fijadas en la cartulina base.
Luego repetí el mismo procedimiento con la siguiente cartulina para darle continuidad a la historia y quedo tal cual como lo pueden visualizar en la imagen.
La tercera cartulina la use como portada por lo que la doble a la mitad y pegue las otras hojas en la parte interior, menos mal que me habían quedado unas imágenes de sobra porque no sabía cómo decorar la portada, por lo que aquí solo pegue las imágenes de manera informal y le dimos este título especial “Las aventuras de Josué” hicimos las letras en una hoja en blanco y las coloreamos de naranja para resaltarlos un poco.
Para resaltar un poco los dibujos que iban a ir pegados en la portada que fue de color verde, primeramente lo pegue en una hoja en blanco y luego los recorte dejándole una pestaña para que resaltara más.
La maestra de mi niño quedo encantada con el diseño utilizado, pero más aun con la manera tan didáctica como mi hijo le cuenta su historia.
Por acá les comparto una imagen de como quedaron los 2 libros, el de mi niño y el de mi princesa al cual le hice esta hermosa portada en foami.
De ante mano agradezco el que dediques parte de tu valioso tiempo para leer mi trabajo y que Dios te multiplique el apoyo que le aportes a mi publicación. Bendiciones
All photos used here are my property and were taken with the camera of my Redmi Note 9T phone. The design was made with the GridArt application.
Muy lindo trabajo y el niño feliz.