Good morning, afternoon or evening my beautiful people of Hive Diy! I am more than happy to share another new post in every new week in this nice community full everywhere of creativity, I hope God bless you always and daily have a great productivity, creativity and a shower of blessings to all, I find myself wishing you to be the best in every way and aspect possible today and the rest of the week.♡
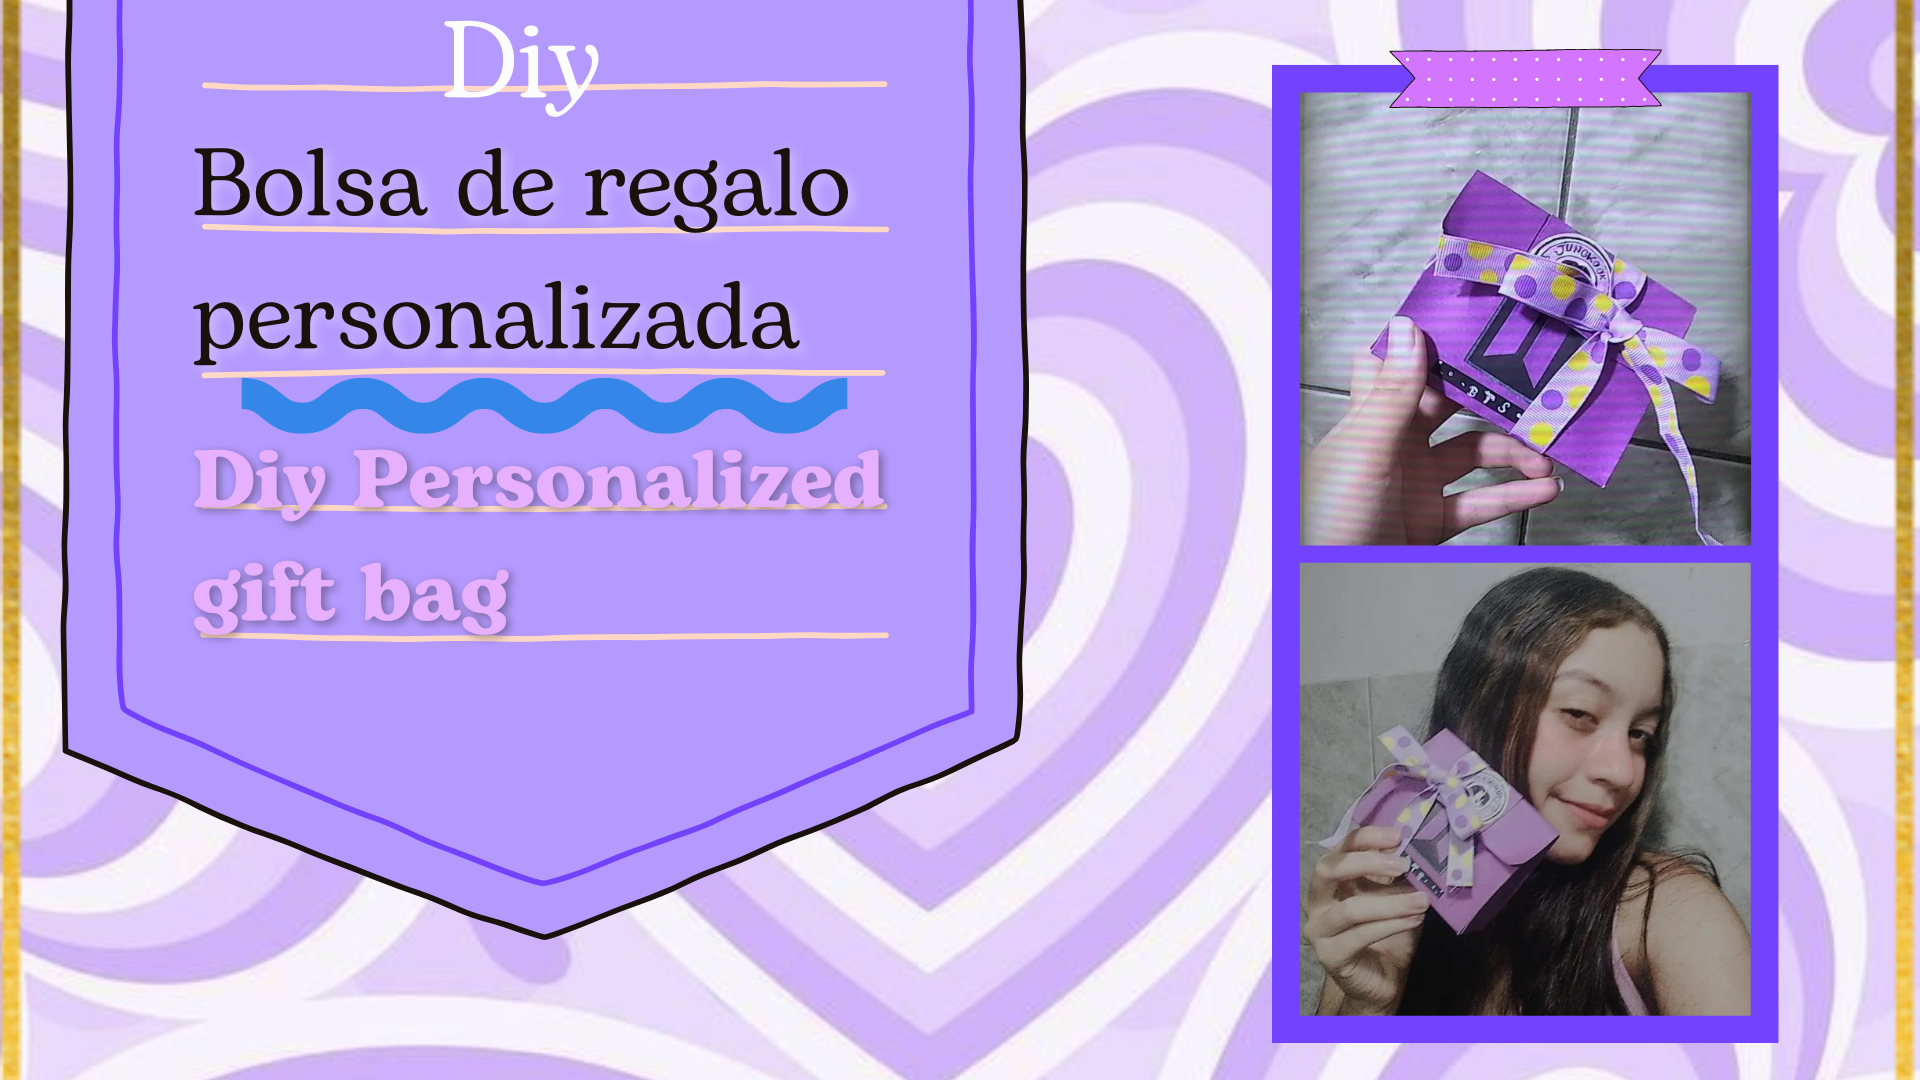
Justo ahora les traigo un nuevo tutorial lleno de creatividad, una nueva bolsa de regalo, es algo distinta a las demás y eso es lo que más me gusta, ideal para obsequiar, guardar, al igual que envolver un regalo en algún cumpleaños, celebrando o como un simple presente en cualquier momento, la cosa está en qué lo que le da el toque es la personalización que se le dé, de manera que podemos jugar con el color, los diseños, el tamaño, es magnífico los mil y un modelos que podemos sacar con esta idea, es muy lindo a la hora de regalar, así que encantada de mostrarles el paso a paso prosigo con los materiales y luego manos a la obra.
Just now I bring you a new tutorial full of creativity, a new gift bag, it is something different from the others and that's what I like the most, ideal for gift giving, storage, as well as wrapping a gift on a birthday, celebrating or as a simple present at any time, the thing is what gives it the touch is the personalization that is given, so that we can play with color, designs, size, it is magnificent the thousand and one models that we can get with this idea, it is very nice when it comes to giving, so I am happy to show you the step by step I continue with the materials and then get to work.
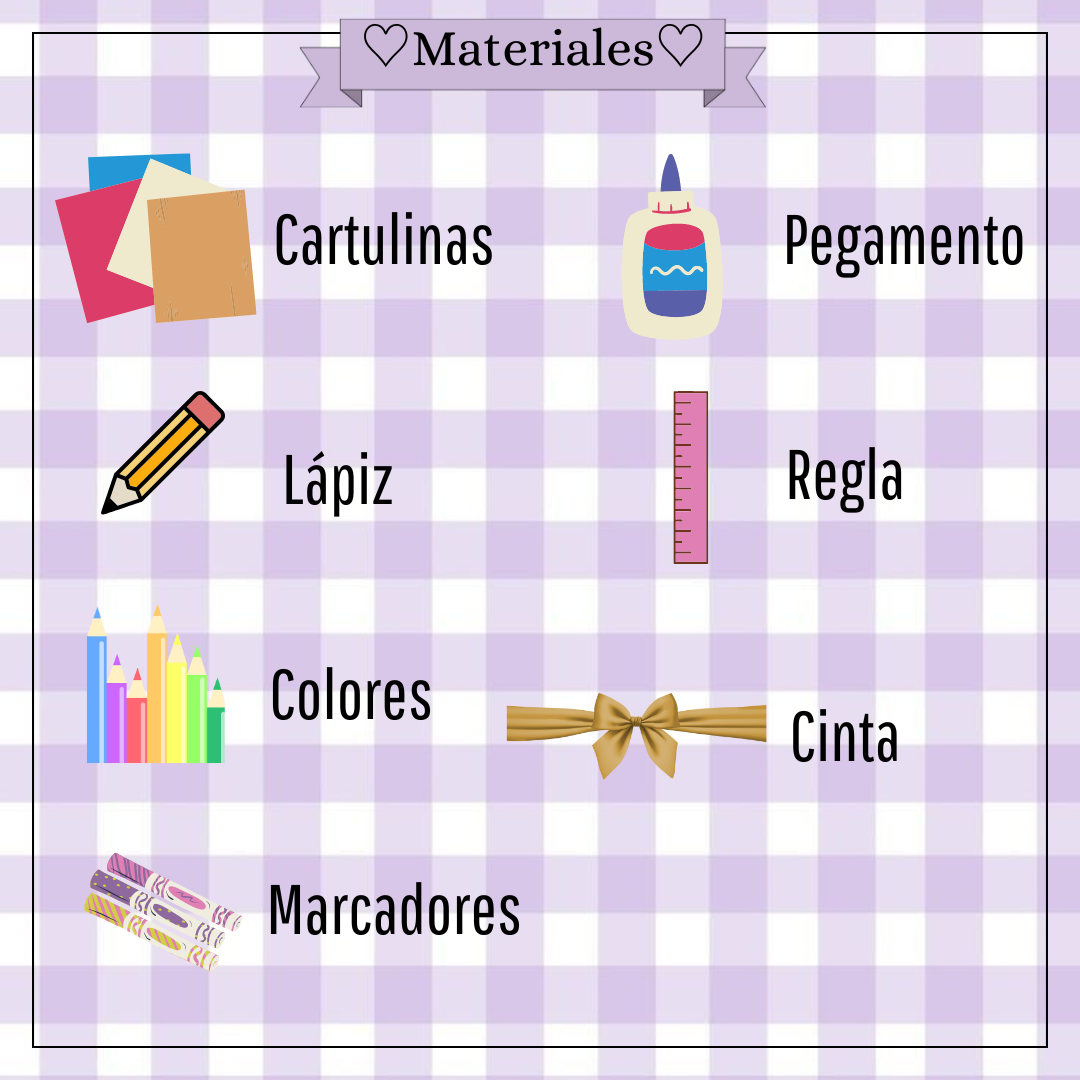
♡Materials to be used:♡.
- Cartulinas
- Pegamento o silicón
- Tijeras
- Regla
- Cinta
- Colores
- Marcadores
- Cardboard
- Glue or silicone
- Scissors
- Ruler
- Tape
- Colors
- markers
♡Step bye Step♡
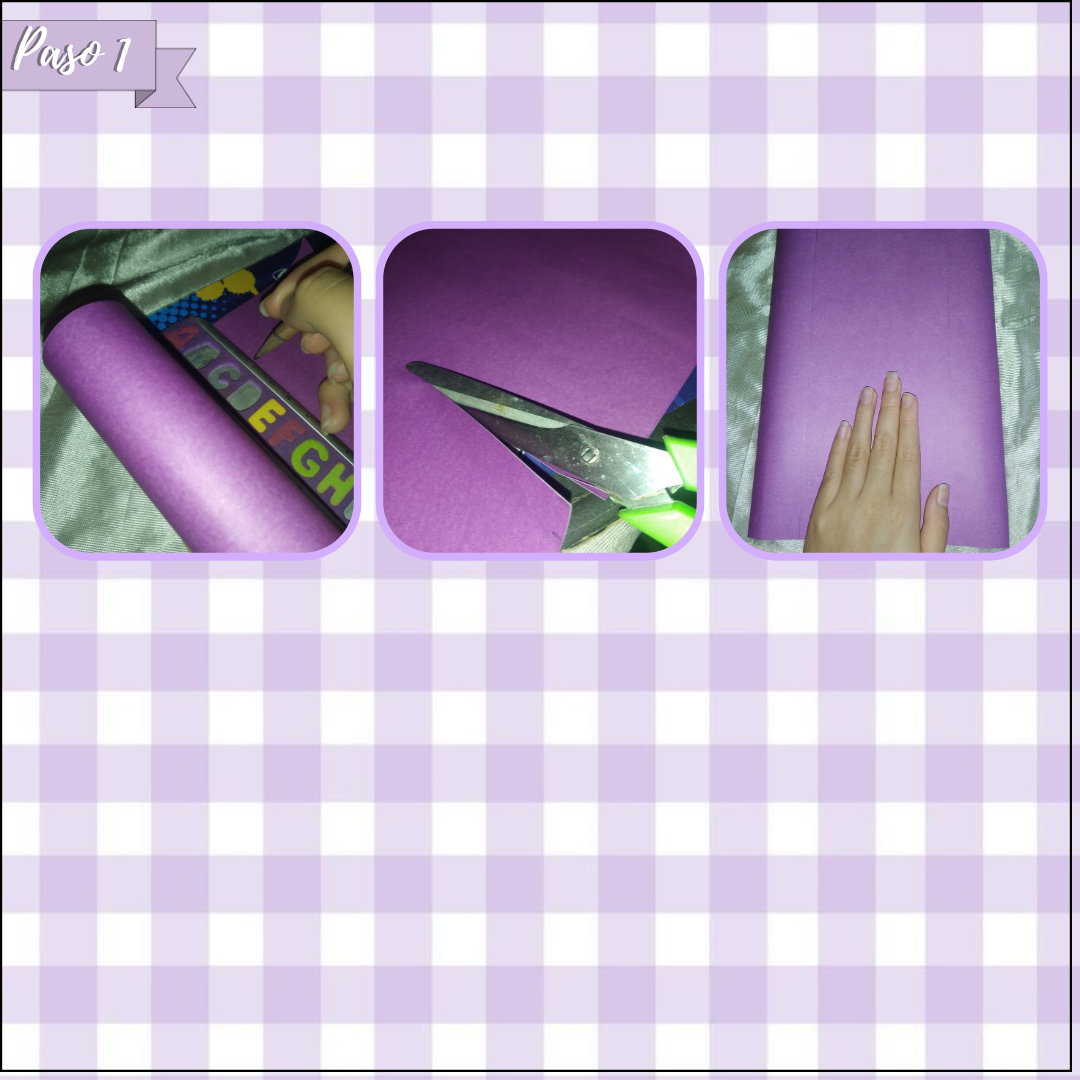
Paso 1:
Step 1:
Para empezar vamos a sacar nuestra cartulina del color y la textura que queramos, así con el apoyo de la regla y nuestro lápiz vamos a marcar un rectángulo de unos 20 cm de ancho por 25 cm de largo, en este caso yo lo hice así, ustedes lo pueden hacer de las medidas que gusten, lo importante es que sea un rectángulo, así recordamos esta pieza para continuar.
To begin with we are going to take our cardboard of the color and texture we want, so with the support of the ruler and our pencil we will mark a rectangle about 20 cm wide by 25 cm long, in this case I did it like this, you can do it in the measures you like, the important thing is that it is a rectangle, so we remember this piece to continue.
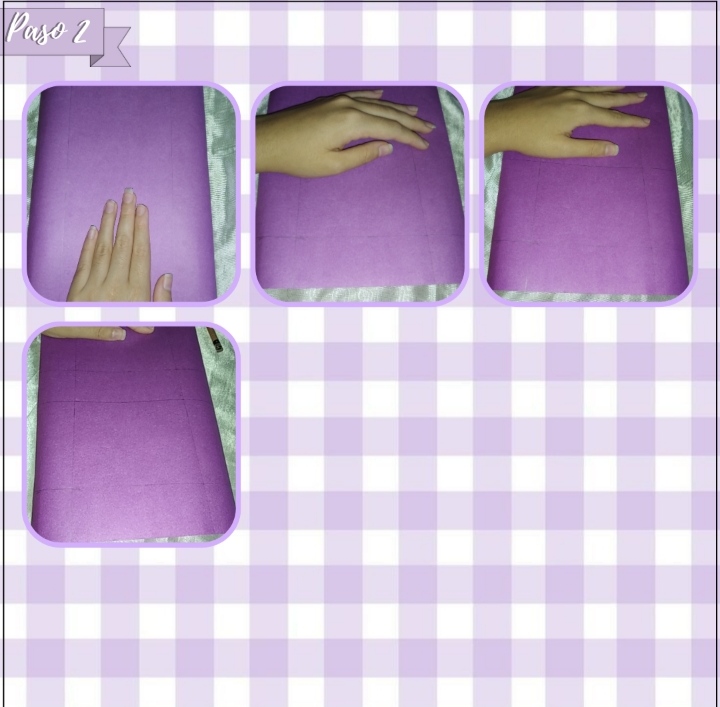
Paso 2:
Step 2:
Continuamos nuevamente con las ayuda de nuestra regla y lápiz en el rectángulo que hicimos anteriormente, así vamos a marcar a ambos lados por el largo de la cartulina una línea de 5cm cada una a cada costado, después en la parte de abajo vamos a hacer una línea recta de 6cm de ancho, luego seguida de esa línea vamos a marcar una nueva línea de 10cm, por último a los 5cm.
We continue again with the help of our ruler and pencil in the rectangle that we did before, so we will mark on both sides along the length of the cardboard a line of 5cm each on each side, then at the bottom we will make a straight line of 6cm wide, then followed by that line we will mark a new line of 10cm, finally at 5cm.
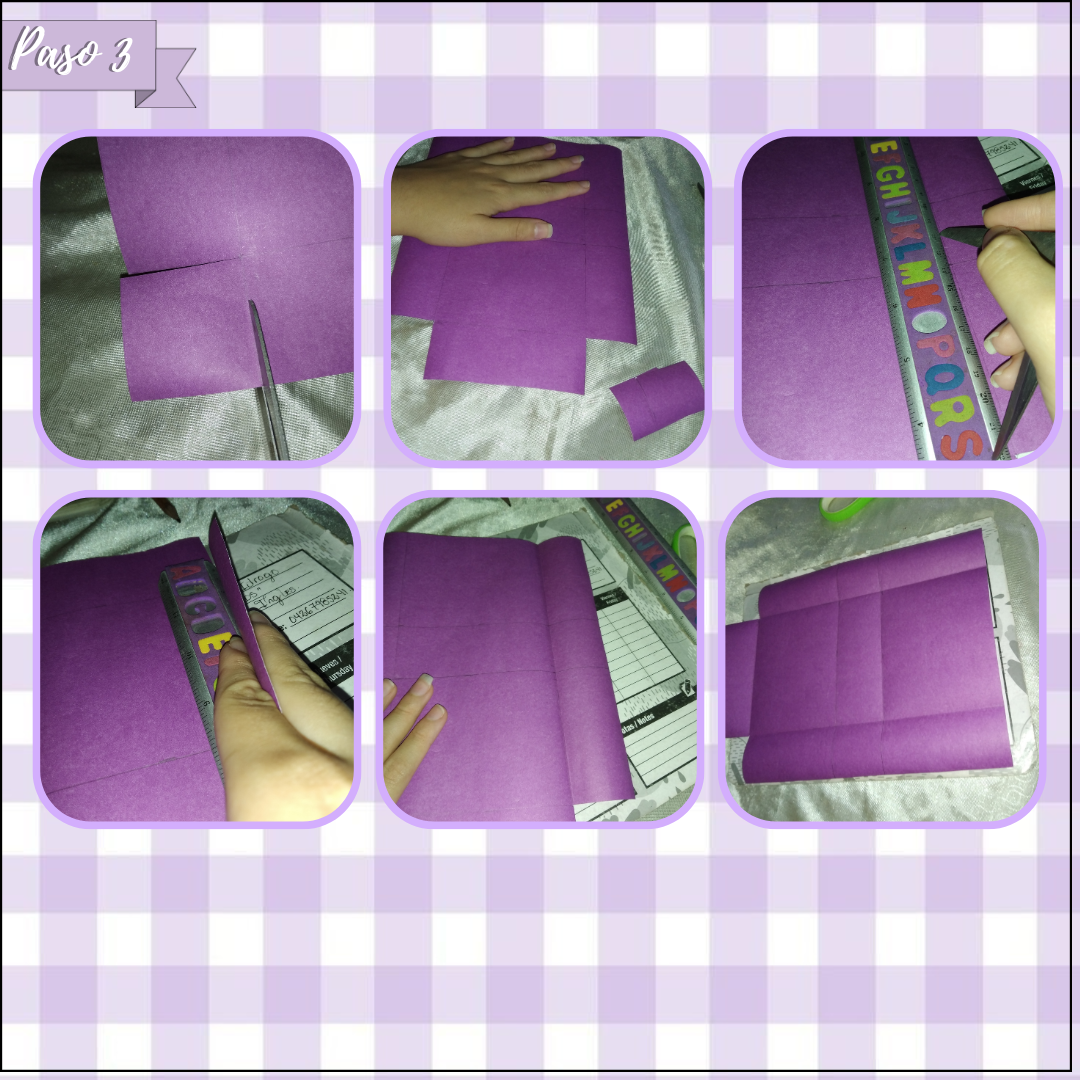
Paso 3:
Step 3:
Proseguimos a recortar los cuadrados que quedaron marcados en las esquinas inferiores con la ayuda de nuestra tijera, luego con la misma, pero está vez con solo el filo y apoyándome de una regla voy a marcar solo aplicando un poco de presión los dobleces de cada lado y las líneas de en medio con mucho cuidado, quedando así bien marcadas como pueden apreciar en la imágen.
We continue to cut out the squares that were marked in the lower corners with the help of our scissors, then with the same, but this time with only the edge and leaning on a ruler I will mark only by applying a little pressure the folds on each side and the lines in the middle very carefully, thus being well marked as you can see in the image.
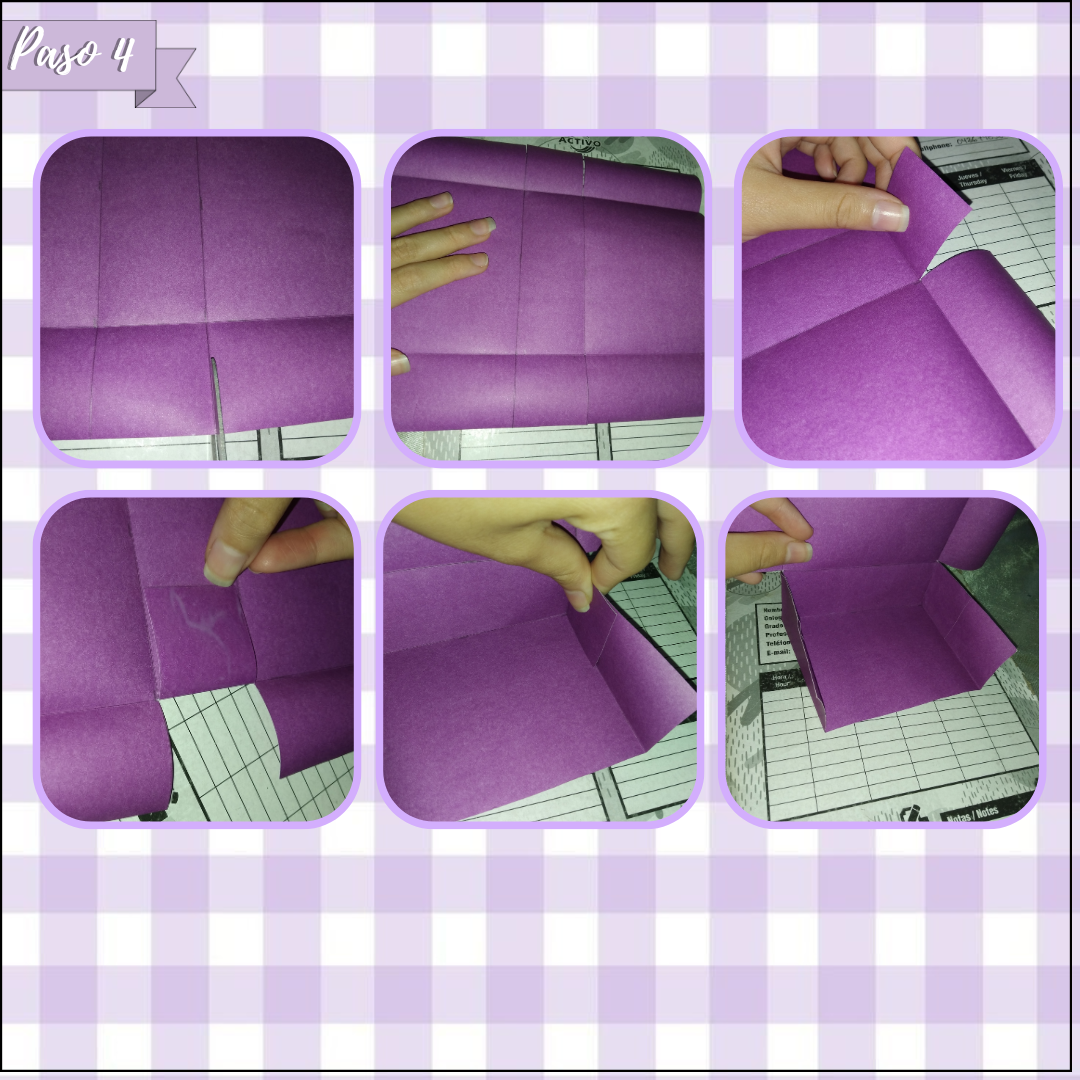
Paso 4:
Step 4:
De nuevo tomaremos la tijera y está vez vamos a hacer un simple corte de una línea recta, justo en los cuadrados que se marcan al costado, separados por el dobles, solo un simple corte, así tomaremos esas solapas les agregaremos silicón de preferencia o pegamento y lo vamos a pegar en la parte de adentro de la pieza que no tiene borde en la parte de arriba, ocultando por dentro de esta pieza de cada lado.
Again we will take the scissors and this time we will make a simple cut of a straight line, just in the squares that are marked on the side, separated by the double, just a simple cut, so we will take those flaps we will add silicone or glue and we will paste it on the inside of the piece that has no edge at the top, hiding inside this piece on each side.
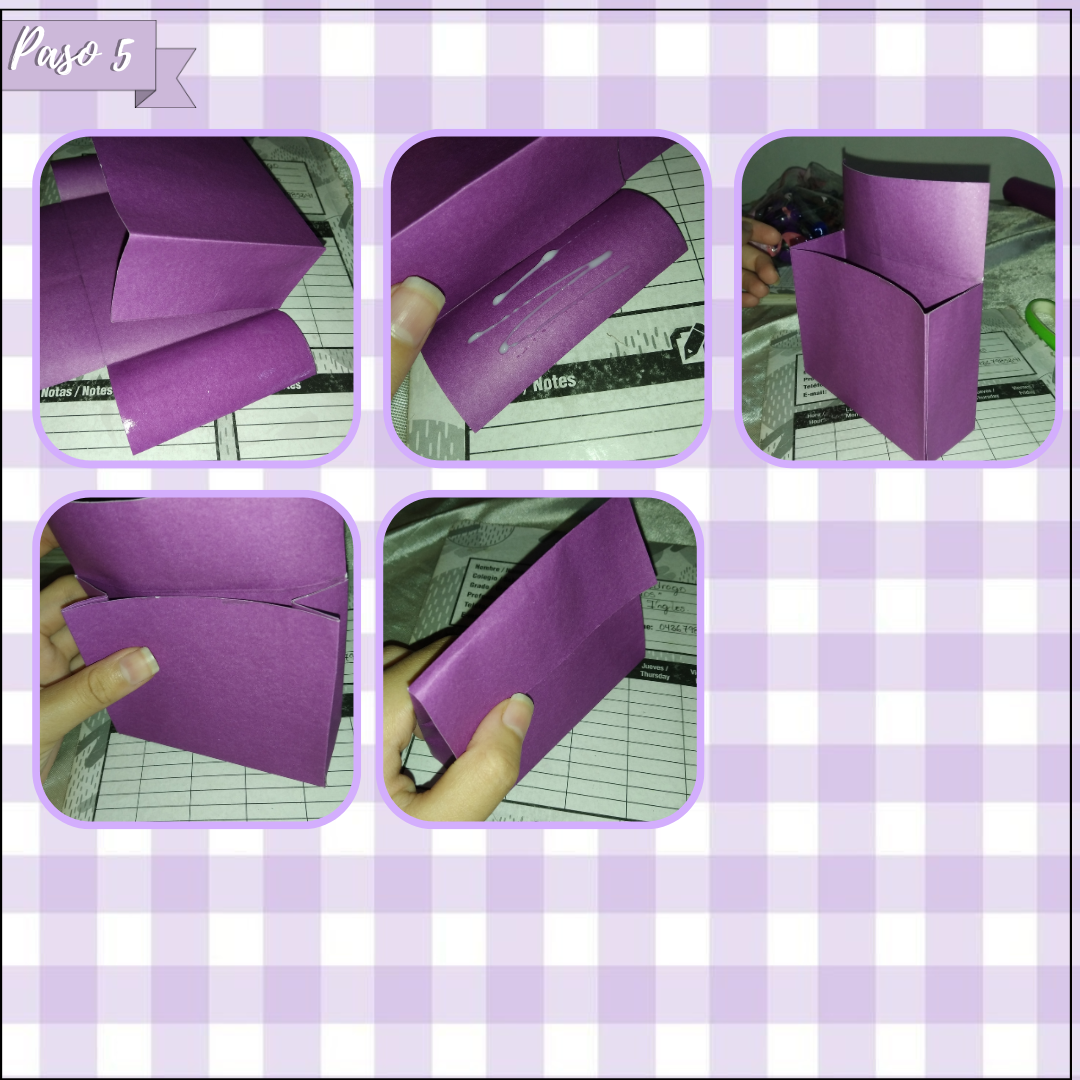
Paso 5
Step 5:
Así con el cuadrado semi formado lo doblaremos hacía adentro de esta y le agregaremos pegamento a las solapa de los lados para unirlas con la pieza anterior, proseguimos a doblar a la mitad los bordes de los extremos de esta bolsa para que así sea flexible y se logre doblar con facilidad la parte de arriba, así doblaremos la parte restante de arriba hacía abajo, para que sea una especie de tapa para esto, como se puede apreciar.
So with the semi-formed square we will fold it inside this and we will add glue to the flaps of the sides to join them with the previous piece, we continue to fold in half the edges of the ends of this bag so that it is flexible and it can be easily folded the top, so we will fold the remaining part of the top down, to be a kind of lid for this, as you can see.
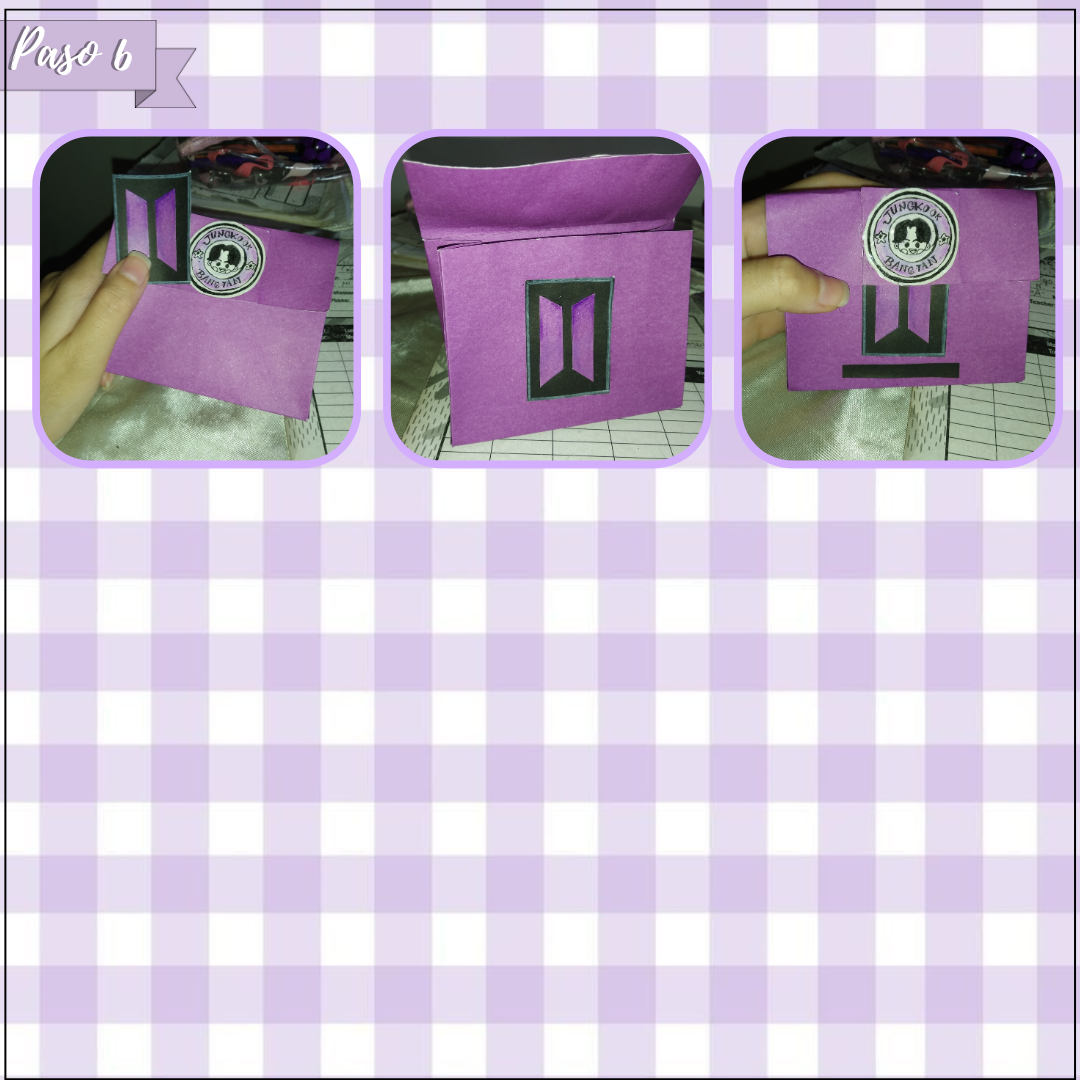
Paso 6:
Step 6:
Ahora bien mi parte favorita y escencial, decorar y decorar, aquí tomaremos la temática que más nos guste, que este acordé a la celebración o a los gustos del cumpleañero o simplemente de nosotros, en este caso yo la decore de BTS ya que a mí amiga le gusta, por lo tanto hice dos pequeños dibujos y recorte una tira de cartulina negra, así con la ayuda de silicón frío pegue estás a mi elección, en la parte de la bolsa y seguidamente en la tapa, por así decirlo y por último para darle ese toque de regalo sorpresa agregué una linda cinta de color morado con diseño de puntos, simplemente hice un pequeño lazo y ya estaría.
Now my favorite and essential part, decorate and decorate, here we will take the theme that we like the most, that is according to the celebration or the tastes of the birthday boy or girl or just us, in this case I decorated it with BTS because my friend likes it, so I made two small drawings and cut a strip of black cardboard, I then with the help of cold silicone glued these to my choice, in the part of the bag and then on the lid, so to speak and finally to give it that touch of surprise gift I added a nice purple ribbon with dot design, I just made a small bow and that would be it.
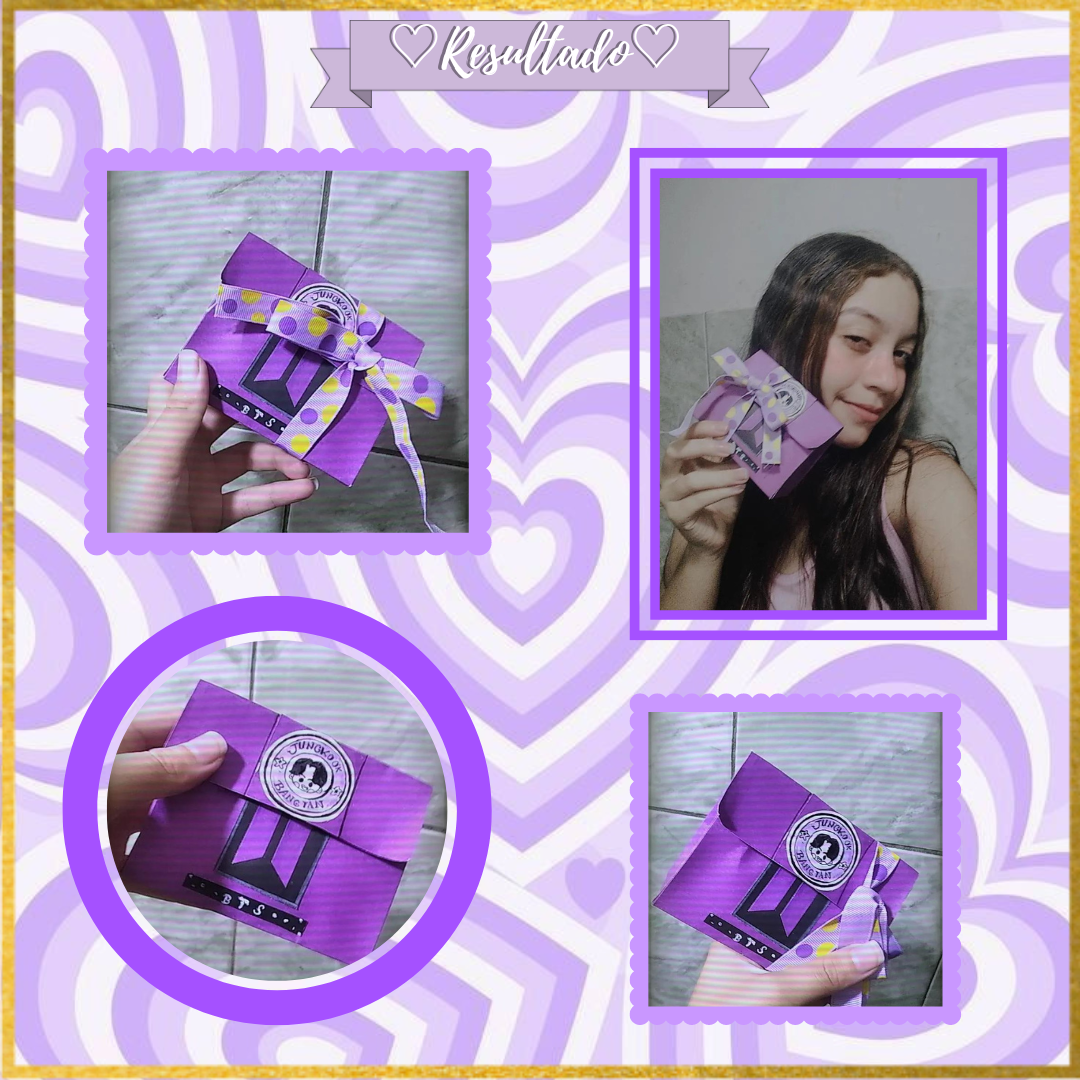
Así en unos cuantos pasos sencillos tendremos lista nuestra linda bolsita de regalo, especial para regalar en cualquier ocasión, ya que es muy versátil, podemos hacerla totalmente desde cero, así que los invito a que la hagan y puedan compartir un pedacito de ustedes con los demás.
So in a few simple steps we will have ready our cute little gift bag, especially to give away on any occasion, as it is very versatile, we can make it completely from scratch, so I invite you to make it and you can share a little piece of you with others.
Les agradezco por acompañarme un día más en está nueva semana, gracias por llegar hasta aquí, espero seguir leyendo por aquí sus lindos comentarios, un abrazo enorme, nos vemos la próxima, amigos de la colmena.🧡
I thank you for joining me one more day in this new week, thank you for coming here, I hope to continue reading your nice comments here, a big hug, see you next time, friends of the hive.🧡
♡¡Gracias por leer!♡
♡Thank you for reading!♡
Photos of my authorship taken from my Xiaomi Redmi 7 phone, edited in the free version of Canva.
Congratulations @stefania16! You have completed the following achievement on the Hive blockchain And have been rewarded with New badge(s)
Your next target is to reach 15000 upvotes.
You can view your badges on your board and compare yourself to others in the Ranking
If you no longer want to receive notifications, reply to this comment with the word
STOPCheck out our last posts:
Support the HiveBuzz project. Vote for our proposal!
Gracias, que increíble.✨
¡Eso es genial @stefania16! ¡Estamos emocionados de ver tus logros en Hive! ¡Sigue adelante y logra este nuevo objetivo!
😍❤️
Que bonita me gusto mucho 😍😘 eres muy creativa y talentosa.
Muchas gracias amiga me alegro mucho, gracias de verdad, un abrazo.💜😍