Click on English version
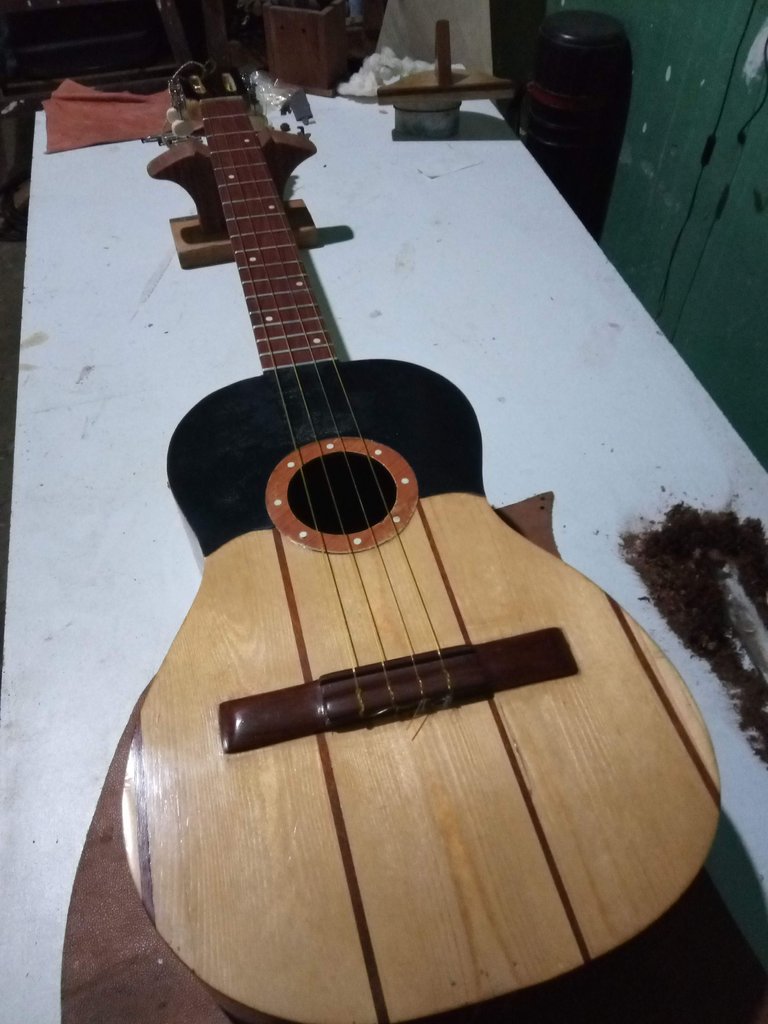
Greetings, fellow lovers of repairs and DIY, here I bring you some lutherie, we will fix and improve a Venezuelan cuatro.
The instrument arrived to the atelier for some changes of pegs, with some isolated zippers by the use, it turns out that when I begin to observe it for diagnosis I observe that the lateral parts of the bridge are detached and the lower lobe is where the bridge is glued presents a deformation as if they were the waves of the sea, the following thing is to solve these two critical factors to return the optimal state of the instrument, enjoy the process and it will be useful for related projects.
Saludos, compañeros amantes de las reparaciones y el bricolaje, por acá les traigo algo de luthería, arreglaremos y mejoraremos un cuatro venezolano
El instrumento llegó al atelier por unos cambios de clavijas, con algunas cremalleras aisladas por el uso, resulta que cuando lo empiezo a observar para su diagnóstico observo que las partes laterales del puente están despegadas y el lóbulo inferior es decir donde está pegado el puente presenta una deformación como si fuesen las olas del mar, lo siguiente es resolver estos dos factores críticos para devolver el estado óptimo del instrumento, que disfruten del proceso y les sea útil para proyectos relacionados.
Click on English version
Details of the material with which the instrument was made:
- Harmonic box.
- Top: Venezuelan national pine with mahogany trimmings.
- Mahogany sides and back
- Handle / Neck: pine
- Bridge: mahogany
- Frets: 17
- String pull / vibrating length: 555 mm
- Made by the luthier: Antonio Duran Barquisimeto - Venezuela
Materials to use:
- Carpenter's glue
- 1.5 mm veneer of coniferous or light wood.
- Clamps / clamps
- Electric or manual drill.
- 2 nails of 1.5 mm thick.
- 40cmx2.5cmx4cm flat wooden strips.
- Water and a rag of 15cmx25cm approx.
- Heat gun / hair dryer.
- Spatula.
- Sandpaper No. 80
- Automotive masking tape.
- Small plastic spatula
- Patience
Detalles del material con que se realizó el instrumento:
- Caja armónica
- Tapa:pino nacional venezolano con adornos de caoba.
- Aros y fondo de Caoba
- Mango / Mástil: pino
- Puente:caoba
- Trastes: 17
- Tiro de cuerda / largo vibrante: 555 mm
- Fabricando por el luthier: Antonio Duran Barquisimeto - Venezuela
Materiales a usar:
- Cola de carpintero
- Chapa de madera de 1.5 mm aprox. De madera conífera o liviana.
- Sargentos /prensas
- Taladro eléctrico o manual.
- 2 clavos de 1.5 mm de espesor
- Listones de madera planos de 40cmx2.5cmx4cm
- Agua y algún trapo de 15cmx25cm aprox.
- Pistola de calor / secador de cabello.
- Espátula.
- Papel de lija n.º 80
- Cinta de enmascarar automotriz
- Espátula de plástico pequeña
- Paciencia
Paso número 1
 |  |
Click on English version
After the diagnosis we pass to a process a little complicated, to disassemble the bridge, this is a little easier when it has been detached, that is to say it facilitates the process, here it is necessary to go with care not to spoil the harmonic cover, the bridges are detached by multiple conditions, gluing with an ambient humidity greater than 60%, tension of the strings and in this case the cause is the instability of the harmonic cover. We begin inserting the spatula by the edges, a few seconds by the right side and then by the left side and we increase this work, intervening until arriving at the center, this with extreme care, sometimes we have to give slight taps to the handle of the spatula so that the impact goes ungluing the dry glue.
In this process we must be attentive depending on the origin of the chordophone, some builders place nails and / or screws, this in the case of factory instruments and laminated wood cover (against in veneers) a way to verify is to feel inside the harmonic box and if through the tact we feel any nut with screw, try to remove it.
Tras el diagnóstico pasamos a un proceso un poco complicado, desmontar el puente, esto es un poco más fácil cuando él se ha estado despegado, es decir facilita el proceso, acá se debe ir con cuidado para no estropear la tapa armónica, los puentes se despegan por múltiples condiciones, encolado con una humedad ambiente mayor al 60%, tensión de las cuerdas y en este caso la causa es la inestabilidad de la tapa armónica. Empezamos insertando la espátula por los bordes, unos segundos por el lado derecho y luego por el izquierdo y vamos incrementando este trabajo, interviniendo hasta llegar al centro, esto con sumo cuidado, en ocasiones tenemos que dar leves golpecitos al mango de la espátula para que el impacto vaya despegando la cola seca.
En este proceso debemos de estar atento dependiendo de la procedencia del cordófono, algunos constructores le colocan clavos y / o tornillos, esto en el caso de instrumentos de fábrica y de tapa de madera laminada. (contra en chapadas) una forma de verificar es palpando en el interior de la caja armónica y si a través del tacto sentimos alguna tuerca con tornillo, tratar de retirarlo.
Paso número 2
Click on English version
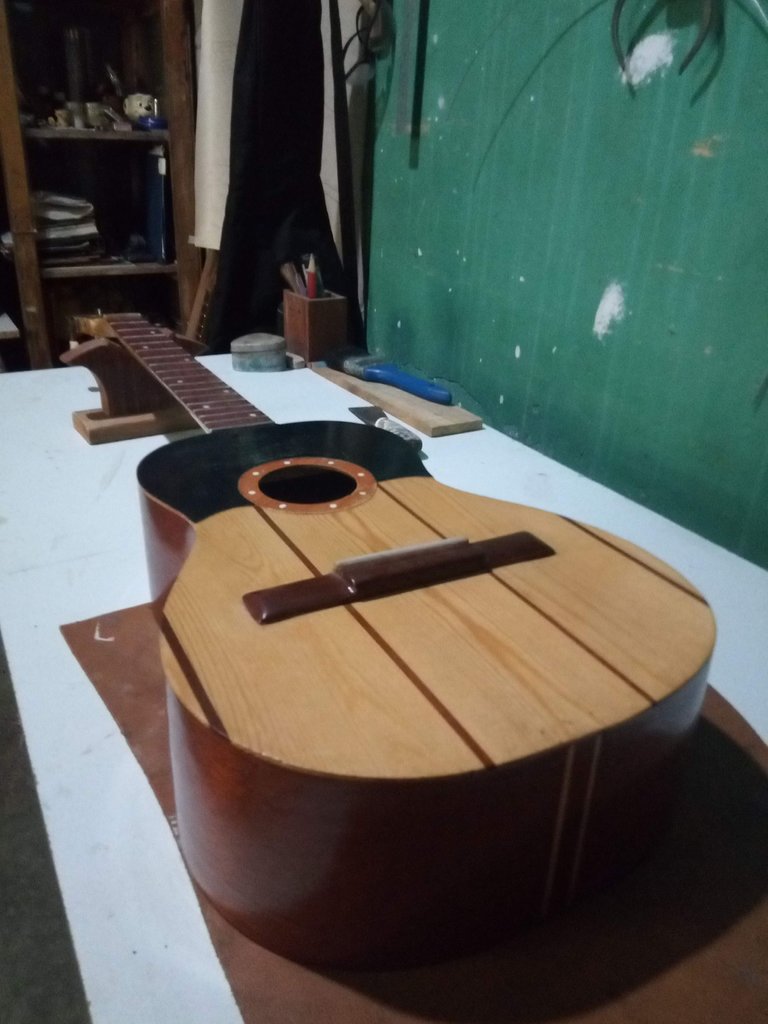
Once this peeling stage is finished, we proceed to clean the area with the rest of glue and to verify the plane of the bridge, it is cleaned and rectified with sandpaper No. 80 if possible on a flat surface, it can be on a glass of 5 mm or a rectified slab, at the end the bridge is left aside, we reserve it and we move forward.
Culminando está etapa de despegado, se procede a limpiar la zona con resto de cola y a verificar el plano del puente, se limpia y se rectifica con papel de lija n.º 80 en lo posible sobre una superficie plana, puede ser sobre un vidrio de 5 mm o una losa rectificada, al culminar se deja de lado el puente, lo reservamos y avanzamos.
Paso número 3
 |  |
Click on English version
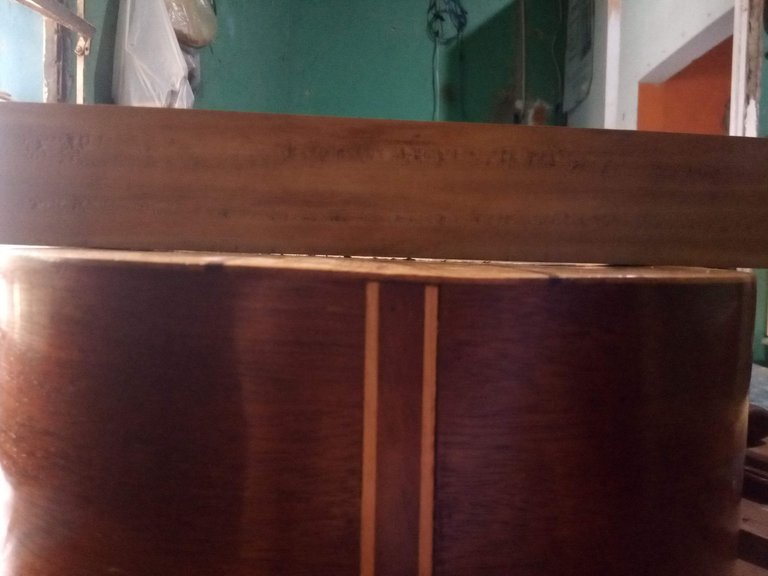
As I mentioned in step one that the bridge was coming unstuck due to the instability of the wood, in this step we proceed to use the cloth moistened with enough warm water and it is incorporated inside the box specifically on the soundboard so that the wood absorbs it, in this way we will try to achieve a more optimal plane through the pressure and heat.
Once well moistened we place the instrument on the workbench well fixed, and we place inside bamboo sticks with blocks to exert pressure upwards a minimum pressure just in the places where it is sunk, on the outside we place the grade block just on the line where the bridge is, we make a little pressure and verify that it gives us an almost flat plane, because it is wood is nature not everything can be perfect.
Como bien conté en el paso uno que el puente se estaba despegando por la inestabilidad de la madera, en este paso se procede a usar el trapo humedecido con suficiente agua tibia y se incorpora en el interior de la caja específicamente sobre la tapa armónica para que la madera la absorba, de esta manera se tratará de lograr un plano más óptimo a través de la presión y el calor.
Una vez bien humedecido colocamos el instrumento en el banco de trabajo bien fijo, y colocamos en el interior baritas de bambú con tacos para ejercer presión hacia arriba una presión mínima justo en los lugares donde está hundido, por la parte externa colocamos el taco grade justo en la línea donde está el puente hacemos un poco de presión y verificamos que nos dé un plano casi plano, pues es madera es naturaleza no todo puede ser perfecto.
Paso número 4
Click on English version
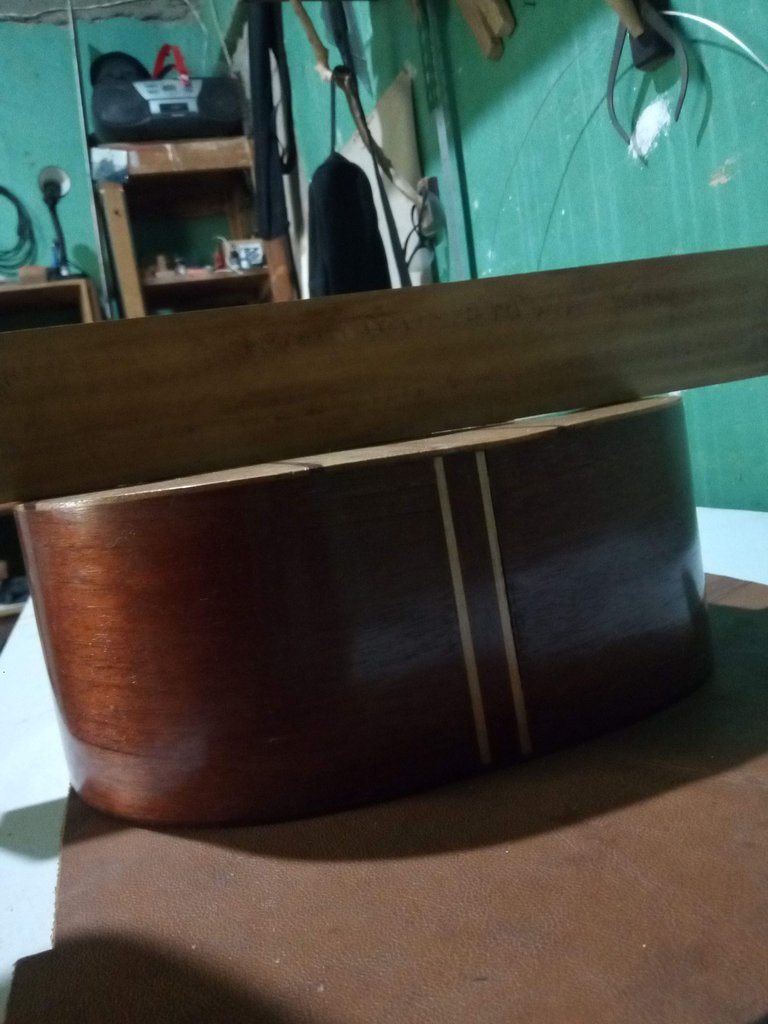
Once put the internal struts and the plugs on the outside we proceed to evaporate the water that absorbed the wood, using a heat gun or a hair dryer always a quarter of a distance to avoid damaging the varnish, with the heat and the pressure that we give with the plugs to the lid we mold the plane, because the wood is molded with heat and water.
In this we will take a time of about two days drying for a while and without removing the press, these we remove them when we have already verified that everything is completely dry.
Note:.
In the caps this phenomenon happens because of the type of cut with which the wood was removed, it is evident that it is a tangential cut plus it is glued in 5 parts ie each wood has its behavior, so these movements are directed independently, these can be 5 parts of course, but taking care that the grain is radial, with linear grain, so the wood is more stable ie resists twisting ...
Una vez puesto los puntales internos y los tacos por la parte externa procedemos a evaporar esa agua que absorbió la madera, usando una pistola de calor o un secador de cabello siempre a una cuarta de distancia para no hacerle daño al barniz, con el calor y la presión que le damos con los tacos a la tapa moldeamos el plano, pues la madera se moldea con calor y agua.
En esto nos tomaremos un tiempo al rededor de unos dos días secando por rato y sin quitar las prensa, estas las quitamos cuando ya hayamos verificado que todo esté totalmente seco.
Nota:
En las tapas sucede este fenómeno por el tipo de corte con el que se sacó la madera, es evidente que es un corte tangencial además de que está encolado en 5 partes es decir cada madera tiene su comportamiento, por ello estos movimientos se dirigen de manera independiente, estas pueden ser 5 partes por supuesto, pero cuidando que las vetas sea radial, con vetas lineales, de esta manera la madera es más estable es decir se resiste a la torsión ...
Paso número 5
 |  |
Click on English version
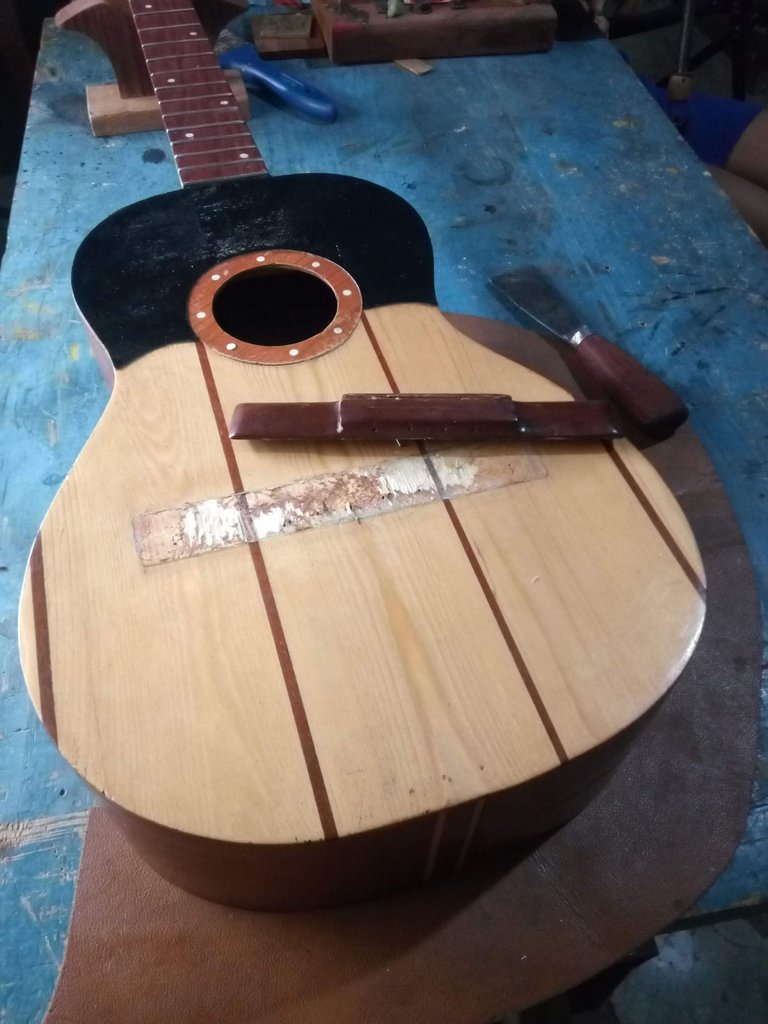
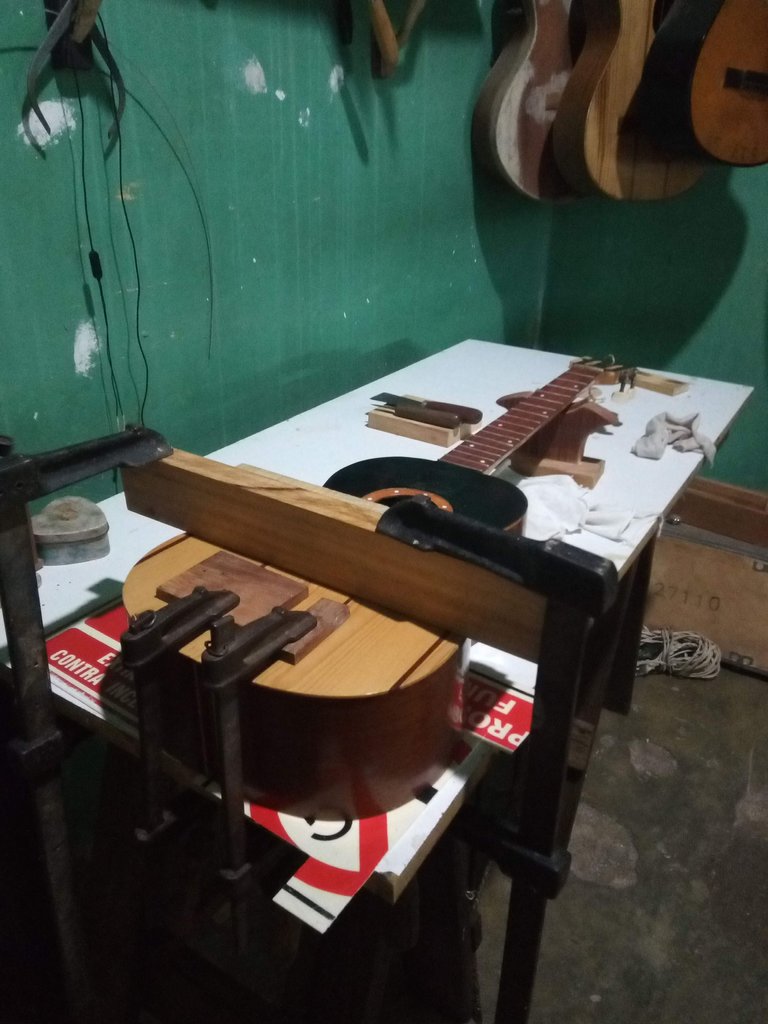
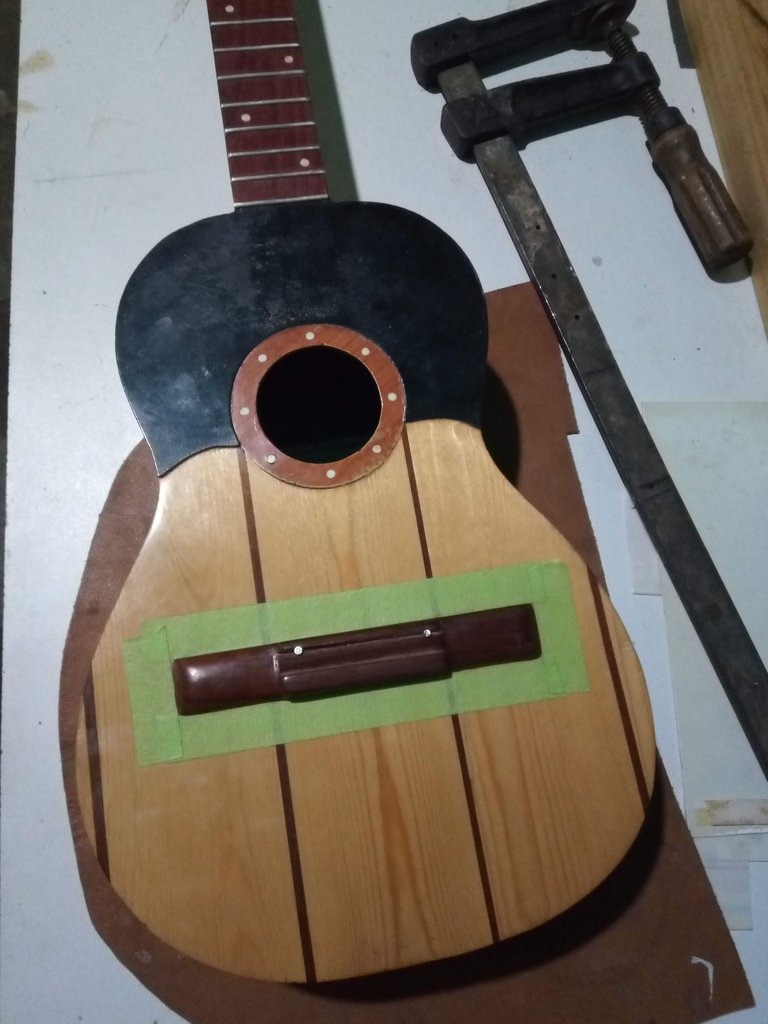
Once our patience is cultivated, we proceed to a possible improvement in the structure, so that the bridge has a better support and the wood does not seek to deform exaggeratedly.
In this we will use a wood of 1.5 mm or 1 mm approx. of thickness of similar dimensions to the bridge, this wood must be of radial cut, because it will be glued transversely to the plane of the harmonic cover generating this way a counter torsion contributing in turn a little of rigidity and stability, before gluing we scratch the wood so that the glue adheres better and we glue using the same bamboo struts in its interior and to place some guides with the two nails so that it cannot move to the sides and it remains straight.
Ya al cultivar nuestra paciencia se procede a una posible mejora en la estructura, para que el puente tenga un mejor soporte y la madera no busque deformarse exageradamente.
En esto usaremos una madera de 1.5 mm o 1 mm aprox. de espesor de unas dimensiones similar al puente, está madera debe ser de corte radial, pues estará encolada transversal al plano de la tapa armónica generando así una contra torsión aportando a su vez un poco de rigidez y estabilidad, antes de encolar rayamos la madera para que se adhiera mejor la cola y encolamos usando los mismos puntales de bambú en su interior y colocarles unas guías con los dos clavos para que no pueda moverse a los lados y quede recta.
paso número 6
Click on English version
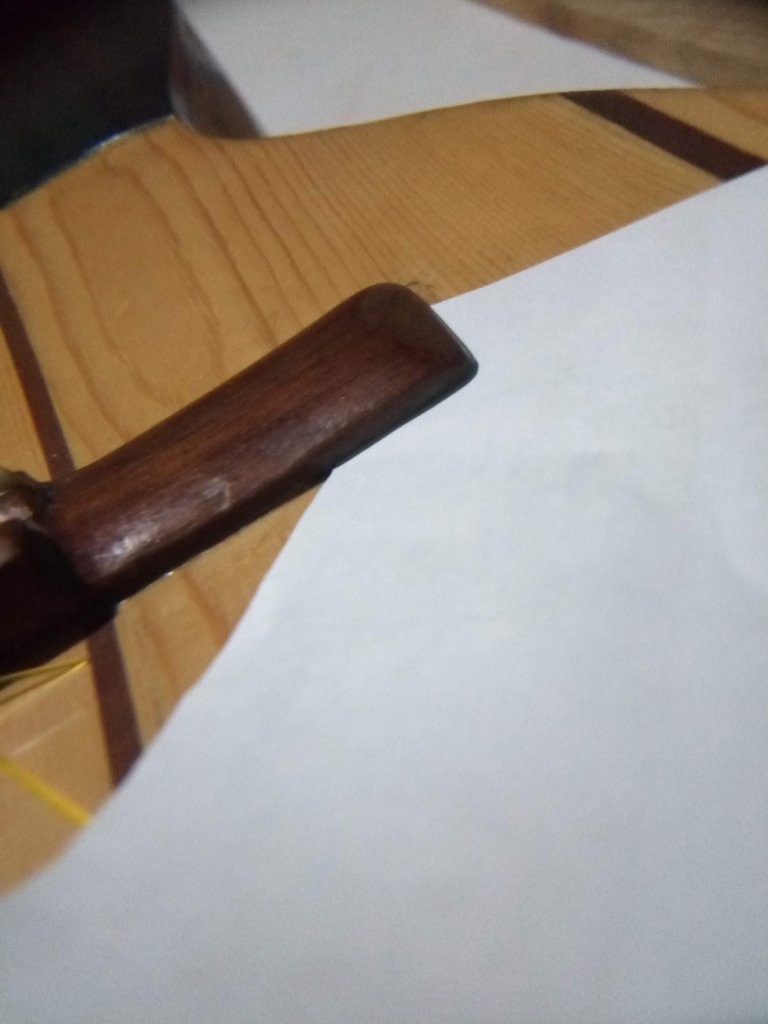
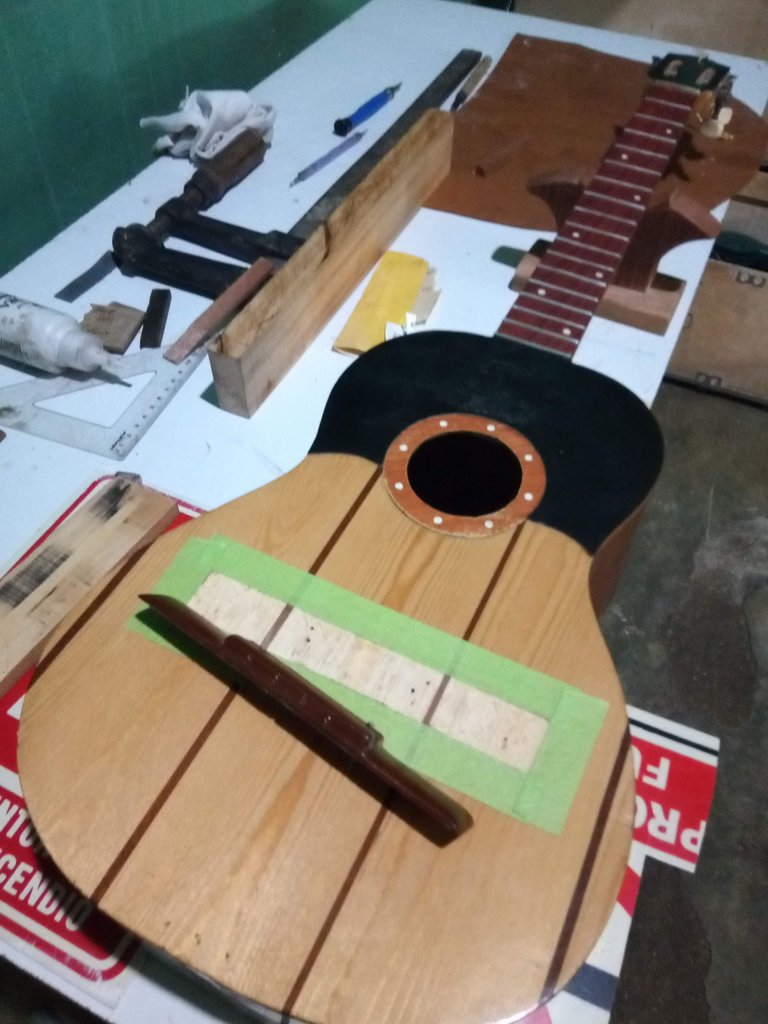
After completing about 3 hours of drying of the reinforcement of the bridge (depending on the glue, sometimes it is left to dry for 12 hours to be more sure can also leave a drop of sample to see its drying), we proceed to remove the internal bars and rectify that such was the plane where the bridge will support, we present the bridge and observe, we pass a sheet of paper along the edge to verify that everything is supporting accurately and enlist the glue, masking tape and a plastic spatula for excess glue.
Tras cumplir unas 3 horas de secado del refuerzo del puente (depende de la cola, aveces se deja secar por 12 horas para estar más seguro también puede dejar una gota de muestra a ver su secado), se procede a quitar las barras internas y rectificar que tal quedó el plano donde se apoyara el puente, presentamos el puente y observamos,pasamos una hoja de papel por el borde para verificar que todo esté apoyando con exactitud y alistamos la cola, cinta de enmascarar y alguna espátula de plástico para el exceso de cola.
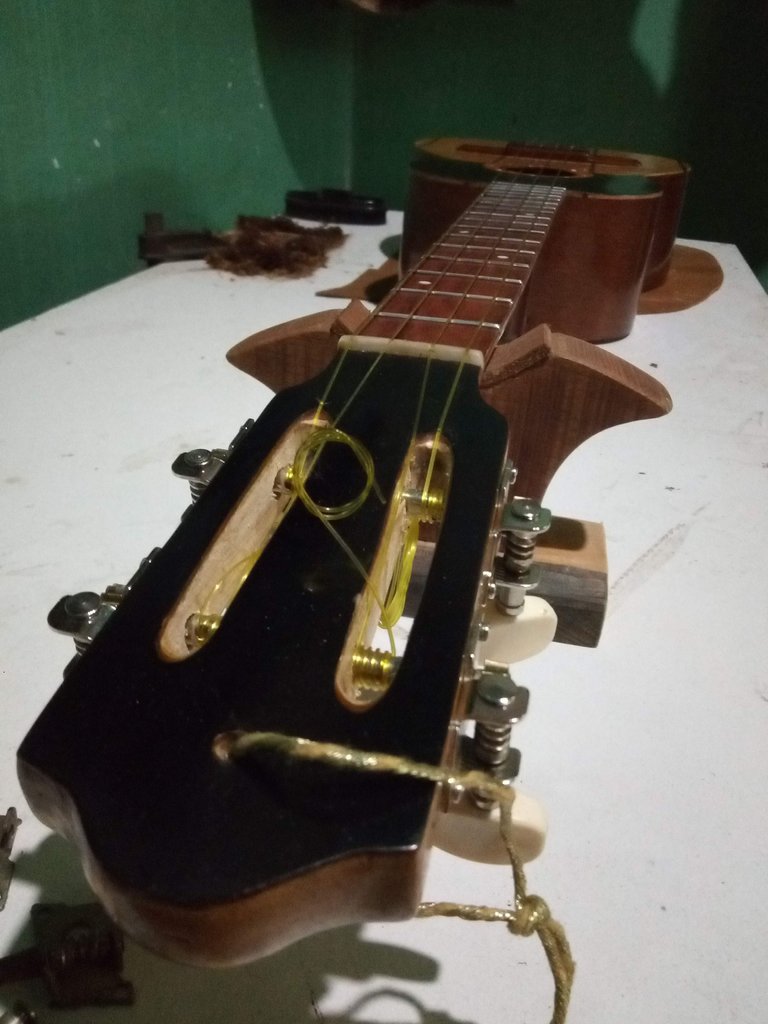
Paso número 7
 |  |
Click on English version
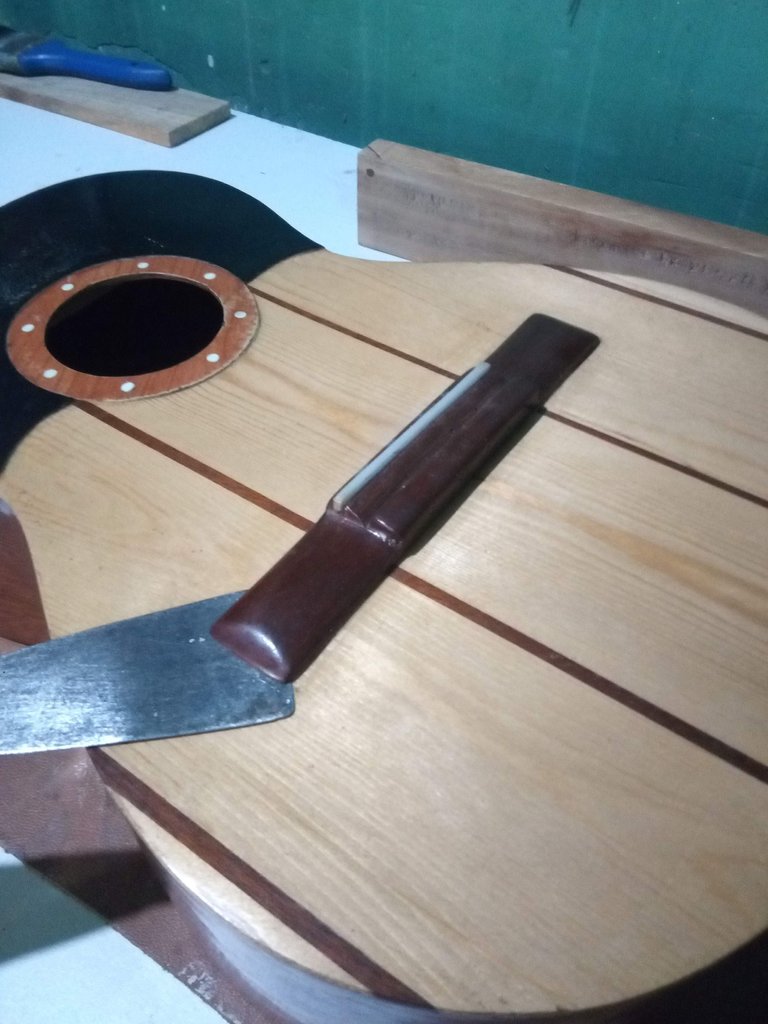
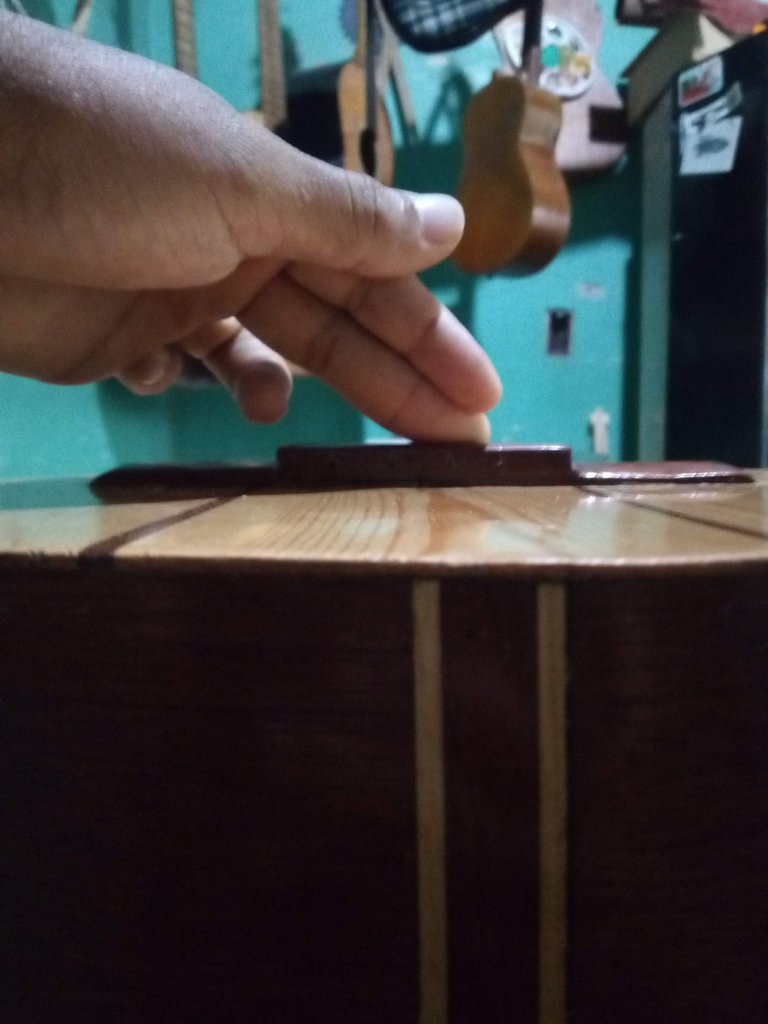
We look for the bridge and just where the capo is placed, we open with a 1.5 mm bit two holes one where the 4th string passes and another on the 1st string this so that the bridge does not move to the sides we pass it to the lid we mark and open also the holes, here as it is a repair the place of the bridge is already marked, but it never hurts to measure the distance from fret 0 to 12 the result that gives us is transported from the 12th fret to the center of the capo and with this we verify our 8th.
We put masking tape around the edges of the bridge so as not to stain the varnish and work much cleaner and proceed to scratch a little the surface of both the bridge and the top, we put glue in both places and proceed to glue ...
| Note:The tool to use for gluing the bridge will be discussed in a future publication. |
|---|
Buscamos el puente y justo donde se coloca la cejilla, abrimos con una mecha de 1.5 mm dos agujeros uno donde pasa la 4.ª cuerda y otro en la 1.ª cuerda esto para que el puente no se nos mueva para los lados lo pasamos a la tapa marcamos y abrimos también los agujeros, acá como es una reparación ya está marcado el lugar del puente, pero nunca está de más medir la distancia del traste 0 al 12 el resultado que nos dé se trasporta del traste 12 al centro de la cejilla y con esto verificamos nuestra 8va.
Colocamos cinta de enmascarar por los bordes del puente para no manchar el barniz y trabajar mucho más limpio y procedemos a rayar un poco la superficie tanto del puente con la tapa, colocamos cola en ambos lugares y procedemos a encolar...
| Nota:El útil a usar para el encolado del puente lo estaremos viendo en una próxima publicación. |
|---|
 | |
Click on English version
Work completed, instrument optimized, tuned and owners happy, came in for a peg change and left with three solutions other than a good cleaning and waxing.
- Personal photographs, taken with my Alcatel cell phone.
- Text translation:
https://www.deepl.com/translator-mobile
Thank you for reading my post about one of the many tasks that are done in the craft of lutherie, if you have any questions or suggestions see you in the comments section, until a future publication Deep Peace.
Trabajo finalizado, instrumento óptimo, afinado y propietarios contentos, vino por cambio de clavija y se fue con tres soluciones aparte de una buena limpieza y encerado.
- Fotografías personales, tomadas con mi celular Alcatel.
- Traducción de texto:
https://www.deepl.com/translator-mobile
Grandioso trabajo. Felicidades...
!diy
!discovery 50
Muchas gracias!
This post was shared and voted inside the discord by the curators team of discovery-it
Join our Community and follow our Curation Trail
Discovery-it is also a Witness, vote for us here
Delegate to us for passive income. Check our 80% fee-back Program
You can query your personal balance by
!DIYSTATSGreat restoration work. Thanks for this good step by step
Thank you! I will do my best to document it for future publications.
a community encouraging first-hand content, and each individual living their best life.
Thank you for your support!
Congratulations @torre-alba! You have completed the following achievement on the Hive blockchain And have been rewarded with New badge(s)
Your next target is to reach 900 upvotes.
You can view your badges on your board and compare yourself to others in the Ranking
If you no longer want to receive notifications, reply to this comment with the word
STOPCheck out our last posts:
¡Agradezco por compartir el contenido!
A truly amazing job that will have a satisfactory result.
Agradecido por leer el post.
Saludos que bonito
Gracias saludos!