✨🐻¡Hola amigos amantes de la creatividad! Espero que hayan pasado un muy buen comienzo de semana.🐻✨
🔸Sin más que añadir, a continuación los dejo con el paso a paso:
✨🐻¡Hello friends who love creativity! I hope you had a very good start to the week.🐻✨
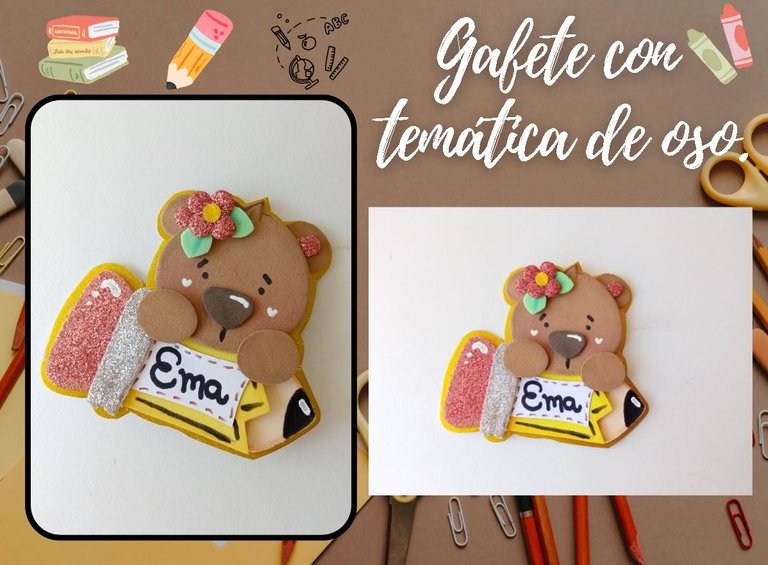
Good afternoon friends. I hope you are having a great week. Today I share with you the step by step to make a beautiful bear school badge. A few months ago I made my first school badge, in that case it was for a child and since I was delighted with the result, I didn't want to waste so much time to make another one for a little girl, with a different theme so that they would have a new and beautiful idea. . Not only does it have to be a school badge, you can make it to your liking, with the theme or for the occasion of your preference, such as a party and event.
I was really delighted with this result, I really enjoyed making this cuteness for the little ones in the house and I hope you enjoy this tutorial.
🔸Without more to add, then I leave you with the step by step:
♥️ESPERO QUE TE GUSTE,
¡Empecemos!
♥️I HOPE YOU LIKE IT,
Let's start!

✂️ MATERIALES | ✂️ MATERIALS
Para el lápiz:
- Foami: amarillo y crema.
- Foami escarchado: rosado y dorado.
Para el oso:
Foami: verde, marrón claro y oscuro
Foami escarchado: rosado y amarillo.
Cartulina escarchada dorada.
Marcadores y tizas.
Alfiler.
Pegamento.
Regla.
Lápiz.
Hoja.
Tijera.
For the pencil:
- Foami: yellow and cream.
- Frosted foam: pink and gold.
For the bear:
Foami: green, light and dark brown
Frosty foam: pink and yellow.
Gold frosted cardstock.
Markers and chalks.
Pin.
Glue.
Ruler.
Pencil.
Sheet.
Scissors.
🐻 PROCEDIMIENTO | 🐻 PROCESS
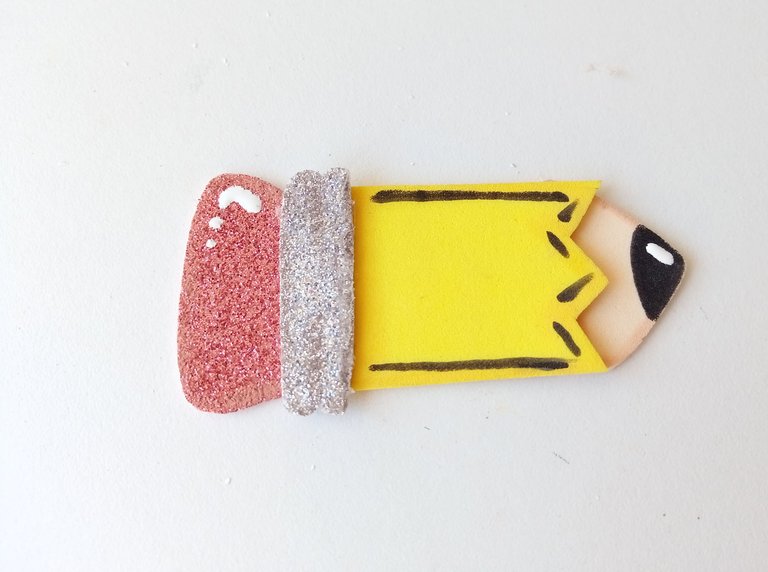
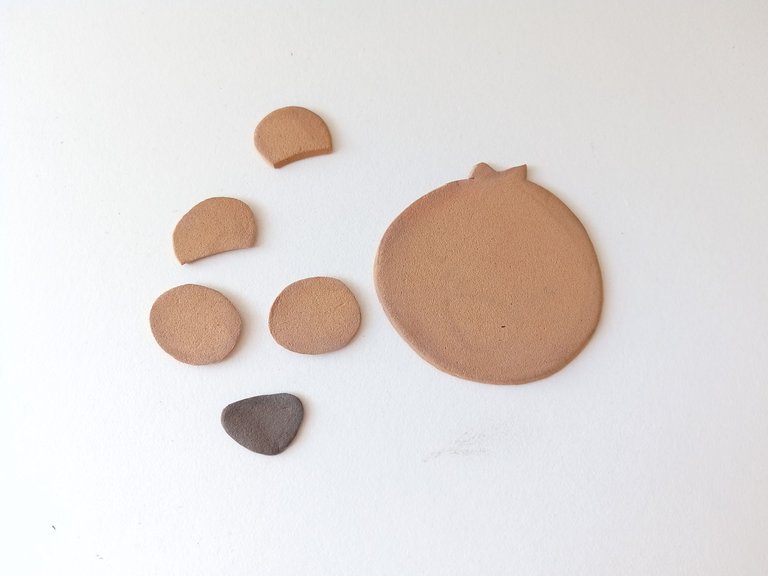
- PASO 1:
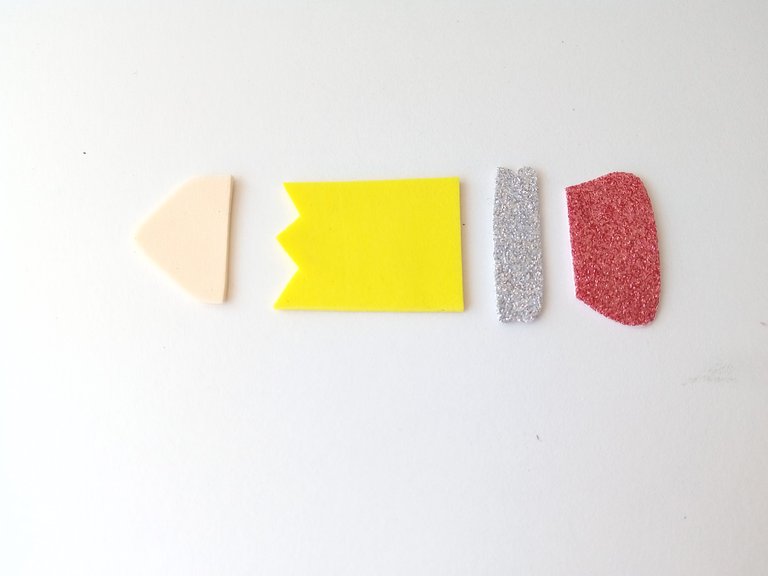
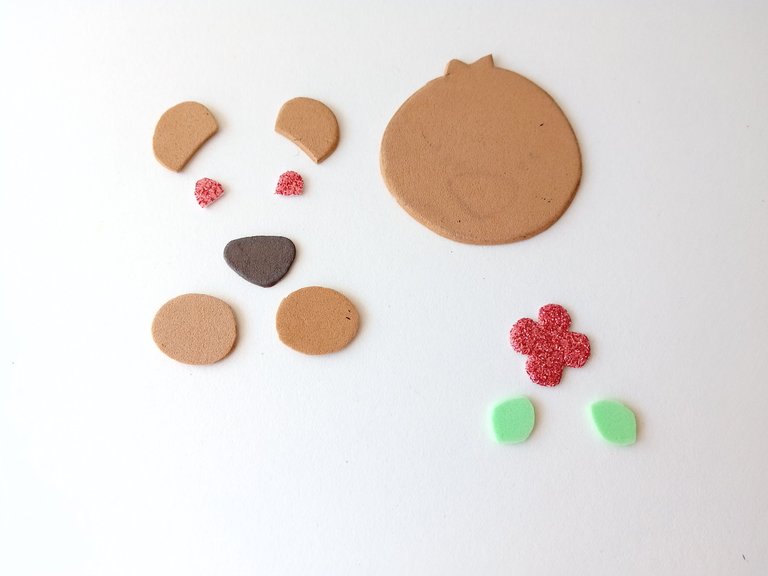
Lo primero que hice fueron los patrones del lápiz y el oso en una hoja blanca. La medida del lápiz fue de 8 cm de ancho y de ahí ajuste las medidas del resto de las figuras. Una vez listo el patrón, transferí a los colores correspondientes de foami, de la siguiente manera: el cuerpo del lápiz en amarillo, el centro del lápiz en plateado escarchado y la borra en rosado escarchado. En cuanto al oso, cabeza, patas y orejas en marrón claro, nariz en marrón oscuro, centro de la flor en amarillo, hojas en verde, parte interna de las orejas y flor en foami escarchado rosado. Luego, recorté cada pieza.
- STEP 1:
The first thing I did was the pencil and bear patterns on a white sheet. The pencil measurement was 8 cm wide and from there I adjusted the measurements of the rest of the figures. Once the pattern was ready, I transferred it to the corresponding colors of foam, as follows: the body of the pencil in yellow, the center of the pencil in frosty silver, and the eraser in frosty pink. As for the bear, head, paws and ears in light brown, nose in dark brown, center of the flower in yellow, leaves in green, inner part of the ears and flower in frosty pink foam. Then, I cut out each piece.
- PASO 2:
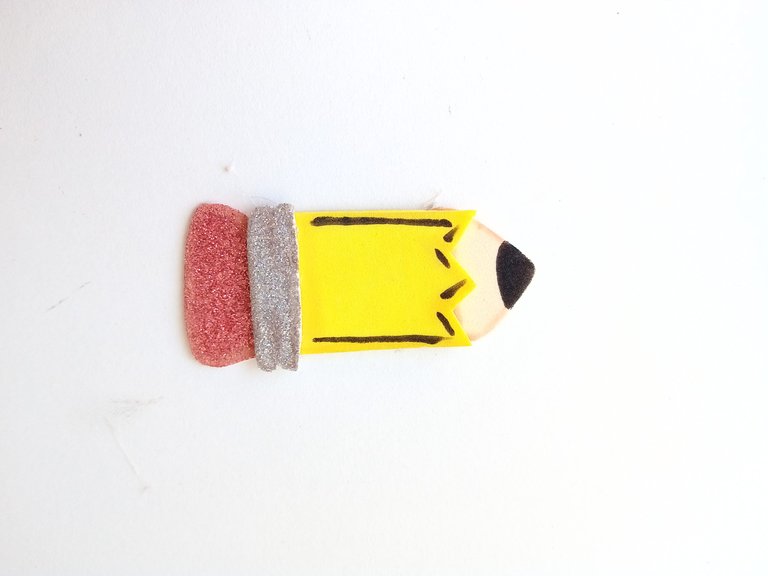
Una vez listas todas las piezas, comencé por el lápiz dando color en los bordes de cada pieza con un tono más oscuro de tiza. Proseguí armando la pieza con pegamento, pinté la punta del lápiz con marcador negro y di detalles con el mismo marcador para resaltar. Además, di puntos de luz en la borra y punta del lápiz.
- STEP 2:
Once all the pieces were ready, I started with the pencil, coloring the edges of each piece with a darker tone of chalk. I continued assembling the piece with glue, painted the tip of the pencil with black marker and gave details with the same marker to highlight. Additionally, I gave points of light on the eraser and tip of the pencil.

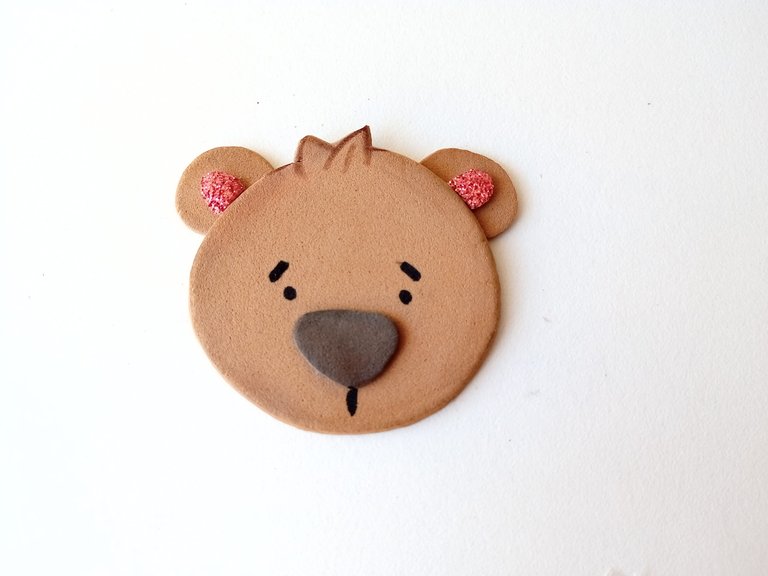
- PASO 3:
Ahora voy con el oso, para el oso fue más o menos el mismo proceso inicial que el lápiz, di color al borde de las piezas con un tono más oscuro de tiza. Luego, pegué las piezas en el orden correspondiente, dibujé los ojos, cejas, boca y di detalles extras.
- STEP 3:
Now I'm going with the bear, for the bear it was more or less the same initial process as the pencil, I colored the edge of the pieces with a darker tone of chalk. Then, I glued the pieces in the corresponding order, drew the eyes, eyebrows, mouth and gave extra details.
- PASO 4:
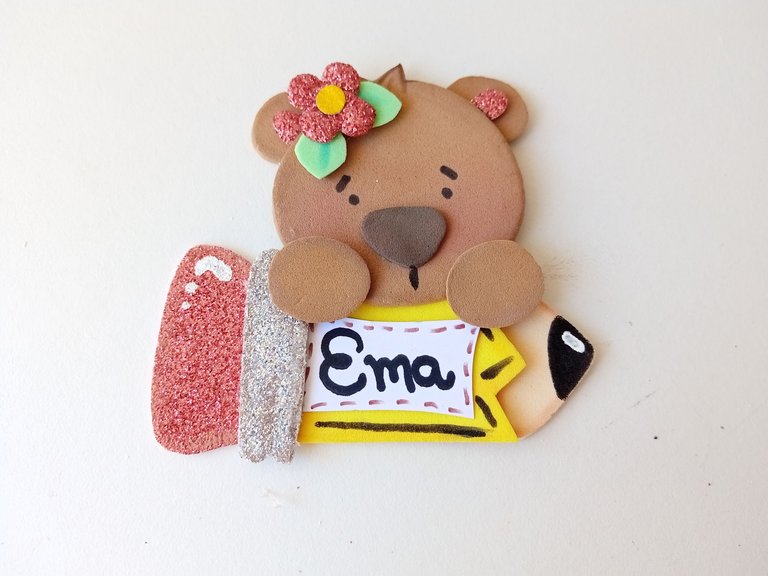
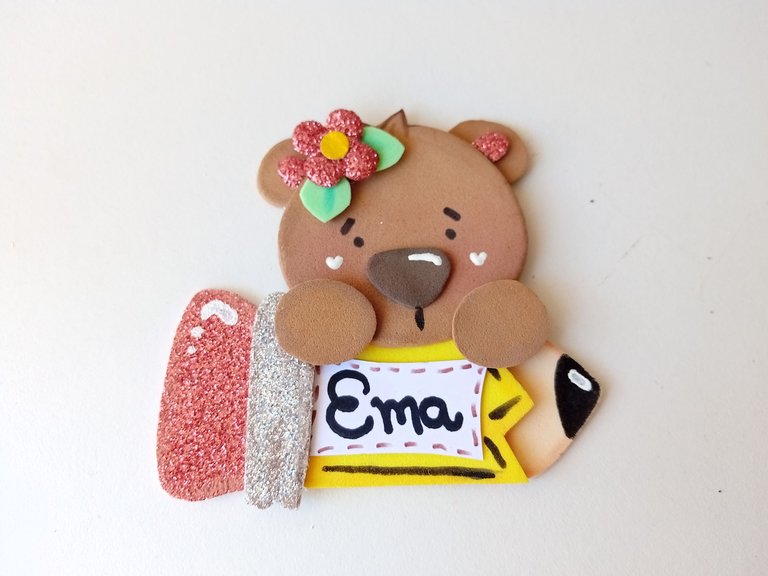
Seguidamente, coloqué el lápiz horizontal y pegué la cabeza en la parte superior, las patas como si estuviera sosteniendo el lápiz, armé la flor, di detalles con marcador y pegué a la cabeza. Por último, escribí el nombre de la niña en una hoja blanca, di detalles al borde y pegué al lápiz.
- STEP 4:
Next, I placed the pencil horizontally and glued the head on top, the legs as if I were holding the pencil, I assembled the flower, gave details with marker and glued the head. Finally, I wrote the girl's name on a white piece of paper, gave details to the border and glued it to the pencil.
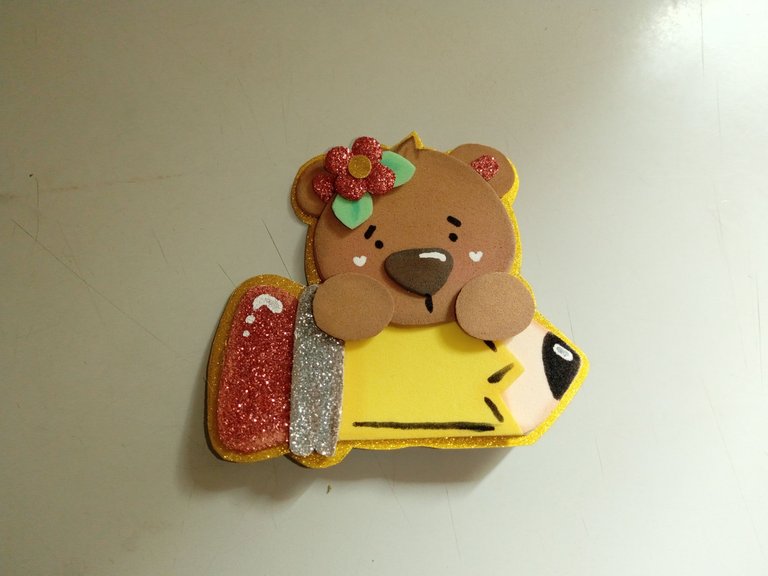
✨¡And ready!✨This way they can make a nice school badge for the little ones, for parties or for any occasion they want. The best thing is that you can create the theme and colors of your choice. I hope you liked the step by step and are encouraged to make it.
❤️Until the next post.
✨RESULTADO: | ✨RESULT:


Todas las fotografías son de mi propiedad.
Separador y Fotos editadas en Canva
All photographs are my property.
Photos edited in Canva
Super lindo! Nada que ver con el pedazo de cartulina que le ponían a uno y que inclusive mis hijos también usaron.
Ya le hiciste uno a Olivia y ahora otro a Ema @milagrosmhbl... ahora quiero el de Aramis! jaja
Declarada la genia del foami.
Jaja eso es verdad amiga, a mi tambien me ponían casi que una hojita 😂. Me alegra que te haya gustado tanto amiga. Saludos!!!
wow you are amazing, thanks for sharing. keep up the good work.
!giphy wow
@sagarkothari88 vote
!PIZZA
!DHEDGE
Via Tenor
Muchas gracias por el comentario! Agradezco muchísimo sus palabras.
Saludos ✨💕
This post has been selected for upvote from our token accounts by @bhattg! Based on your tags you received upvotes from the following account(s):
- @dhedge.bonus
- @dhedge.neoxag
- @dhedge.waiv
@bhattg has 4 vote calls left today.
Hold 10 or more DHEDGE to unlock daily dividends. Hold 100 or more DHEDGE to unlock thread votes. Calling in our curation accounts currently has a minimum holding requirement of 100 DHEDGE. The more DHEDGE you hold, the higher upvote you can call in. Buy DHEDGE on Tribaldex or earn some daily by joining one of our many delegation pools at app.dhedge.cc.
$PIZZA slices delivered:
@bhattg(9/10) tipped @valenpba
Quiero uno personalizado para Maxi por fi 🤭😍
Te quedó demasiado bello mi Valen, de verdad que mi sobrino sería feliz haciéndole todos esas manualidades. Gracias por compartirnos 💕
Ay!!! Es verdad, al Maxi se le vería bello un gafete.💕
Gracias mi Vane bella! Me alegra que te haya gustado 🤭
Ami qué precioso te quedó, ya estás experta con el foamy.
Esto está genial para las maestras que a inicios de año hacen este tipo de cositas.
Demasiado lindo
Gracias amiga bella!!! Poco a poco Ami 🤭.
Sí, para el inicio de clases está genial, así los pequeños están identificados.🤭💕
Ayyyyyyyyyyyyy🥹🩷🩷
Pero cuánta preciosura veo por aquí, te ha quedado demás de precioso y tierno Ami🩷
Muchas gracias amiga hermosa!!🥹🩷 Tu también hacer creaciones preciosas , eres ls mejor. 💗
Esto está demasiado cuchi mi Valen 🥰 Te quedó mega hermoso y ese osito super tierno, amé como te quedó el resultado ¡una belleza! 😍 !DIY
Muchas gracias mi Mary 🤭 Me alegra que te haga gustado esta miniatura jaja. Te mando un abrazote.💕
Que bello valen, se ve muy cuchi🥰🥰
Muchas gracias mi Yage bella! 💗
Ayy que hermoso no habia visto esta cosita😍😍 tu siempre haciendo bellezas, y si llevan el nombre de mi princesa es mas lindo aun jajja😍😍
Ay! Gracias amiga hermosa 💗 No se me ocurría ningún nombre, mi mamá me dijo Ema y me acordé de tu Emita bella✨💕
Te quedo hermoso amiga. Un gran trabajo y esa princesa feliz con su gafete.
Muchas gracias amiga bella! Me alegra que te haya gustado, así es, toda contenta 🤭
Amigaaa te quedo muy lindo 😍, me gusto, no sabía que le llamaban gafete, yo lo conozco como escarapela.
Muchas gracias amiga ! Bueno, fíjate que me entero que también se le llama escarapela 🤭. Las dos aprendimos algo nuevo jaja✨💕
Está precioso!
Muchas gracias! ✨
¡¡¡Buen trabajo!!! Gracias por publicar tu excelente contenido en Hive Diy, tu osito quedo muy coqueto y lindo, me gusta mucho como le hiciste el acabado final con el marcador para embellecerlo más.
Tu comunidad artesana ahora es testigo

Muchas gracias por valorar mi tutorial amigos! Muy contenta y me alegra mucho que les haya gustado.💕