Bienvenidos, amigos creativos🎨💜
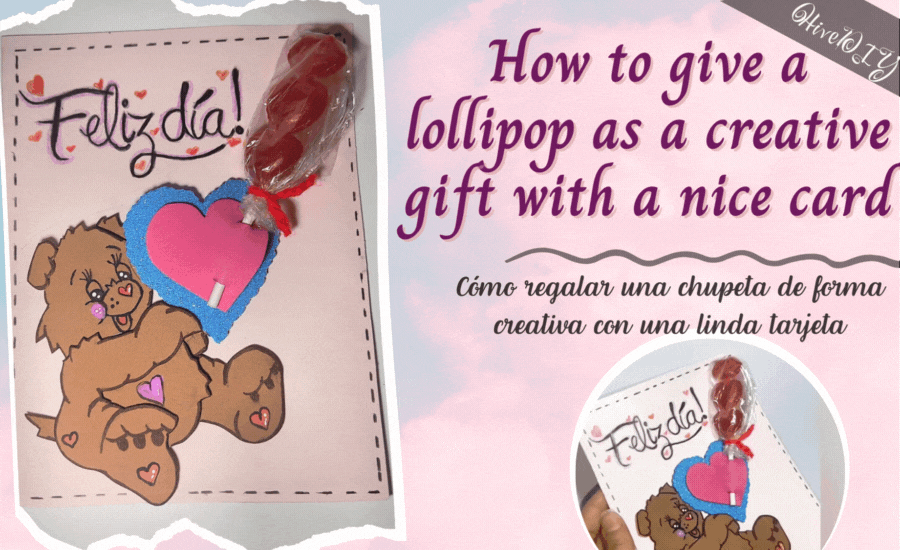
En mi país natal (Venezuela) celebramos San Valentín el 14 de febrero, pero acá en Colombia la cual es la que radico actualmente es celebrado este mes de septiembre, teniendo lugar cada tercer sábado de este mes, es decir que para este año será celebrado el 16. Es por ello que en esta oportunidad traigo una idea de tarjeta a la cual le puedes agregar una chupeta o un bombón como dicen aquí. Esta tarjeta tiene como idea principal dedicárselo para esas amigas especiales, porque si la amistad también se celebra… Sin más preámbulos
Welcome, creative friends🎨💜
Hello everyone, I hope and wish that you are feelinwell, I am happy because the fact that I am out of my country makes me celebrate special dates twice, as in this case Valentine's Day✨.
In my native country (Venezuela) we celebrate Valentine's Day on February 14, but here in Colombia which is where I currently reside is celebrated this September, taking place every third Saturday of this month, which means that this year will be celebrated on the 16th. That is why this time I bring a card idea to which you can add a lollipop or a bonbon as they say here. The main idea of this card is to dedicate it to those special friends, because friendship is also celebrated... Without further ado...
|


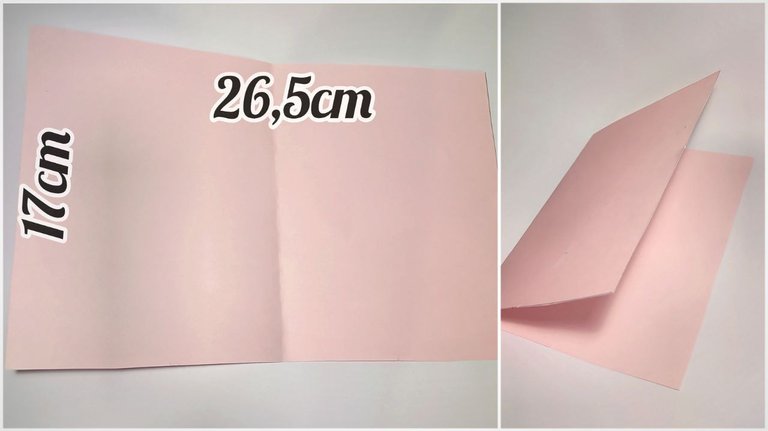
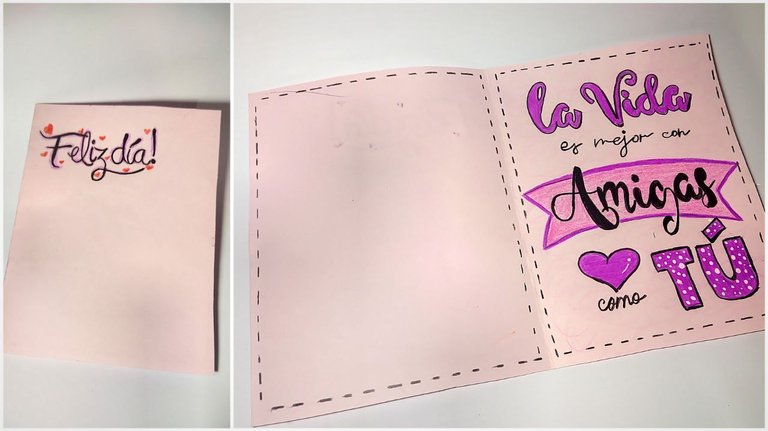
🍭 Paso 1: Lo primero que hice es recortar un pliego de cartulina con medidas de 26,5cm horizontalmente y 17cm en vertical, luego realice un dobles a la mitad y reserve.
🍭 Step 1: The first thing I did was to cut a sheet of cardboard measuring 26,5cm horizontally and 17cm vertically, then make a double in half and set aside.
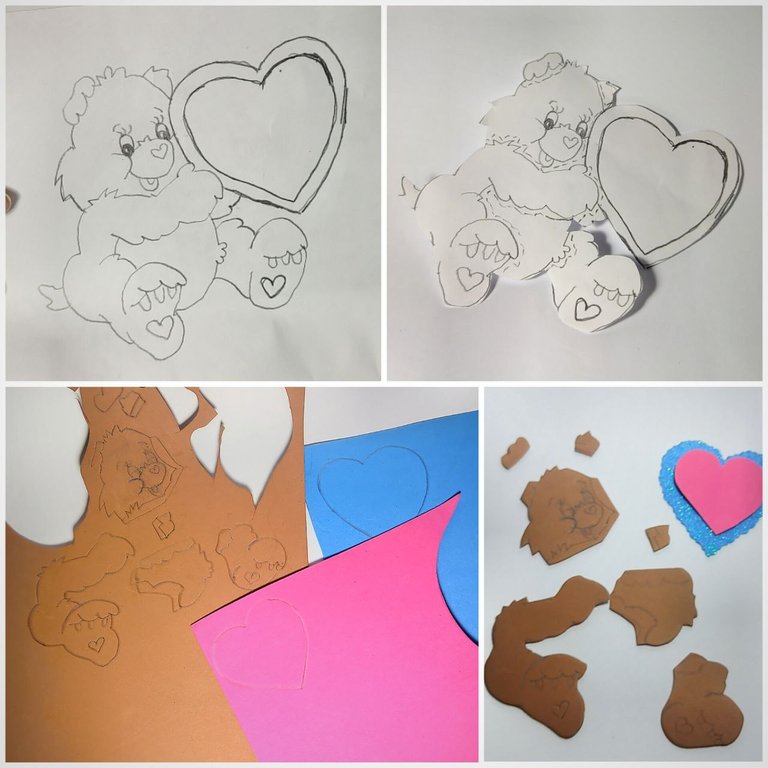
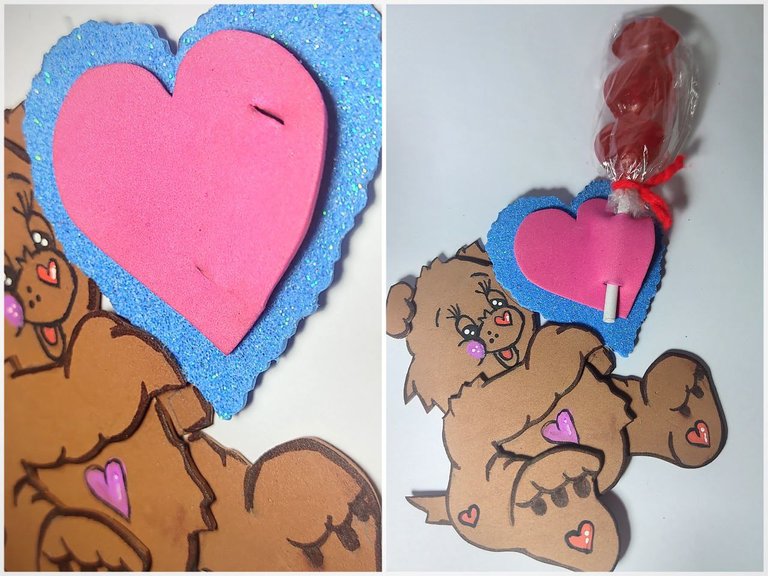
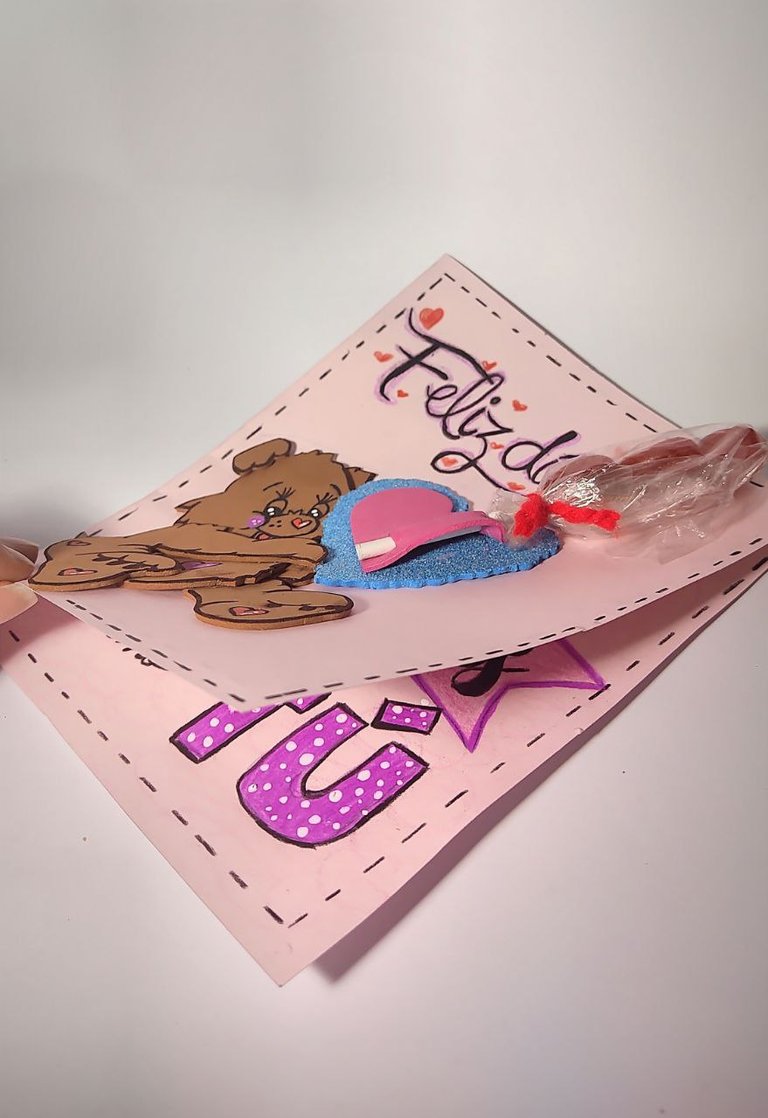
🍭 Paso 2: En internet busque un oso con corazón y dibuje en una hoja blanca el que mas me gusto, luego recorte siendo este el molde a utilizar y así realizarlo en foamis. Transfiriendo cada parte del oso en el color correspondiente: El oso en foami color beige y el corazón en un foami escarchado color azul y uno más pequeño en fucsia sin escarcha
🍭 Step 2: On the internet I searched for a bear with a heart and drew on a white sheet the one I liked the most, then I cut it out and this was the mold to use to make it in foamis. Transferring each part of the bear in the corresponding color: The bear in beige foami and the heart in a blue frosted foami and a smaller one in fuchsia without frosting.
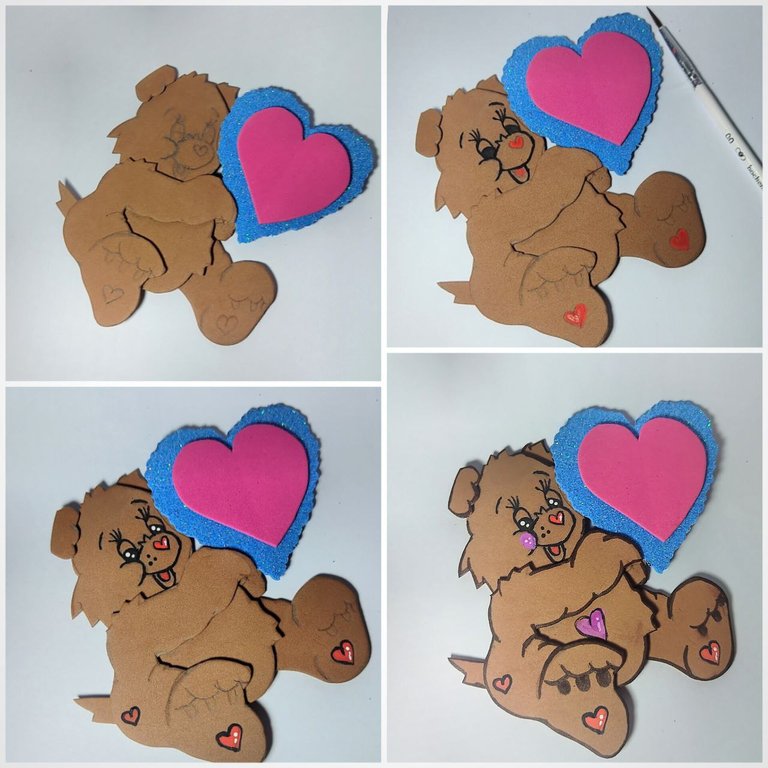
🍭 Paso 3: Teniendo todas las partes en foami ya recortadas, procedí a pegar cada una de ellas hasta completar el diseño.
🍭 Paso 4: Con ayuda de un pincel muy finito realice las decoraciones en los ojos, hocico y boca con pintura al frío negra y algunos puntos en blanco. Adicional realice pequeños corazones con pintura color rojo, y un poco de rosado para las mejillas. Con marcador marrón realice un delineado alrededor de todo el borde del osito.
🍭 Paso 4: Con ayuda de un pincel muy finito realice las decoraciones en los ojos, hocico y boca con pintura al frío negra y algunos puntos en blanco. Adicional realice pequeños corazones con pintura color rojo, y un poco de rosado para las mejillas. Con marcador marrón realice un delineado alrededor de todo el borde del osito.
🍭 Step 3:Having all the foami parts already cut out, I proceeded to glue each one of them until the design was complete.
🍭 Step 4:With the help of a very fine brush, decorate the eyes, snout and mouth with black cold paint and some white dots. Additionally make small hearts with red paint, and a little pink for the cheeks. With brown marker outline all around the edge of the bear.
🍭 Step 4:With the help of a very fine brush, decorate the eyes, snout and mouth with black cold paint and some white dots. Additionally make small hearts with red paint, and a little pink for the cheeks. With brown marker outline all around the edge of the bear.
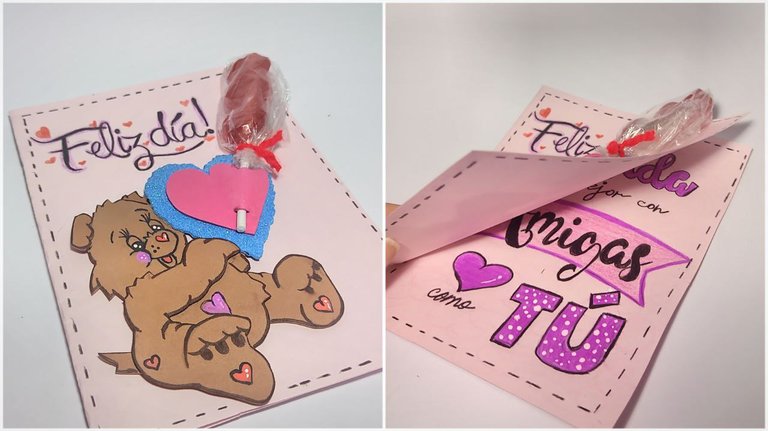
🍭 Paso 5: Para agregar la chupeta, en la cual yo decidí una que traía un besito y corazones me ayude con un corta exacto y realice una pequeña ranura a la medida del palo de la chupeta y de esta forma agregué la misma.
🍭 Step 5: To add the lollipop, in which I chose one with a kiss and hearts, I used an exacto cutter and made a small groove to the size of the stick of the lollipop and in this way I added the lollipop.
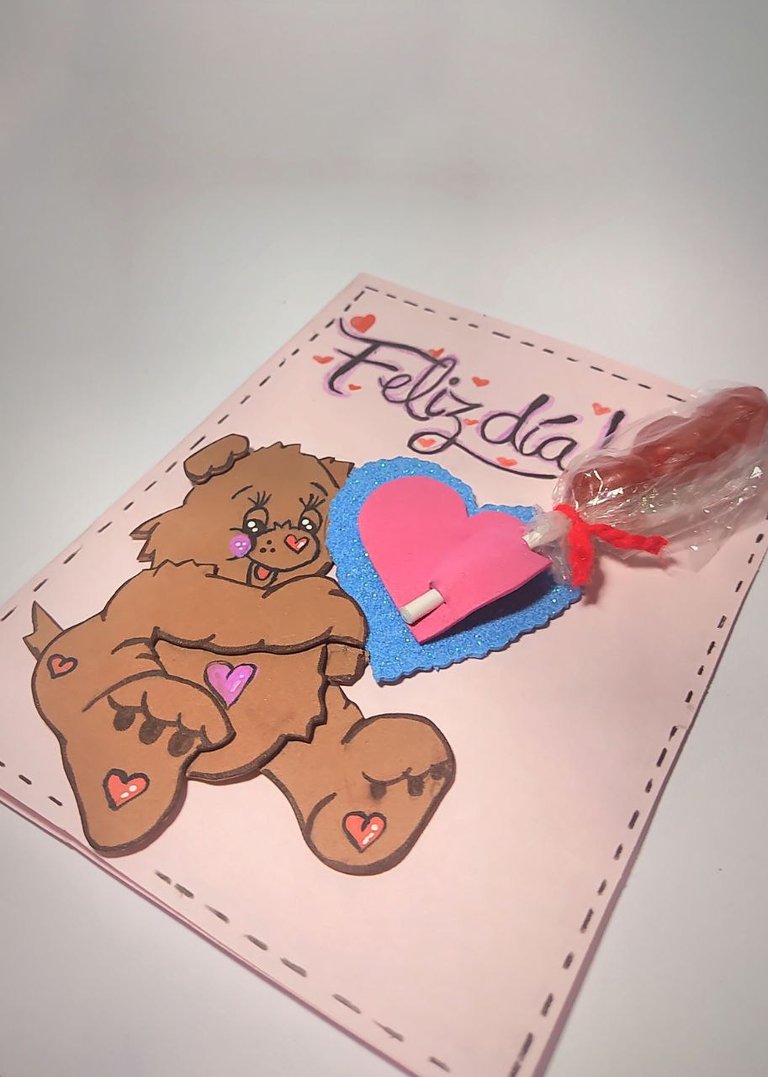
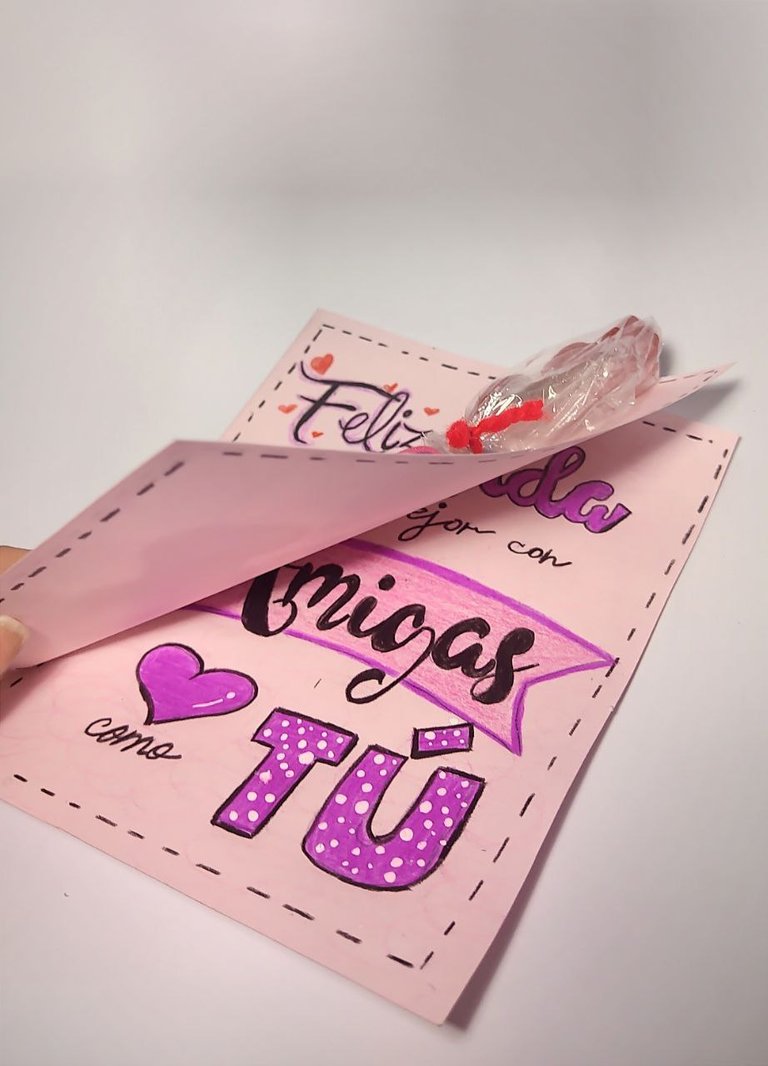
🍭 Paso 6: Lo seguido que hice es realizar las decoraciones a la tarjeta, decidí hacer por la parte de afuera la palabra “feliz día”y algunos corazones, en la parte inferior escogí la frase “La vida es mejor con amigas como tú”, y pequeñas líneas al borde de la misma. Para todo esto utilice colores.
Nota: En la parte que quedó sin escrito le iría perfecto alguna foto especial, o si bien desean algún otro mensaje.
Nota: En la parte que quedó sin escrito le iría perfecto alguna foto especial, o si bien desean algún otro mensaje.
🍭 Step 6: The next thing I did was to decorate the card, I decided to make on the outside the word "happy day" and some hearts, at the bottom I chose the phrase "Life is better with friends like you", and small lines at the edge of the card. For all this I used colors.
Note: In the part that was left without writing, a special photo would be perfect, or if you wish some other message.
Note: In the part that was left without writing, a special photo would be perfect, or if you wish some other message.
🍭 Paso 7: Finalmente pegue el oso sosteniendo la chupeta en la primera parte de la tarjeta.
🍭 Step 7: Finally glue the bear holding the lollipop on the first part of the card.

¡Y de esta forma obtuve una linda tarjeta para regalar!, personalmente yo amo los dulces así que el hecho de siempre agregar uno me encanta, es una idea que puedes adaptar a cualquier celebración, con la frase y el diseño que más gustes… Recuerda solo dejar volar tu imaginación✨.
Nos vemos en una nueva creación👩🎨
And this way I got a nice card to give as a gift, personally I love candy so the fact of always adding one I love, it is an idea that you can adapt to any celebration, with the phrase and design you like... Remember just let your imagination fl✨.
See you in a new creation👩🎨

Mil gracias por leerme una vez
Nos vemos en una próxima publicación.
Muchas bendiciones y abrazos digitales🤗
Thank you very much for reading me once
See you in an upcoming post.
Many blessings and digital hugs🤗

Mil gracias por leerme una vez
Nos vemos en una próxima publicación.
Muchas bendiciones y abrazos digitales🤗
Thank you very much for reading me once
See you in an upcoming post.
Many blessings and digital hugs🤗
Pero qué belleza de carta, si que me encanta, aunque se ve un poco complicada para yo hacerlo porque soy muy mala en las cosas que tengan que ver con dibujar, pero de verdad que me gustó mucho, te quedó preciosa
Muchísimas gracias, aprecio mucho que te gustará🤗. Al principio también me costaba, todo es cuestión de práctica❤️. Saludos
Me gustó mucho el efecto 3D logrado al pegar pieza por pieza del osito cariñoso. La tarjeta es demasiado hermosa y cute, excelente idea.
Aunque así pieza por pieza toma un poquito más de tiempo, pero es una gran forma para lograr el 3D. Muchísimas gracias por el apoyo y apreciar mi trabajo🤗❤️
Hermosa tarjeta, muy original 🌷🌹🌼🌺💮🌸🪷💐🏵️🌻☘️.
Gracias linda❤️
🌹🌷
Que bella y creativa forma de obsequiar una chupeta amiga, me encanta la idea, está muy linda y es u excelente detalle 🥰
Gracias mi Mary, me alegro mucho que te gustará. Abrazos
Tan hermosa tarjeta! Me encantó! 😍😍
Gracias Eve♥️
Me gusto el oso, muy bonito y creativo la forma como lo dibujaste y lo plasmaste en el foami, muy bueno, un lindo detalle, saludos.
Muchísimas gracias, me alegro que te gustará el oso también fue mi parte favorita. Saludos💕
Ay que cosita más hermosa Yage!! Quedé enamorada 💗 una carta bastante original, creo que nunca he visto una así.
Te quedó preciosa amiga! Gracias por compartir.
Muchísimas gracias mi valen🥰, gracias a ti por comentar❤️
Congratulations @yagelybr! You have completed the following achievement on the Hive blockchain And have been rewarded with New badge(s)
Your next target is to reach 3500 comments.
You can view your badges on your board and compare yourself to others in the Ranking
If you no longer want to receive notifications, reply to this comment with the word
STOPCheck out our last posts:
Hola Yagely. Muy hermosos estos pequeños detalles, sin duda le alegrarían a cualquiera. Buen trabajo, te felicito ❤️
Hola Laura, estos detalles son mi favorito pues tienen gan significado y realmente no sé necesita de mucho más que solo amor. Muchísimas gracias por valorar mi trabajo, lo aprecio mucho💕.
Te quedó muy preciosa esta idea Yage, me encanta💕