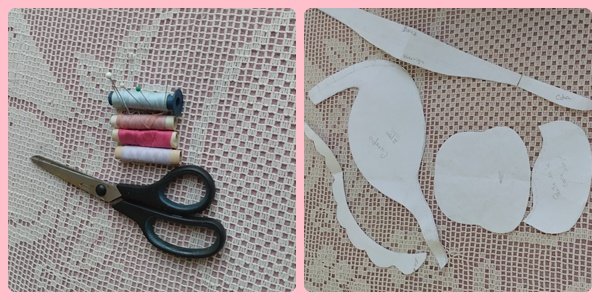
Vamos con la lista de materiales:
- Tela de peluche
- Manta polar
- Tela color beige
- Tijera
- Lápiz
- Alfileres
- Hilos
- Palo de altura
- Patrones
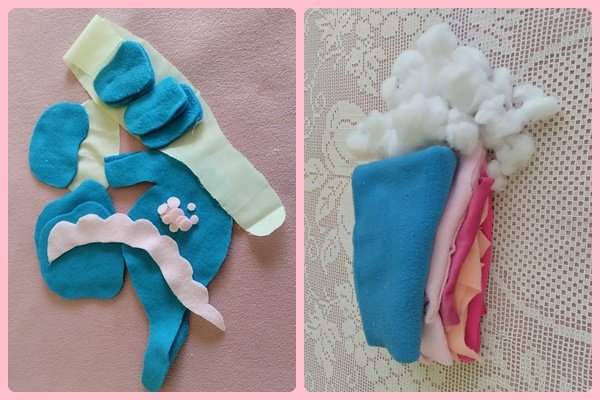
- Guata
- Fieltro
- Cinta
- Adornos
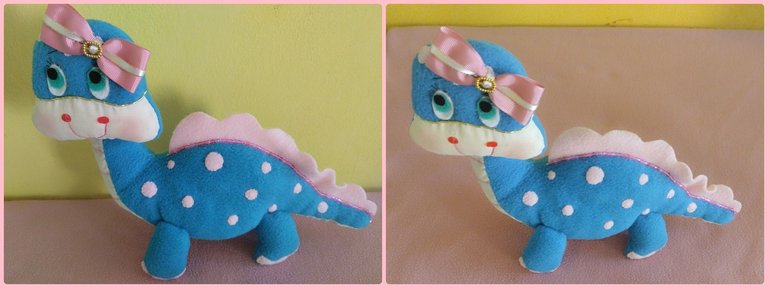
Hello, hello, dear friends. I am pleased to be with you again. This time, I am going to show you the procedure of a stuffed animal in the form of a baby dragon. These animals are mythological beings and children are fascinated by them. So, I made this special gift for my granddaughter and although it took me more work than expected, I am happy with the result, I know she will love it. Her room will look beautiful, as she will have a stuffed animal to decorate it.
Let's get to the list of materials:
- Plush fabric
- Polar blanket
- Beige fabric
- Scissors
- Pencil
- Pins
- Threads
- Height stick
- Patterns
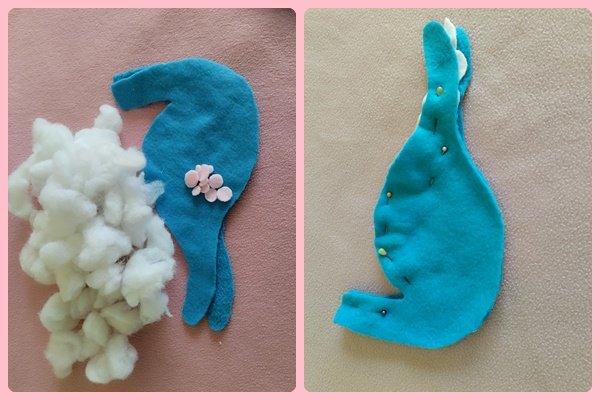
- Wadding
- Felt
- Ribbon
- Ornaments
Procedimiento:
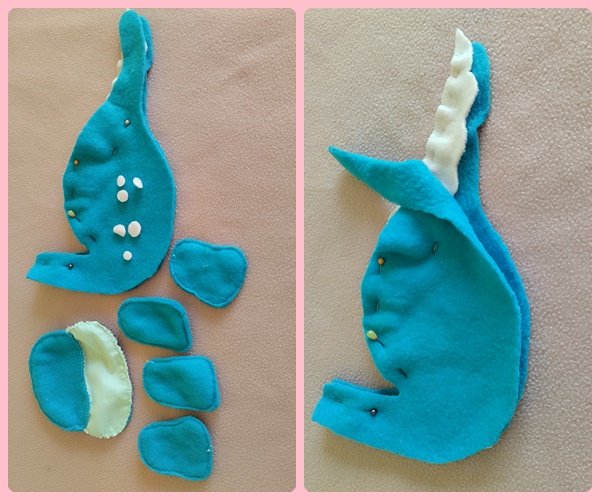
Para este diseño, tomé una imagen referencial de internet y la modifiqué a mi gusto para sacar los patrones. Posteriormente, marcamos las piezas, cortamos dos cuerpos, dos crestas, una barriga, una cabeza, una pieza trasera completa, una parte de la frente y la parte de la barbilla y en las patas, cuatro piezas delanteras y cuatro piezas traseras.
Después de tener todas las piezas cortadas, empezaremos armar nuestro dragón bebé. Comencemos por la cresta, colocamos las dos piezas derecho con derecho y cosemos por la parte del diseño, dejando la parte de abajo sin coser, luego, se le da unos piquetes con la tijera por toda la cresta y volteamos, ayudándonos con un palito de altura o una tijera para sacar bien la forma.
Procedure:
For this design, I took a reference image from the internet and modified it to my liking to draw the patterns. Afterwards, we marked the pieces, cut two bodies, two crests, a belly, a head, a complete back piece, a part of the forehead and the part of the chin and for the legs, four front pieces and four back pieces.
After we have all the pieces cut, we will start assembling our baby dragon. Let's start with the crest, we place the two pieces right side together and sew along the design part, leaving the bottom part unsewn, then, with the scissors, we will make a few picks along the crest and flip it over, helping us with a height stick or a scissors to get the shape out well.
Posteriormente, tomamos las dos piezas del cuerpo, se pone una al derecho y fijamos la cresta con alfileres para colocar la otra parte y punteamos con costura recta desde el cuello hasta la cola, revisando que la cresta esté bien sujeta, finalmente, retiramos los alfileres.
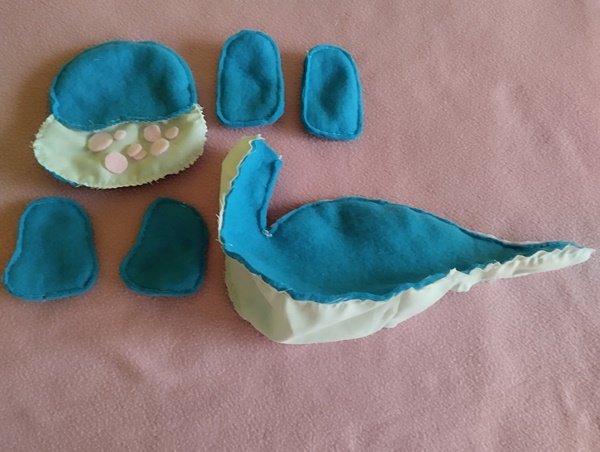
Ahora seguimos con la barriga, esta parte la cosemos al cuerpo con costura recta. Lo podemos hacer de dos formas: la cosemos por dentro y, luego, volteamos o coser por fuera y así la orilla quedaría como un adorno. Así ya tendríamos lista la cresta y la barriga.
Armamos la cabeza, dividida en tres partes. Las dos piezas delanteras las unimos con costura recta. Seguidamente, cosemos a la pieza trasera por el alrededor, luego, le hacemos con la ayuda de la tijera un pequeño orificio por la parte trasera baja y así volteamos la pieza.
Afterwards, we take the two pieces of the body, we put one right side up and fix the crest with pins to place the other part and we stitch with straight stitching from the neck to the tail, checking that the crest is well attached, finally, we remove the pins.
Now we continue with the belly, this part we sew it to the body with a straight seam. We can do it in two ways: we sew it on the inside and then we flip it over or sew it on the outside, so the edge will be like an ornament. This way we would have the crest and the belly ready.
We assemble the head, divided into three parts. The two front pieces are joined with a straight seam. Next, we sew around the back piece, then, with the help of the scissors, we make a small hole in the lower back part and turn the piece over.
Por último, armaremos las patas, encaramos las piezas y cosemos con costura, haciéndole un orificio para voltear. Ya con todas las piezas cosidas empezamos a rellenar con guata y cosemos el orificio.
Ya con nuestro cuerpo del dragón listo, empezamos a coser la cabeza dándole varias puntadas para sujetarla bien y pegamos los ojos, la boca y también unimos las patas. Estos dragones tienen unos adorables y grandes ojos, lo podemos decorar a nuestro gusto.
Finally, we will assemble the legs, face the pieces and sew them together, making a hole to turn them over. Once all the pieces are sewn, we start stuffing with wadding and sew the hole.
Once our dragon body is ready, we start sewing the head giving it several stitches to hold it well and we glue the eyes, the mouth and we also join the legs. These dragons have adorable big eyes, we can decorate them as we like.
Este peluche es suave y tierno, ideal para un regalo. Los niños pueden abrazarlo y jugar con él, acurrucándose en las noches. Además, es fácil de llevar, pues lo hice de un tamaño considerable. Por otra parte, si se ensucia, podemos limpiarlo suavemente con un poco de agua, dejarlo secar al sol y seguirá siendo el mismo hermoso peluche.
De esta forma, concluyo este proyecto, espero que les haya gustado. Hasta una próxima oportunidad.
This plush toy is soft and cuddly, ideal for a gift. Children can hug it and play with it, cuddling at night. In addition, it is easy to carry, as I made it of a considerable size. On the other hand, if it gets dirty, we can gently clean it with a little water, let it dry in the sun and it will still be the same beautiful stuffed animal.
This way, I conclude this project, I hope you liked it. See you next time.
Las fotos son de mi galería.
Traducido con DeepL.
The photos are from my gallery.
Translated with DeepL.
Gracias 😊
That is a cute baby dragon. Perfect for gifting kids
Gracias 😊 por el lindo comentario. Saludos.
Muchas gracias por el apoyo, lo valoro mucho 🙏😊
Congratulations @yesenia.romero! You have completed the following achievement on the Hive blockchain And have been rewarded with New badge(s)
Your next target is to reach 2750 upvotes.
You can view your badges on your board and compare yourself to others in the Ranking
If you no longer want to receive notifications, reply to this comment with the word
STOPCheck out our last posts:
Gracias por la información 😃
¡Eso es perfecto @yesenia.romero! ¡Eres increíble en Hive! ¡No te detengas ahora, logra esa nueva meta!
Por cierto, también necesitamos tu ayuda. ¿Podemos pedirle que apoye nuestra propuesta para que nuestro equipo pueda continuar con su trabajo?
Todo lo que necesita hacer es hacer clic en el botón "soporte" en esta página: https://peakd.com/proposals/248.
Gracias!
Quedó bello, tiene un aspecto muy tierno con ese lacito en la cabeza, los ojitos y la boquita. Hermosa tu manualidad. Saludos