Saludos queridos amigos, espero se encuentren de maravilla! Yo estoy muy bien y hoy quiero compartir con ustedes un tutorial para hacer unas espectaculares espadas de papel mediante la técnica de Origami, este tutorial lo encontré en un video a traves de Facebook, obviamente yo quería dar un toque personalizado a las que realizarían para mi, y enumerar por supuesto el paso a paso, espero me acompañen y sea de su agrado.
Greetings dear friends, I hope you are doing great! I am very well and today I want to share with you a tutorial to make some spectacular paper swords using the Origami technique, I found this tutorial in a video through Facebook, obviously I wanted to give a personalized touch to the ones that would be made for me, and of course list the step by step, I hope you join me and I hope you like it.
MATERIALS:
- White paper
- Colored paper
- Scissors
- Ruler
- Pencil
- Glue
MATERIALES:
- Papel blanco
- Papel de colores
- Tijera
- Regla
- Lápiz
- Pega

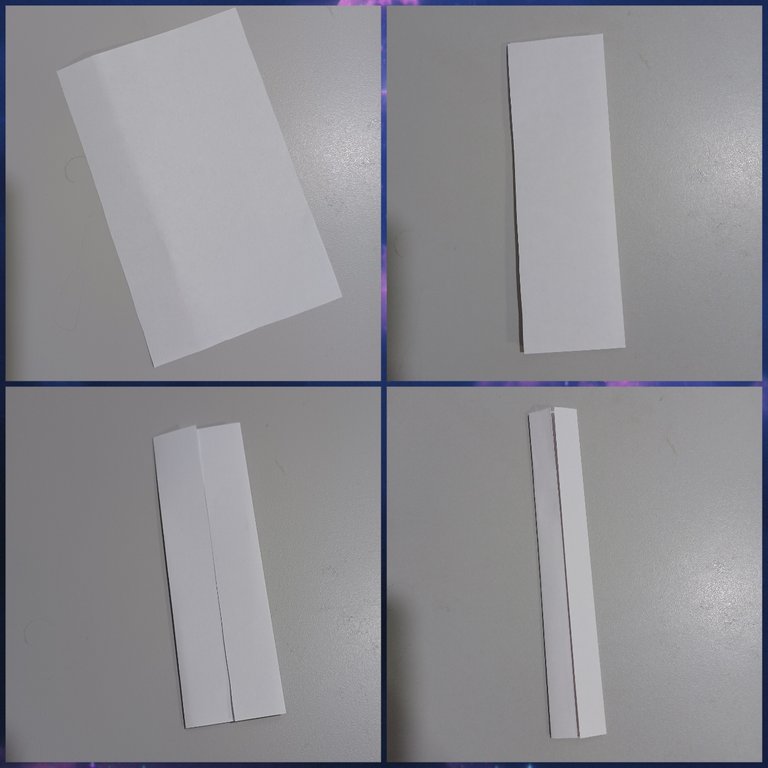
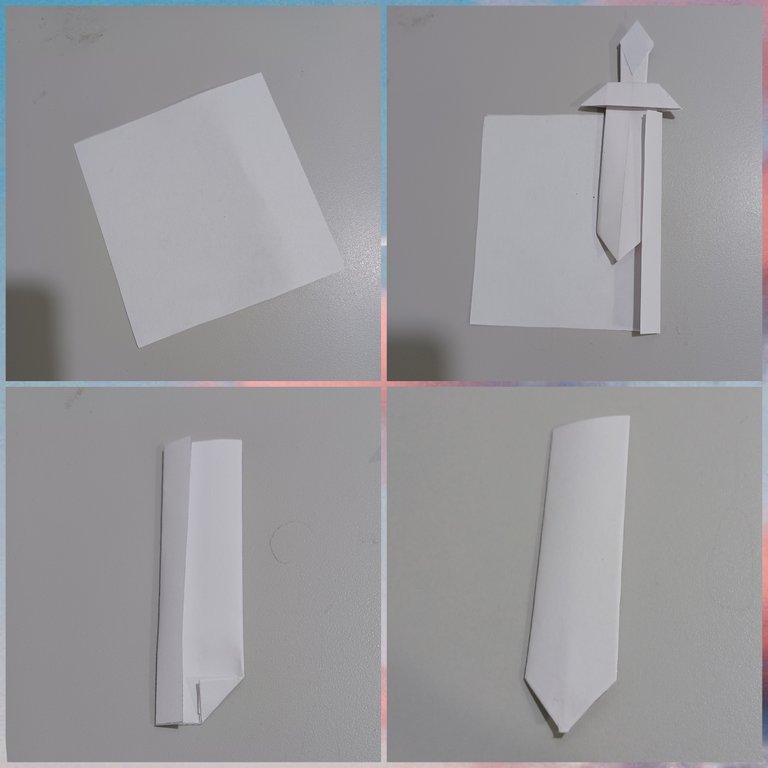
Lo primero que hice fue recortar un rectángulo de papel, para una medida final de 11cm aproximadamente tomé un trozo de papel de 8x13cm, seguidamente se dobla a la mitad por el lado largo del papel, pero solo para delimitar el medio, se abre nuevamente y esta vez se llevan ambos lados al medio del papel, y se repite una vez más.
The first thing I did was to cut out a rectangle of paper, for a final measure of approximately 11cm I took a piece of paper of 8x13cm, then folded it in half on the long side of the paper, but only to delimit the middle, open it again and this time take both sides to the middle of the paper, and repeat once more.
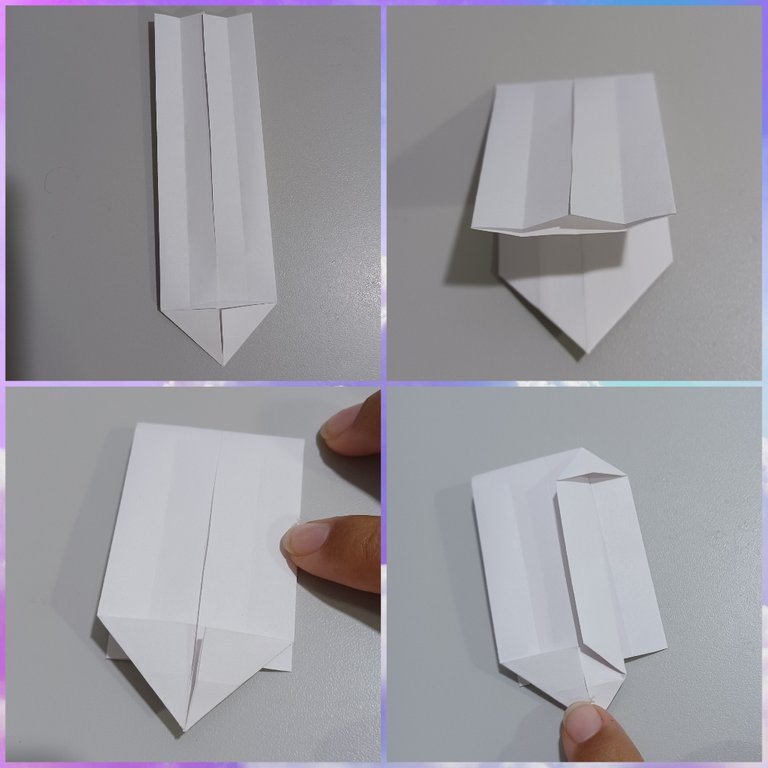
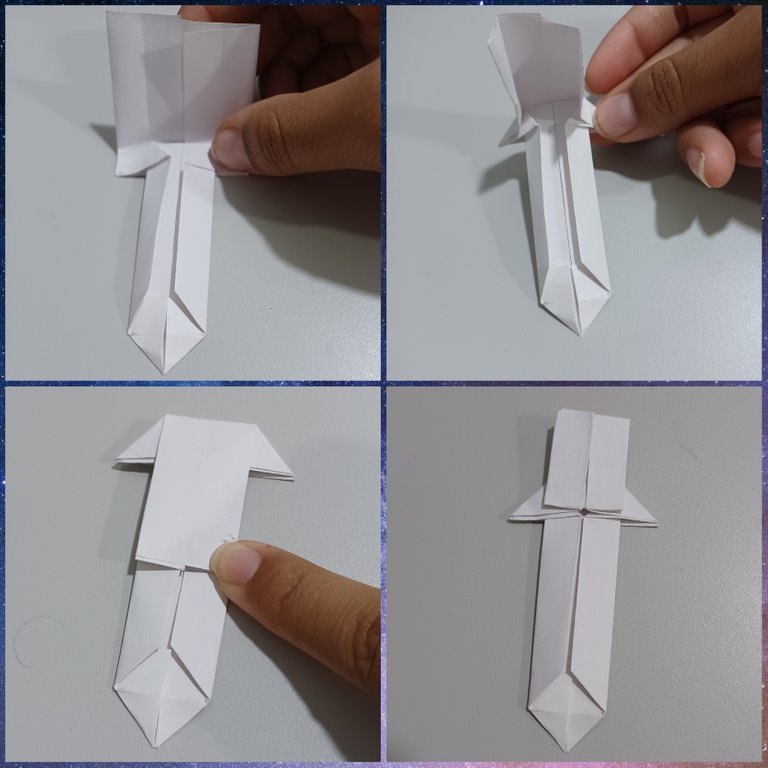
Luego se desdobla la última parte, y esta vez de doblan las esquinas de uno de los lados del papel, hacia el lado donde se ve el papel doblado, luego se gira el papel y se dobla casi a la mitad, yo lo hice hasta donde comienza el doblez de las esquinas.
Se gira nuevamente el papel, y esta vez se vuelve a doblar hacia adentro por el doblez que habiamos hecho previamente, surgiendo esta vez dos pequeños dobleces en forma triangular en la parte superior.
Then unfold the last part, and this time fold the corners of one of the sides of the paper, towards the side where you see the folded paper, then turn the paper and fold it almost in half, I did it up to where the fold of the corners begins.
The paper is turned again, and this time it is folded inwards again by the fold that we had previously made, this time two small triangular folds appear at the top.
Se repite en ambos lado del papel y luego se gira nuevamente el papel, esta vez para doblar hacia arriba la parte que habíamos doblado en el paso anterior. En este punto ya tenemos la hoja de la espada y solo resta la empuñadura.
Repeat on both sides of the paper and then turn the paper again, this time to fold up the part we had folded in the previous step. At this point we have the blade of the sword and only the hilt remains.
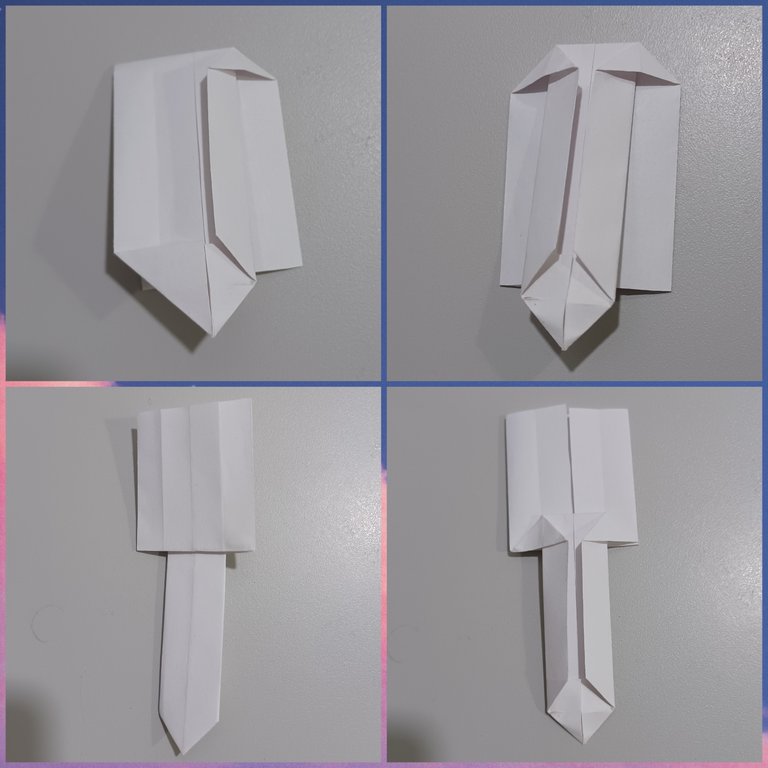
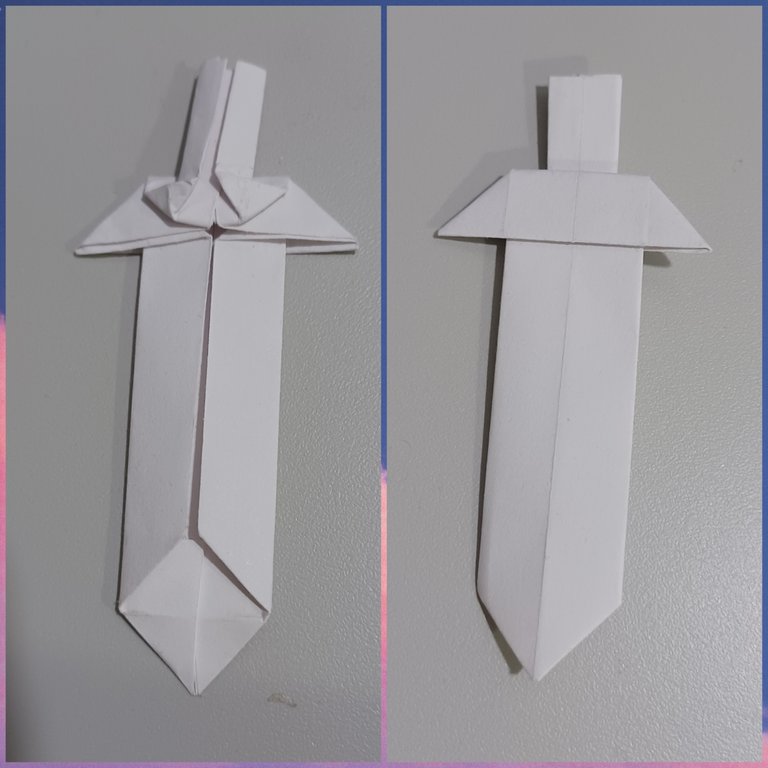
Para hacer la empuñadura situamos el papel con el lado de los dobleces hacia el frente, y doblamos siguiendo la forma, los dobleces pervios nos delimitan un poco donde se deben repetir, hasta que el papel de ajuste a la forma. Luego restará una pestaña que doblaremos hacia arriba, para hacer un nuevo doblez hacia adentro y replegamos esta vez unos rectángulos más pequeños donde el papel se junta como en pasos anteriores.
To make the handle we place the paper with the side of the folds to the front, and fold following the shape, the pervious folds delimit us a little where they should be repeated, until the paper fits the shape. Then there will be a flap that we will fold upwards, to make a new fold inwards and we fold this time some smaller rectangles where the paper meets as in previous steps.
Y asi luce la espada por el derecho y el revés, yo coloque un poco de pega para reforzar la forma, pero realmente se sostiene muy bien.
And this is what the sword looks like on the right and back, I put some glue to reinforce the shape, but it really holds very well.
Pero esto no termina aca, restaba hacer la funda de las espada, para ello tome un trozo de papel de 8x8cm y comence a envolver la hoja de la espada, luego doblez las esquinas inferiores hacia adentro, para darla la forma de vaina y recorte el exceso de papel para que se ajustará al largo de la espada.
But this does not end here, it remained to make the sheath of the sword, for this I took a piece of paper 8x8cm and began to wrap the blade of the sword, then fold the bottom corners inward, to give it the shape of the scabbard and trim the excess paper to fit the length of the sword.
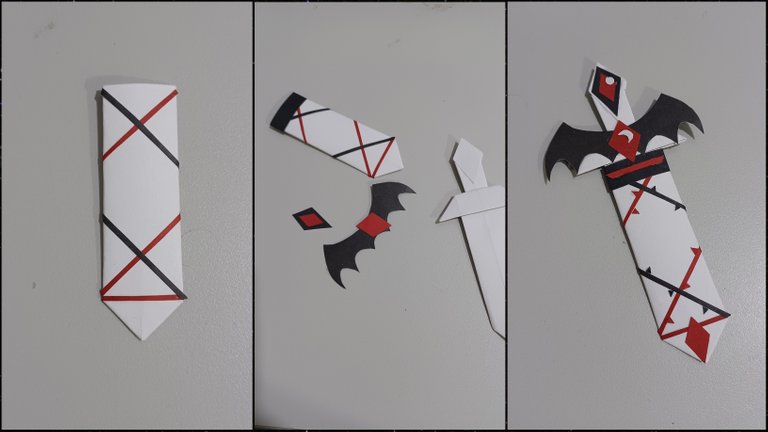
Pero como mencioné al principio quería personalizar un poco mis espadas, asi que tomé papeles de colores y realicé dos bonitos diseños, una fue una espada mágica en color rosa, azul y amarillo, con unas bonitas alas de angel, lo que me hace pensar que es la espada de un tipo de ser celestial; para la segunda recorte unas alas de murciélago en color negro y algunos rombos rojos, en las tiras decorativas coloque unas espinas recortadas del mismo papel, la cual seria para un ser opuesto a un ángel.
But as I mentioned at the beginning I wanted to personalize my swords a little, so I took some colored paper and made two beautiful designs, one was a magic sword in pink, blue and yellow, with beautiful angel wings, which makes me think that it is the sword of a type of celestial being; for the second one I cut some bat wings in black and some red diamonds, in the decorative strips I placed some thorns cut out of the same paper, which would be for a being opposite to an angel.
Es un tutorial que quería repetir hace mucho tiempo y habia pensado en que qu6eria hacer la personalización en el diseño de cada una, es muy sencillo y divertido, quiero hacer un par más para hacer una espada tematica de alguna otra criatura mágica.
It is a tutorial that I wanted to repeat a long time ago and I had thought that I would like to do the customization in the design of each one, it is very simple and fun, I want to make a couple more to make a sword theme of some other magical creature.


Espero que este tutorial les sea parecido útil, muchas gracias por leer, los espero en un proximo post!
I hope you found this tutorial useful, thank you very much for reading, I hope to see you in a future post!

This post has been manually curated by @bhattg from Indiaunited community. Join us on our Discord Server.
Do you know that you can earn a passive income by delegating to @indiaunited. We share more than 100 % of the curation rewards with the delegators in the form of IUC tokens. HP delegators and IUC token holders also get upto 20% additional vote weight.
Here are some handy links for delegations: 100HP, 250HP, 500HP, 1000HP.
100% of the rewards from this comment goes to the curator for their manual curation efforts. Please encourage the curator @bhattg by upvoting this comment and support the community by voting the posts made by @indiaunited.
Thank you! 😊🥰
Esas espadas son una belleza , mi favorita es la rojo con negro 😍
Sabía que esa te gustaría! Muchas gracias por tu comentario ✨️
¡Son realmente adorables! 😍 Me hicieron recordar que cuando era niña jugaba mucho con muñecos hecho de papel que yo misma dibujaba y metía a los personajes en muchas aventuras, me hubiese gustado tener unas espadas como esas, hubieran hecho de la experiencia de juego completamente épica ja ja Me encantó tu post, como siempre amiga 😘💚
Muchas gracias Sue! Siii, admito que yo jugué con las espaditas, probablemente haga una versión digital de ellas 🥰
Excelente amiga especialmente para niños para relajarse muy buena creatividad del origami feliz día.
Si, es muy buena para niños porque es sencilla y no tiene pasos muy complicados
Pues asi es amiga excelente para los niños feliz noche.
Wooooow!
Que cuchiitura estas espaditas, gracias por compartir excelente tutorial mi Yetsimar 💗