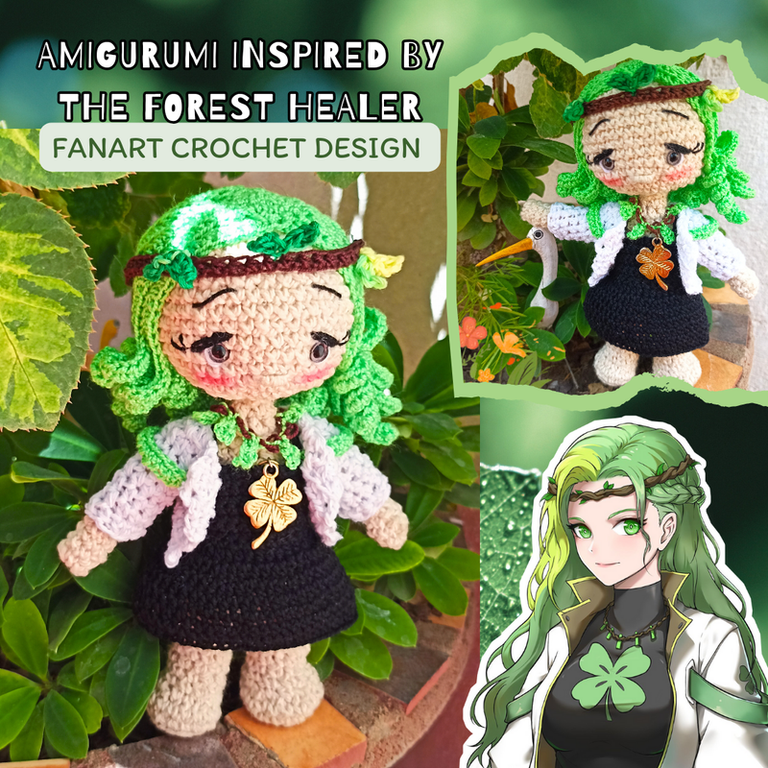

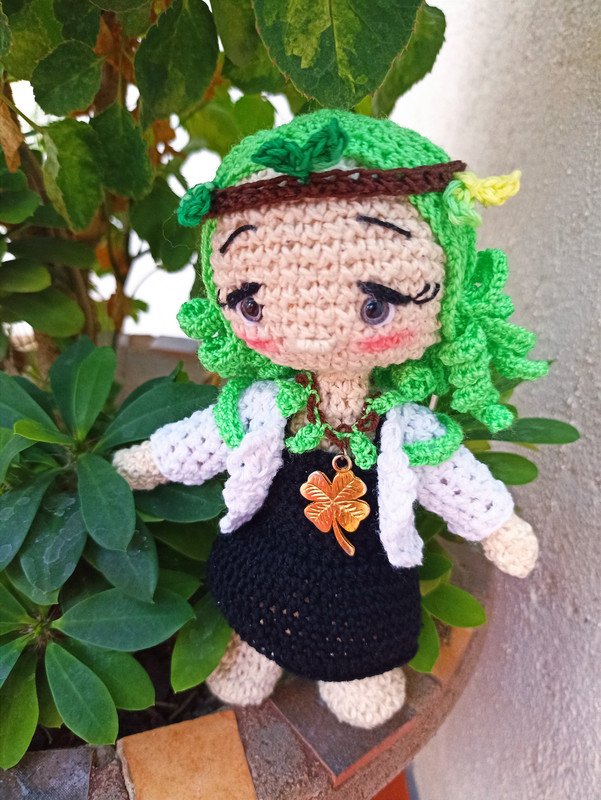
Hello friends of Hive ♥️ I welcome to my blog all of you who visit me on this occasion to share with you a new project I made for the Holozing community inspired by one of their characters, the forest healer, in its amigurumi crochet version. I have to confess that this was my first figure of this kind, but when I looked at it I couldn't deny trying to make it, although the original design is about a princess and I together with the help of my mom had to transform it to the game design, like the hair color, clothes and accessories. It took me about 3 days to finish it, but I think the time invested was worth it because I was very satisfied with the result. Now I will show you the whole creative process of this crocheted design inspired by the healer of the forest. 😊🍀

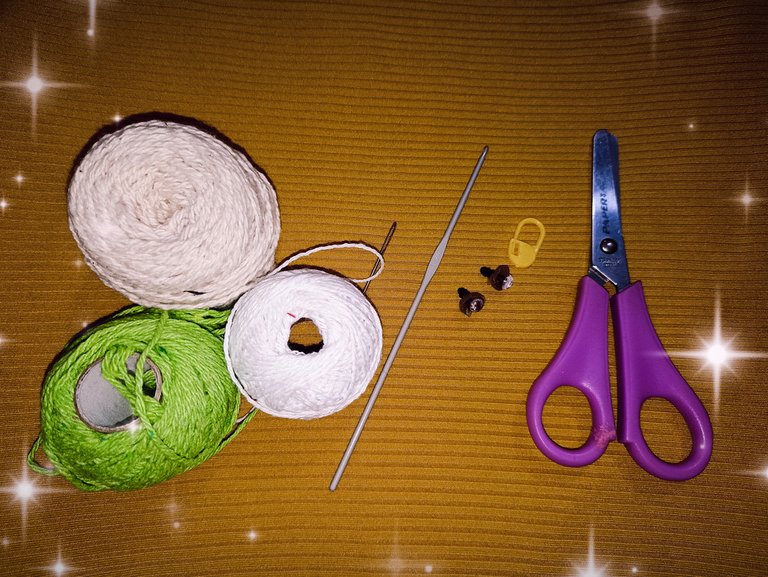
🍀For wrist (Body):🍀
- Skin colored yarn (light tone), white, black, green.
- Crochet needle (2mm)
- Brooch eyes (5mm)
- Pink makeup shadow (blush)
- Cotton or synthetic stuffing
- Scissors
- Wool needle
- Safety clasp.
🍀For clothing and accessories:🍀
- White, green, black, brown yarn
- Crochet needle (2 mm)
- Scissors

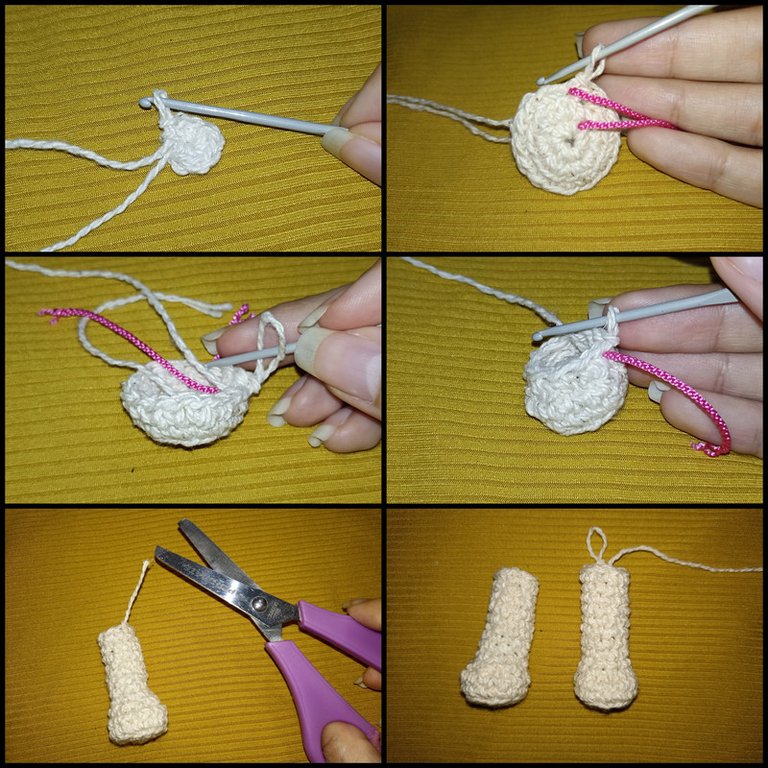
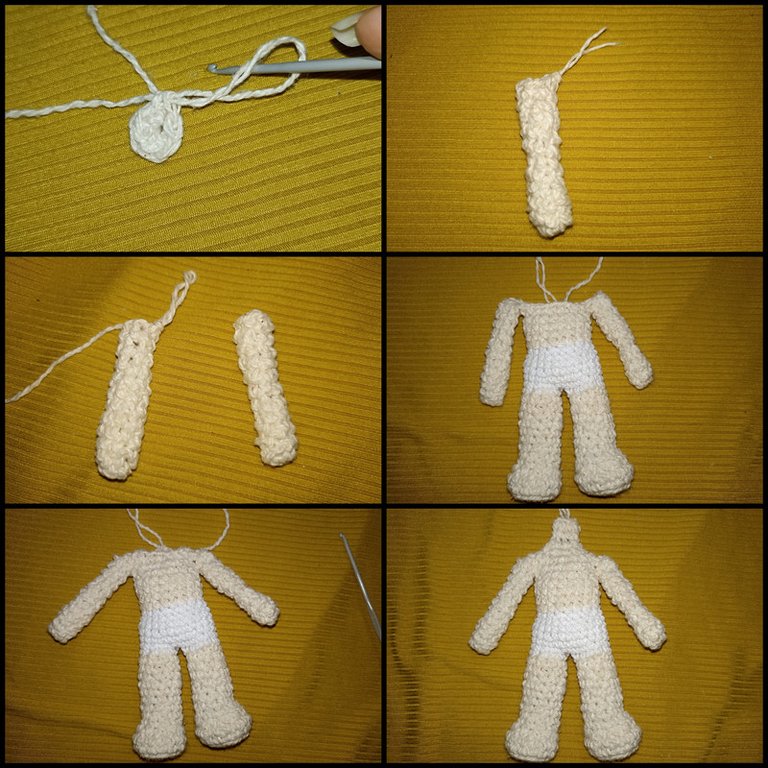
To start with the body of this doll, I will begin by knitting the legs, for this I will make a magic ring of 8 single crochet stitches, close it, and then I will make 8 increases (AUM) to have a total of 16 PB. For the third round I am going to have the same 16 PB for the back strand of the chain. In the fourth round I continue with the same 16 PB and in round 5 I will start with 2 PB, 6 decreases (DISM), 2 PB, for a total of 10 PB. Now from round 6 to round 12 I continue with the 10 PB, this will be the length of the leg. Then we cut the yarn, hide the excess and repeat the whole process to get the two legs.
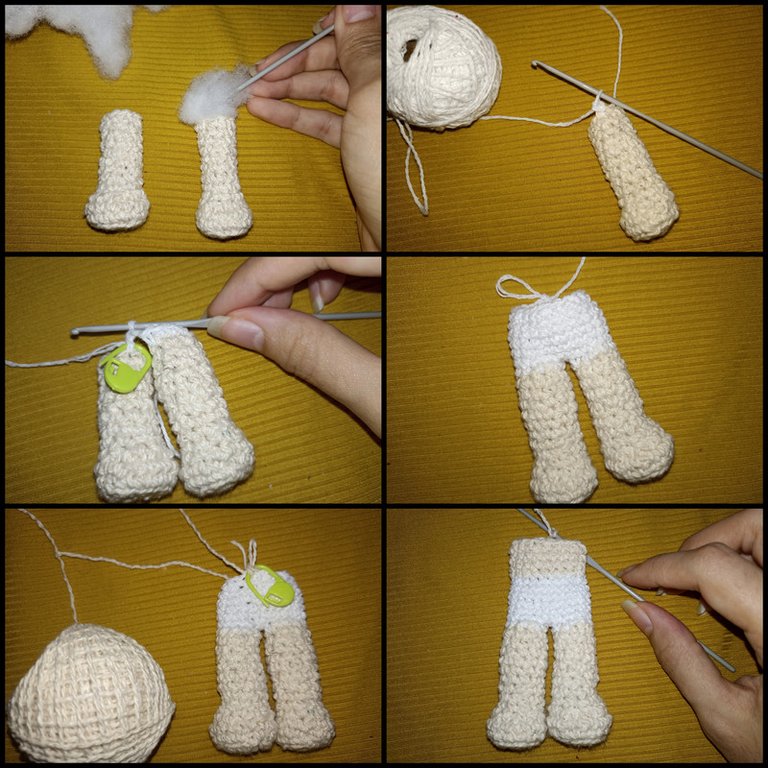
At the end of this step I will stuff both legs. Now we join with another color of yarn, in this case I will use white to simulate and distinguish the doll's underwear. To do this I am going to knit starting with the right leg 4 PB, then 2 chains that will be the space of the separation between each leg, then I will continue with 10 PB, 2PB, 10PB and 2 PB by the chain that we made at the beginning until completing the round. Now from that round until the 18th round we are going to knit 24 PB in total.
For the last round of what would be the underwear we are going to make decreases for it I am going to knit 2 PB, 1 DISM, and repeat 6 times in the round to have a total of 18 PB. Then follows the color change to the skin, from there we continue from that new round until the 24th round keeping the same 18 PB. In this step we can fill in what is forming of body.
For the arms it is very easy, for this we are going to knit a magic ring of 6 PB, we close it and from round 2 to 11 we are going to knit and maintain the same stitches, that will be the length of our arm. Important point in this step is that the arms are not going to be filled. We are going to repeat this until we have the two pieces.
We go back to the body, and we are going to locate the position of the arms, and starting from the middle of the back of the body we are going to knit 5 PB, then 6 PB, 9 PB, 6 PB and 4 PB, for a total of 30 stitches. From there we will knit 3 PB, 1 DISM, and repeat 6 times in the round, then 2 PB, 1 DISM, finish the round, 1 PB, 1 DISM. We end round 29 with 2 PB, 1 DISM and repeat 3 times in the round for a total of 9 stitches. Finally from round 30 to 31 we keep the same stitches and fill in well since the neck part will be the support of the head so it will not fall off and tilt to one side.
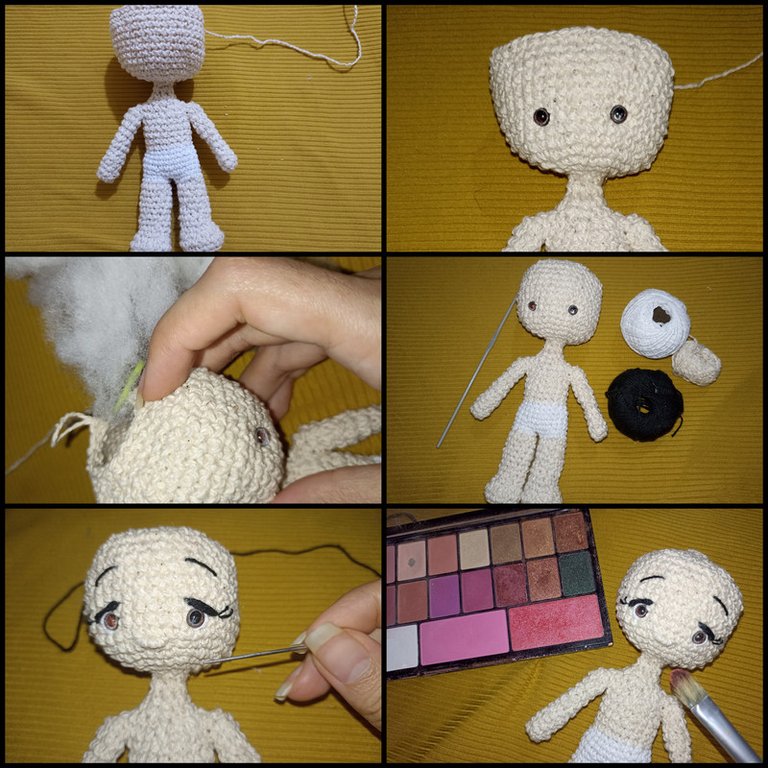
We continue from the previous point to make the head, for this we will start round 32 with 9 AUM, in round 33 we will start with 1 PB, 1 AUM and repeat 9 times in that round. Then for round 34 we will make 2 PB, 1 AUM and repeat again 9 times in the round, in round 35 we will make 4 PB, 1 AUM and repeat 6 times, and then the 6 PB we have left over from the round. Finally from round 36 to 44 we will do 42 PB.
Up to here we leave it to place the eyes, leaving a separation between them of 7 PB. We put in enough stuffing and continue now with the decreases. For the next round we will make 5 PB, 1 DISM, repeat 6 times in the round. For the 46th round we will make 4 PB, 1 DISM, repeat 6 times. For round 47 we will do 3 PB, 1 DISM, repeat 6 times. In round 48 we will do 2 PB, 1 DISM, and repeat 6 times. Finally we will do 1 PB, 1 DISM and repeat 6 times, and to close we complete with 6 DISM.
This next part was one of my favorites because we will do embroidery and makeup work, so with black and white thread we will make the outline of the eyes, eyelashes and eyebrows, we will also make the nose and finally we will add some pink shadow on the cheeks to simulate blush and so we will make our doll much more flirtatious.
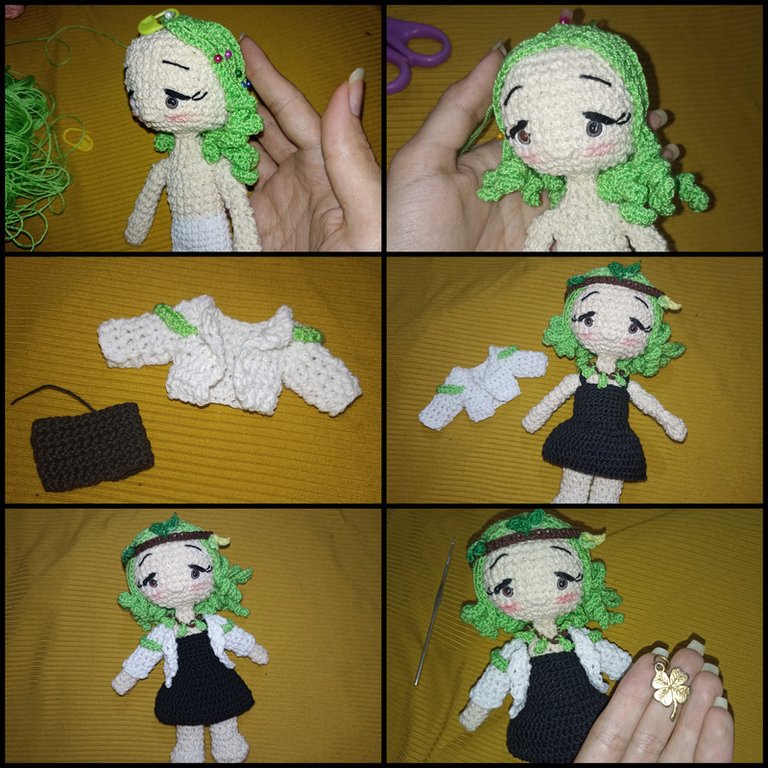
For the hair I decided to use green yarn because of the original hair of the character of the healer of the forest, and to start making it we will make in the first round a magic ring of 6 PB, then in round 2 we will make 6 AUM, and already in round 3 we will make 1 PB, 1 AUM and repeat 6 times in the round until we get 18 stitches in total. From there we knit 1 PB and then we will knit 35 chains, we go back through the third chain from the needle and knit 33 half purl stitches (MPA), we finish with a slip stitch through the first PB and in the next stitch we will knit a new PB, from there we repeat all the above until we complete the 18 stitches.
Once we have the hair we are going to place it on the body and fasten it according to our preference with the help of pins and then we sew it with the same thread.
For the clothes try to look for a model as close to the original design, for this I started with a white jacket that I made with 20 chains, then on these I weave 2 MPA, 1 AUM and Rep 6 times in the round. Then we continue in the next round with 3 MPA, 1AUM and Rep 6 times. We continue round 3 with 4 MPA, 1 AUM and Rep 6 times. For round 4 we will do 6 MPA, skip 7 MPA, do 10 MPA, and skip 7 MPA again. Finally we finish from the next round to number 7 22 MPA. For the sleeves we position ourselves in the underarm area and we will do 3 MPA and in the rest we will do 7 MPA until we complete the round of 10 stitches, from there until round 6 we knit the same amount of stitches as this will be the length of the sleeve.
For the dress it was quite improvised, what I did was to make a kind of top in black from the waist to the neckline, making loops of PB. Then for the skirt I positioned myself in the last stitch and started making increases, 1 MPA, 1AUM, and repeat until I completed the row. Then 4 MPA, 1 AUM, then 5 MPA, 1 AUM and from there I continue the rows without increases until I find the desired length.
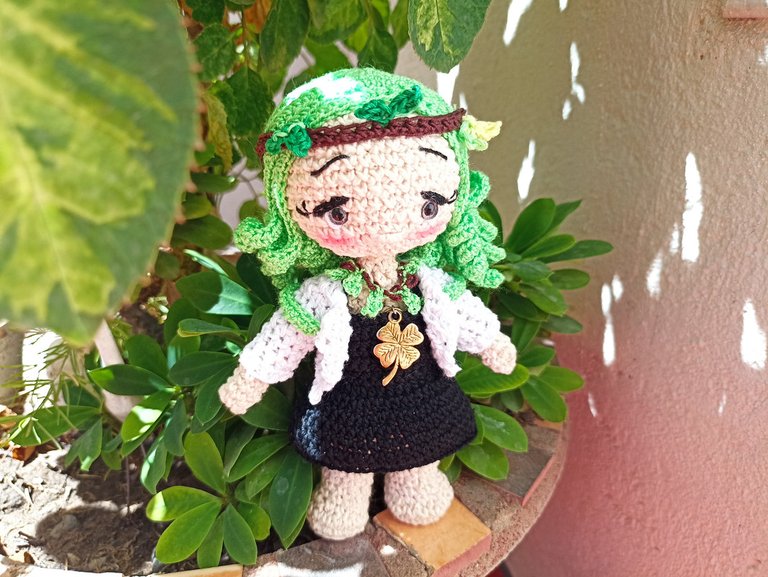
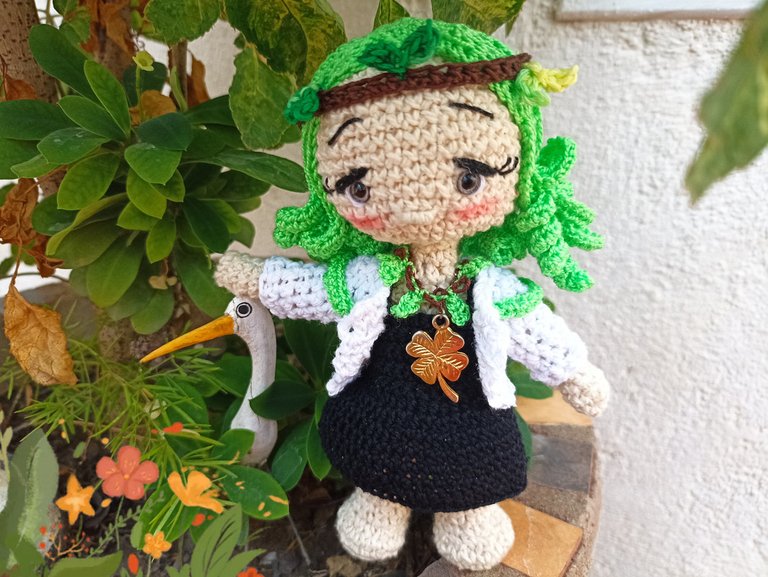
To finish, add some details to make her as close as possible to the original, such as the headband with leaves on her head, the details on the jacket, a necklace with crystals and a pendant charm in the center of her dress. And that's it, all that's left is to dress her up and arrange her for the photo and place her as an ornament...or maybe as a gift 😊.
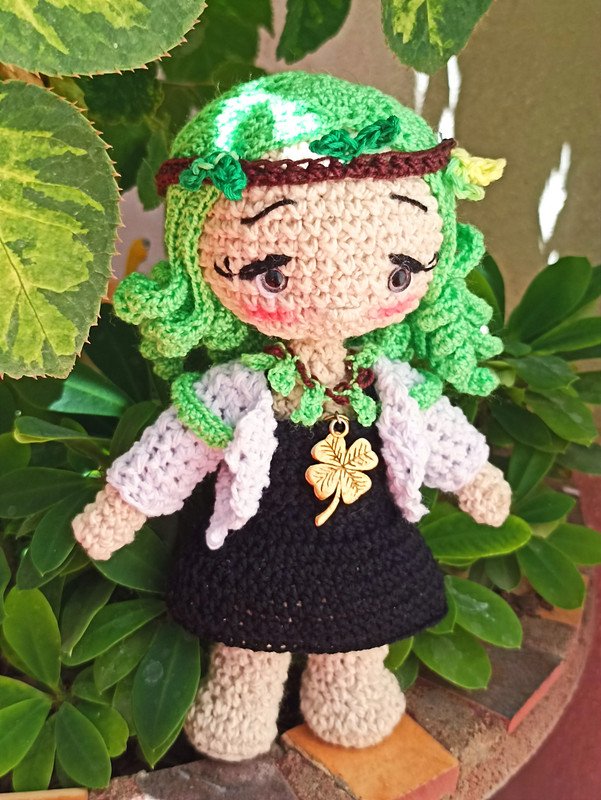
And this is how our finished project would look like...My first amigurumi!..a very nice crocheted design inspired by the Holozing forest healer...I hope you liked my tutorial showing you the whole creative process so that if you want you can make one yourself too, with love I say goodbye and see you next time!💕
All content is my own and images are my property
Camera: Redmi note 10s
I use an LED light ring as a base for my phone to take pictures of myself
Editing and Separator
App PicMonkey - App Picsart - App Canva
Translator
DeepL


Wao!! This looks so lovely and beautiful. You must have dedicated your time to creating this.
Nice crocheting of the female forest healer❤️.
The colors and combinations are really amazing
Simply beautiful
https://reddit.com/r/holozing/comments/1adtxsq/amigurumi_inspired_by_the_forest_healer_fanart/
The rewards earned on this comment will go directly to the people( @cetb2008 ) sharing the post on Reddit as long as they are registered with @poshtoken. Sign up at https://hiveposh.com.