Wrote in Portuguese and translated to English using GT.
Hi HiveDevs friends!
PixBee Bot - Not just another HIVE Bot - part1
PixBee Bot - Not just another HIVE Bot - part2
PixBee Bot - Not just another HIVE Bot - part3
In this post I will show how I set up a frontend to show relevant system information to PixBee users.
Choosing Templates
To provide an easy way to check if Pixbee is working and if PIX and HBD tokens are available, we decided to create a frontend.
To do this, we chose a dashboard template and customized it with information that would be relevant to users.
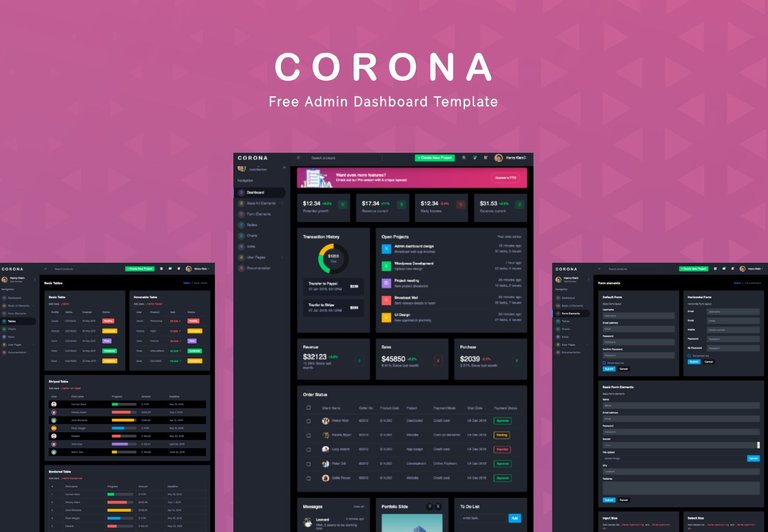
After analyzing several dashboard models and templates, we chose one that was aligned with the visual identity we wanted to give to PixBee.
A bit of Cyberpunk with modernity, that was responsive to work on both desktop and mobile and the chosen one was this template called Corona.
We liked the font formatting options, the buttons with or without icons and the colors, tables and graphs with animations.
In addition to being easy to edit and light to load quickly.
Creation of APIs
After defining what data we would display on the frontend, we started creating some APIs to obtain the information that would be displayed on the home page and some other support APIs for specific calculations.
Updating Data
As we are working on the MVP (Minimum Viable Product), I wanted to do something simple but effective, without depending on more complex frameworks.
In the future, I believe that choosing a more modern framework will be necessary to facilitate updates, but for now...
We thought of a way to "create our own framework" using pure JavaScript, where it would be functional to populate the backend data.
To do this, we standardized the types of variables, which could be text, objects and values, where depending on each type of variable, we would use the properties of the HTML components to insert the data into the correct attributes, such as .value, .innerHtml or .style.
This is what the code looked like to get the ApI data and populate it from time to time on the dashboard:
function getPageData() {
  // a elements list that use InnerHtml property
  const elementsInnerHTMLKeys = [
    "proBanner",
    "OurExchangePer",
    "OurExchangeFee",
    "OurRefundPer",
    "HBDBRLChangeIcon",
    "BTCBRLChangeIcon",
    "BTCUSDChangeIcon",
    "HIVEUSDChangeIcon",
    "HIVEBRLChangeIcon",
    "HBDBRLChangePerc",
    "BTCBRLChangePerc",
    "BTCUSDChangePerc",
    "HIVEUSDChangePerc",
    "HIVEBRLChangePerc",
  ];

  fetch("/apidata")
  .then(response => response.json())
  .then(data => {
    // object to store account balance
    var accBalance = new Object();
    // for each variable received, check if its on inner html list
    // or use value property
    // or check for specific variable name to used it as necessary
    for (const [key, value] of Object.entries(data)) {
      var htmlElement = document.getElementById(key);
      if(htmlElement !== null) {
        if (elementsInnerHTMLKeys.includes(key)) {
          htmlElement.innerHTML = value;
          if(key=="proBanner")
            document.querySelector('#bannerClose').addEventListener('click',function(){closeProBanner();});
        } else if(key=="progressDayFly"){
          htmlElement.style.width = value + "%";
        } else {
          htmlElement.innerText = value;

          if(key==="HivePriceBRL")
            accBalance.hivePriceBRL = value;
          else if(key==="HBDPriceBRL")
            accBalance.hbdPriceBRL = value;
          else if(key==="balanceHbd")
            accBalance.hbd = value;
          else if(key==="balancePix")
            accBalance.pix = value;
          else if(key=="balanceHive")
            accBalance.hive = value;
        }
      }
    }
    setAccountsBalance(accBalance);
  })
}

(function(window, document, undefined) {
  window.onload = init;
  function init(){
    // set an interval to update page. long interval to not consume api and overload server, dont need to be real time (yet)
    setInterval(getPageData, 30*60000);
    getPageData();
  }
})(window, document, undefined);
This way, we found a simple way to add variables to the dashboard, without having to deal with them one by one.
Pages
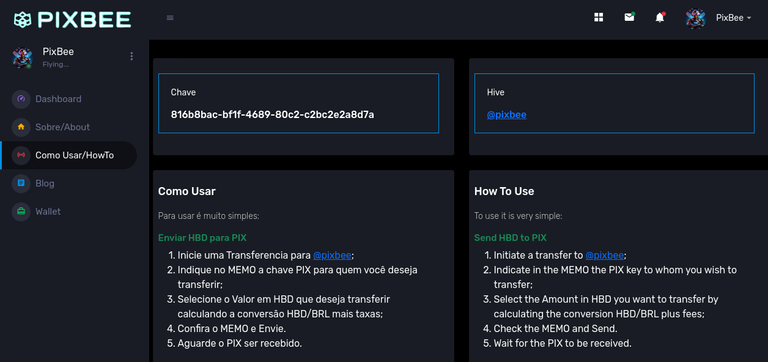
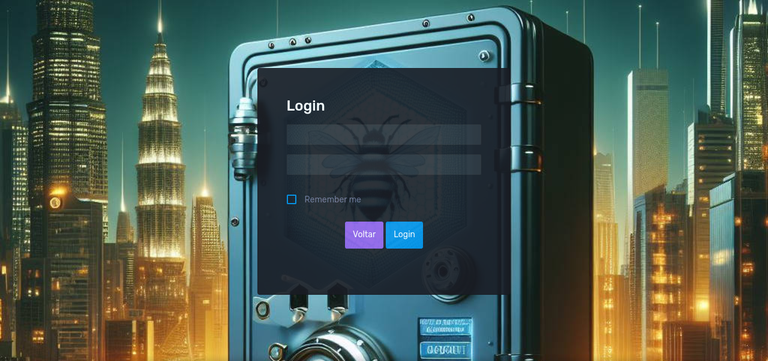
Thinking about a future, where KYC might be necessary, I also decided to create some other pages, such as:
- Login,
- How to use,
- About,
- Settings
With some basic information populated on this page, let's focus on the dashboard. Then we come back to improve each of these other pages.
 |  |  |
Dashboard
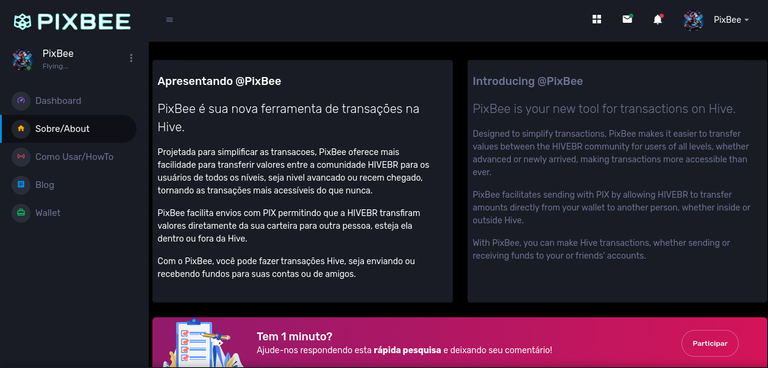
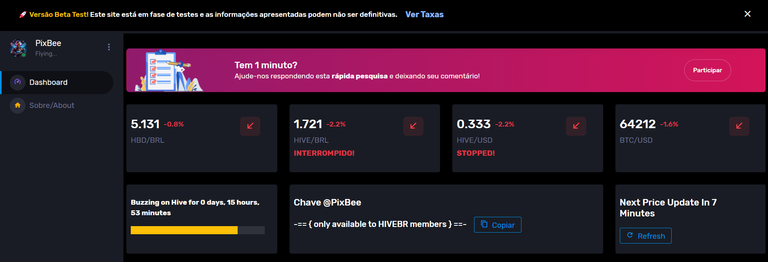
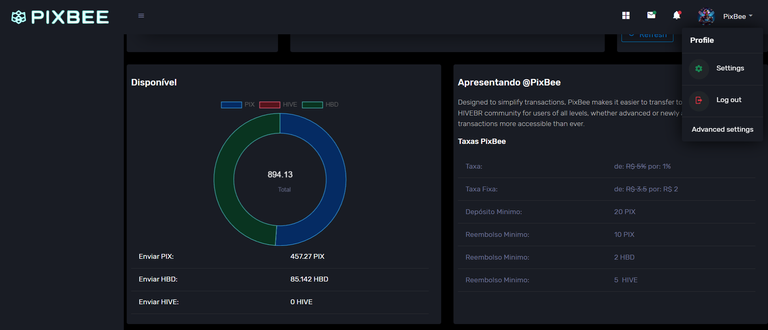
Now, when users access the Pixbee website, it is possible to view various system information.
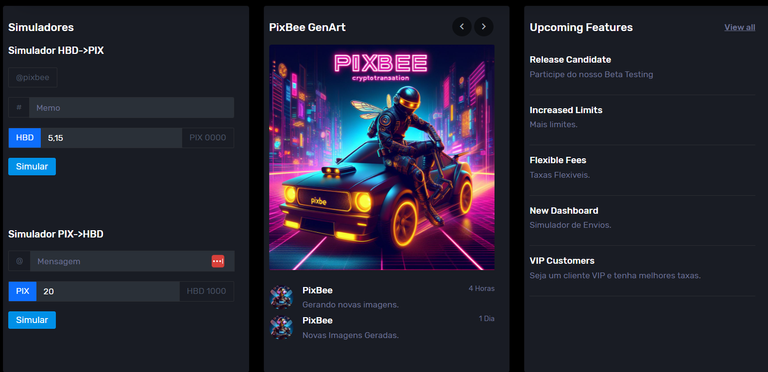
Simulation
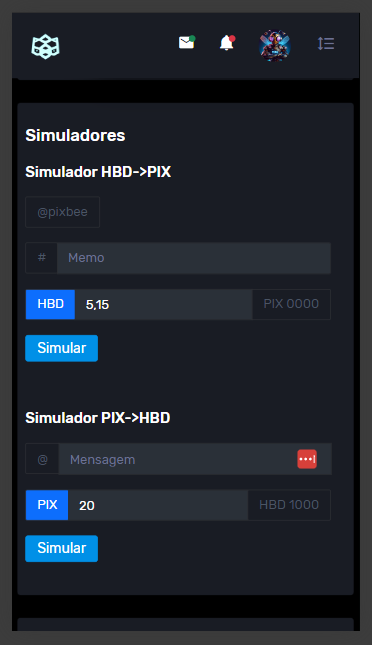
This simulator is a valuable tool for users as it allows them to accurately estimate the amount of tokens they will receive before carrying out a transaction. This helps increase users' trust in the service and ensure a positive experience.
As a next step, I plan to develop a calculator that will allow users to enter how much they want to receive and how much they want to send.
Additionally, I will continue working on updates and improvements for PixBee, always ensuring the best possible experience for users.
Uptime
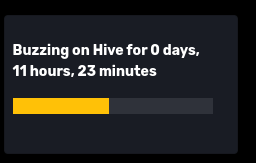
Maybe it's not very relevant, but to bring a certain dynamism, we put the time that PixBee is flying... oops, running..., when PixBee is restarted to receive updates the value will be reset.
Liquidit Pool
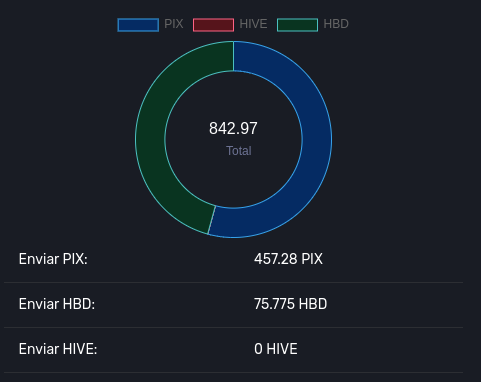
To provide an easy way to check if Pix and HBD tokens are available, we have created a chart to display the amount of each token available. This way, the user will be able to know before sending whether the transaction will be complete.
If there is no amount available, the user will be automatically reimbursed in the case of HBD, and in the case of PIX, they will have the option to be reimbursed, or PixBee's role will be to buy HBD and send it to the specified account.
A process that will still be done manually, but over the course of the project I want to automate with a trading bot and a balance account bot.
And this is what our dashboard looked like:
Real Use Cases
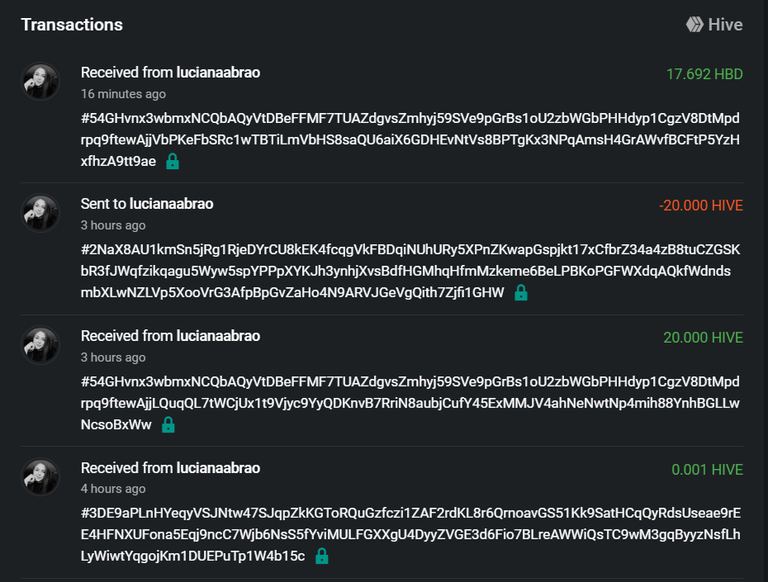
After a series of tests in a test environment, I finally put Pixbee into production in the Beta version and got one more person to test, my friend @lucianaabrao, she made a withdrawal and found the process very easy to follow and managed to make a direct Pix from the Hive wallet!
The process started by sending Hive, which was not available and she received the refund automatically.
Then she converted HIVE to HBD and did PIX successfully.
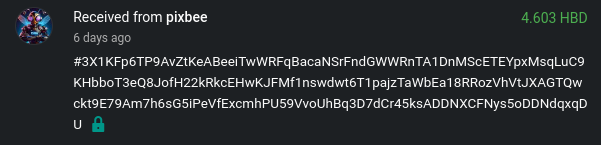
And to test both sides of the process, I made a purchase to ensure that everything is working correctly and guarantee PIX liquidity in the service.
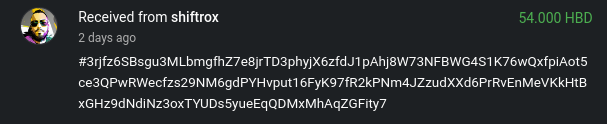
Then it was @shiftrox's turn, who again tested and approved the service.
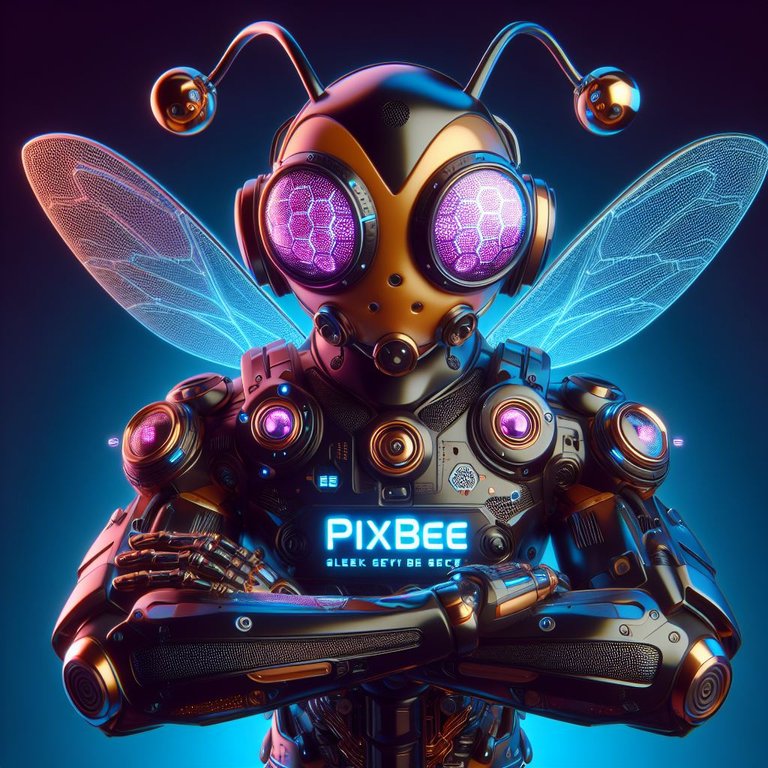
Images and Logo
PixBee's images and logo were made with the help of artificial intelligence, where after several prompts and attempts, we got something we liked.
| Logo | Mini Logo | Avatar |
|---|---|---|
 |  |  |
And did you like it?
https://aphid-glowing-fish.ngrok-free.app/
Versão Brasileira
Olá amigos HiveDevs!
PixBee Bot - Not just another HIVE Bot - part1
PixBee Bot - Not just another HIVE Bot - part1
PixBee Bot - Not just another HIVE Bot - part3
Nesse post vou mostrar como montei um frontend para mostrar informações relevantes do sistema para os usuários PixBee.
Escolhendo Modelos
Para fornecer uma forma fácil de verificar se a Pixbee está funcionando e se há tokens PIX e HBD disponíveis, decidimos criar um frontend.
Para isso, escolhemos um template de dashboard e personalizamos com informações que seriam relevantes para os usuários.
Depois de analisar diversos modelos e templates de dashboard, escolhemos um que estava alinhado com identidade visual que queríamos dar para PixBee.
Um pouco de Cyberpunk com modernidade, que fosse responsivo para funcionar tanto em desktop quanto em mobile e o escolhido foi esse template de nome Corona.
Gostamos das opções de formatação de fonte, dos botoes com ou sem ícones e as cores, tabelas e gráficos com animações.
Alem de ser fácil de editar e leve para carregar rápido.
Criação das APIs
Depois de definir quais dados iriamos exibir no frontend, partimos para a criação de algumas APIs para obter as informações que seriam exibidas na pagina inicial e algumas outras APIs de suporte para cálculos específicos.
Atualizando Dados
Como estamos trabalhando no MVP (Produto Mínimo Viável), queria fazer algo simples mas eficaz, sem depender de frameworks mais complexos.
No futuro, creio que a escolha de um framework mais moderno sera necessário para facilitar os updates, mas por hora...
Pensamos em uma forma de "criar nosso próprio framework" usando JavaScript puro, onde fosse funcional para popular os dados do backend.
Para isso, padronizamos os tipos de variáveis, podendo ser texto, objetos e valores, onde dependendo de cada tipo de variável, iria usar as propriedades dos componentes HTML para inserir os dados nos atributos corretos, como .value, .innerHtml ou .style.
Essa foi assim que ficou o código para pegar os dados da ApI e popular de tempo em tempo no dashboard:
function getPageData() {
  // a elements list that use InnerHtml property
  const elementsInnerHTMLKeys = [
    "proBanner",
    "OurExchangePer",
    "OurExchangeFee",
    "OurRefundPer",
    "HBDBRLChangeIcon",
    "BTCBRLChangeIcon",
    "BTCUSDChangeIcon",
    "HIVEUSDChangeIcon",
    "HIVEBRLChangeIcon",
    "HBDBRLChangePerc",
    "BTCBRLChangePerc",
    "BTCUSDChangePerc",
    "HIVEUSDChangePerc",
    "HIVEBRLChangePerc",
  ];

  fetch("/apidata")
  .then(response => response.json())
  .then(data => {
    // object to store account balance
    var accBalance = new Object();
    // for each variable received, check if its on inner html list
    // or use value property
    // or check for specific variable name to used it as necessary
    for (const [key, value] of Object.entries(data)) {
      var htmlElement = document.getElementById(key);
      if(htmlElement !== null) {
        if (elementsInnerHTMLKeys.includes(key)) {
          htmlElement.innerHTML = value;
          if(key=="proBanner")
            document.querySelector('#bannerClose').addEventListener('click',function(){closeProBanner();});
        } else if(key=="progressDayFly"){
          htmlElement.style.width = value + "%";
        } else {
          htmlElement.innerText = value;

          if(key==="HivePriceBRL")
            accBalance.hivePriceBRL = value;
          else if(key==="HBDPriceBRL")
            accBalance.hbdPriceBRL = value;
          else if(key==="balanceHbd")
            accBalance.hbd = value;
          else if(key==="balancePix")
            accBalance.pix = value;
          else if(key=="balanceHive")
            accBalance.hive = value;
        }
      }
    }
    setAccountsBalance(accBalance);
  })
}

(function(window, document, undefined) {
  window.onload = init;
  function init(){
    // set an interval to update page. long interval to not consume api and overload server, dont need to be real time (yet)
    setInterval(getPageData, 30*60000);
    getPageData();
  }
})(window, document, undefined);
Dessa forma, encontramos uma maneira simples de adicionar variáveis no dashboard, sem ter que tratar uma a uma.
Paginas
Pensando em um futuro, onde talvez um KYC seja necessário, resolvi também criar algumas outras paginas, como:
- Login,
- Como Usar,
- Sobre,
- Configurações
Com algumas informações básicas populadas em casa uma dessa pagina, vamos focar no dashboard. Depois voltamos para melhorar cada uma dessas outras paginas.
| | |
Dashboard
Agora, quando os usuários acessarem o site Pixbee, é possível visualizar diversas informações do sistema.
Simulação
Esse simulador é uma ferramenta valiosa para os usuários, pois lhes permite estimar com precisão a quantidade de tokens que receberão antes de realizar uma transação. Isso ajuda a aumentar a confiança dos usuários no serviço e a garantir uma experiência positiva.
Como próximo passo, planejo desenvolver uma calculadora que permitirá aos usuários informar quanto desejam receber e quanto desejam enviar.
Além disso, continuarei trabalhando em atualizações e melhorias para o PixBee, garantindo sempre a melhor experiência possível para os usuários.
Uptime
Talvez não seja muito relevante, mas para trazer um certo dinamismo, colocamos o tempo que PixBee esta voando... ops, rodando..., quando a PixBee for reiniciada para receber atualizações o valor sera reiniciado.
Liquidit Pool
Para fornecer uma forma fácil de verificar se há tokens Pix e HBD disponíveis, criamos um gráfico para exibir a quantidade de cada token disponível. Dessa forma, o usuário poderá saber antes de enviar se a transação sera completa.
Caso não tenha valor disponível, o usuário sera reembolsado automaticamente em caso de HBD, e em caso de PIX, terá a opção de ser reembolsado, ou a função da PixBee sera de comprar HBD e enviar para a conta especificada.
Um processo que ainda sera feito manualmente, mas que com o tempo do projeto desejo automatizar com um trading bot e com um balance account bot.
E assim ficou nosso dashboard:
Casos Reais de Uso
Após uma série de testes em ambiente de teste, finalmente coloquei a Pixbee em produção na versão Beta e consegui mais uma pessoa pra testar, minha amiga lucianaabrao, ela fez um saque e achou o processo bem fácil de seguir e conseguiu fazer um Pix direto da carteira Hive!
O processo comecou enviando Hive, o que nao estava disponivel e ela recebeu o remebolso automaticamente.
Depois ela converteu HIVE em HBD e fez PIX com sucesso.
E para testar ambos lados do processo, fiz uma compra para garantir que tudo está funcionando corretamente e garantir a liquidez de PIX no serviço.
Depois foi a vez do shiftrox, que novamente testou e aprovou o serviço.
Imagens e Logo
As imagens e logo da PixBee foram feitas com o Auxilio da Inteligencia artificial, onde que depois de diversos prompts e tentativas, obtivemos algo que gostamos.
| Logo | Mini Logo | Avatar |
|---|---|---|
| | |
E vocês gostaram?
https://aphid-glowing-fish.ngrok-free.app/
Congratulations @vaipraonde! You have completed the following achievement on the Hive blockchain And have been rewarded with New badge(s)
Your next target is to reach 33000 upvotes.
You can view your badges on your board and compare yourself to others in the Ranking
If you no longer want to receive notifications, reply to this comment with the word
STOPCheck out our last posts:
Super Easy!
Show!!! Going to try to make it easier!
Obrigado por promover a comunidade Hive-BR em suas postagens.
Vamos seguir fortalecendo a Hive
Your post was manually curated by @Shiftrox.
Delegate your HP to the hive-br.voter account and earn Hive daily!
🔹 Follow our Curation Trail and don't miss voting! 🔹