I was given a final year project in school and I was asked to build a drone-base maize dectection and disease identification system, which means after I have built a drone (Modelling and 3d-printing) with all the handware components, I would need to work on the software aspect of the drone being able to detect maize plants and also be able to identify if the maize plant is healthy or have a particular diseases.
Since I know nothing about machine learning, it has driven me towards having to seek for knowledge on the course, and today, I would be sharing what I know so far.

LET'S BEGIN!!!
Many people have mixed up Artificial intelligence (AI) with Machine Learning and Neural Networks although they are all inter-related and a subset of each other.
To my understanding, Artificial Intelligence is training a computer to perform a particular task by giving it a set of rules to follow when it comes in contact with a problem. Let's take one of the first AIs that was built to beat one of the oldest Grandmasters of chess. The AI was programmed to follow set of rules to follow when making decisions in playing the game.

And you know what , the AI later won and beat the grand-master. That was the first foundation of AI in history.
Machine Learning is a subset of AI that involves training a computer to be able to make predictions without having to explicitly program the computer. It learns from the data fed to the computer and becomes better at making predictions over time.
Neural Networks, from my little understanding, inspired from how the brain functions, consist of neurons that receives input data which are then interconnected to produce and output layer which makes the computer make predictions and decisions on new data it sees.
For my project I progress into knowing more about Neural networks, and then understanding Convolution Neural Network. All these are the basics of computer vision, speech recognition, image identification, and natural language forecasting.
I have been introduced to the use of Terraform and Keras which would aid in implementing and deploying the neural networks models effectively and efficiently. For now, I am just in the basics of Machine Learning and would be sharing the basic skeleton of building a model.
TRAINING YOUR FIRST MODEL
This part we would delve into training our model into making predictions and being able to solve celsius to fahrenheit conversion. This would help us understanding the basics of how models are being built.
PREQUISITES:
To fully understand what I would be explaning here, it is important that:
- You have basic programming knowledge, preferrably python as this is what I would be using. Click on link to learn python before going further with this course.
- The program ran in this post made use of tensorflow using google colab, if you want to get started with google colab, click on link.
After fulfilling all the prequisite, I am sure you would have a full understanding of what is explained here by the end of the article.
To begin training your first model, you need to do the following:
- Import necessary dependencies
- Setup Training Data
- Create a model
- Train the Model
We can also do the following as well: Display Training Statistics of the model, and Use the model to predict Values.
So let us begin with each step:
1. IMPORT NECESSARY DEPENDECIES
import tensorflow as tf
import numpy as np
import logging
logger = tf.get_logger()
logger.setLevel(logging.ERROR)
2. SETTING UP TRAINING DATA
This we would be setting up the data that we would use to train our model.
celsius_q    = np.array([-40, -10,  0,  8, 15, 22,  38],  dtype=float)
fahrenheit_a = np.array([-40,  14, 32, 46, 59, 72, 100],  dtype=float)

for i,c in enumerate(celsius_q):
  print("{} degrees Celsius = {} degrees Fahrenheit".format(c, fahrenheit_a[i]))
To understand the code above:
for i,c in enumerate(celsius_q):
print("{} degrees Celsius = {} degrees Fahrenheit".format(c, fahrenheit_a[i]))
Here is a for loop iterating over the array of celsius_q and printing the output in a given format set by {}. I.e. the output for each element of celsius_q is printed in the first {} and the value of each index of fahrenheit_a. Hence gives this output:
-40.0 degrees Celsius = -40.0 degrees Fahrenheit
-10.0 degrees Celsius = 14.0 degrees Fahrenheit
0.0 degrees Celsius = 32.0 degrees Fahrenheit
8.0 degrees Celsius = 46.0 degrees Fahrenheit
15.0 degrees Celsius = 59.0 degrees Fahrenheit
22.0 degrees Celsius = 72.0 degrees Fahrenheit
38.0 degrees Celsius = 100.0 degrees Fahrenheit
The next step to do is to build our model but it is important we get to understand some machine learning terminologies i.e Features, Labels and Examples:
Features: This is referred as the input to our model i.e. The Celsius_q
Labels: This is the output, which is what the model is to predict ie. The fahrenheit_a
Examples: This is the input/output data that is used during training.
3. CREATE A MODEL
To create our model, there are three processes we need to do which are:
- Build a layer
- Assemble Layers into Models
- Compile the model with loss with optimizer functions
So let's continue:
BUILD A LAYER
We have a straight forward problem which we would want to solve; simply just the conversion of celsius to Fahrenheit, so a single neuron would just be used as our dense layer.

I know 😅 because I can relate. Let me explain what dense layer means before everything starts getting confusing.
Dense Layer: This is the layer where our input get interconnected to our neuron.
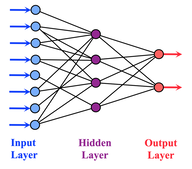
From the image above, the hidden layer is the dense layer where each input is connect to the neurons in the hidden layer. To understand more, I suggest checking this Link out.
To build our layer, we can give it any name let's sake "ML" with the code "tf.keras.layers.Dense" alongside the following configurations:
input_shape=[1]: This means the input shape is set to only one value, because we have a one dimension array. Example of a one dimension array:
1D_List = [1, 2, 3, 4, 5]
This similar to the case as we have for celsius_q.
units=1: This specify the number of neurons we want to use in the dense layer. i.e. which is one as we have said earlier.
Therefor we have:
ML = tf.keras.layers.Dense(units=1, input_shape=[1])
ASSEMBLE LAYERS INTO MODELS
Once models are being defined like what was previously done, we need to make sure they are assembled into a model. The model is being taken as an argument, specifying the order of caluclation from the input to output.
And for this model, we have just a single layer, ML. We do this by writing this line of code:
model=tf.keras.Sequential([ML])
You may also find other developers building their layers and assembling them using one line of code:
model=tf.keras.Sequential([tf.keras.layers.Dense(units=1, input_shape[1])
COMPILE THE MODEL WITH LOSS AND OPTIMIZER FUNCTIONS
Before training begins, the models are being compiled using loss and optimizer functions, and what exactly do they do?
Loss function: This helps the computer to measure how much error it has made in its predictions from the desired outcome. That error difference between its predictions and outcome is what is referred as loss.
Optimizer Functions: This is method the computer would adjust internal values to minimize loss.
This is done by using the following line of code:
model.compile(loss='mean_squared_error', optimizer=tf.keras.optimizer.Adam(0.1))
To understand more about the mean_squared_error and the optimizer Adam used, I suggest you click on the link shared.
The value 0.1 is the learning rate which ranges from 0.001 to 0.1. A lower value causes too many iterations to train the model and a higher value reduces its accuracy. So it is important to take good note of what value to use when building your model.
Now, we are done creating our model, it is time for us to build our model.
4. TRAIN THE MODEL
This is done by calling the fit method.
The training is done by taking the Examples i.e. the inputs and output values in order to determine the model function that leads to the corresponding output. The output prediction may not come close to the correct value so we have the loss function which measures the error difference optimizer function that minimize the internal loss.
The epochs argument used is to tell how many times the training cycle would run and verbose argument determines how much output the methods produces.
history = model.fit(celsius_q, fahrenheit_a, epochs=1000, verbose=False)
print("Finished training the model")
In the code above, since we used epochs=1000, we told the computer to train for a cycle of 1000 times and then notify us by when training is done by printing: Finished training the model.
DISPLAY TRAINING STATS
If you want to see how much the computer reduced loss during training based on the epochs cycle, You run the code:
import matplotlib.pyplot as plt
plt.xlabel('Epoch Number')
plt.ylabel("Loss Magnitude")
plt.plot(history.history['loss'])
Now that the computer has been trained, we proceed by using the model to predict value of 100 celsius to fahrenheit by running this code:
print(model.predict([100.0]))
The we obtain the output:
1/1 [==============================] - 0s 145ms/step
[[211.74742]]
As you can see from the result, the output is close to the original conversion value using the formular: f = c × 1.8 + 32.
Congratulations! you have just known the foundational level of building and training a Model in Machine Learning. I would continue sharing my knowledge as in Machine Learning. Stay tuned!
𝙰𝙱𝙾𝚄𝚃 𝚃𝙷𝙴 𝙰𝚄𝚃𝙷𝙾𝚁

Designed by @ grisvisa
Starstrings01, also known as Giftedhands, attends the Federal University of Agriculture in Abeokuta to study mechatronics engineering. He is a lover of the hive, a guitarist from Nigeria, and a student.
His ambition on Hive is to be more than just an ordinary blogger; he wants to be someone with a purpose. That's why he started the newbies initiative @newbies-hive to help guide and support newbies. Please follow the @newbies-hive curation trail by clicking here.
He tries to juggle education with being active on the chain, but his love and passion for Hive keep him on track..
All gifs included are powered by Tenor
Some posts you might be interested to read:
QUALITY ENGAGEMENT Vs. QUALITY CONTENTS Vs. GAINING VISIBILITY ON HIVE
BEING UNIQUE DOESN'T MAKE IT ORIGINAL || HIVE REWARDS ORIGINALITY
SETTING YOUR RECOVERY ACCOUNT USING PEAKD INTERFACE
Posted Using LeoFinance Alpha
Omo science is hard...lol
Okay let me burst you
Would you believe that my fourteen year old brother can build a drone?
That's nice... Do you have pictures and images? Which school did he go to and how did he learn?
What approach did he take in building the drone? Did he make use of any sensors?
Did he assemble the drone or modelled and 3D print it?
!PIZZA
$PIZZA slices delivered:
@chrisheyne(2/15) tipped @starstrings01
The motherboard is essentially the backbone of your computer, connecting all the other components together and allowing them to communicate with each other. check my site