( ENG)
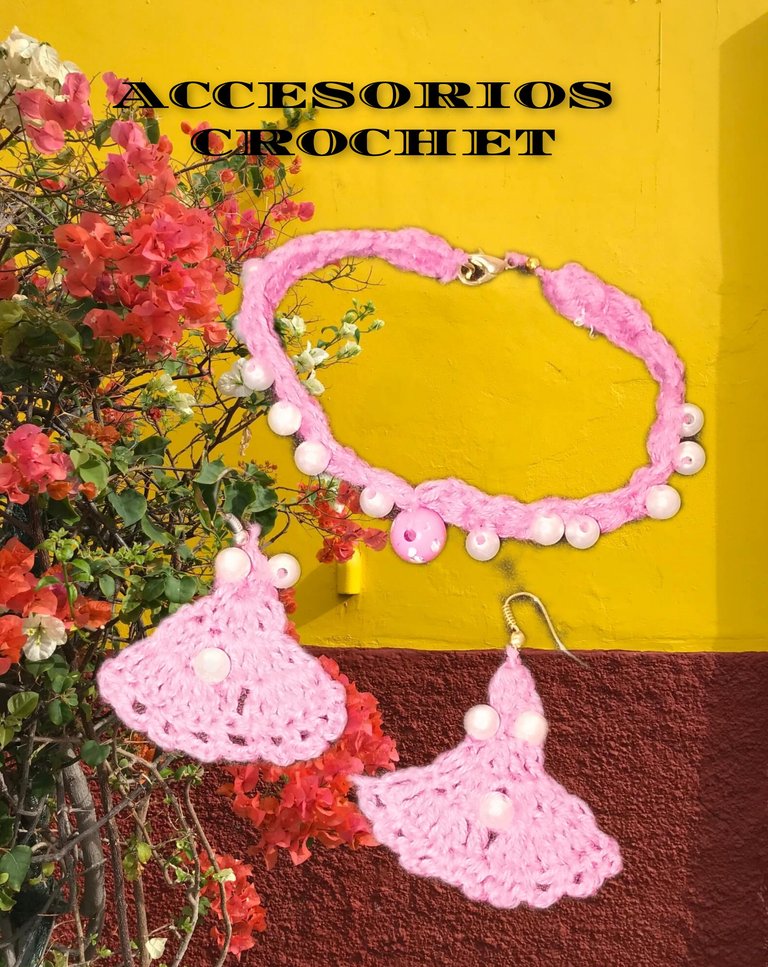
Hello everyone, it is a pleasure to be with you again, I hope you are having a good time, and that this is a great week of creations. Today I am going to show you a very simple tutorial on how to make a beautiful accessory, where I used the Crochet technique, its color is very delicate and youthful, although it is ideal for pairing regardless of age, it simply looks fantastic. when wearing them. You could use it, for any occasion and time. I invite you to follow me and I will show you how easy it is to make, and how satisfying the final result is.
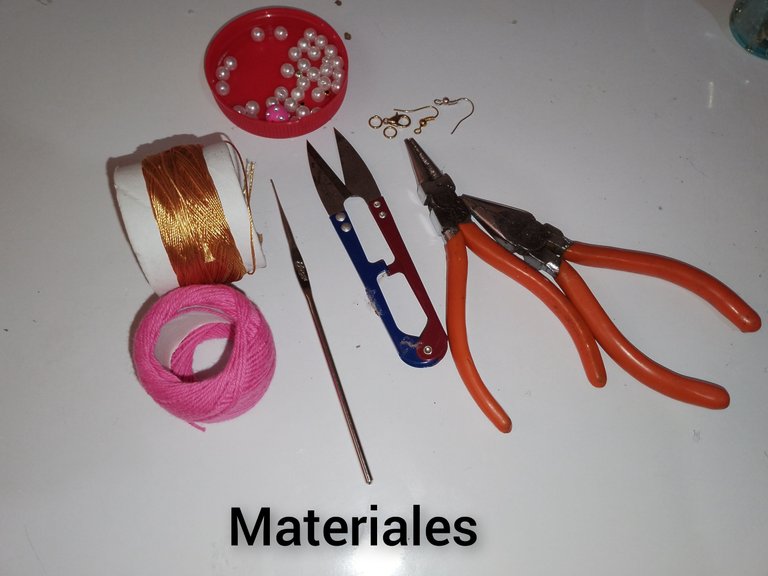
Materials.
Yarn for knitting, pink color.
. knitting needle
. Pearls n4, white.
. Pink bead n10, pink, with gold frosty dots.
. Jewelry earring.
. Hook for Retes.
. Bracelet pin.
.jewelry tweezers.
. Scissors.
STEPS:
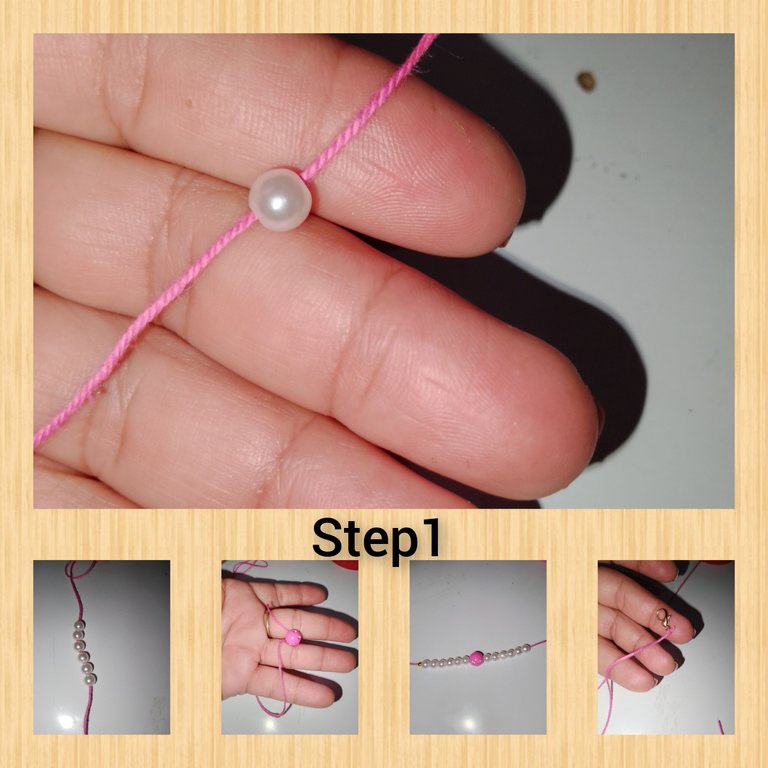
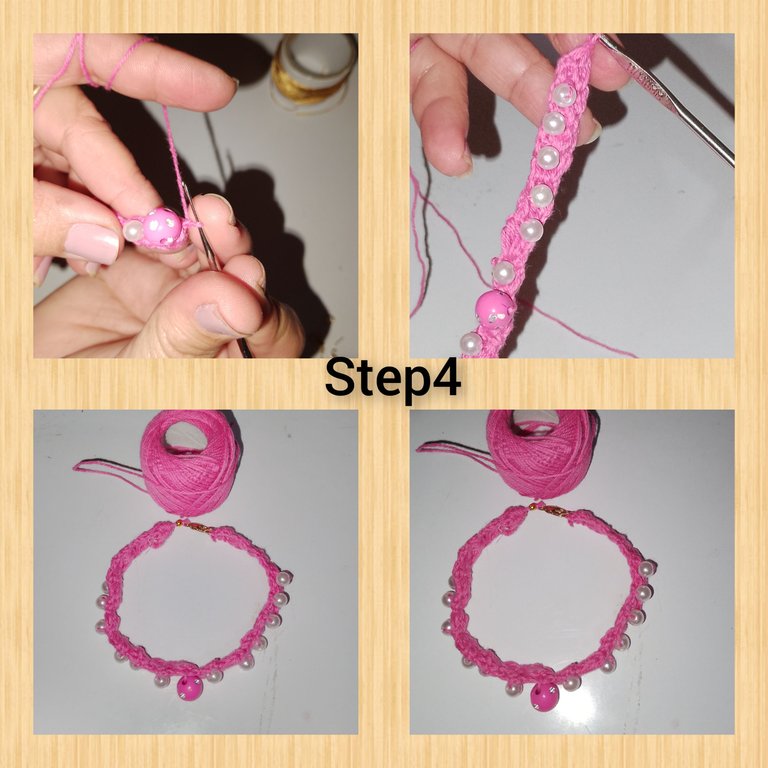
1.) Start by introducing the knitting thread, six white beads, followed by the pink bead and six white beads. Insert the pearls separated into two groups of six by the pink bead. I tie the pin with two knots, for a bracelet.
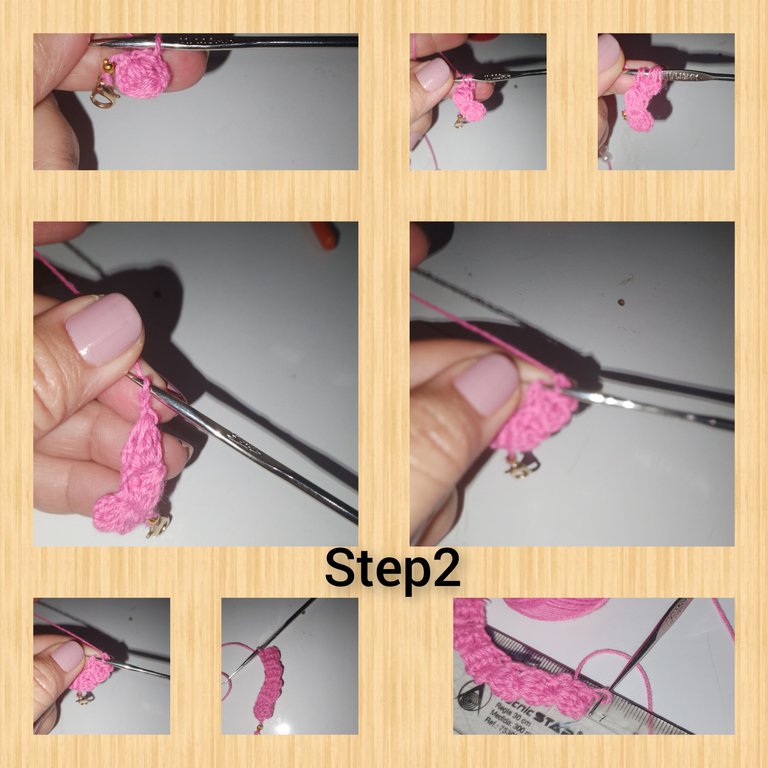
2.) I knit a chain stitch, I pick up five double crochets, and closing together, I knit a chain stitch, I turn the fabric, I pick up three chain stitches and go down to the initial chain stitch and I knit a slip stitch, I turn it again knitted and inside the knitted chain stitches, I pick up three double crochets, closing them together. Just as at the beginning, I repeat four more times, making a total of six groups of double crochets, which resemble a delicate little balloon.
3.) I start from this turn to involve the beads, so I knit a first bead with the knitting needle until I knit it, I position myself after placing it on the next side, to give a little pressure, I turn, I knit three chain stitches, with slipped stitch, I position myself on the next side, carrying and closing five double crochets together, and in this way, I will involve the white pearls one by one.
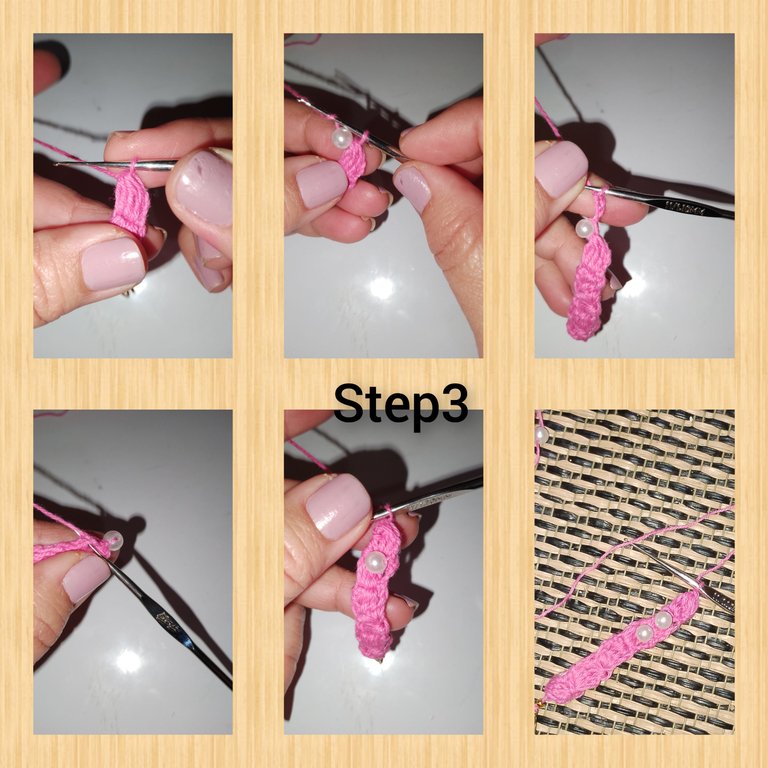
4.) continued, this time involving the pink bead, and following the process, I continued, making the following pearls in the same way, and finished, tying the jewelry ring. Thus, being prepared, the first pieces of this being of knitted accessories, crocheted.
5.) For the earrings, I place three white pearls on the knitting thread, and tie the hook with the knitting thread. Introducing the knitting needle, inside the rite, originating from the hook for Retes, I raise five double crochets which I close together,
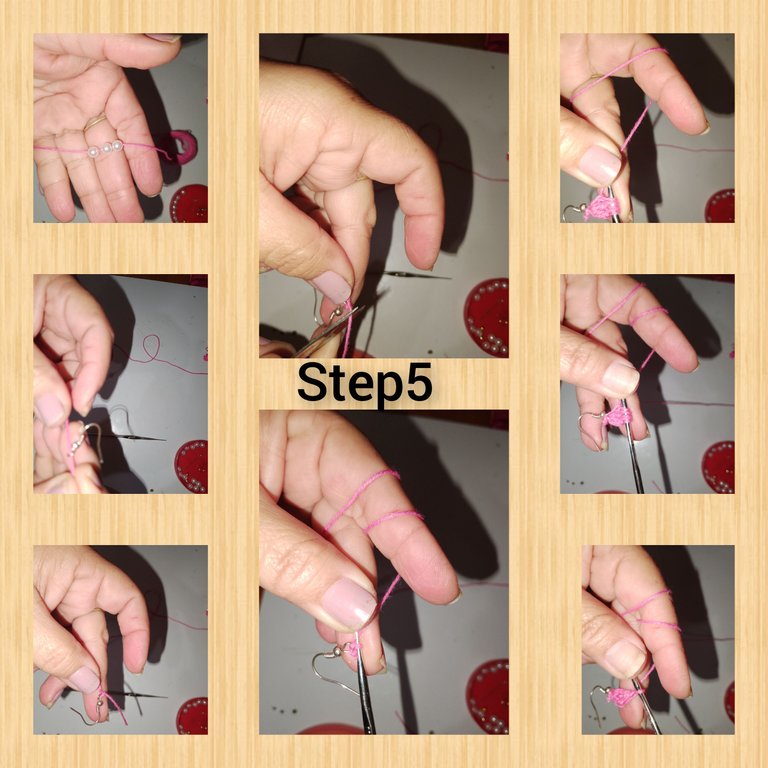
6.) for this round, I pull up to the fabric, a first pearl, I raise five double crochets, this time I will not saw them together but they will be consecutive, to form a kind of fan, when I reach the high point n6, I knit a new pearl , and fixed with aslip stitch, I turn the fabric and knit, two double crochets in each double crochet of the previous round. Having a total of says points.
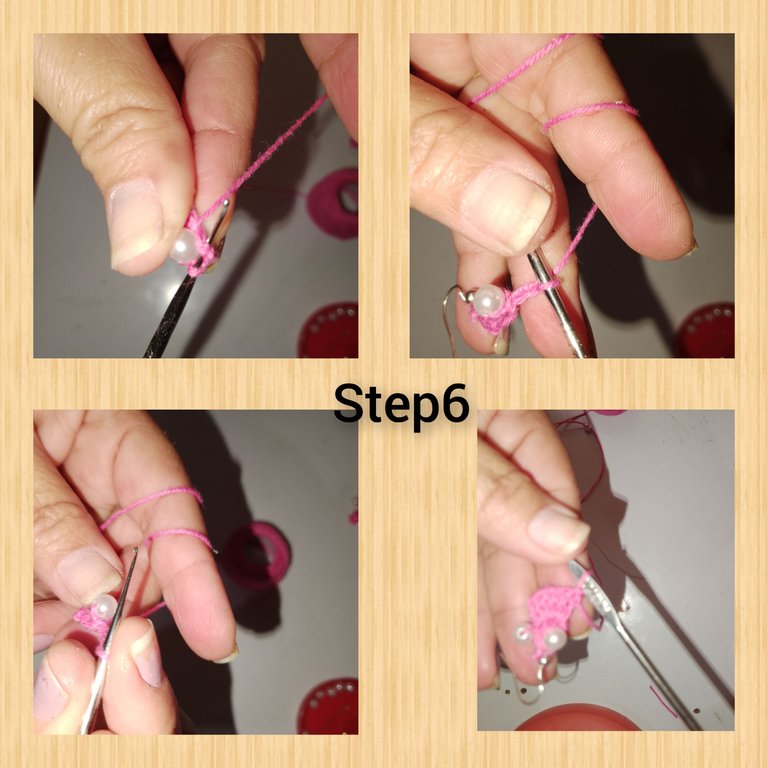
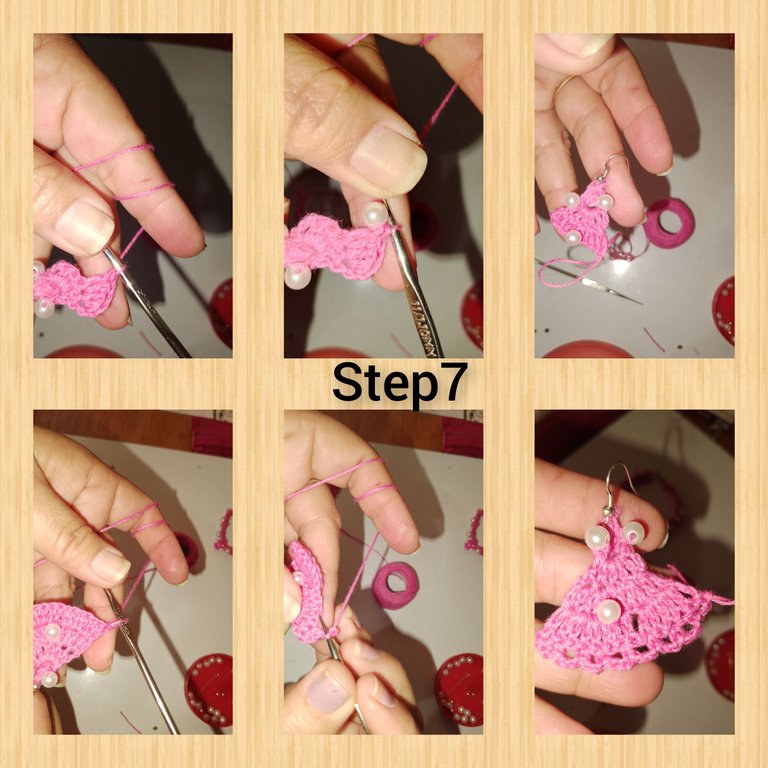
7.) I continue, knitting six double crochets, I roll the last pearl, and I knit six more double crochets. I turn the fabric and knit two chain stitches, and leaving a space I make a slip stitch.
. All photos are my property.
. Use incollage Use language translator.
Very grateful and pleased for your view, it is a pleasure to show you the latest on my blog. It will be until the next opportunity.
( ESP)
Hola a todos, es un placer, estar de nuevo, con ustedes, espero l estén pasando bien, y que est sea un gran semana de creaciones. Hoy paso, para mostrarles un muy sencillo,tutorial, de como realizar, un hermoso, ser de accesorios, dónde usé la técnica de Crochet, su color es muy delicado y juvenil, aunque idel par see usados sin importar la edad, simplemente lucir fantástica al llevarlos puesto. Podrías usarlo, para cualquier ocasión y momento. Te invito a seguirme y le mostraré lo fácil que es su elaboración, y lo satisfactorio de su resultado final.
Materiales.
Hilo para tejer, color rosado.
. Aguja para tejer
. Perlas n4, color blanca.
. Cuenta rosada n10, rosada, con puntos escarchados dorados.
. Arito de bisutería.
. Anzuelo para Retes.
. Pasador para pulsera.
.pinzas de bisutería.
. Tijeras.
PASOS:
1.) comienzo introduciendo el hilo de tejer, a seis perlas de color blanca, seguido de la cuenta, color rosada y seis perlas de color blanco. Introducida las perlas separadas en dos grupos de seis por la cuenta de color rosado. Ato con dos nudos el pasador, para pulsera.
2.) tejo un punto cadena, levanto cinco puntos altos, y cerrando juntos, tejo un punto cadenas, doy vuelta a el tejido, levanto tres puntos cadenas y bajo a el punto cadena inicial y tejo un punto deslizado, doy nuevamente vueltas a el tejido y dentro de los puntos cadenas tejidos, levanto tres puntos altos, cerrándolos juntos. Tal como en el inicio, repito cuatro veces más, haciendo un total de seis grupos de puntos altos, que semejan a un delicado globito.
3.) comienzo a partir de esta vuelta a involucrar las perlas, así que ruego hasta el tejido una primer perla con la aguja de tejer, me ubico luego de colocarla al siguiente lado, para dar un poco de presión, doy vuelta, tejo tres puntos cadenas, con punto deslizado, me ubico en el siguiente lado, llevando y cierro juntos cinco puntos altos, y de est manera, iré involucrando de a una las perlas de color blanca.
4.) continuo, está vez involucrando la cuenta de color rosado, y siguiendo el proceso, continuo, haciendo de misma manera, las siguientes perlas, y finalizó, atando el arito de bisutería. Quedando así, elaborada, la primera piezas de este ser de accesorios tejido, a crochet.
5.) par alos aretes, coloco en el hilo de tejer, tres perlas de color blanco, y ato el anzuelo con el hilo de tejer. Introduciendo la aguja de tejer, por dentro de el rito, originario de el anzuelo para Retes, levanto cinco puntos altos los cuales cierro juntos,
6.) para esta vuelta, trago hasta el tejido, un primer perla, levanto cinco puntos altos, está vez no los serrare juntos sino que serán consecutivos, par formar una especie de abanico, llegado a el punto alto n6, trigo una nueva perla, y fijo con un punto deslizado, doy vuelta a el tejido y tejo, dos puntos altos en cada punto alto de la vuelta anterior. Teniendo un total de dice puntos.
7.) continuo, tejiendo seis puntos altos, ruedo la última perla, y tejo seis puntos altos más. Doy vuelta a el tejido y tejere dos puntos cadenas, y dejando un espacio hago un punto deslizado.
. Todas las fotos son de mí propiedad.
. Use incollage
Use traductor lenguaje.
Muy agradecida y complacida por su vista, a mí blog, es un gusto, mostrarles lo más reciente. Será hasta auna próxima oportunidad.
Hola amiga cómo estás realmente has hecho un excelente trabajo🌻 me gustó mucho cómo hiciste el tejido a crochet está muy lindo el color💝 que utilizaste me encanta este juego así de accesorio para lucir con Outfit rosado, Gracias por compartir Saludos y bendiciones💖😘💪🏻🌹