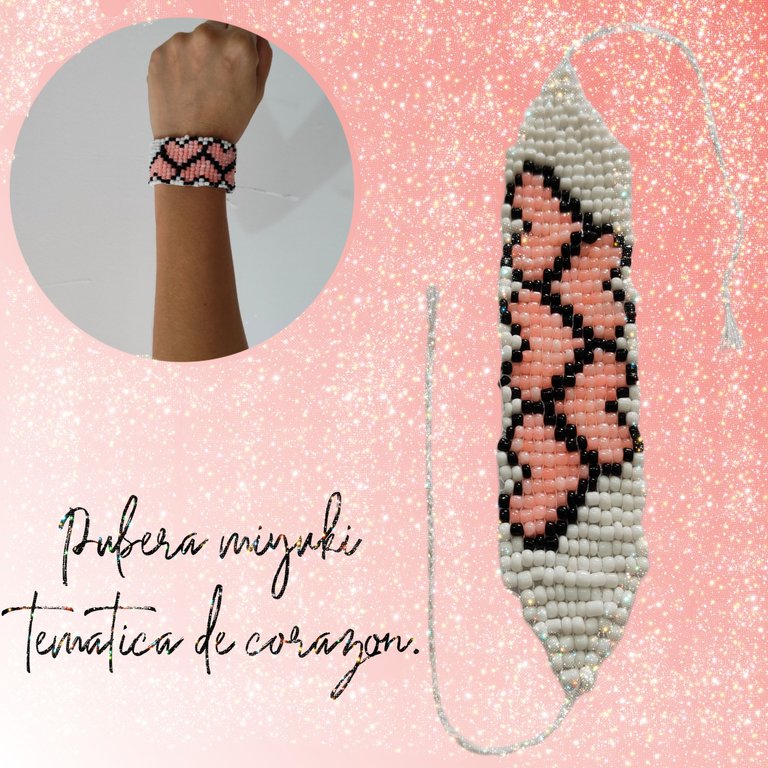
Bienvenidos || Welcome

Luego de una ausencia en mi blog por justo motivos que en los próximos dias estare relatando, hoy puedo de nuevo estar aqui y continuar compartiendo con ustedes, haces dias habia comenzado elaborar esta pulsera sin embargo no fue hasta hoy que me pude sentar y culminarla asi como realizar el post, esperando que todos se encuentren bien, iniciemos para realizar esta pulsera vamos a necesitar los siguientes materiales:
After an absence in my blog for just reasons that in the coming days I will be relating, today I can be here again and continue sharing with you, days ago I had begun to develop this bracelet but it was not until today that I could sit and finish it as well as make the post, hoping that everyone is well, let's start to make this bracelet we will need the following materials:
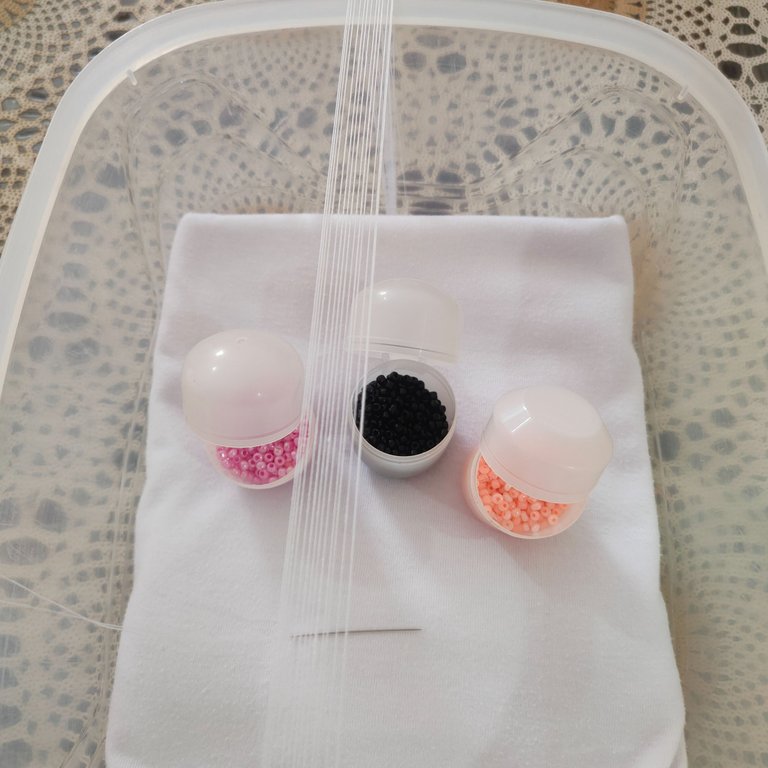
Materiales || Materials
✅ Mostacillas blancas.
✅ Mostacillas coral.
✅ Mostacillas negras.
El color de las mostacillas es a gusto de cada uno. ☺️
✅ Hilo nailon.
✅ Telar o una bandeja plastica de preferencia rectangular.
✅ Aguja.
✅ White beads.
✅ Coral beads.
✅ Black beads.
The color of the beads is at the discretion of each individual. ☺️
Nylon thread.
✅ Loom or a plastic tray, preferably rectangular.
✅ Needle.
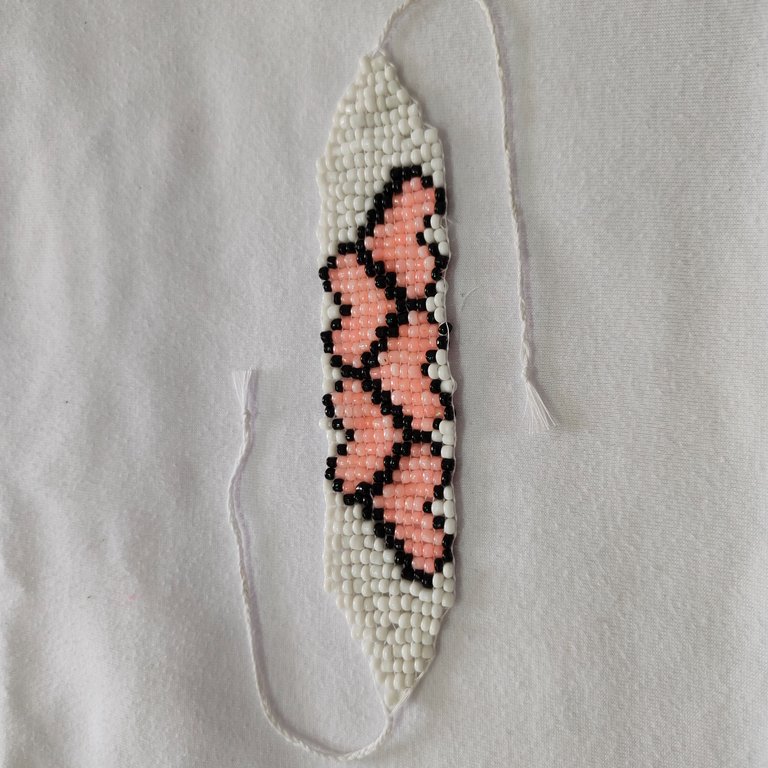
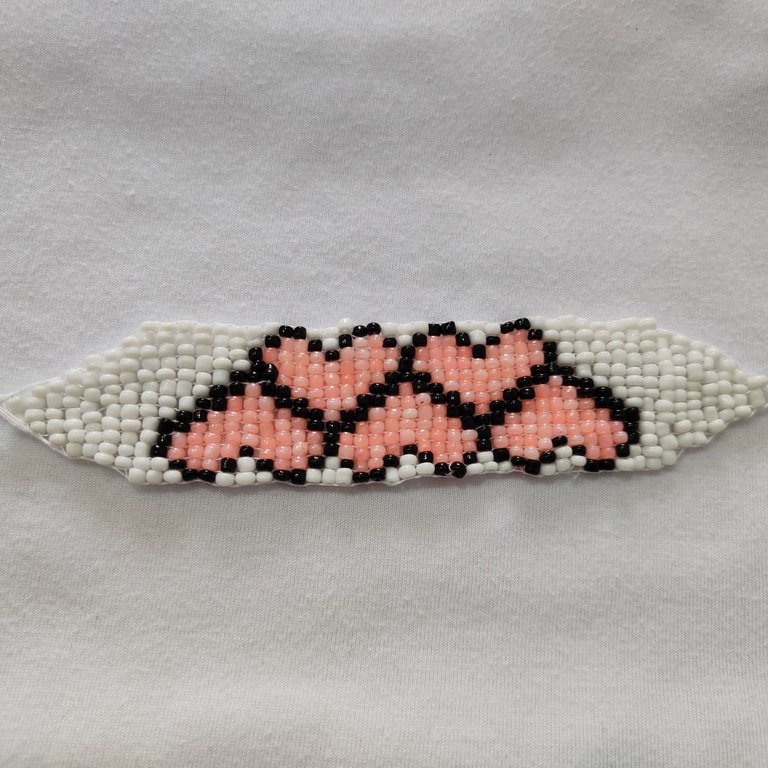
Diseño ||Design
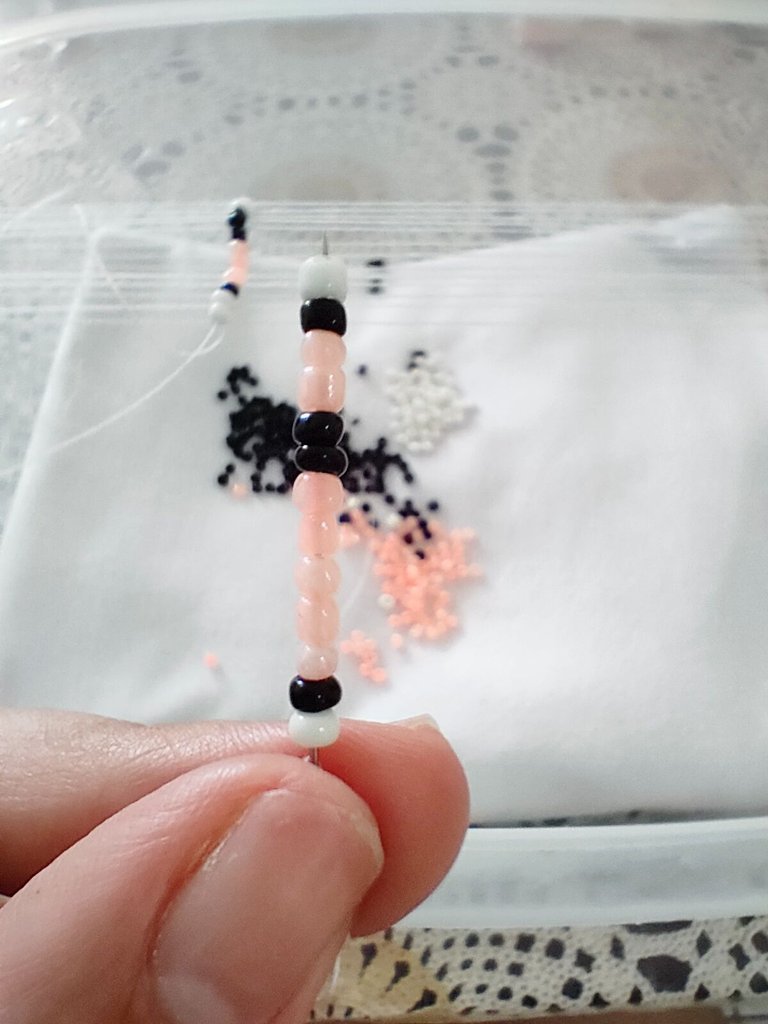
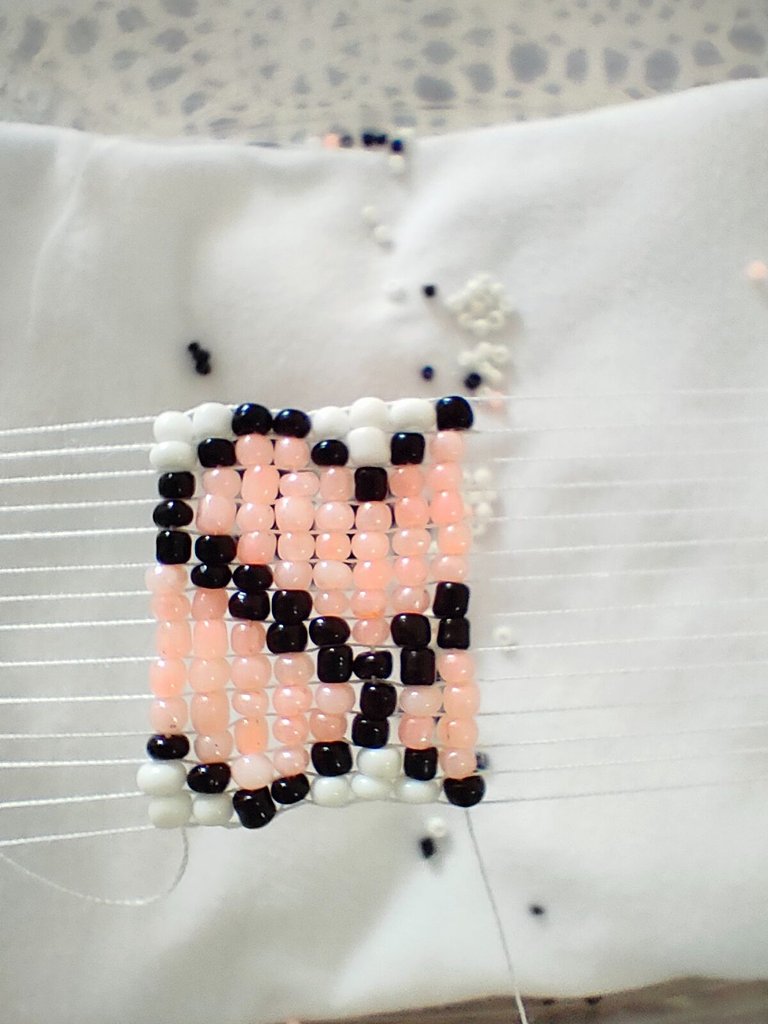
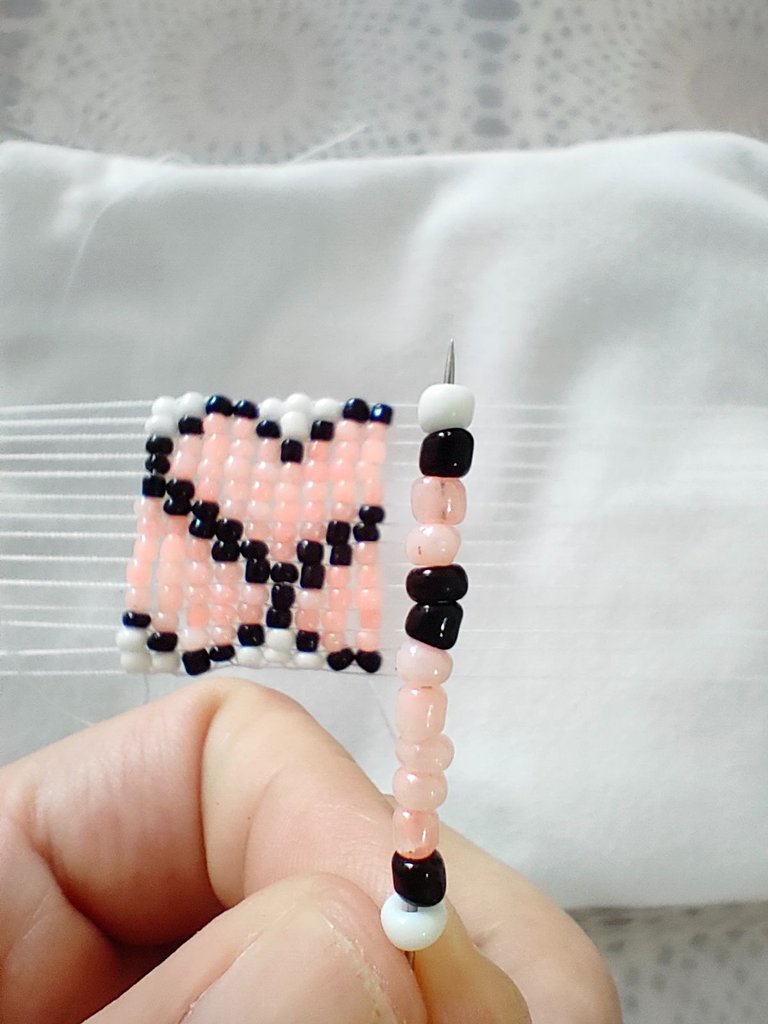
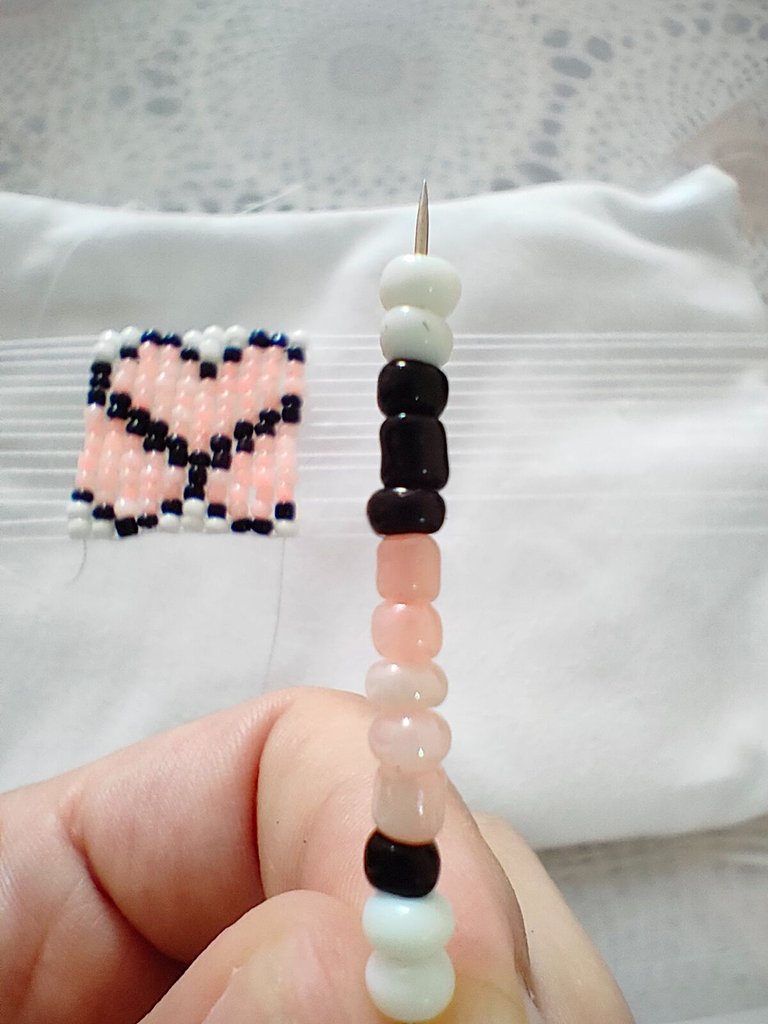
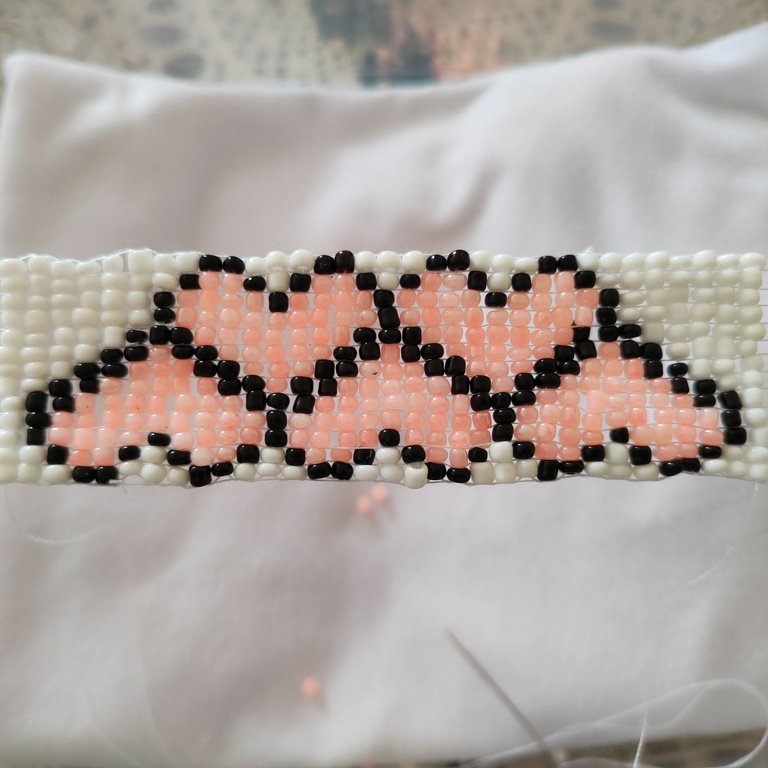
Unas de las cosas que mas puede resultar molesto en esta técnica es el patrón o diseño a seguir así que aca les estaré dejando una foto macro para que puedan ver el diseño y guiarse cuando deseen recrear la pulsera.
One of the things that can be most annoying in this technique is the pattern or design to follow so here I will be leaving a macro photo so you can see the design and be guided when you want to recreate the bracelet.
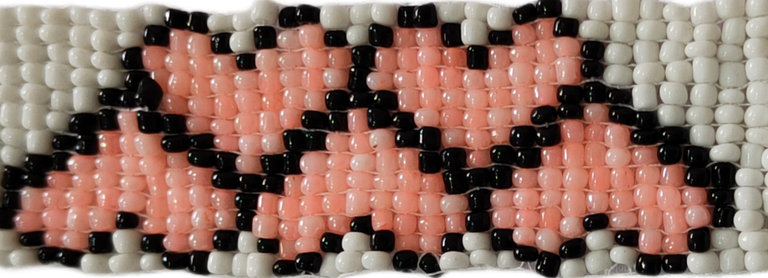
Ya que en ocasiones una imagen valen más que mil palabras, otra recomendación que les puedo dar ess usar mostacillas calibradas ya que al poseer el mismo tamaño el trabajo resulta mas bonito.
Since sometimes a picture is worth a thousand words, another recommendation I can give you is to use calibrated beads since they have the same size and the work is more beautiful.
Pasos ||Steps
✅ Paso 1. En el caso que no dispongan de una telar, con un envase plastico de forma rectangular de tamaño grande crearemos un telar provisorio y dependiendo del grosor de nuestra pulsera vamos a colocar la cantidad de hilos necesarios, en mi caso como el diseño es amplio la pulsera sera gruesa asi que coloque 14 hilos en total y para evitar que estos se muevan mientra la realizo, fijaremos sus extremos con cinta adhesiva en los laterales del envase.
✅ Step 1. In case you do not have a loom, with a large rectangular plastic container we will create a temporary loom and depending on the thickness of our bracelet we will place the amount of threads needed, in my case as the design is wide the bracelet will be thick so I placed 14 threads in total and to prevent them from moving while I make it, we will fix its ends with tape on the sides of the container.

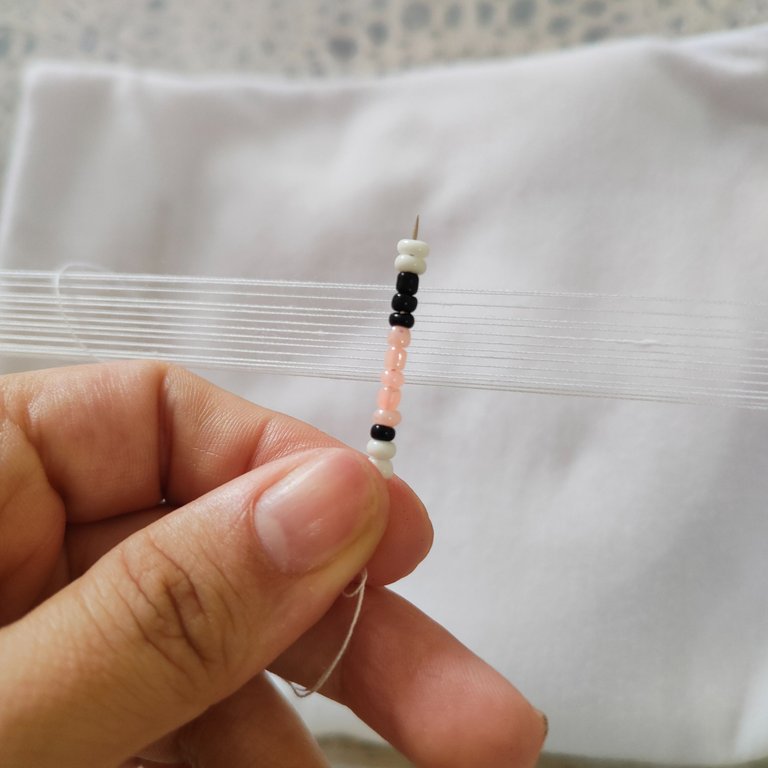
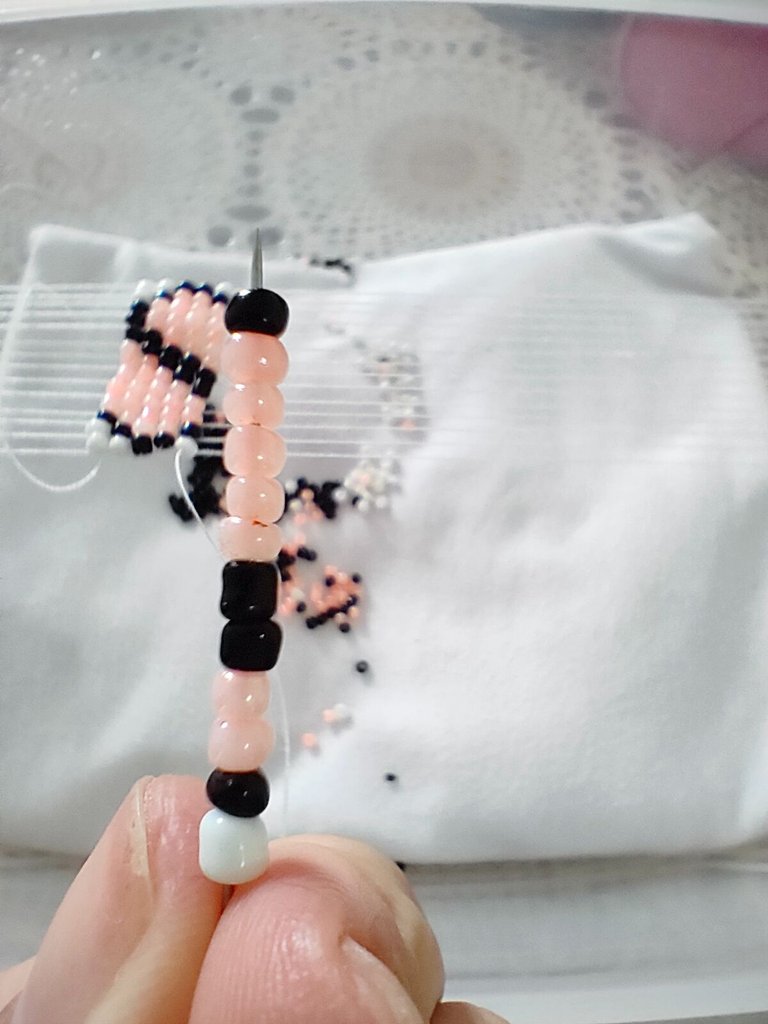
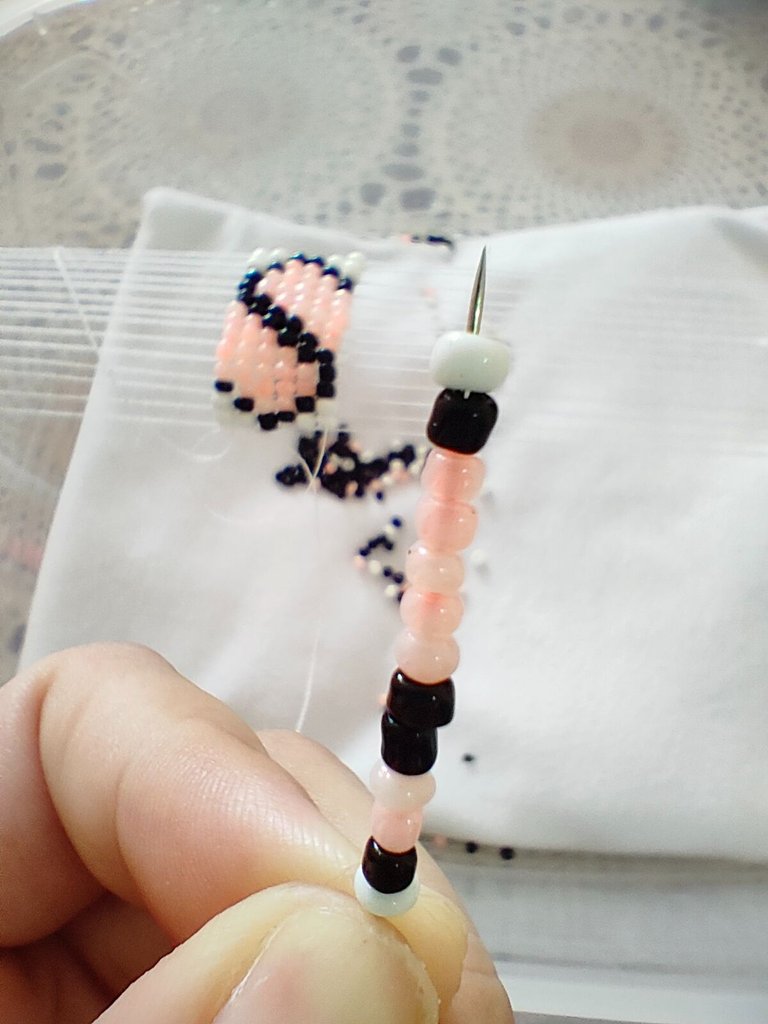
✅ Paso 2. Mediremos 1 metro de hilo y amarramos un extremo en el primer hilo de nuestro telar (en la zona media, ya que la pulsera se trabajara en ambos extremos ) y en el otro extremo del hilo ensartamos la aguja para asi iniciar haciendo la pulsera para esa primera hilera usaremos 2 mostacillas blancas 1 negra, 5 coral, 3 negras y 2 blancas cada una de estas mostacillas deben quedar entre 2 hilos del telar una vez que pasamos la aguja atraves de ellas vamos a retornar por ellas de nuevo teniendo en cuenta que la aguja pase por encima de los hilos del telar para asi asegurarnos que sea mas resistente la pulsera, esto lo haremos con cada hilera de mostacillas que haremos en adelante.
✅ Step 2. We will measure 1 meter of thread and tie one end in the first thread of our loom (in the middle zone, since the bracelet will be worked at both ends) and at the other end of the thread we thread the needle to start making the bracelet for that first row we will use 2 white beads, 1 black, 5 coral, 3 black and 2 white, 3 black and 2 white each of these beads should be between 2 threads of the loom once we pass the needle through them we will return for them again taking into account that the needle passes over the threads of the loom to ensure that the bracelet is more resistant, we will do this with each row of beads that we will do from now on.
✅ Paso 3. Para esta hilera usaremos 1 mostacilla blanca, 1 negra, 5 coral, 2 negras, 2 coral, 1 negra y 1 blanca.
✅ Step 3. For this row we will use 1 white, 1 black, 5 coral, 2 black, 2 coral, 2 coral, 1 black and 1 white mustard.
✅ Paso 4. Para esta hilera usaremos 1 mostacilla negra, 5 coral, 2 negras, 4 coral y 1 negra.
✅ Step 4. For this row we will use 1 black, 5 coral, 2 black, 4 coral and 1 black mustard.
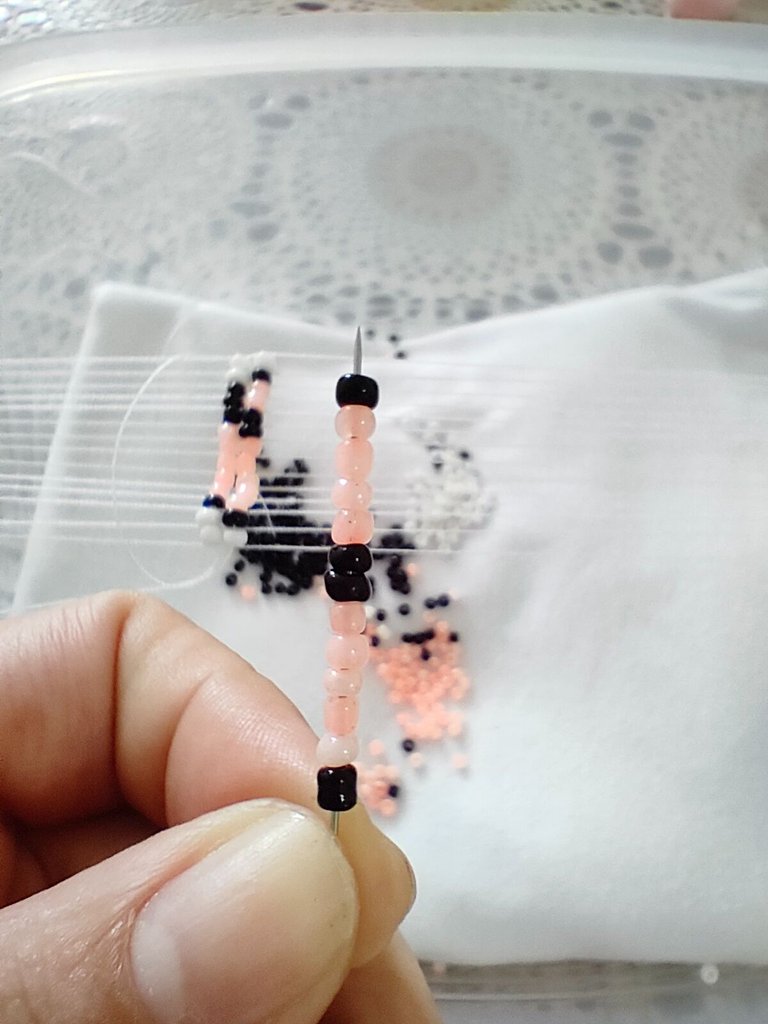
✅ Paso 5. Para esta hilera usaremos 1 mostacilla negra, 4 coral, 2 negras, 5 coral y 1 negra.
✅ Step 5. For this row we will use 1 black, 4 coral, 2 black, 5 coral and 1 black mustard.
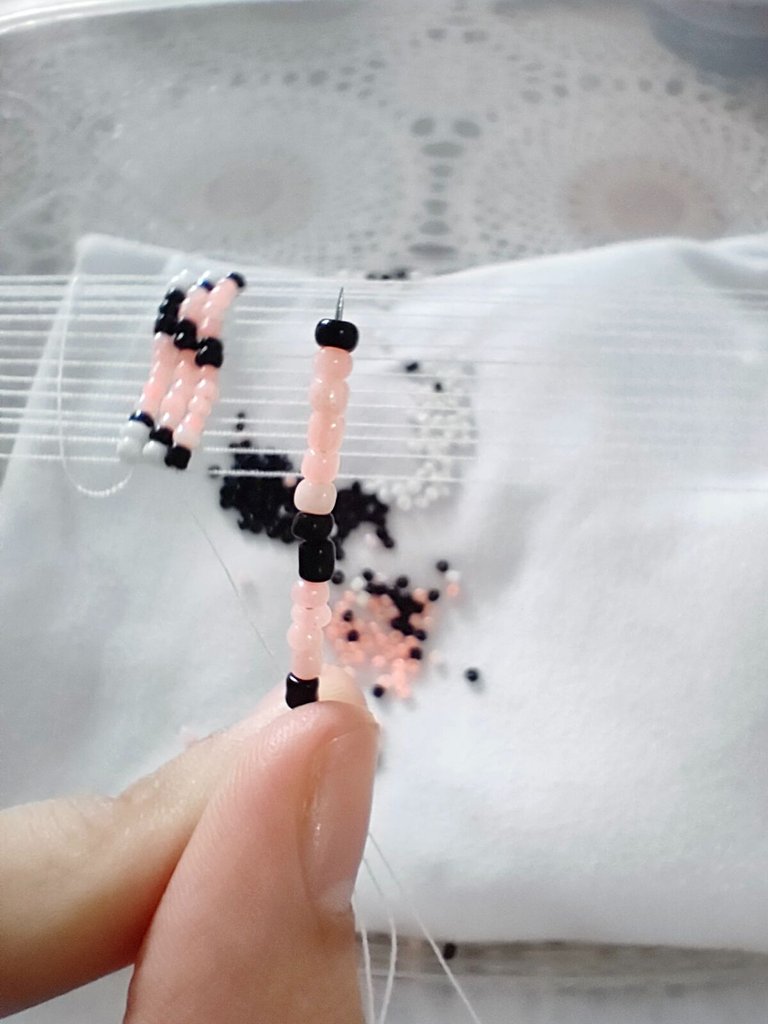
✅ Paso 6. Para esta hilera usaremos 1 blanca, 1 negra, 2 corales, 2 negras, 5 coral, 1 negra y 1 blanca.
✅ Step 6. For this row we will use 1 white, 1 black, 2 coral, 2 black, 2 black, 5 coral, 1 black and 1 white.
✅ Paso 7. Para esta hilera usaremos 1 blanca, 1 negras, 2 corales, 2 negras, 5 corales y 1 negra.
✅ Step 7. For this row we will use 1 white, 1 black, 2 coral, 2 black, 2 black, 5 coral and 1 black.
✅ Paso 8. Para esta hilera usaremos 2 blancas, 3 negras, 5 corales, 1 negra y 2 blancas, de esta manera tendremos la primera mita del diseño.
✅ Step 8. For this row we will use 2 white, 3 black, 5 coral, 1 black and 2 white, so we will have the first half of the design.

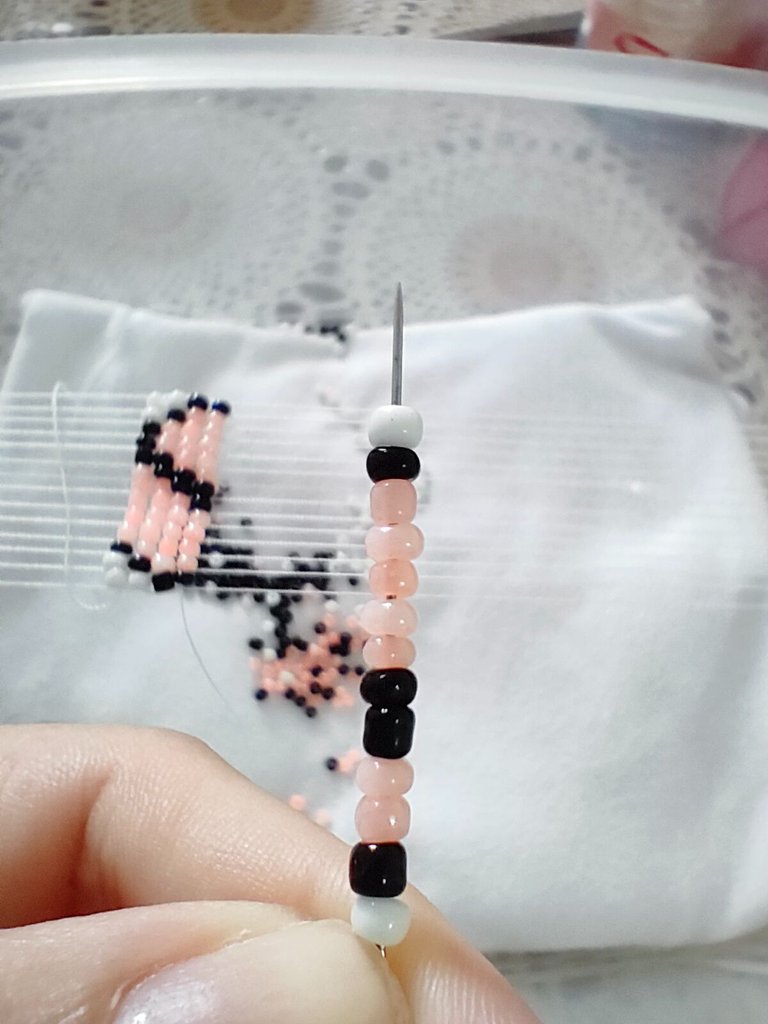
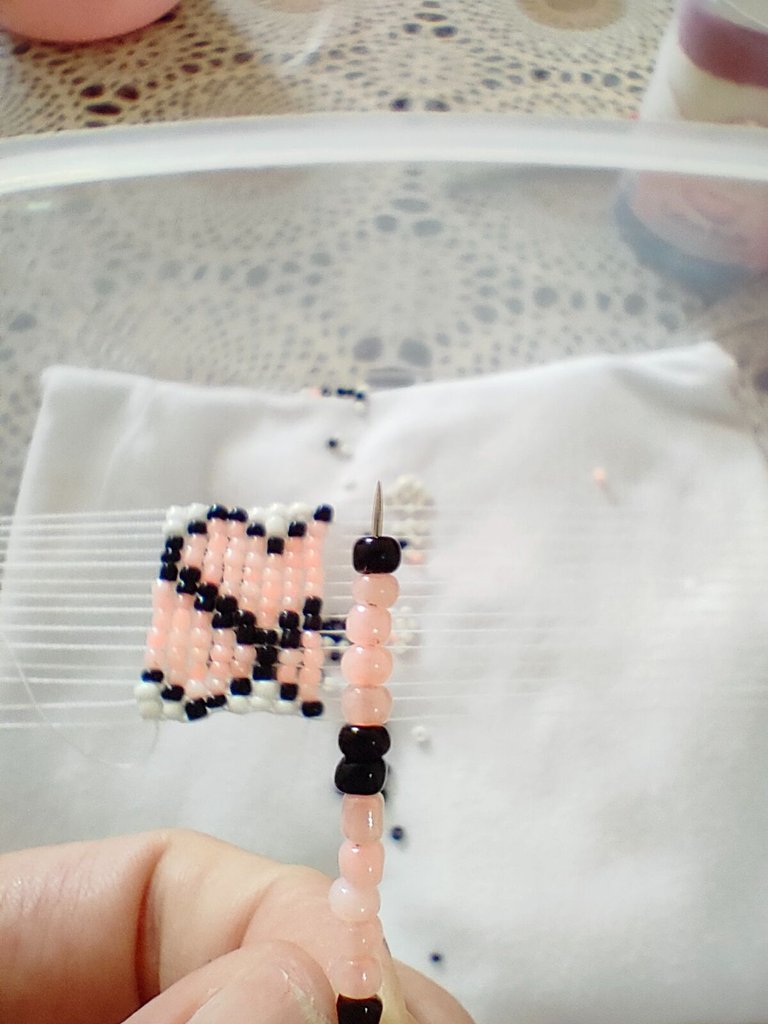
✅ Paso 9. Para esta hilera usaremos 1 mostacilla blanca, 1 negra, 2 corales, 2 negras, 5 corales, 1 negra y una blanca, este lado del diseño es lo que llaman efecto espejo pues lo que haras es replicar los pasos anteriores pero de forma regresiva.
✅ Step 9. For this row we will use 1 white, 1 black, 2 corals, 2 black, 5 corals, 1 black and 1 white, this side of the design is what they call mirror effect because what you will do is replicate the previous steps but in a regressive way.
✅ Paso 10. Para esta hilera usaremos 1 mostacilla negra, 4 corales, 2 negras, 5 corales y 1 negra.
✅ Step 10. For this row we will use 1 black mustard, 4 corals, 2 black, 5 corals and 1 black.
✅ Paso 11. Para esta hilera usaremos 1 mostacilla negra, 5 corales, 2 negras, 4 corales y 1 negra.
✅ Step 11. For this row we will use 1 black mustard, 5 coral, 2 black, 4 coral and 1 black.
✅ Paso 12. Para esta hilera usaremos 1 mostacilla blanca, 1 negra, 5 corales, 2 negras, 2 corales, 1 negra y 1 blanca.
✅ Step 12. For this row we will use 1 white, 1 black, 5 coral, 2 black, 2 coral, 2 coral, 1 black and 1 white mustard.
✅ Paso 13. Para esta hilera usaremos 2 mostacillas blancas, 1 negra, 5 corales, 3 negras, 2 blancas.
✅ Step 13. For this row we will use 2 white, 1 black, 5 coral, 3 black, 2 white beads.
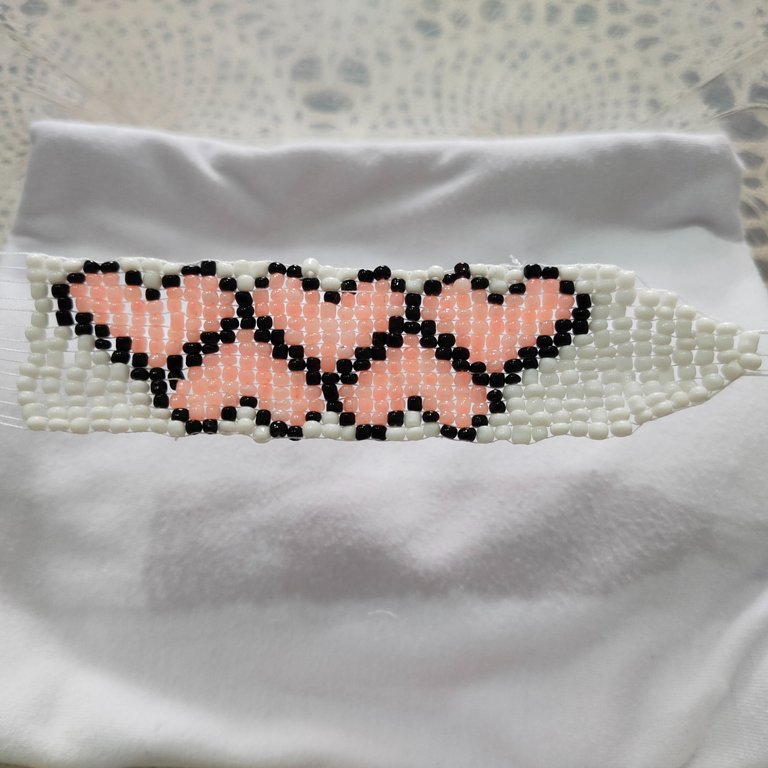
De esta forma tendremos la otra mita del diseño y a partir de aqui es replicar el diseño de acuerdo al largo que deseas la pulsera.
This way we will have the other half of the design and from here is to replicate the design according to the length you want the bracelet.
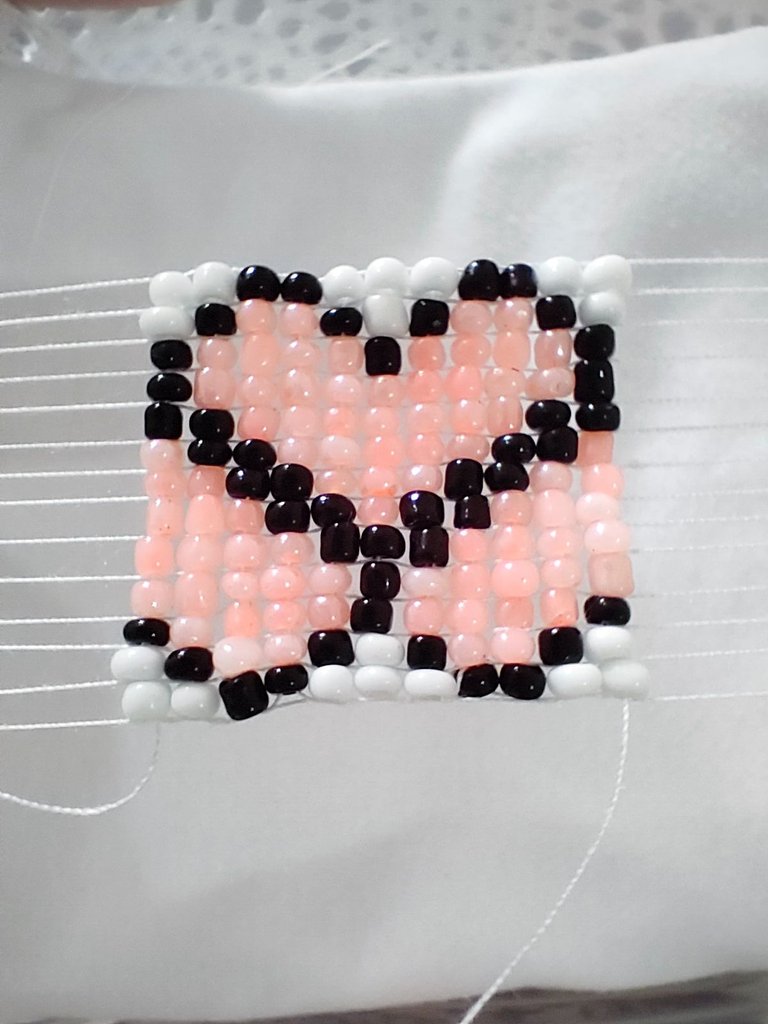
Para mi resulta fascinante ver como el diseño a medida que se replica luce aun mas.
I find it fascinating to see how the design looks even better as it is replicated.
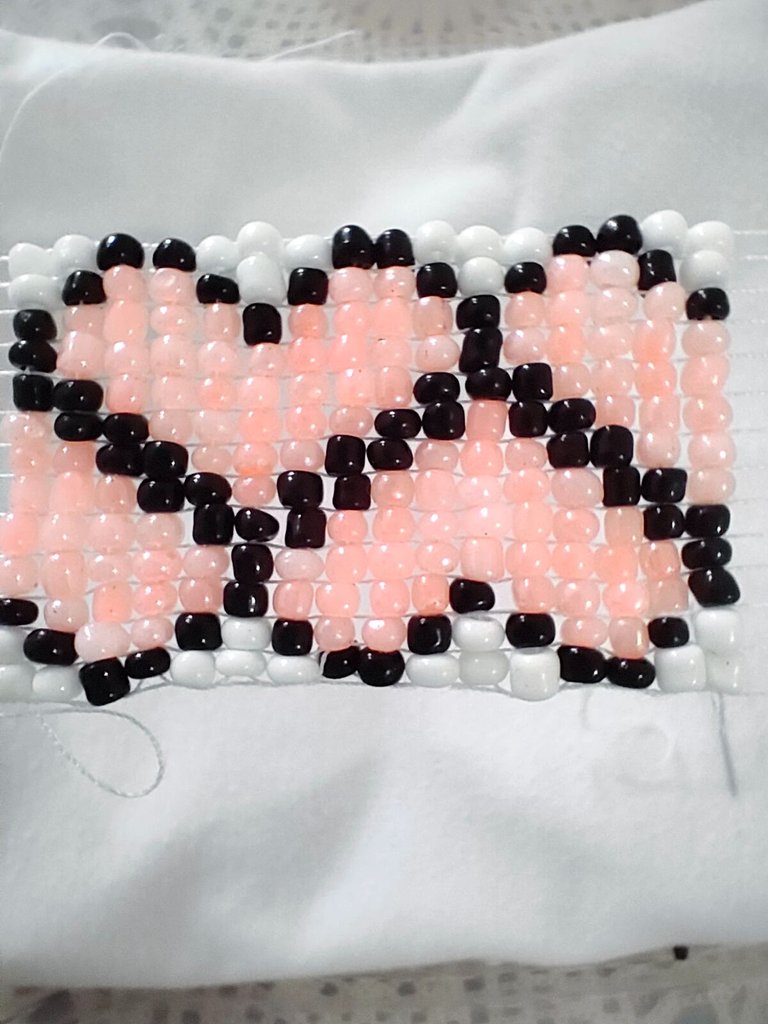
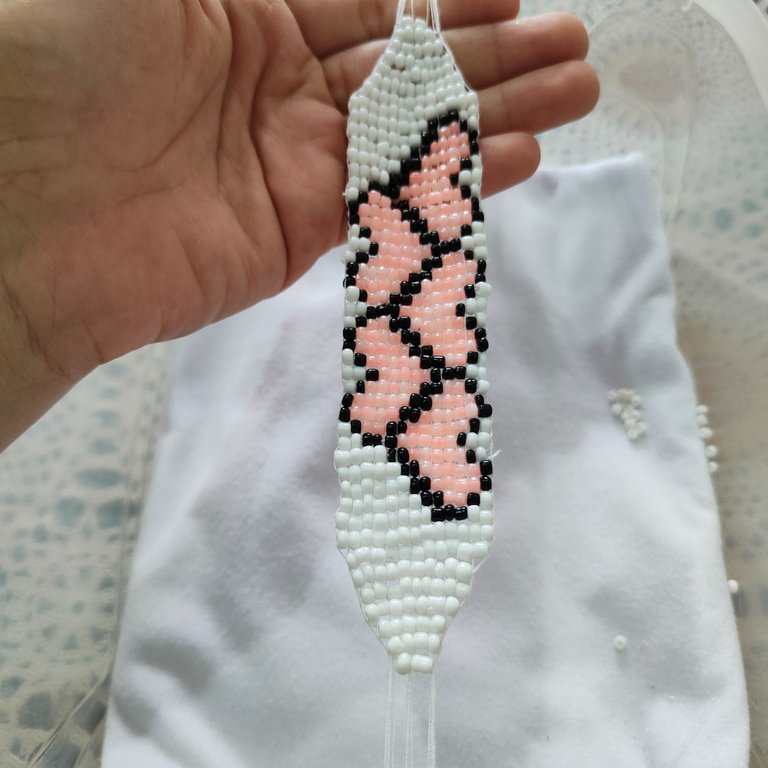
Por la forma del diseño los corazones de los costados quedan a la mita y dejarlos asi seria un crimen 😂 asi que cuando consideremos que el largo de nuestra pulsera es el adecuado vamos a finalizar ese corazón queda a por la mita pero sin comenzar el corazón que le sigue, sustituyendo las mostacillas corales y negras por solo blancas esto lo haremos en ambos extremos.
Because of the shape of the design, the hearts on the sides of the bracelet are at half length and leaving them like that would be a crime 😂 so when we consider that the length of our bracelet is adequate we will finish that heart is at half length but without starting the heart that follows, replacing the coral and black beads with only white, we will do this at both ends.
✅ Paso 14. Y para culminar los extremos iremos reduciendo poco a poco la cantidad de mostacillas por hileras hasta llegar a 2.
✅ Step 14. And to finish off the ends we will gradually reduce the number of beads per row until we reach 2.
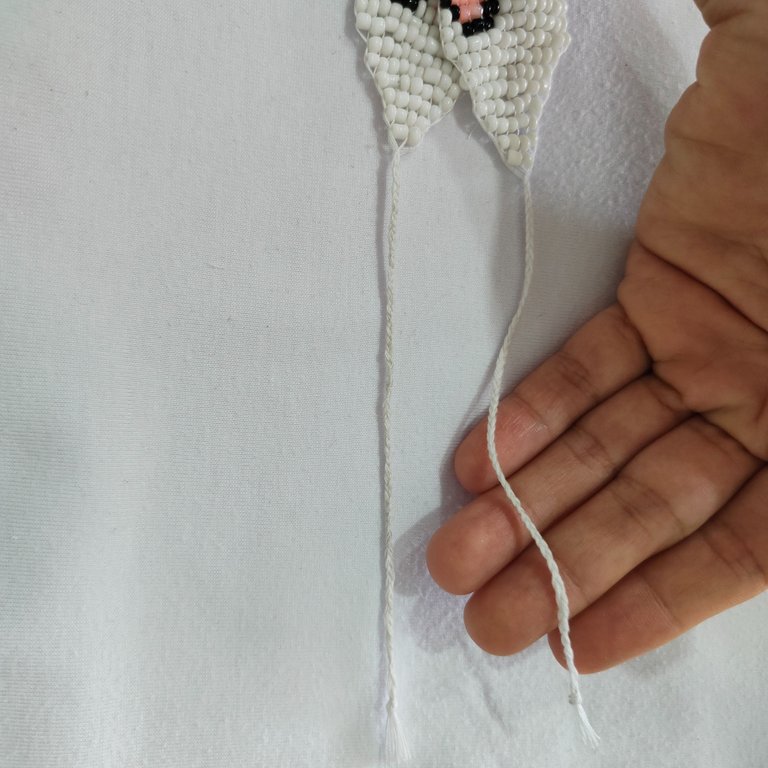
✅ Paso 15. Para culminar trensamos los hilos de cada borde de la pulsera y de esa forma tendremos lista una pulsera con un diseño muy bonito.
✅ Step 15. To finish we braid the threads of each edge of the bracelet and that way we will have a bracelet with a very nice design.
Resultado || Result
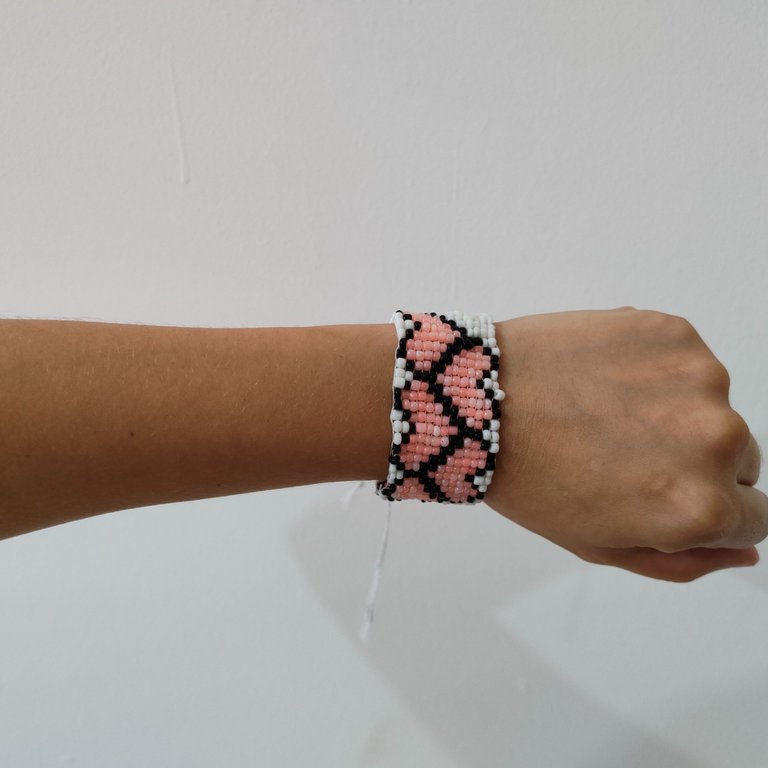
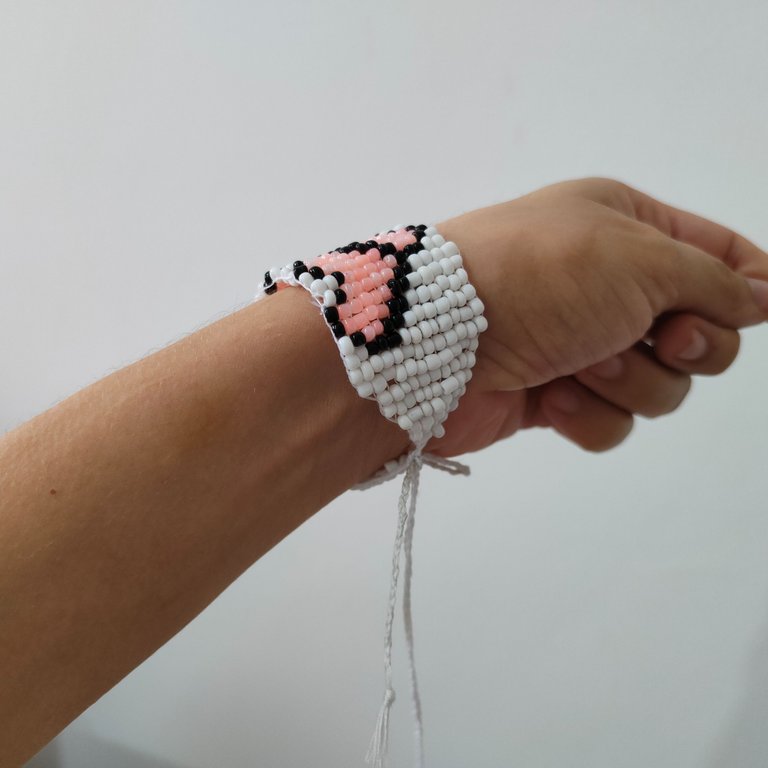
Espero haya sido de su agrado la pulsera del dia de hoy cualquier duda o sugerencia siempre serán bienvenidas, con gusto estare respondiendo en la sección de comentarios, sin mas gracias por su atención, tiempo y apoyo será hasta una próxima ocasión estimados amigos y lectores.
I hope you liked today's bracelet, any questions or suggestions are always welcome, I will gladly be responding in the comments section, without further thanks for your attention, time and support will be until next time dear friends and readers.
La creatividad no tiene límite. || There is no limit to creativity. ✨💎🎉🌷

COMMUNITY JEWELRY.

🎥Imágenes y vídeo creados con: |Images and video created with: Youcut video| Giphy | Canva |
🇪🇸 Traducido con DeepL
This bracelet design is very good. It looks so beautiful. Thank you for sharing how you made this bracelet.
Thank you very much. @diyhub
Te quedó hermosa esa pulsera amiga, el diseño y los colores son muy lindos y combinan muy bien, un accesorio perfecto sin duda 🥰
Awwwwwww mi bella @mariajcastro28 muchas gracias por tu apreciación me legra saber mucho que fue de tu agrado un fuerte abrazo ten bonito dia.
Genial para mi niña ☺️
De seguro lucirá muy bien la princesa de la casa. @edwing357
Holaaa amiga 🤗 claro que sí ☺️🤗🤗🤗😊
Congratulations @mili2801! You have completed the following achievement on the Hive blockchain And have been rewarded with New badge(s)
You can view your badges on your board and compare yourself to others in the Ranking
If you no longer want to receive notifications, reply to this comment with the word
STOPHola amiga muy bonito y creativo tu brazalete
Muchas gracias estimado amigo me alegra mucho saber que te gusto el trabajo presentado @virgilio07
Es un lindo trabajo, bien elaborado 😉
Muy bonita quedó la pulsera, la técnica Miyuki es muy bonita.