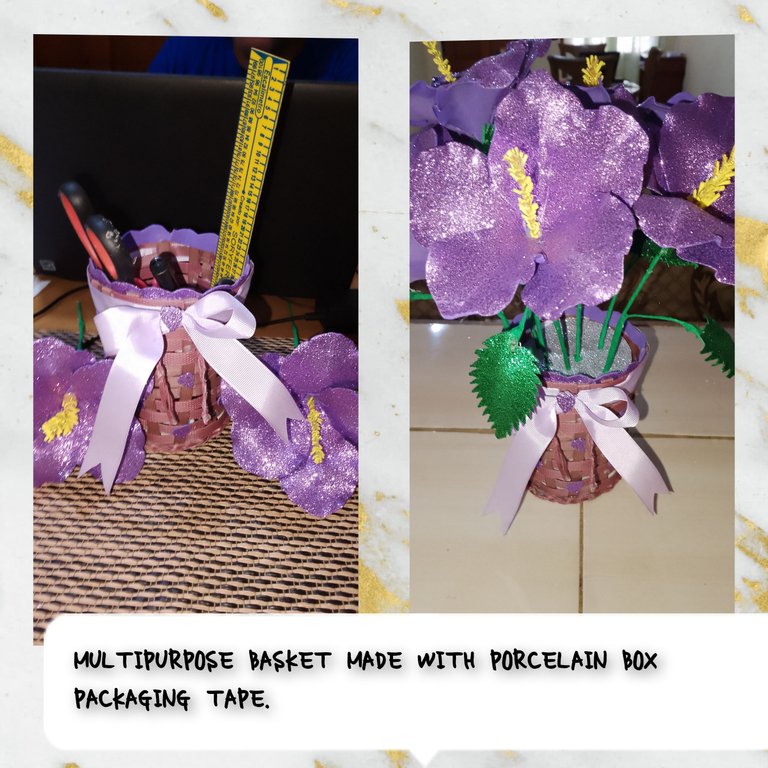
Hello everyone, I'm pleased to greet you, and wish this a great week, for everyone at @diyhub. May it be filled with a lot of tranquility and peace to create new and innovative content and projects. Today I am going to show you how to make a nice dispenser, which you can give it several uses, inspired by a very pretty flower pot, for flowers, as an organizer for pencils, for craft utensils, among others, for this I use packing tape, porcelain boxes. The invitation is. Follow me, until the end.
Materials:
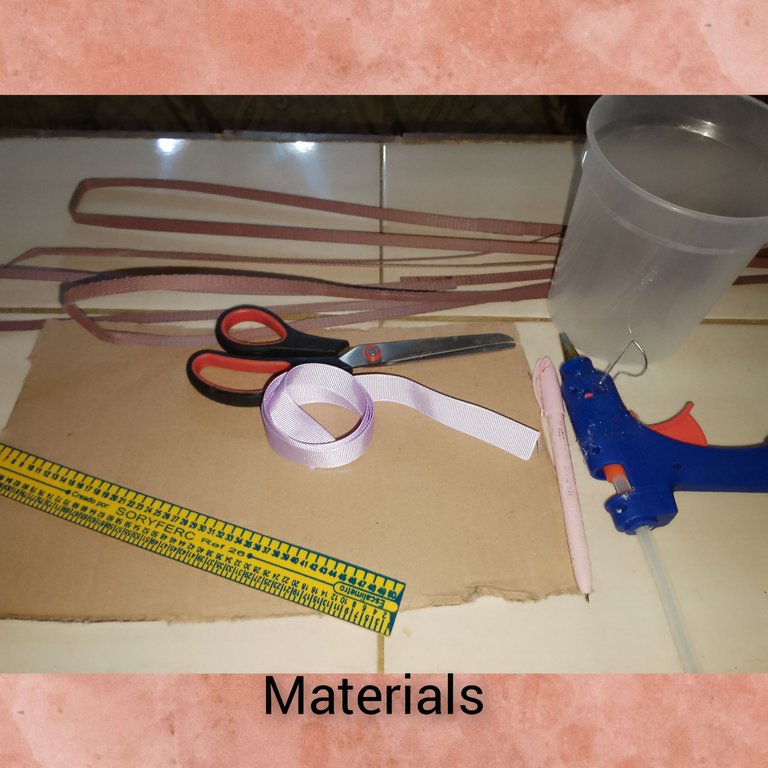
. Flat plastic tape (they come in porcelain boxes)
. Plastic container for food
. Piece of cardboard.
. Hot glue.
. Purple ribbon.
. Frosty purple foam cutouts.
. Marking pencil.
. scissors
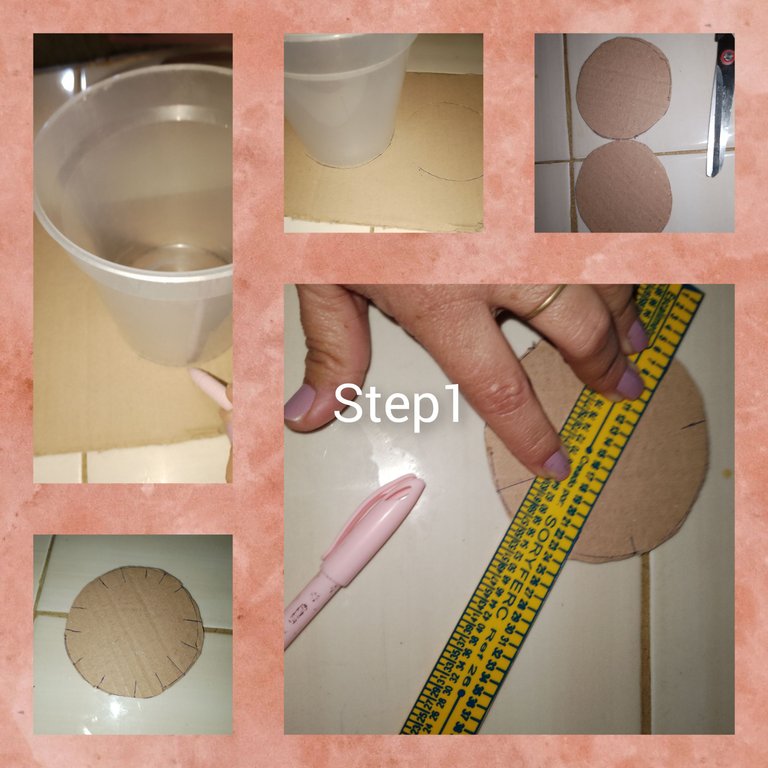
Steps: 1.) I start by placing the plastic soup container on the cardboard, with the help of the pencil I mark its upper part, repeat to obtain the drawing of two circles of equal size, then cut out with the scissors. Next, I mark with the ruler, 14 spaces, 3xcm each, I will only mark this in one of the cut out circles.
2.) Once I had collected the flat plastic packaging tapes for a few days, I cut fourteen 20cm strips, applied silicone on each of the stripes and glued a strip of tape.
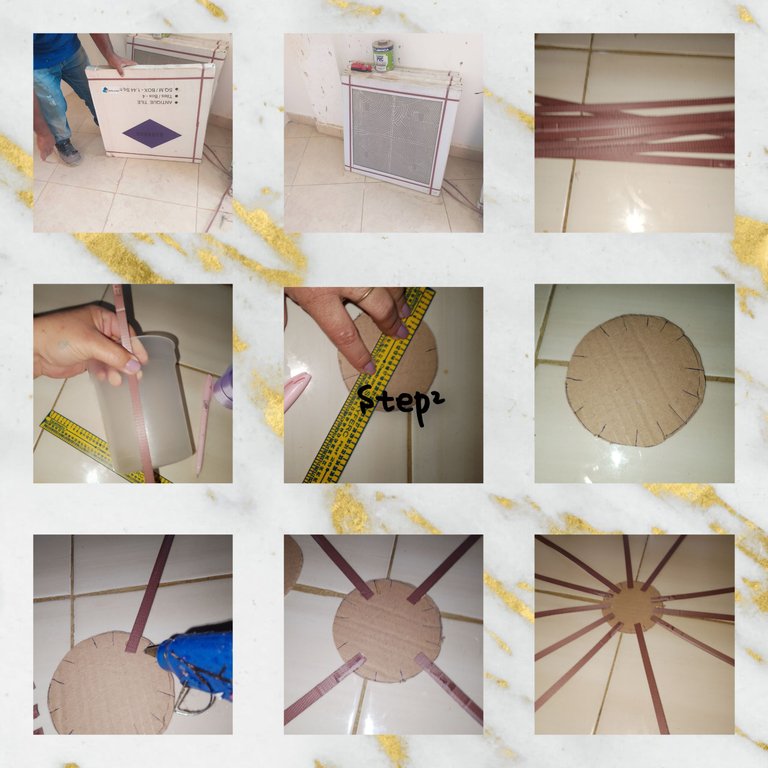
3.) Complete the fourteen ribbons, apply plenty of hot silicone, and glue the second circle, after gluing the circle, I make a small double to each ribbon, so that it begins to take shape, to continue, I place the container on top of the circles. plastic and I start knitting, with the basket stitches.
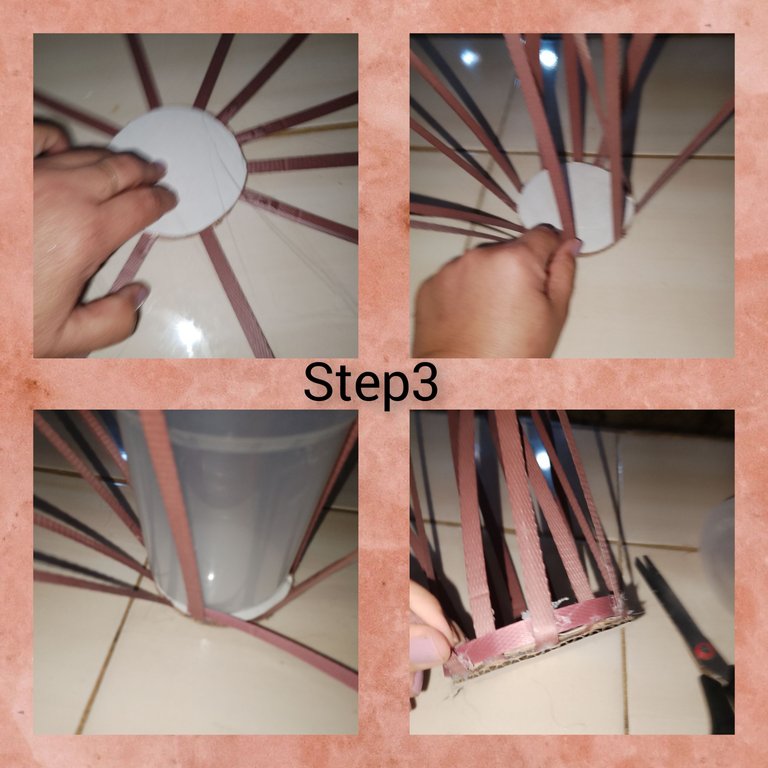
4.) I continue, with my knitting, and in each round, I must cut the ribbon, and start a new round, always from the same starting point, and very careful, so that each beginning is different from the previous one, in this way, I achieve the desired height. I removed the plastic container, it was a little difficult for me to remove it, since the silicone escaped and it remained stuck to the tape. But I managed to get it out, although a little battered.
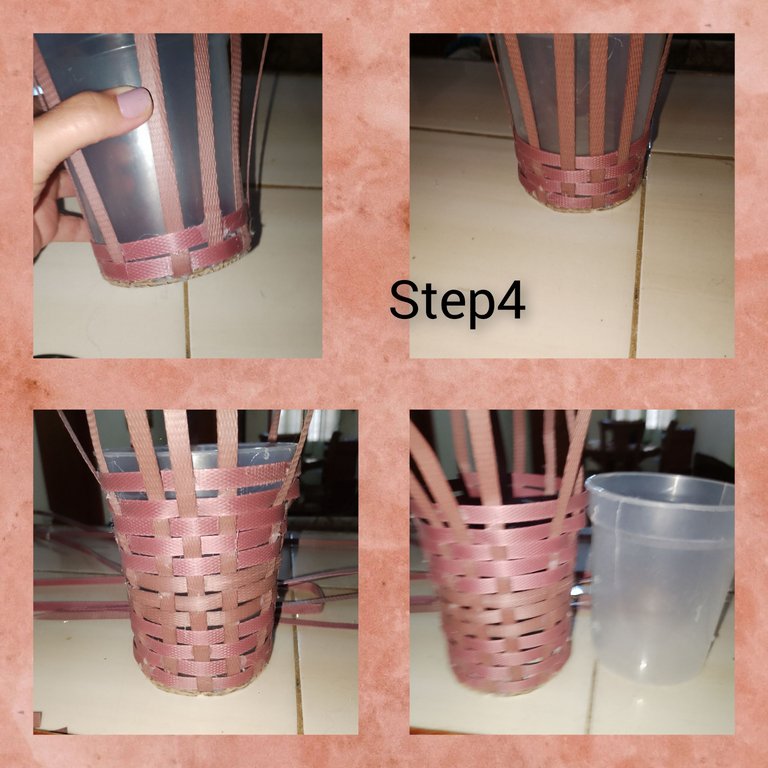
5.) Applying silicone, I fold all the ends of the packing tape inward.
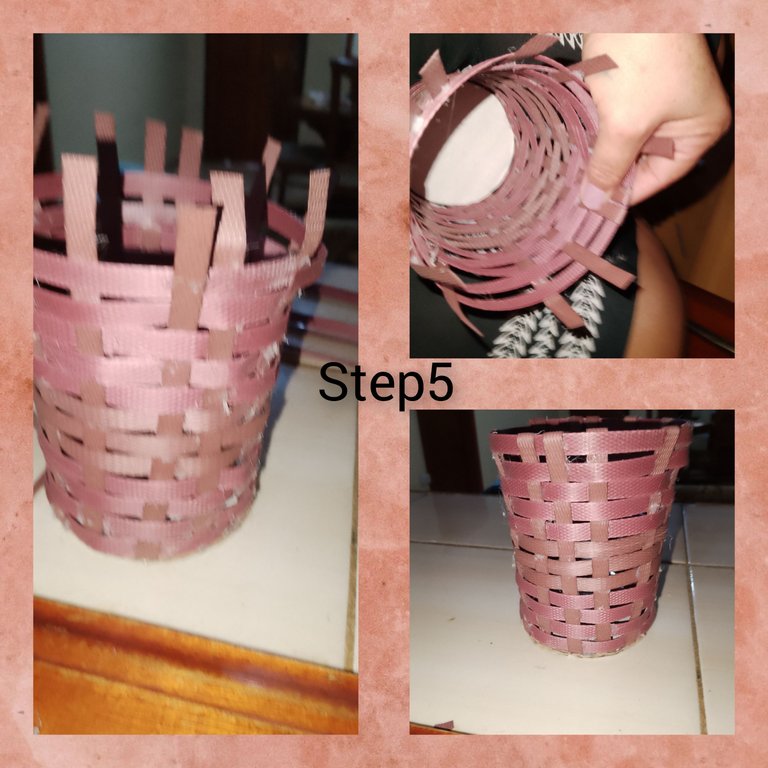
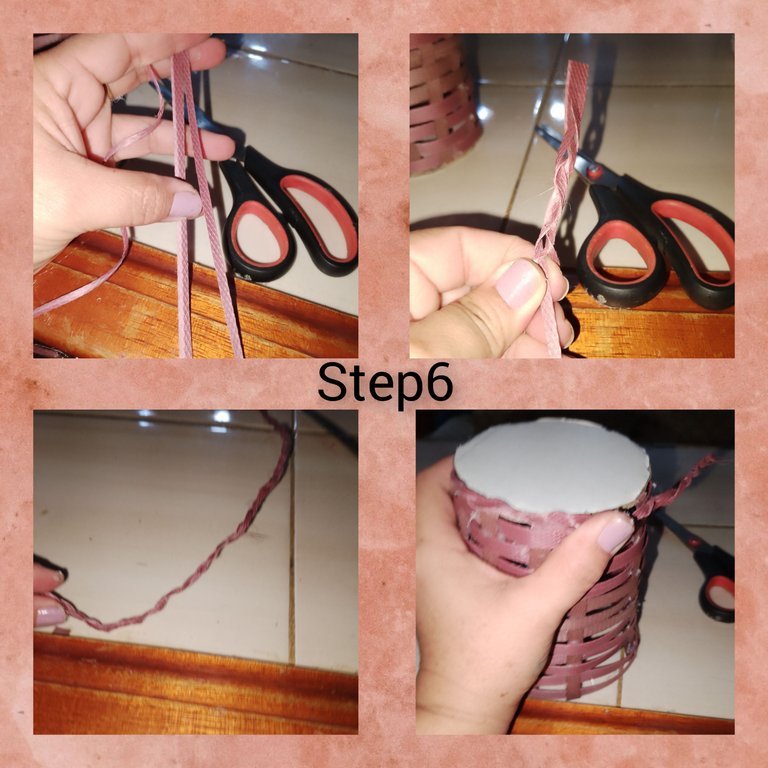
6.) I cut a piece of packing tape and make three thin cuts, weave a thin braid of three strands, applying silicone, on the top of the dispenser and turning the circle of the cardboard glue. Then I cut the residue.
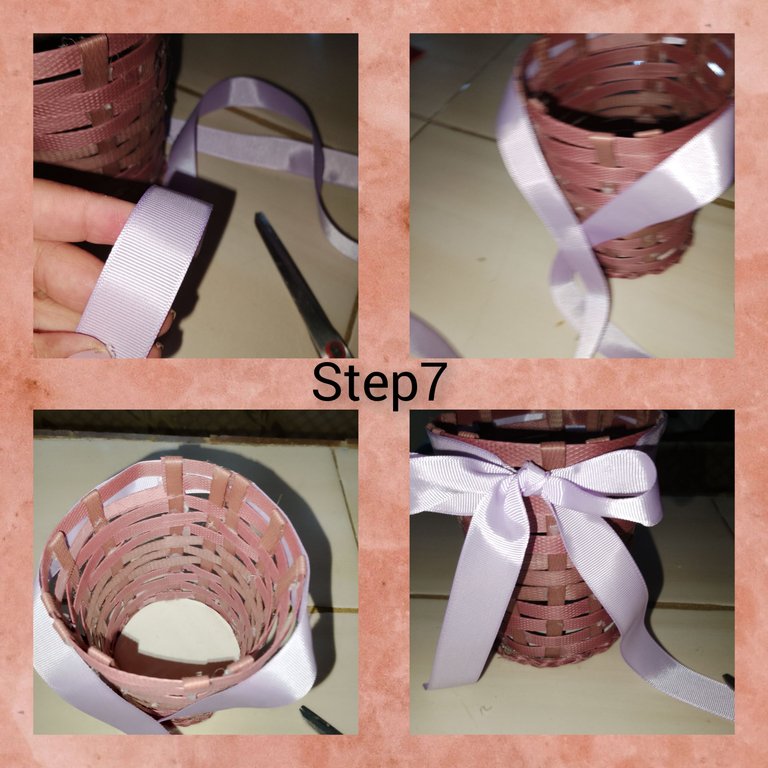
7.) With the silk tape, I go over the top of the dispenser, and define it apart from the front, making a bow, I make cuts at the ends of the tape, and place some silicone stitches, to prevent the tape from spreading.move.
8.) On the foam, he marked several hearts and cut out, he also marked a small linton, wavy the tips and glued them to the inside of the dispenser, leaving the wavy part visible. I glue a first heart on the ribbon, and with the rest, I glue around it.

Really pleased with the final result of this project, at first I didn't imagine what to do with so much waste, I only spent a day collecting it, to put it in the toilet, but the idea came to me that one collected it. I'm sure I'll do something else with them.

. All photos are my property, taken with my smartphone.
. Use incollage
. Use language translator.
Grateful for following me until the end, it is always a pleasure to visit my blog, it will be until the next opportunity.
(ESP)
Hola a todos, me complace saludarles, y desear est sea una gran semana, para todos en @diyhub. Que este llena de mucha tranquilidad y paz para crear, nuevos y novedosos contenidos y proyectos. Hoy paso a mostrarles como hacer un lindo dispensador, que puedes, darle varias utilidades, inspirado en una muy bonita maceta, para flores, cómo organizador de lápices, de utensilios par manualidades entre otro, par ello use cinta de embalar, cajas de porcelanatos. La invitacion es. Seguirme, hasta el final.
Materiales:
. Cinta planas plásticas ( vienen en cajas de porcelanatos)
. Envase plástico para comida.
Pedazo de cartón.
. Pegamento caliente.
. Cinta morada.
. Recortes de foami color morado escarchado.
. Lápiz para marcar.
. tijeras
Pasos:
1.) Comienzo, colocando el envase plástico para sopa, sobre el cartón, con ayuda de el lápiz marco su parte superior, repito para obtener el dibujo de dos círculos de igual tamaño, luego recortó con las tijeras. Seguidamente, marco con la regla, 14 espacio, de 3xcm cada uno, esto solo lo marcarle en uno de los círculos recortados.
2.) Ya recolectadas, durante algunos días,Blas cintas planas plásticas de embalar, corto catorce tiras de 20cm, aplicó silicón sobre cada una de las rayas y pego un listón de cinta.
3.)Completa las catorce cintas, aplicó abundante silicón caliente, y pego el segundo círculo, luego de pegado el círculo, hago un pequeño dobles a cada cinta, para que comience Tomar forma, para continuar, coloco sobre de los círculos, el envase plástico y comienzo a tejer, con el puntos de cesta.
4.) Continuo, con mí tejido, y en cada vuelta, debo cortar la cinta, e iniciar un nueva vuelta, siempre desde el mismo punto de partida, y muy tenta, a qué cada inicio se diferente al anterior, de esta manera, logro la altura deseada. Retiro el envase plástico, me costó un poco, sacarlo, ya que se me escapó el silicón y el quedó pegado a la cinta. Pero logré sacarlo, aunque un poco maltratado.
5.) Aplicando silicón, doblo hacia adentro, todas las puntas de la cinta de embalar.
6.) Corto un pedazo de cinta para embalar y hago tres cortes delgados, tejo una delgada trenza de tres hebras, aplicando silicón,en la parte superior de el dispensador y dando vuelta a el círculo de el cartón pego. Luego corto el residuo.
7.) Con la cinta de seda, recorro la parte superior de el dispensador, y defino l aparte de el frente, haciendo un lazo, doy cortes en las puntas de la cinta, y coloco algunas puntadas de silicón, para evitar la cinta se mueva.
8.) Sobre el foami, marco varios corazones y recortó, así mismo marco un pequeño linton, ondulado las puntas y pego por dentro de el dispensador, dejando verse la, parte ondulada. Pego un primer corazón sobre el lazo, y con los demás, pego por el alrededor.
Realmente complacida, con el resultado final, de este proyecto, no imaginé en un principio que hacer, con tanto desecho, solo paso un di en recogerlos, para echarlos al aseó, pero me surgió la idea, que un recolectó. Se seguro haré algún otro cosa con ellos.
. Todas las fotos son de mí propiedad, tomadas con mí teléfono inteligente.
. Use incollage
. Use traductor lenguaje.
Agradecida me hayas seguido hasta el final, siempre es un gusto su visita a mí blog, será hasta una próxima oportunidad.
Hermosas flores!
Gracias cariño... abrazos
It looks very practical for multiple uses, it looks very nice.
I'm thinking of making one I like to knit in different materials. 🌺🌺🌺
Hola, de seguro le quedará genial @lauracraft, que bueno le haya gustado. Hermoso martes.
Gracias linda, espero que sí 😃
Esta idea es interesante y práctica, me gusta lo bonita que queda la cesta para estar hecha con ese material, el resultado es muy bueno, me gustó mucho 😊
Gracias cariño, 😚 que gusto saber le haya gustado. Saluditos