¡Hola, hola! Mi gente de Hive y linda comunidad de DIYHub 😊, espero todos se encuentren súper bien, animados e inspirados 💟
Esta es mí entrada en el CONCURSO PURR-FECT DIYHUB - En tributo a los GATOS, inspirado por la celebración del Día Internacional del Gato, el pasado 8 de agosto.
Hello, hello! My Hive people and beautiful DIYHub community 😊, I hope you are all super well, encouraged and inspired 💟
This is my entry in the DIYHUB PURR-FECT CONTEST - In tribute to CATS, inspired by the celebration of International Cat Day, last August 8.
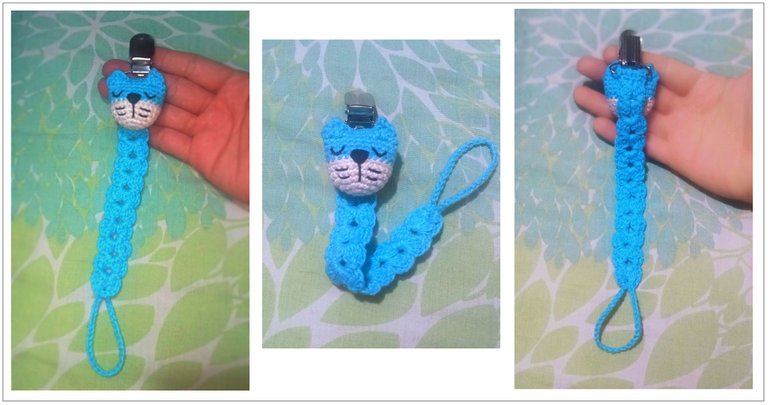
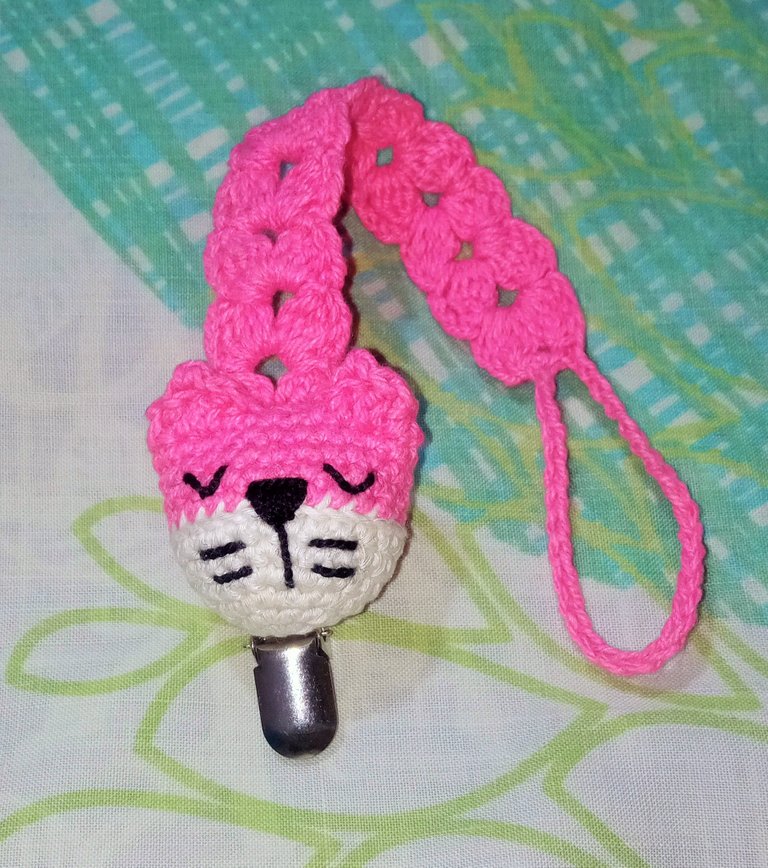
Portachupete regalado / pacifier holder gift
La idea de hacer el portachupete de michi dormilón, surgió de última hora, por la necesidad de hacer un obsequio a un lindo bebe que fuimos a conocer mi esposo y yo.
Y bueno la cuestión es que; hace un mes que nació un nuevo integrante en la familia de mi esposo, un lindo cachetón que nos tiene a todos enamorados jajaja…. Pero nosotros no habíamos podido ir a conocerlo, y bueno el domingo en la noche surgió la oportunidad de viajar a donde vive la familia de mi esposo, y pues no teníamos un obsequio para el bebé y decidí tejer algo y así no llegar con las manos vacías.
Y pase un ratito pensando que sería lo más rápido de tejer, y tenía que ser algo sencillo, pero también muy hermoso y útil, y ya que el viaje lo haríamos al día siguiente en la mañana, primero pensé en un gorrito o unos zapatitos, pero recordé que la mamita del bebe había pasado fotitos en el grupo de la familia de las cositas que le habían regalado antes del nacimiento del bebe y que habían bastantes gorritos.
Luego revisando a ver que colores de hilos tenia me di cuenta que tenía todo para hacer un portachupete y como son súper rápidos de tejer, me dije… listo este será el detalle perfecto, así que me puse manos al ganchillo e inicie a tejer.
Tengo varios amigurumis súper pequeños de gatitos dormilones y pensé que quedarían perfectos para decorar el portachupete y que el azul sería ideal para esta ocasión ya que él bebe es un niño, así que busque hilo del mismo con el que tejí al gatito e inicie el tejido.
Les cuento que el tejido lo hice tan rápido que no tome fotos del proceso, pero me gustó tanto el resultado que quise hacer otro y es el que le mostrare en este post. Tejerlo no toma más de 30 minutos, así que espero se animen a hacerlo.
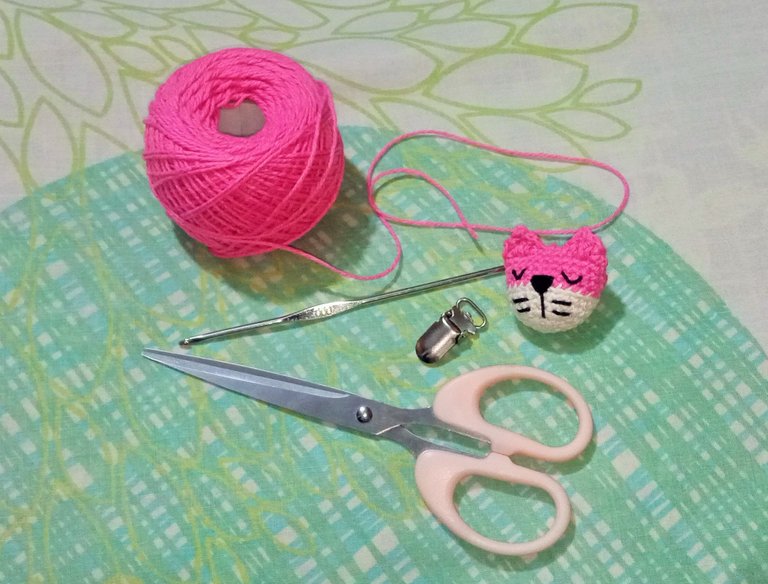
Materiales:
- Hilo de algodón (color deseado).
- Aguja de crochet #1.
- 1 Broche para tirantes.
- Aguja lanera y tijera.
The idea of making the sleepy michi pacifier holder, came at the last minute, because of the need to make a gift to a cute baby that my husband and I went to meet.
And well the thing is that; a month ago a new member was born in my husband's family, a cute baby boy that has us all in love hahaha.... But we had not been able to go to meet him, and well on Sunday night we had the opportunity to travel to where my husband's family lives, and we didn't have a gift for the baby and I decided to knit something so we wouldn't arrive empty handed.
I spent a while thinking about what would be the quickest thing to knit, and it had to be something simple, but also very beautiful and useful, and since the trip would be the next day in the morning, first I thought of a hat or some slippers, but I remembered that the baby's mom had passed pictures in the family group of the little things that she had been given before the birth of the baby and that there were quite a few hats.
Then checking to see what colors of yarn I had I realized that I had everything to make a pacifier holder and as they are super fast to knit, I said to myself... ready this will be the perfect detail, so I crocheted and started to knit.
I have several super small amigurumis of sleepy kittens and I thought that they would be perfect to decorate the pacifier holder and that blue would be ideal for this occasion since the baby is a boy, so I looked for the same yarn with which I knitted the kitten and started knitting.
I tell you that I knitted it so fast that I didn't take pictures of the process, but I liked the result so much that I wanted to make another one and that's the one I'll show you in this post. It doesn't take more than 30 minutes to knit it, so I hope you are encouraged to do it.
Materials:
- Cotton yarn (desired color.
- Crochet needle #1.
- 1 Braces clasp.
- Wool needle and scissors.
Para realizar este tejido solo emplearemos puntos sencillos:
cadeneta (cad.), punto bajo (Pb), punto alto (Pa), punto deslizado o punto razo (Pr) y punto popcorn.
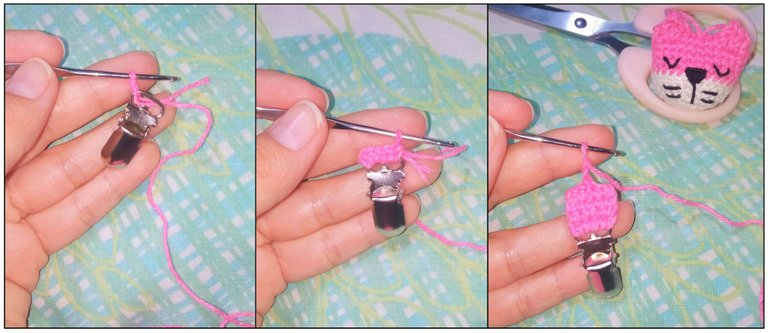
Paso a Paso:
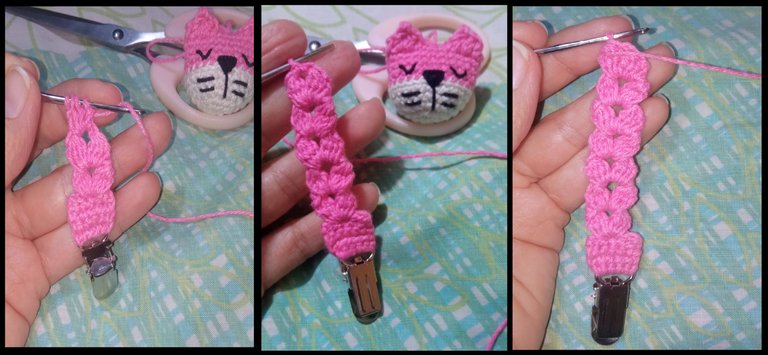
Para iniciar tejeremos 5 puntos bajos directamente en el broche, y seguidamente hacemos 3 vueltas de 5 puntos bajos cada una, para un total de 4 vueltas, al finalizar la última vuelta damos vuelta a nuestro tejido y hacemos 2 puntos deslizados, para así posicionarnos en el centro del tejido.
To knit this fabric we will only use simple stitches:
chain stitch (ch), single crochet (ch), single crochet (Pb), double crochet (Pa), slip stitch (Pr) and popcorn stitch.
Step by step:
To start we will knit 5 single crochet stitches directly on the brooch, and then we will knit 3 rows of 5 single crochet stitches each, for a total of 4 rows, at the end of the last row we will turn our fabric and knit 2 slip stitches, in order to position ourselves in the center of the fabric.
Dentro de este punto tejeremos 2 puntos popcorn separados por dos cadenetas, el punto popcorn se hace tejiendo 3 o más puntos altos dentro del mismo punto y cerrándolos juntos, en este caso serán 4 puntos altos cerrados juntos.
Inside this stitch we will knit 2 popcorn stitches separated by two chains, the popcorn stitch is made by knitting 3 or more double crochet stitches inside the same stitch and closing them together, in this case it will be 4 double crochets closed together.
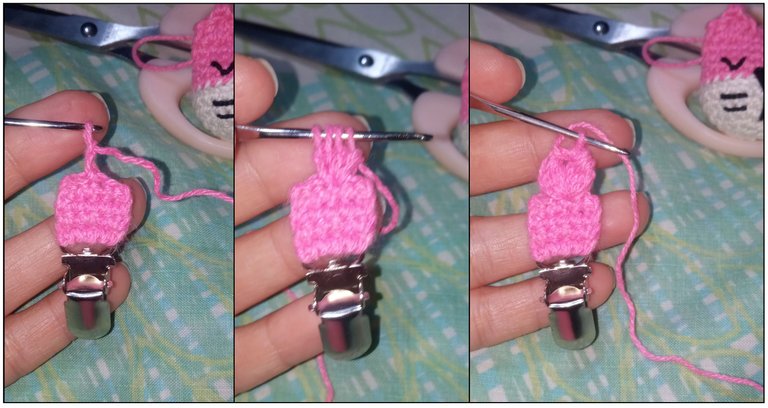
Entonces, estando posicionados en el centro del tejido base, que son las 4 vueltas de 5 puntos bajos, hacemos 2 cadenetas y seguidamente tejemos 3 puntos altos y cerramos todo junto, luego hacemos 2 cadenetas y 4 puntos altos cerrados juntos. Así formamos esta primera vuelta de puntos popcorn, y en total haremos 12 vueltas como esta, para así lograr aproximadamente 14cm de largo del cordón del portachupete.
Then, being positioned in the center of the base fabric, which are the 4 rows of 5 single crochet stitches, we make 2 chain stitches and then we knit 3 double crochet stitches and close all together, then we make 2 chain stitches and 4 double crochet stitches closed together. This way we form this first row of popcorn stitches, and in total we will make 12 rows like this, to achieve approximately 14cm of length of the pacifier holder cord.
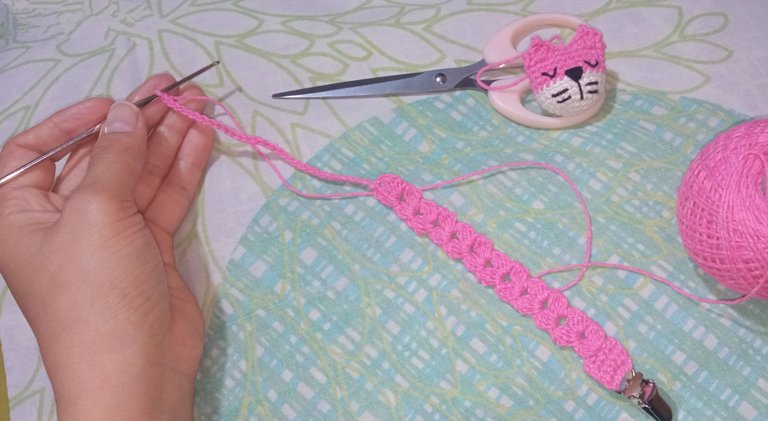
Al tener listas las 12 vueltas, realizamos 30 cadenetas y las unimos con un punto deslizado entro del espacio que queda de las 2 cadenetas que separan los 2 puntos popcorn.
Once the 12 rows are ready, we make 30 chain stitches and join them with a slip stitch inside the space left by the 2 chain stitches separating the 2 popcorn stitches.
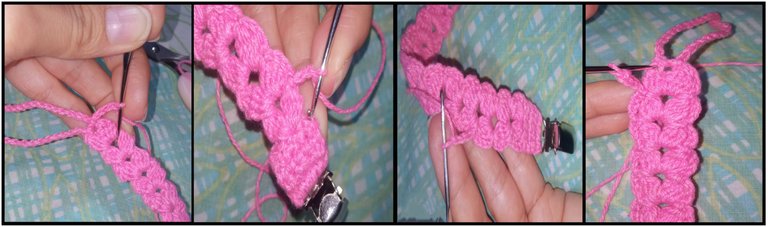
Ahora haremos una especie de borde para dar un acabado más prolijo a nuestro portachupete, partiendo del punto deslizado que acabamos de hacer, tejemos 4 cadenetas y con un punto deslizado las unimos a la abertura o huequito que fue quedando entre los dos puntos popcorn.
Now we will make a kind of border to give a neater finish to our pacifier holder, starting from the slipped stitch we just made, we knit 4 chains and with a slipped stitch we join them to the opening or hole that was left between the two popcorn stitches.
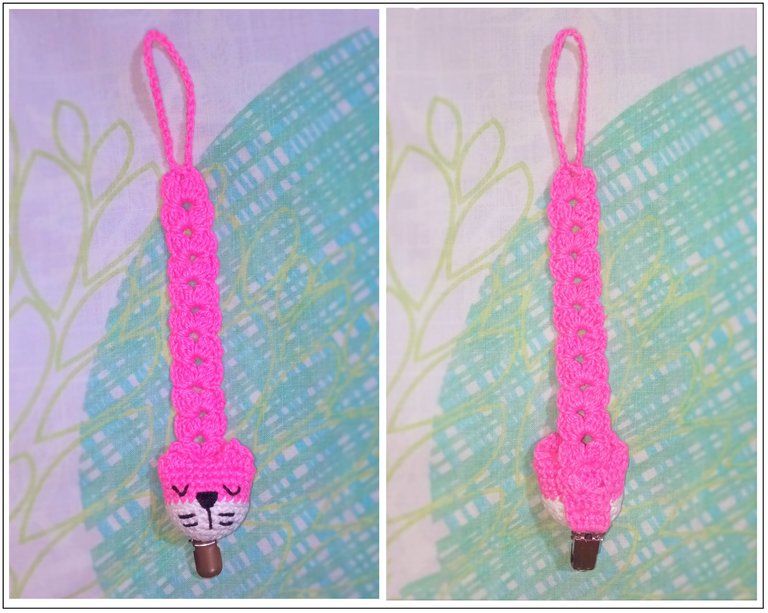
Para finalizar cosemos el Michi o gatito dormilón al tejido, asegurándonos de que quede bien firme para que sea completamente seguro para él bebe.
Y así culminamos este lindo trabajo de crochet de un portachupete de michi dormilón. También puedes hacer sólo la cinta tejida sin colocar ningún adorno y se verá igual de hermoso.
Finally, we sew the Michi or sleepy kitty to the fabric, making sure that it is very firm so that it is completely safe for the baby.
And so we finish this cute crochet work of a sleeping michi pacifier holder. You can also make just the knitted ribbon without any embellishment and it will look just as beautiful.
Deseo les haya gustado este post de como hacer este lindo portachupete y bueno espero sus bonitos comentarios y/o un me gusta, así me motivan para seguir haciendo más publicaciones de este tipo.
Se despide de ustedes con mucho cariño su amiga Nathalie @laranitacrochet
Todas las fotografías utilizadas en la publicación son propiedad de la autora.
I hope you liked this post on how to make this cute pacifier holder and I look forward to your nice comments and / or a like, so I am motivated to continue making more publications of this type.
Your friend Nathalie @laranitacrochet bids you a fond farewell.
All the pictures used in this publication are property of the author.
What a wonderful idea, it is a very tender detail, it is very beautiful. Congratulations, good luck in the contest.❤️
Thank you very much!😊
Ainsss Dios pero que belleza, eso es lo mas tierno que he visto hoy, la verdad me encanta tu trabaja, te felicito. Muy linda entrada al concurso. Muchas suerte. Sigue compartiendo este tipo de contenido tan maravilloso, tienes un gran potencial. Bendiciones @laranitacrochet 🌈
!DIY
Amén! Tu comentario me hiso el día! Muchísimas gracias 😊🤗, pronto haré un post de como hacer el gatito qué use para el portachupete 😉😁
Te quedo muy lindo y divertido seguro el dueño del chupete estaré feliz de tener esta belleza de accesorio.
Gracias! Yo también espero que el bebé disfrute de tener este lindo regalo.
Congratulations @laranitacrochet! You have completed the following achievement on the Hive blockchain And have been rewarded with New badge(s)
Your next target is to reach 400 upvotes.
You can view your badges on your board and compare yourself to others in the Ranking
If you no longer want to receive notifications, reply to this comment with the word
STOPCheck out our last posts:
What a beautiful job, a sweet and cuddly kitten to have as a pacifier holder. A very nice entry to the contest. Best of luck... Thank you for sharing in our community // Que trabajo tan hermoso, un gatito dulce u tierno para tenerlo de porta chupete. Una muy linda entrada al concurso. Suerte... Gracias por compartir en nuestra comunidad
Gracias! 😊
You can query your personal balance by
!DIYSTATS