
English
Greetings beautiful people of the #DIYHub community. I recently shared with you how to make a Paper Rose. Today I share with you a new way to do it, without needing to be so skilled in the art of origami.
Materials to Use
- Four pieces of paper with the following dimensions: one of 14 cm x 10 cm, the remaining 9 cm x 9 cm.
- Scissors
- White glue or glue bar (the one of your choice).
- Height stick or toothpick.
NOTE: You can use letter size colored paper or white paper. The one of your preference. I used letter size sheets with a pink and green textured pattern.

Final Result

As you could see in the video, this method is simpler, you only have to cut, half fold and glue. And the result is neater and more delicate. What do you think?
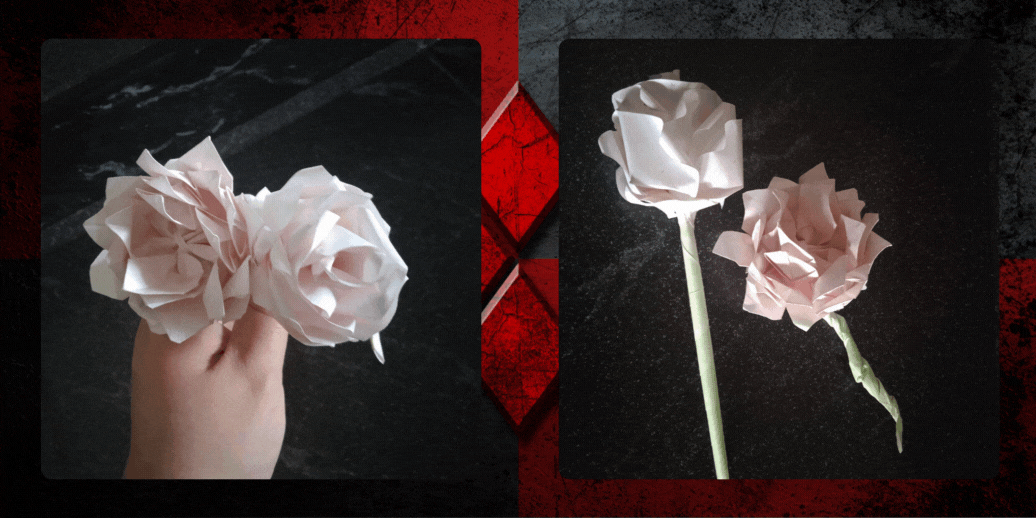
Here is the comparison of both Paper Roses, the previous one and this one. If I keep going like this I think I will make a paper Flower Bouquet, what do you say, should I encourage myself to do it?
If you want to know how to make the first Paper Rose, click HERE.
Thanks for making it to the end of my post.
Let me know what you think about it in a comment.
I'd love to read it.
See you in my next post! Cheers!
𝙾𝚛𝚒𝚐𝚒𝚗 𝚘𝚏 𝙴𝚕𝚎𝚖𝚎𝚗𝚝𝚜 𝚄𝚜𝚎𝚍
✦ The pictures used in this post and the video were captured by my Redmi Note 9A Phone ✦.
✦ Video Editing with ShotCut ✦
✦ Sound used in the Video ✦
✦ Thank You Video at the End ✦
✦ Translated with DeepL ✦
✦ Banners with Canva ✦
𝙼𝚢 𝚂𝚘𝚌𝚒𝚊𝚕 𝙼𝚎𝚍𝚒𝚊
|  |
|  |
|  |
|  |
|  |
|

Español
Saludos gente linda de la comunidad de #DIYHub. Hace poco compartí con ustedes cómo ahcer una Rosa de Papel. El día de hoy te comparto una nueva forma de hacerlo, sin necesidad de ser tan experto en el arte del origami.
Materiales a Utilizar
- Cuatro piezas de papel con las siguientes medidas: una de 14 cm x 10 cm, las restantes de 9 cm x 9 cm.
- Tijera
- Pega Blanca o Pega en Barra (el de tu preferencia)
- Palito de altura o palillo.
NOTA: Puedes usar hojas de colores tamaño carta o en su defecto hojas blancas. El de tu preferencia. Yo usé hojas tipo carta con un dibujo texturizado rosado y verde.
Resultado Final
Como pudiste ver en el video, este método es más sencillo, sólo debes recortar, medio doblar y pegar. Y el resultado es más prolijo y delicado. ¿A ustedes que les pareció?
Aqui está la comparación de ambas Rosas de Papel, la anterior y ésta. Si sigo así creo que haré un Bouquet de flores de papel, ¿ustedes qué dicen? ¿debería animarme a hacerlo?
Si quieres saber cómo se hace la primera Rosa de Papel, pincha AQUI.
Gracias por llegar al final de mi post.
Déjame saber tu opinión al respecto en un comentario.
Me encantaría leerte.
Hasta una próxima publicación! Saludos!
𝙾𝚛𝚒𝚐𝚎𝚗 𝚍𝚎 𝙴𝚕𝚎𝚖𝚎𝚗𝚝𝚘𝚜 𝚄𝚝𝚒𝚕𝚒𝚣𝚊𝚍𝚘𝚜
✦ Las fotos utilizadas en esta publicación, así como el video en sí fueron capturados por mi Telefono Redmi Note 9A ✦
✦ Edición del Video con ShotCut ✦
✦ Sonido utilizado en el Video ✦
✦ Video de Agradecimiento al Final ✦
✦ Traducido con DeepL ✦
✦ Banners con Canva ✦
𝙼𝚢 𝚂𝚘𝚌𝚒𝚊𝚕 𝙼𝚎𝚍𝚒𝚊
| | | | | |
▶️ 3Speak
These amazing paper flowers look amazing. With excellent skills and paper sticks, the scene of the flower has changed into a new color. Thank you so much for sharing your awesome skills. May God always bless you with all abilities.
Oh, thank you so much! now I have a lot of interest in paper flowers, I like them, and soon I will bring another tutorial, thanks for stopping by and commenting!
you are always most welcome thank you so much for your opinion
!diy
!discovery 35
This post was shared and voted inside the discord by the curators team of discovery-it
Join our Community and follow our Curation Trail
Discovery-it is also a Witness, vote for us here
Delegate to us for passive income. Check our 80% fee-back Program
Thank you so much!
a community encouraging first-hand content, and each individual living their best life.
Thank you! I really appreciate it 💕
You can query your personal balance by
!DIYSTATSOMG Thank you so much!
Congratulations @pannavi! You have completed the following achievement on the Hive blockchain And have been rewarded with New badge(s)
Your next target is to reach 30000 upvotes.
You can view your badges on your board and compare yourself to others in the Ranking
If you no longer want to receive notifications, reply to this comment with the word
STOPCheck out our last posts:
Thank you guys! 💕
Stay focused @pannavi! You're making great progress towards your Hive goals.
You made a beautiful rose with the paper.
Weldon job.
I try my best, thank you so much for stopping by! 💕
You are welcome. 😊