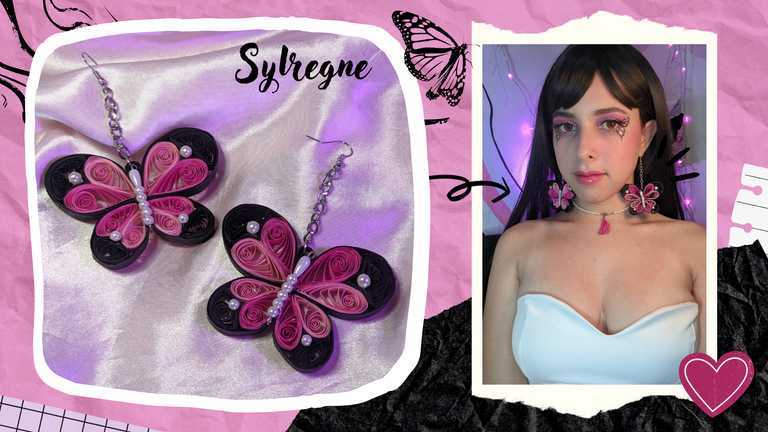
Hello dear friends🌸
Hola queridos amigos🌸
Estos zarcillos de mariposa hechos con la técnica de filigrana son piezas delicadas y detalladas que requieren habilidad y paciencia para crear algo hermoso con mucho amor,🖤 en este caso los colores los elegí basándome en el mi guardarropa; yo sabía que iban a quedar hermosos ya que los había visualizado en mi mente y quiero usarlos mucho, pues me parecen preciosos. ✨🦋

Había pasado unos días descansando ya que se me había enfermado un ojo y no lo quería forzar tanto😬. Aquí podrás ver todo el proceso de elaboración de estos hermosos zarcillos por si te animas a elaborar unos, lo bueno es que puedes hacerlos del color que más te guste y agregarle tu toque personal.🦋🌸✨
Materials I used:🦋
- Cardboard ribbons
- Glue
- Costume jewelry wire
- Tweezers
- Beads
- Base of tendrils and chains
Materiales que utilicé:🦋
- Cintas de cartulina
- Pegamento
- Alambre de bisutería
- Pinza
- Perlas
- Bases de zarcillos y cadenas
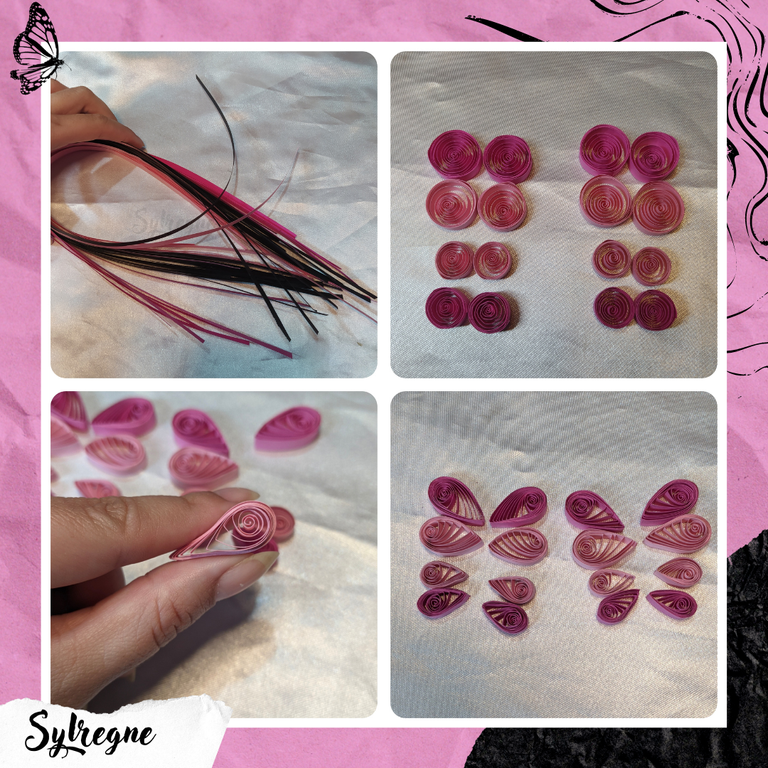
Steps
- First I started by cutting many strips of cardstock to create the ribbons.
- I used 4 pink and 4 fuchsia ribbons of 45 cm x 0.5 cm.
- For the smaller pieces I used 30 cm x 0.5 cm ribbons.
- I rolled the pieces and then flattened them with my fingers to create a drop shape.💧
Pasos
- Primer inicié cortando muchas tiras de cartulina para crear las cintas.
- Utilicé 4 cintas de color rosado y 4 de color fucsia de 45 cm x 0.5 cm.
- Para las piezas más pequeñas usé cintas de 30 cm x 0.5cm.
- Enrolle las piezas y luego las aplaste con los dedos para crear una forma de gota.💧
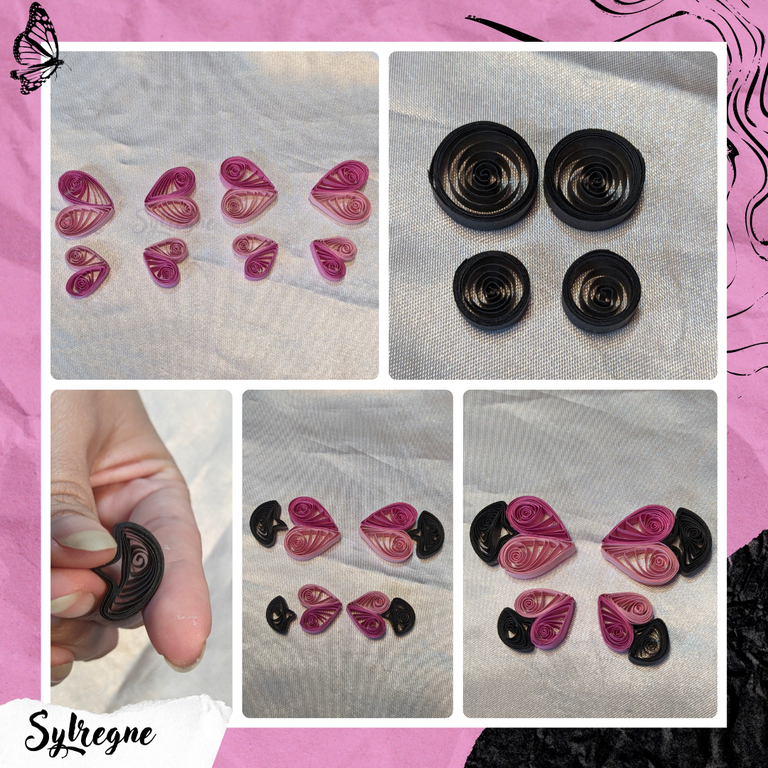
Steps
- I glued the pieces together creating heart shapes.🖤
- For each wing I used two pieces of 45 cm x 0.5 cm and two small pieces of 30 cm x 0.5 cm.
- I rolled the pieces and then with the help of my fingers I created a mushroom-like shape.🍄
- I then glued that piece to the top of the hearts.
Pasos
- He unido las piezas con pegamento creando formas de corazón.🖤
- Para cada ala utilicé dos piezas de 45 cm x 0.5 cm y dos pequeñas de 30 cm x 0.5 cm.
- Enrolle las piezas y luego con la ayuda de mis dedos cree una forma similar a la de un hongo.🍄
- Luego pegué esa pieza en la parte superior de los corazones.

Steps
- I glued a black ribbon around each piece with white glue until the desired diameter was achieved 🦋.
- Then I attached them together with glue and I would have the butterfly shape.
- I used costume jewelry wire, rolled the ends and put inside the wire a drop-shaped pearl and five small pearls, then glued them in the center.
Pasos
- Pegué una cinta negra alrededor de cada pieza con pegamento blanco hasta lograr el diámetro deseado.🦋
- Luego las uni con pegamento y ya tendría la forma de mariposa.
- Utilicé alambre de bisutería, enrolle las puntas y puse dentro del alambre una perla en forma de gota y cinco perlas pequeñas, posteriormente las pegué en el centro.
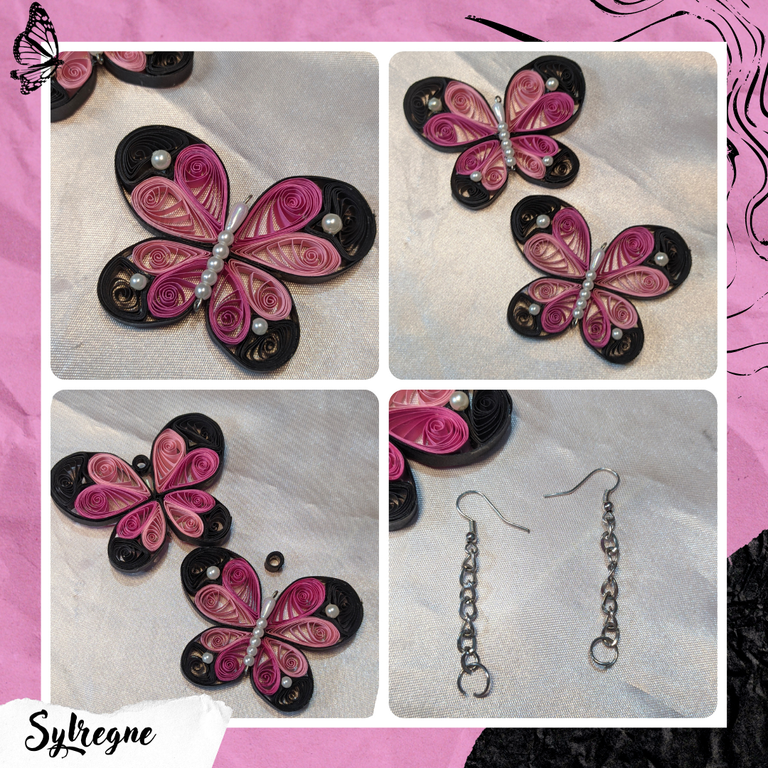
Steps
- I glued other ornament pearls on the butterfly.
- I made some small black circles with 5 centimeters of black ribbon and glued it just behind the body made of pearls.
- I applied varnish on each one.
- Finally I placed some chains together with some tendril bases on the previous piece.
Pasos
- Pegué otras perlas de adorno en la mariposa.
- Realicé unos pequeños círculos de color negro con 5 centímetros de cinta negra y lo pegué justo detrás del cuerpo hecho de perlas.
- Apliqué barnizado sobre cada una.
- Finalmente coloque unas cadenas junto con unas bases de zarcillos en la pieza anterior.
Final result✨🦋
Resultado final ✨🦋
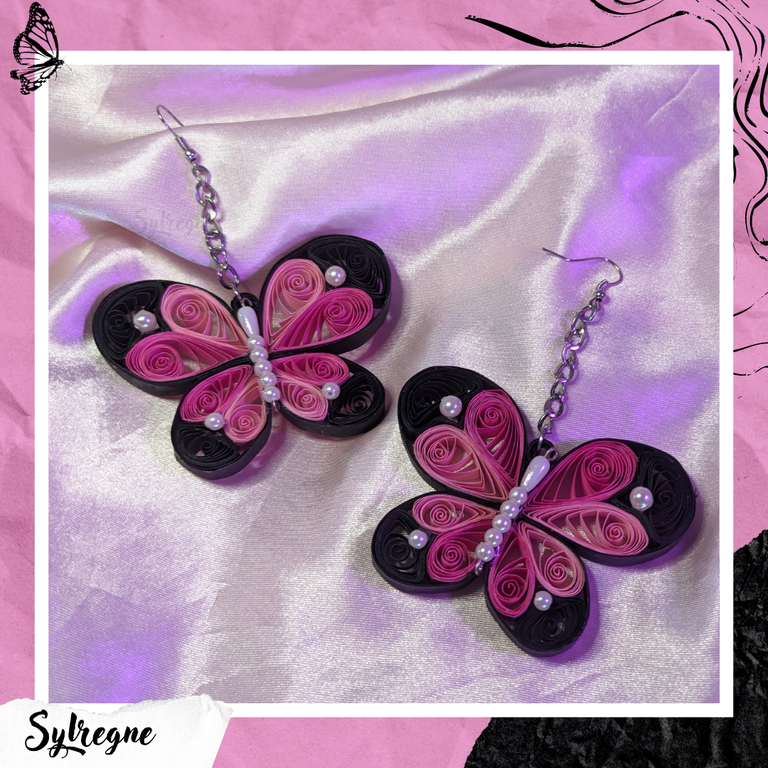
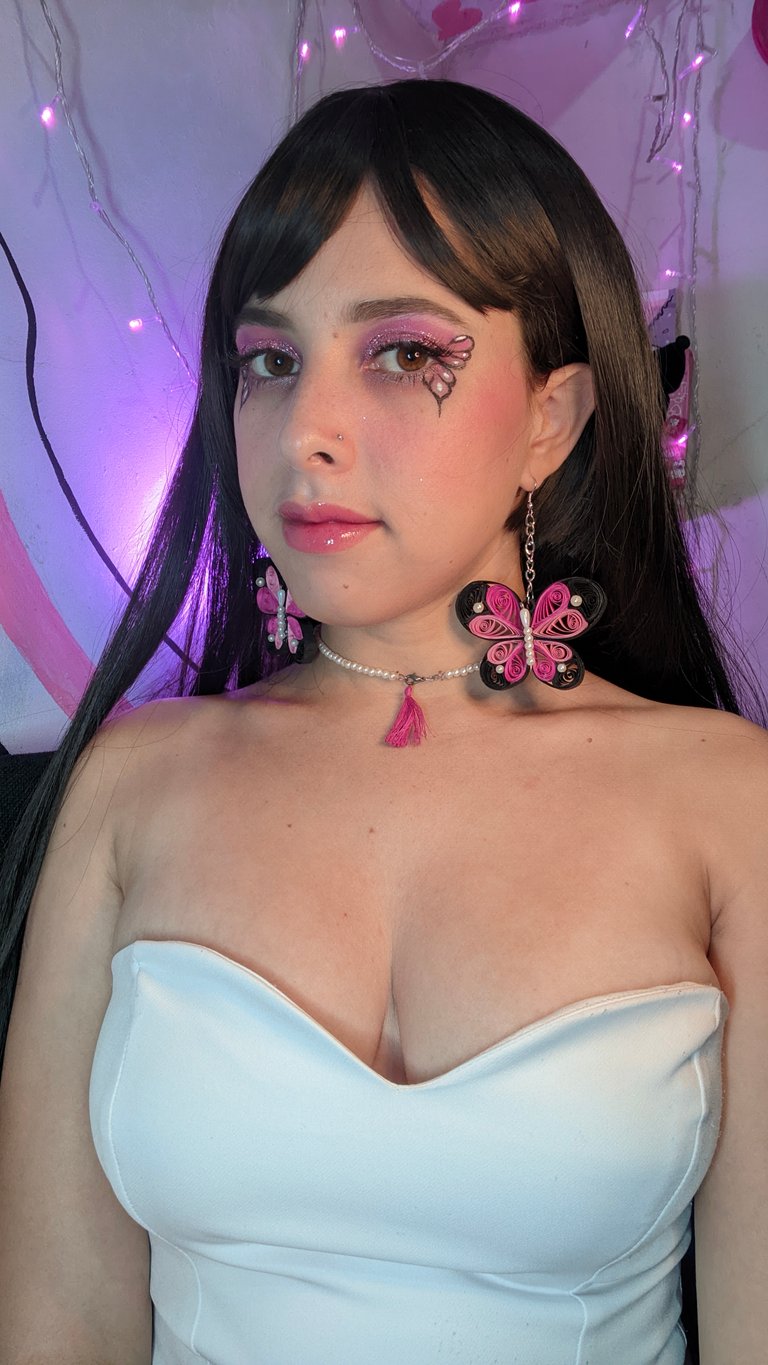

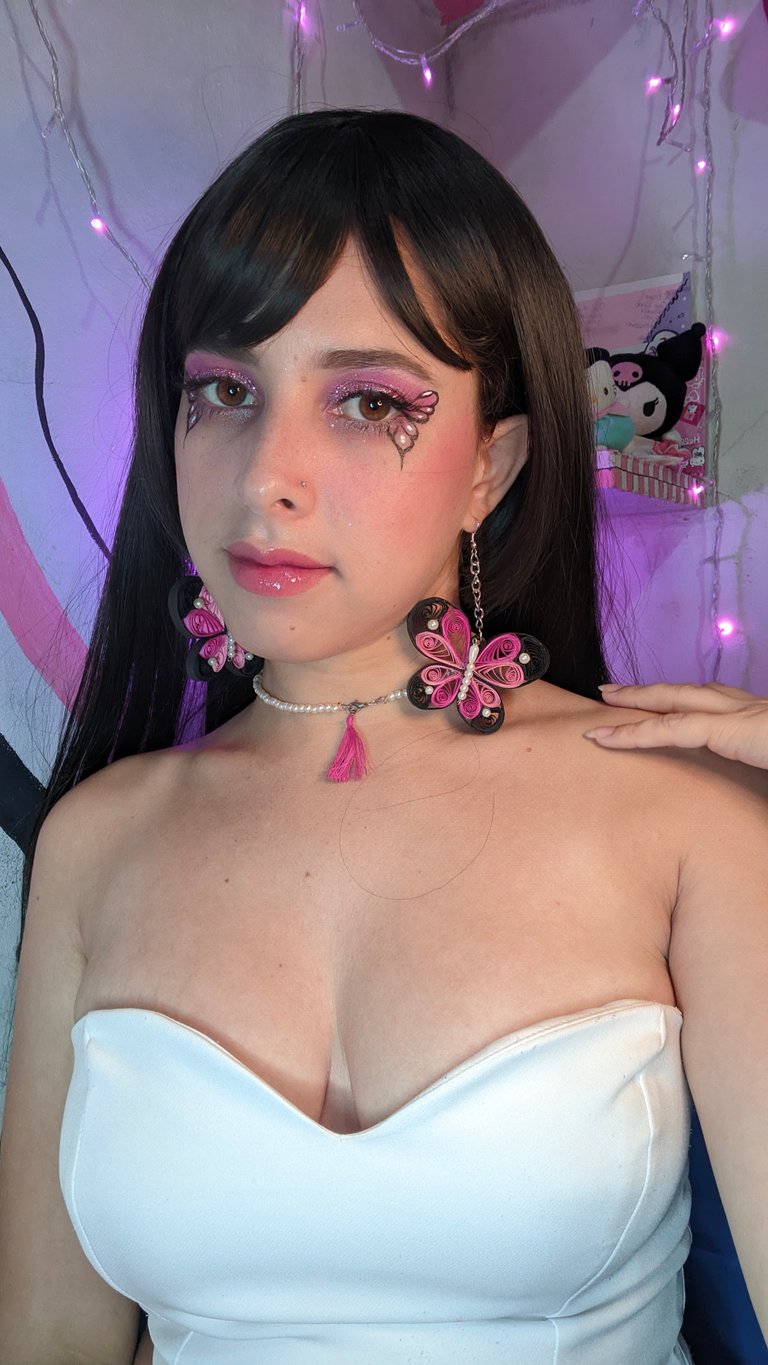
Estos zarcillos son perfectos para ocasiones especiales✨ o para añadir un toque de sofisticación a cualquier look ya que son muy llamativos, siento que se verían muy hermosos con un lindo vestido y lo mejor es que puedes convertir esta idea en un colgante, una tarjeta de regalo, un adorno, entre muchas cosas más. Recuerda siempre que puedes hacer cosas igual de bonitas e incluso mucho mejores que esta con mucho amor y dedicación.🌸🦋
See you soon with new ideas!🦋✨🖤
¡Nos vemos pronto con nuevas ideas! ✨🖤

Super delicados y bonitos tus aretes y el ambiente rosado para la ocasion!😁 Hiciste el post del maquillaje??
Si bella, de hecho el post anterior fué sobre el maquillaje ✨
Que preciosas te quedaron esas mariposas y como zarcillos lucen aun mejor, la combinación de colores también me encanta, este es un trabajo simplemente hermoso y perfecto 🥰🥰
Muchas gracias hermosa, yo creí que lucirán un poco extravagantes por el tamaño, pero me encantan 🌸
Wow these are lovely, I love the color combination😍
The colors are my favorites🖤🦋
quedaron muy lindo, me gusta mucho esta tecnica
Muchas gracias hermosa 🦋🖤
wow. So beautiful. Looks great on you.
Te ha quedado hermoso amiga, muy muy lindos.. saludos 🤗💕
Están espectaculares amiga