Follow along, as I demonstrate how I glazed this ceramic fantasy ship with various color effects. Further on, I will transform this elaborate art sculpture into a creative bonsai forest display.
Last time on my blog, I left readers in suspense as I built a custom ship out of clay slabs. And now we continue on with the results of that work, and putting all our faith in the magical fires of the hot kiln.
If you want to look back at the previous post, you can view it here.
https://ecency.com/hive-129017/@creativetruth/designing-a-decorative-clay-ship
Into The Frying Pan 🍳

Phew! It came out of the kiln in-tact.
A couple hairline cracks. This settles the inner debate in my mind: to fully glaze the side hull, or to leave parts of it au natural? To cover the cracks, I will be applying glazes liberally.
The deck pieces are removable, and they did not warp. This really surprises me that these floating platforms did not fuse in the kiln. I trusted our knowledgeable kiln staff to fire it all assembled together, and they were right. Amazing!
Let's Go For A Swim 👙
With the ship ready to be glazed, I felt I needed a quick side project to give me time to think about the various glaze combinations available to develop a matching color scheme.
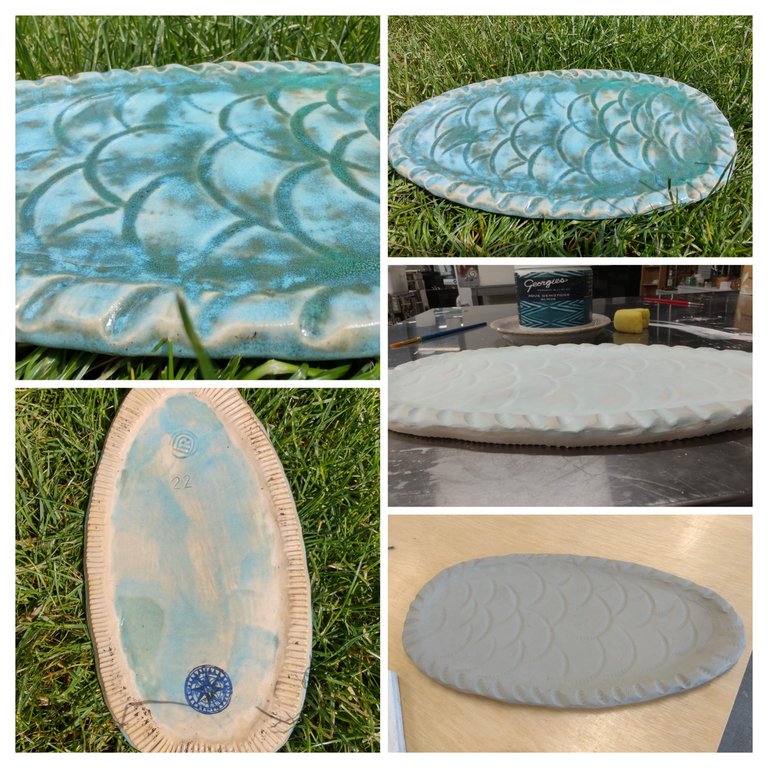
So I decided to build this simple tray for the ship to stand on.
To make a very flat tray that doesn't warp or rock on its feet is actually very challenging. My solution was to meld a band of flat clay on the entire perimeter underneath to act as a continuous footing. Even a tray needs a slight foot, so it doesn't scrape over the ground or rock over debris or tiny rocks. It sits over anything on the ground.
However, when joining soft clay to a footer, the clay will attempt to sag with gravity. What I taught myself about building feet, is to also build a temporary flat pad or platform. As long as it fits into that small space inside the footer to support the slightly raised tray center, it can rest flat without fear of sagging to the floor. Give it something flat to rest on, and it will stay flat.
No kidding, right? You would be surprised how many experienced potters can make gravity defying vases on a spinning wheel, but can't make a thing flat that stays flat on the worktable and in the kiln.
After it dried enough to flip the tray over without worry of bending the tray, I added textured tooth edges to the foot. This will add a bit of traction, to keep the tray even more stable.
The textures on top of the tray were made using the bottom curved edges of a jar. I was aiming to make it look like water rippling around the ship as it sails forward. It ended up more like fish scales.
A greenish glaze I found tends to break on high points, and fills dark in the crevices, and I thought it resembled deep ocean color. Over that I used a glaze called Blizzard to wrap everything with a snowy blue, sort of the foaming water on waves.
Underneath I covered the base lightly with more of the Blizzard glaze, and also a fun glaze decal with a nautical compass design.
Trick Photography 📸

The photos above are not of the finished glazed ship. It is the same bisque fired unglazed ship shown earlier. With a drawing app, I rendered the photos into black and white, and added a multiply layer to digitally paint the glaze colors where I thought the colors would look best.
The fun thing about painting a solid color on a multiply layer, is the shadows from the black and white photo are visible through the color. Everything ends up looking like a very realistic re-colored photo. And working digitally makes things easy to change if I change my mind on which features should be which colors.
Once the glaze touches, it doesn't easily wash off. No mistakes allowed. No changing your mind. And even harder, is the raw paintable glaze does not look anything like the final fired color result.
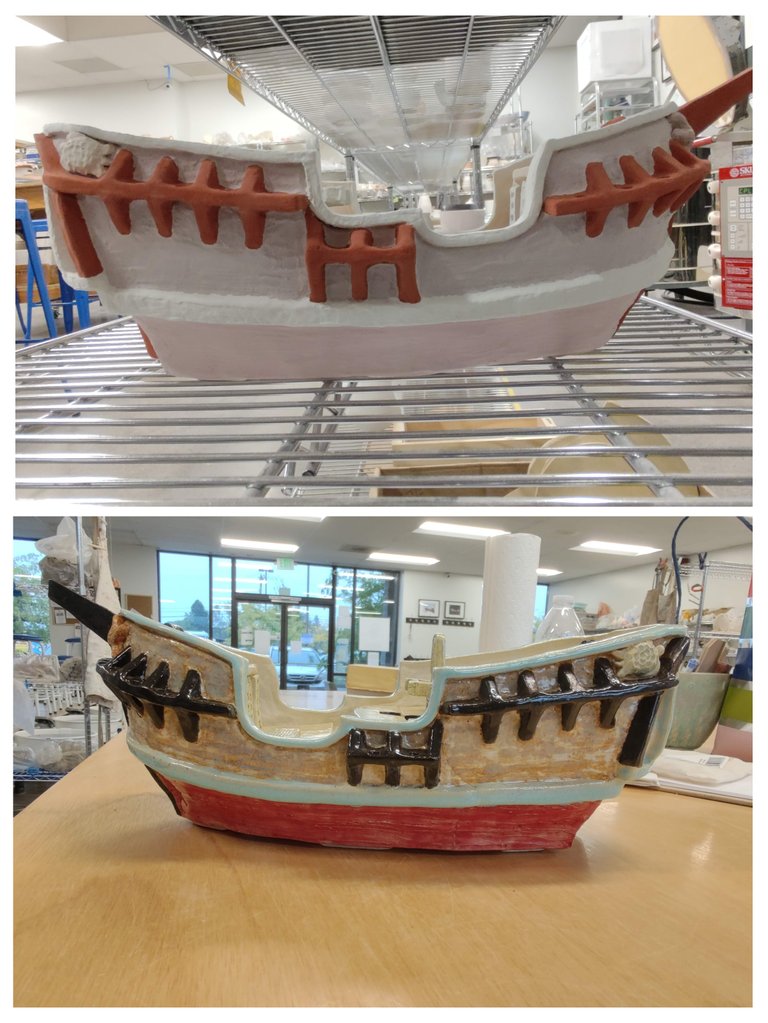
Rear View Results

Let's check out the before and after of each face of the ship, displaying how I painted on the glaze colors, and the resulting effect from being fired in the kiln.
Here on the back, I had glaze called River Pebbles, which turned more of a root beer black/brown than stone grey. That glaze was very watery and stained easily. I think I had to repaint areas four times to get the color this deep.
The cherry red glaze came out wonderful with the deep watermelon red color I was hoping for. The blue blizzard came out a bit light for my tastes, but it did well in keeping the edges looking less heavy, almost like a cloud ship. The inset windows used a lavender glaze, and I think turned out effective in giving a foggy sky reflection imitation.
Over the wood panel walls, I used some glaze combination wizardry. There is a purple glaze that swirls in multitones on textured surfaces, but when combined with a white gloss glaze, everything picks up a beach sand overtone. This was a gamble, but I think it made a decent impression of random natural wood stains. Natural Rock and wood tannin patterns are very challenging to mimic with glazes.
Details, Details

Literally nothing in the hundred of glaze options resembled orange, which I desperately wanted for the starfish. One glaze I had never tried, was called Kimchi, and almost everyone else was using it on everything to make a sort of spicy red sauce effect. It actually performed well on my starfish, as the reds lighten to orange on the thinner surfaces, and deeper in the crevices.
The turtle was painted thick with an accent parakeet green gloss glaze, and picked up almost none of that color. So we gotta live with these white turtles, with a faint blue copper sheen.
Inside the ship the deck floors were given a glaze called honey, but I think it ended up losing the warm yellowy tone, and ended up a bit teak. The trap door, wheel box, captain's door, and ladders were given a glassy green glaze with an autumn leaves stain glaze to accent the inset corners.
My biggest concern was the glazes would drip and run everywhere. I think I must've been wise in choosing glazes that stay tight to their surfaces. On the decks I was very cautious, and constantly sponge wiped clean all side surfaces and underneath, so the decks could remain freestanding. Even though the deck looks like a seamless glaze edge to edge, I actually wiped off 1/8 inch of glaze from all the top edges to prevent it from dripping down the sides.
But did it work? Or did it all fuse solid?
Some Assembly Required

Success!!!
Once again the glaze staff proved their trust to be worth their weight in gold. Everything was fired in the fully assembled shape, and my decks maintained their shapes and freestanding nature.
Now we can open up the pot and look inside where the bonsai trees can be planted.
With all of these removable pieces, what we've made is a very large, heavy, and glasslike lego set only suitable for adults to handle. That's okay, it's my cumbersome toy, and it can be appreciated by people of all ages to look at.
Side View Results
Basking in the glory of this colorful side profile.
Audition Day One: Making The Cut ✂️

Almost a year later, I ordered some Japanese Maple trees. They were being sold as bare root in the winter time. This variety had nice star shaped dragon blood colored leaves, which I thought might dazzle on a windy, sunny day.
None of the taproots had been pruned, and they all looked quite rootbound into a long vertical bottle shape. So I said a little nature prayer and removed as much of the long thick taproots as I dared. Some of the smaller roots were also knotting up in coils around the outside and back through the center, so I trimmed those a bit to tame the snarling mess.
Next I filled the ship with some bonsai soil mix, and planned out how to fit the trees inside.
Houston, we have a problem.
How Not To Build A Ship
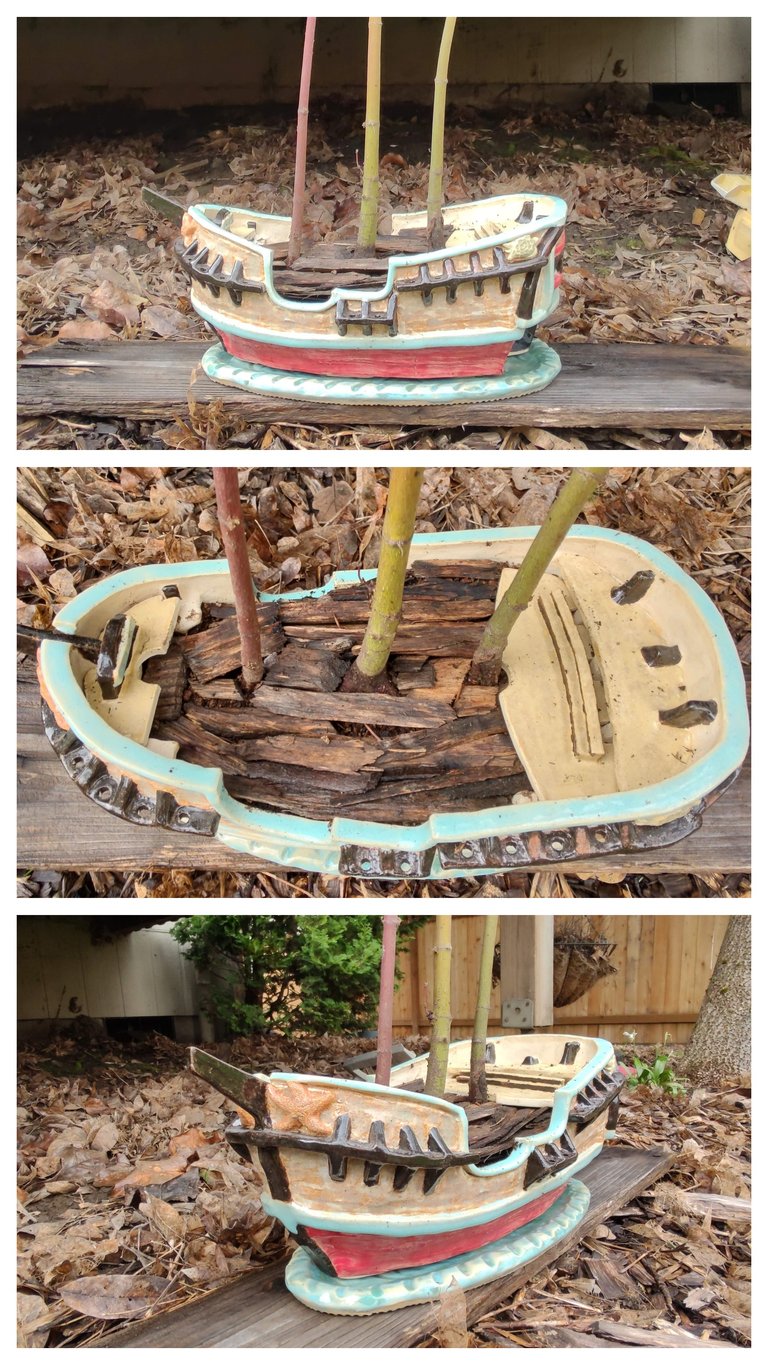
The size of the trunks and roots on the trees are extremely thick.
Some of the trees are far too thick to fit through the mast holes. Most problematic is that the lowest deck only allows a couple inches of soil and air space for roots and nebari to squeeze into. The front deck gives less than an inch from the trunk before the roots run into the side walls.
Plan B: Let's just open the decks, and stuff the trees in. Yes, these wood chips will look like good temporary wood decks. 😁

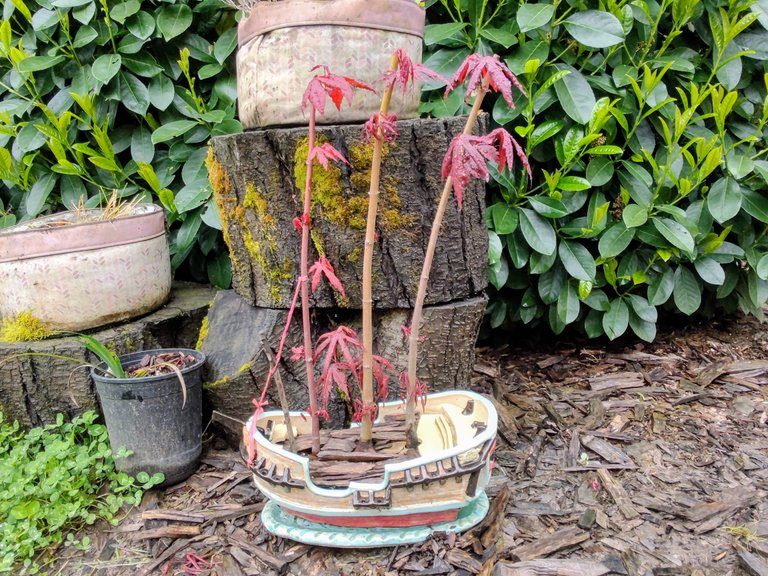
And now here we are in May of 2024, and the trees have successfully pushed out the first leaves of the year.
Multiple buds are opening from the top, middle, and base.
Clearly the roots are taking well to the new container.
Even some rigging lines have been added. A bit of raffia and a stick to keep tension on it are acting as a guy wire to stretch the front mast forward slightly.
Will we ever be able to lay those decks back in? Perhaps. Much smaller trees would be necessary for this ideal outcome. Until then, we'll enjoy what rewards we currently have to work with.
#japanese-maple #glaze #bisque #clay #ship #caravel #hobbies
Photos in this post are all #originalworks by @creativetruth, unless stated otherwise.


for planning
once applying the glaze. Interesting how seemlessly you move from digital to physical world. Not as easy as you make it sound lol
The wonder of working with glaze in a kiln. The transformation when fired with results that are anything but certain
Definitely 👏
I think your vision of the red sails was acheived. Your creative mind will soon have another idea that includes using the decks 😁