( ENG)
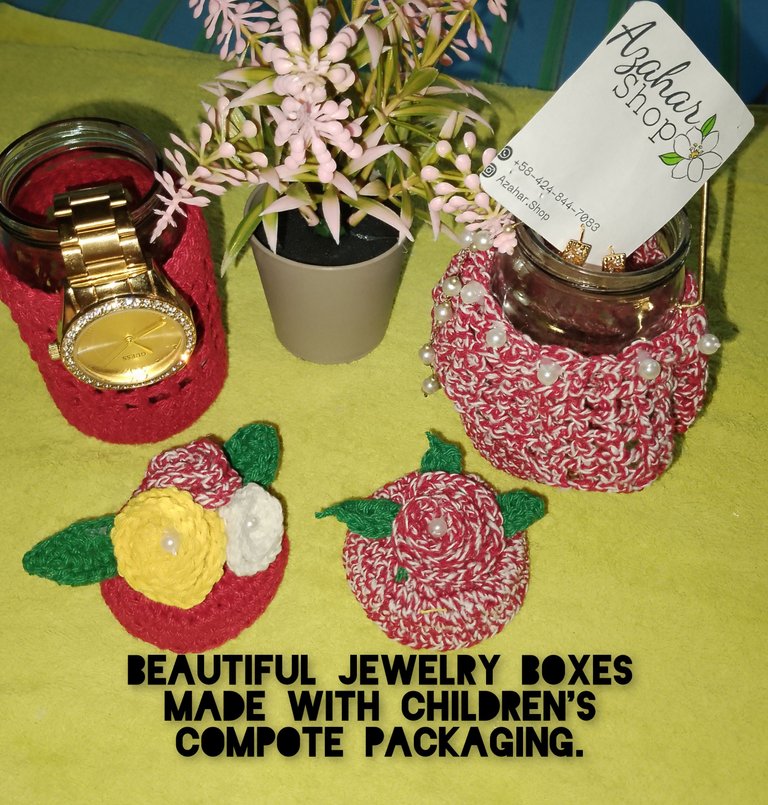
Hello everyone, I feel great joy and pleasure being with you at @diyhub, hoping you are well and enjoying good health, next to your loved ones. Today I am going to show you a very simple and cute manual project, made using the recycling and crochet technique, where I used glass containers for children's compotes. I love working with these containers. With them I have made two beautiful jewelry boxes, which will allow me to keep my accessories safe and organized and above all to be able to classify them, without failing to mention how decorative they look on your shelves or dressing tables, the invitation is to follow me and I will show you how beautiful and easy to do. I wish you enjoy it.
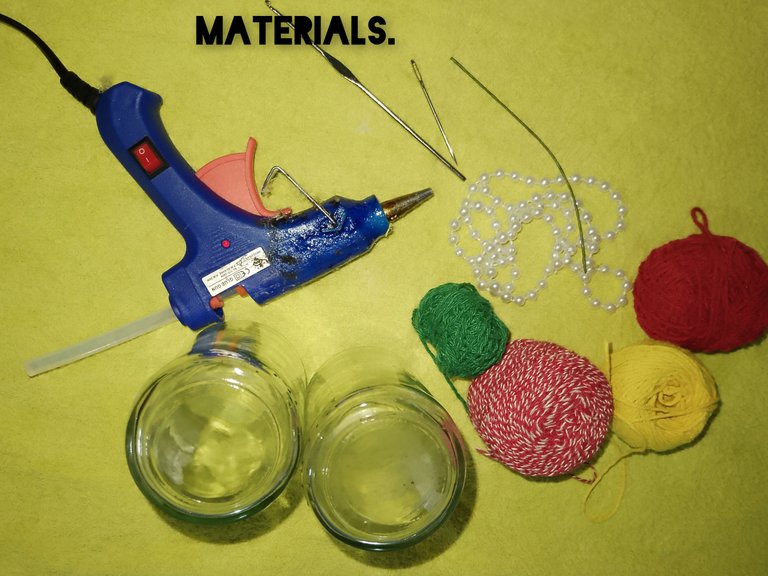
Used materials:
. Two glass containers.
. Pavilion threads for knitting, colors (red, red tinted with white, white and green).
. Knitting needle.
. Wool needle.
. Run pearls.
. Wire cuttings.
. Scissors
. Hot silicone.
STEPS:
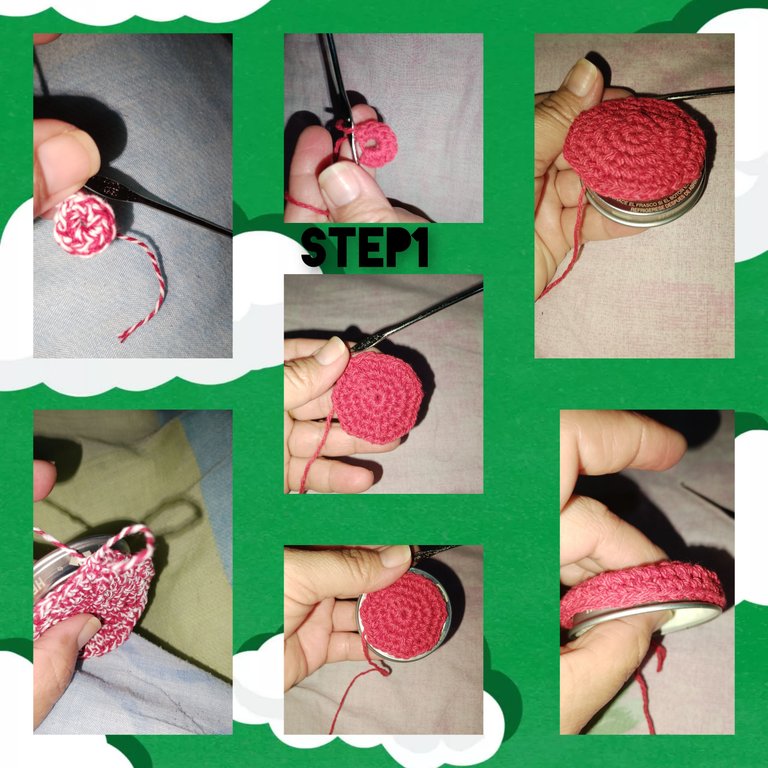
1.) After removing the label from the containers, wash and dry. Using the technical crochet technique, I prepare to knit a cover, which completely covers the top. So, in a magic ring, I will knit, (8sc) and close the ring, in the first sc. And I pick up the ring. For the next round, I will knit, an increase in sc. In each bp. From the previous round, for 16mp. For the next one, I will knit sc, followed by an increase, for (24 sc), in this way, I will knit, two more rounds, for a total of five rounds, making increases, on round four of two stitches and then the increase and the next three sc and the increase. Reaching a total (40 sc), to cover the small edge of the lid, I will knit two rounds without any increase. In this way, I achieve the right size to cover the lid, repeating for the next jewelry box.
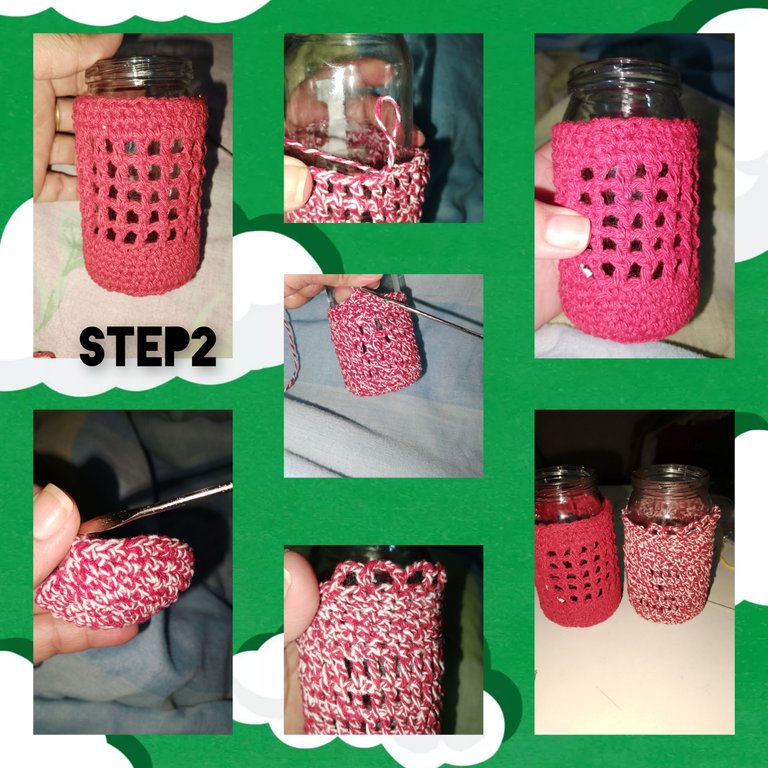
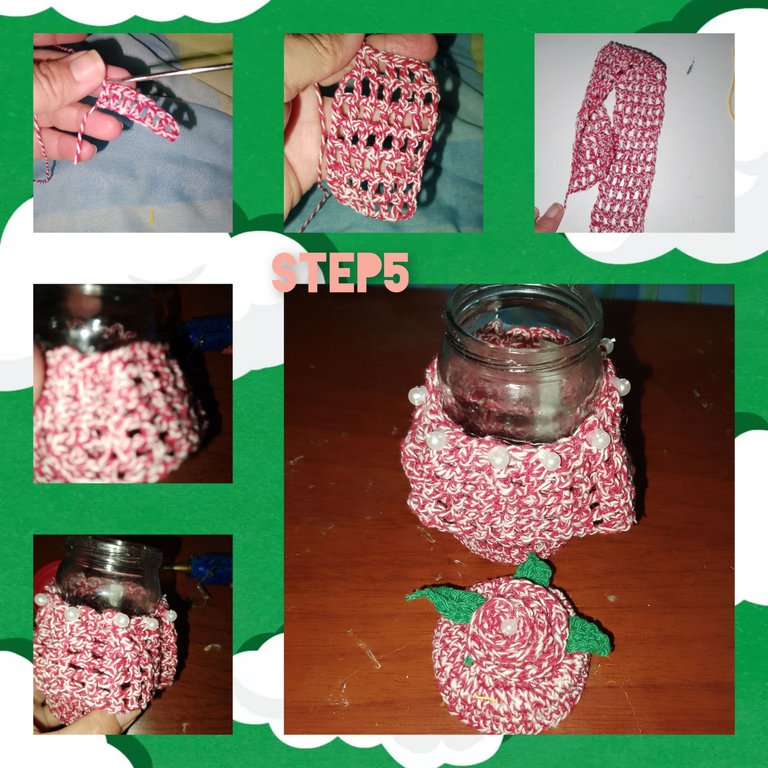
2.) to cover 70% of the surface and the glass container, I begin, repeating the previous step, until round n5, which reaches a total of 40 sc. I knit for a first container, 10 rows of sc, then I pick up a (dc), I knit a (dc), I leave a (sc) and in the next knit, (dc), in this way, I do the route and a total of five rows, I continue, and I knit five more rows of (sc). For the next one I repeat, as is, only that on the edge of the tinted red container, I knit a small border of three, sc, leave a sc and repeat.
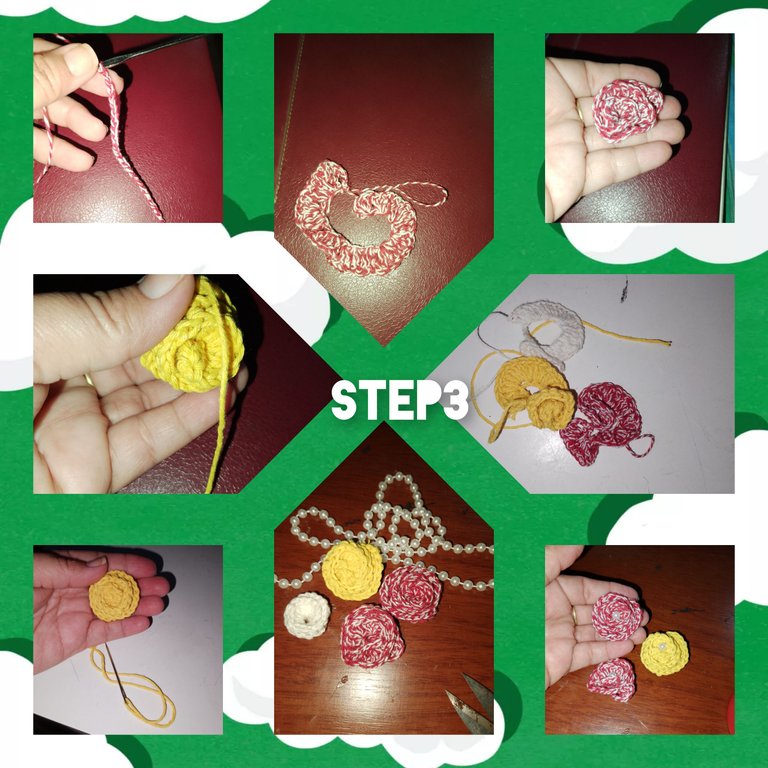
3.) to decorate, yew, 22p.c) and in each of them, yew (4p.a), for, (88pa). After finishing off, I leave a small piece of thread, I place the wool needle, and from the beginning to the end I go around, forming a flower and making several stitches with the wool needle. In this way I formed the flower, I released running pearls and glued them in the center, with a silicone stitch. Using this same process, I yew flowers of different colors.
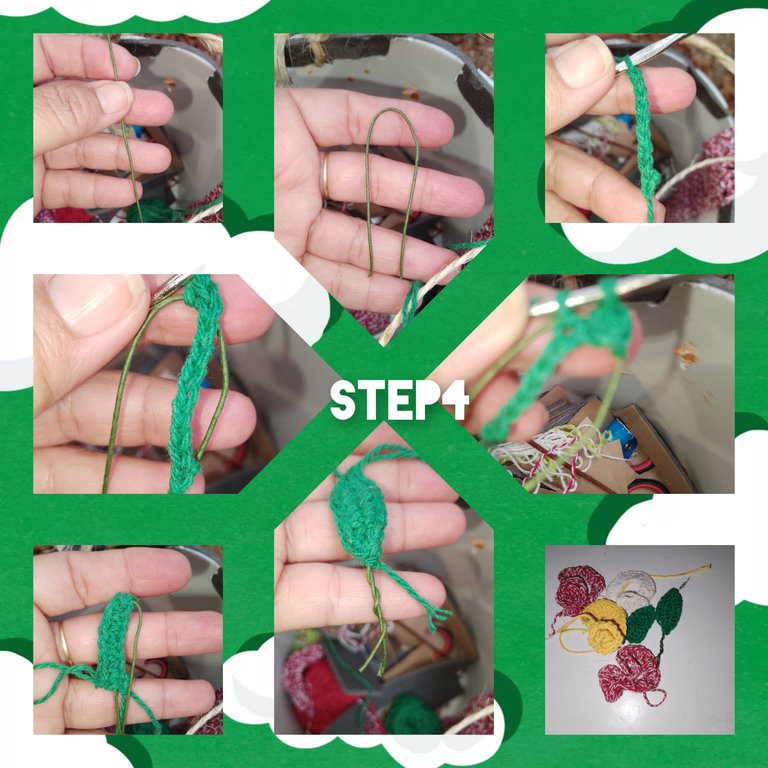
4.) I fold the wire cuts in equal parts, knit (7p.c) and wrapping the wire, I knit half stitches, arriving at the bottom of the first (p.c), I knit the next side in the same way, and if formed littleleaves.
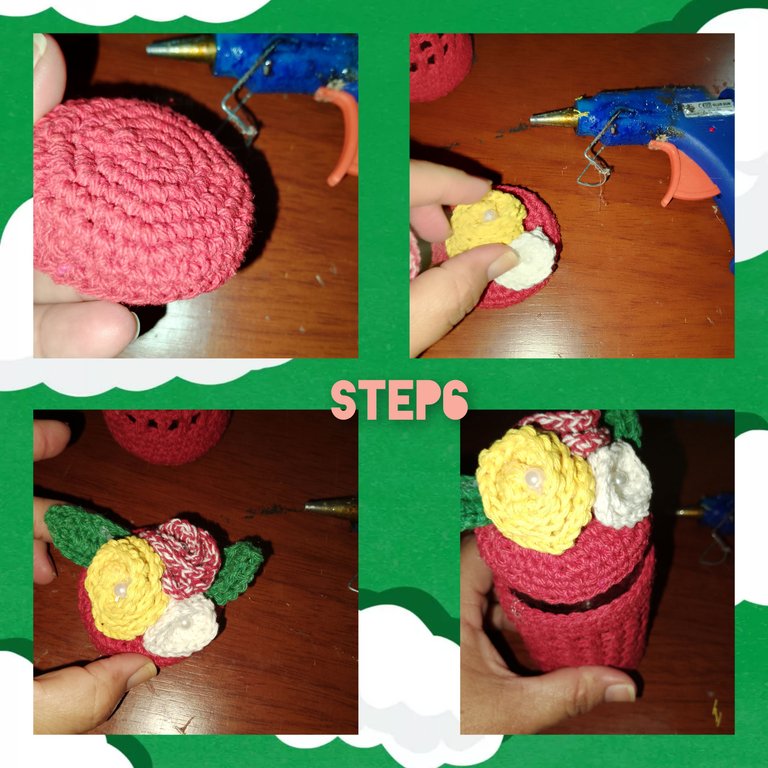
5.) with the matted yarn, I knit (12dc), leaving a dc, pick up, a dc, then repeat for 20 times. Once the ribbon is finished, I glue it to the container, leaving the small edge, chains and half points, making thin doubles, and gluing a little pearl on each fold. I place some silicone on the top of the lid, glue a flower and three delicate leaves.
6.) For the next jewelry box, after placing a little silicone, to fix the lining of the lid, I glue several flowers on it, with their leaves.
In this way, the jewelry boxes have now been ready, with a different function than the one they fulfilled, such as compotes, for the infants. Now they will be my jewelry boxes.

Glossaries:
(P.b) Low point.
(P.c) Chain stitch
(P.a) High point.
(P.s) Slipped point.
. All photos are my property, taken with my smartphone
. Use incollage.
. Use video gifs.
. Use language translator.
Grateful for following me to the end, it will be until the next opportunity.
(ESP)
Hola a todos, siento gran alegría y placer el estar, con ustedes en @diyhub, deseando se encuentren bien y gozando de buena salud, al lado de sus seres queridos. Hoy paso a mostrarles, un muy sencillo y lindo, proyecto manual, hecho usando la técnica de reciclaje y crochet, dónde use, envases de vidrio de compotas infantiles. Adoro trabajar con estos envases. Con ellos he realizado, dos lindos joyeros, que me permitirán mantener resguardo y ordenado mis accesorios y sobre todo poder clasificarlos, sin dejar de mencionar, lo decorativos que lucen en tus estantes o peinadoras, la invitación, es a seguirme y les mostraré lo lindo y fácil de hacer. Deseo lo disfruten.
Materiales Usados:
. Dos envases de vidrio.
. Hilos pavilos para tejer, colores ( rojo, rojo matizado con blanco, blanco y Verde).
. Aguja para tejer.
. Aguja lanera.
. Perlitas corridas.
. Recortes de alambre.
. Tijeras
. Silicón caliente.
PASOS:
1.) Luego de desprender la etiqueta de los envases, lavar y secar. Usando la técnica técnica de crochet, me dispongo a tejer una tapa, que cubra completamente la parte superior. Así qué, en un anillo mágico, tejere, (8pb) y cierro el anillo, en el primer mp. Y recojo el anillo. Para la siguiente vuelta, tejere, un aumento de pb. En cada pb. De la vuelta anterior, para 16mp. Para la siguiente, tejere pb,seguido de un aumento, para (24mp), de esta forma, tejere, dos vueltas más, para un total de cinco vueltas, haciendo aumentos, en la vuelta cuatro de dos puntos y luego el aumento y la siguiente tres pb y el aumento. Alcanzando un total (40 pb), para cubrir el pequeño borde de la tapa, tejere, dos vueltas sin aumento alguno. De esta forma, logro el tamaño justo, para cubrir la tapa, repitiendo para el siguiente joyero.
2.) para cubrir, un 70%, de la superficie y el envase de vidrio, comienzo, repitiendo el paso anterior, hasta la vuelta n5, que alcanza un total de 40 pb. Tejo para un primer envase, 10vueltas de pb, luego levanto un (p.a), tejo un (p.c), dejo un (pb) y en el siguiente tejo, (p.a), de esta manera, hago el recorrido y un total de cinco vueltas, continuo, y tejo cinco vueltas más de (p.b). Para el siguiente repito, tal cual, solo que en el borde de el envase rojo matizado, tejo un pequeño borde de tres, pc, dejo un pb y repito.
3.) para decorar, tejo, 22p.c) y en cada uno de ellos, tejo (4p.a), para, (88pa). Dejo luego de rematar, un pedacito de hilo, coloco la aguja lanera, y desde el inicio hasta el final voy dando vueltas, formó una flor y doy varias puntos con la aguja lanera. De est manera formó la flor, desprende perlas corridas y pego en el centro, con una puntada de silicón. Usando este mismo proceso, tejo, flores de diferentes colores.
4.) doblo en partes iguales los recortes de alambre, tejo (7p.c) y envolviendo el alambre, tejo medios puntos, llegado en la parte baja de el primer (p.c), tejo el siguiente lado de igual manera, y si formó pequeñas hojas.
5.) con el hilo matizado, tejo (12p.c), dejando un p.c, levanto, un p.a, luego repito por 20 veces. Terminado el listón, pego a el envase, dejando de la pequeña orilla, de cadenas y medios puntos, haciendo delgados dobles, y pegando sobre cada doblé, una perlita. Coloco un poco de silicón en la parte superior de la tapa, pego una flor y tres delicadas hojas.
6.) Para el siguiente joyero, luego de colocar un poco de silicón, para fijar el forrado de la tapa, pego varias flores sobre ella, con sus hojitas.
De est manera, ya han quedado listo los joyeros, con una función diferente, a la que cumplieron, como compotas, para los infantes. Ahora serán mis joyeros.
Glosarios:
(P.b) Punto bajo.
(P.c) Punto cadena
(P.a)Punto alto.
(P.d) Punto deslizado.
. Todas las fotos son de mí propiedad, tomadas con mí teléfono inteligente
. Use incollage.
. Use video gifs.
. Use traductor lenguaje.
Agradecida me hayas seguido hasta el final, será hasta una próxima oportunidad.
The jewelry box is attractive and has a simple look for children. Kudos
Si es sencillo y muy decorativo. Gracias
Se ven muy lindos los envases decorados con tejidos a crochet. Me gusta la manera en que sacaste provecho de esos frascos reciclados. Siempre presentando buenas ideas. Saludos.
The jewelry box looks nice and simple, albeit a tad small. Nice work still
Muy agradecida por su apoyo, que bueno le hy gustado...
Qué bellos! Me encanta todo lo maravilloso que se puede lograr dominando la técnica de tejer.
Que bonito amiga, lo que mas me gustó fueron las flores