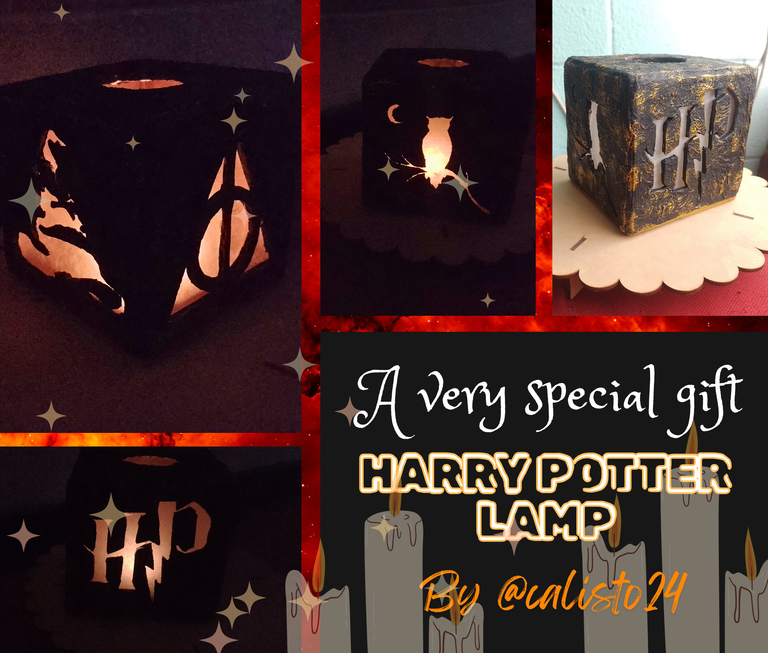
Hey dear artist friends!
A few days ago we had a very special family gathering, my oldest niece's birthday, and I wanted to give her something made with my own hands, since, for me, it is a very beautiful way to show affection.
It occurred to me to make a lamp inspired by Harry Potter, since she is a fan of the saga like me. And of course, here I bring you the step by step of how I made it! I hope you like it.
Hey queridos amigos artistas!
Hace unos días tuvimos una reunión familiar muy especial, el cumpleaños de mi sobrina mas grande, y quise regalarle algo hecho con mis propias manos, ya que, para mi, es una manera muy hermosa de demostrar cariño.
Se me ocurrió hacer una lampara inspirada en Harry Potter, ya que ella es fanática de la saga al igual que yo. Y por supuesto que aquí les traigo el paso a paso de cómo la hice! Espero les guste.
A short time ago, my family and I were blessed to be reunited with my niece, my older brother's oldest daughter. It had been more than 15 years since we knew anything about her, although we searched for her tirelessly, but her maternal family did not allow us to have a relationship with her.
Now that she has come of age, it was she who wanted to approach us and after meeting us, both she and my family, we could not be happier and more honored to share a relationship.
A few days ago it was her birthday, and since we missed so many celebrations in all these years, my family and I decided to throw her a surprise party, but also, I wanted to give her a gift that would be meaningful to her. So after thinking a lot about what I could give him, I came up with this lamp.
Hace poco tiempo, con mi familia, tuvimos la bendición de reencontrarnos con mi sobrina, la hija mas grande de mi hermano mayor. Hacía mas de 15 años que no sabíamos nada de ella aunque la buscamos hasta el cansancio, pero su familia materna, no nos permitían tener relación con ella.Ahora que ella cumplió su mayoría de edad, fue ella quien quiso acercarse a nosotros y luego de conocernos, tanto ella como mi familia, no podemos estar mas felices y honrados de compartir parentesco.
hace unos días fue su cumpleaños, y como nos perdimos de tantos festejos en todos estos años, con mi familia decidimos hacerle una fiesta sorpresa, pero además, yo quería hacerle un regalo que sea significativo para ella. Por lo que luego de pensar bastante en qué podría regalarle, se me ocurrió esta lampara.
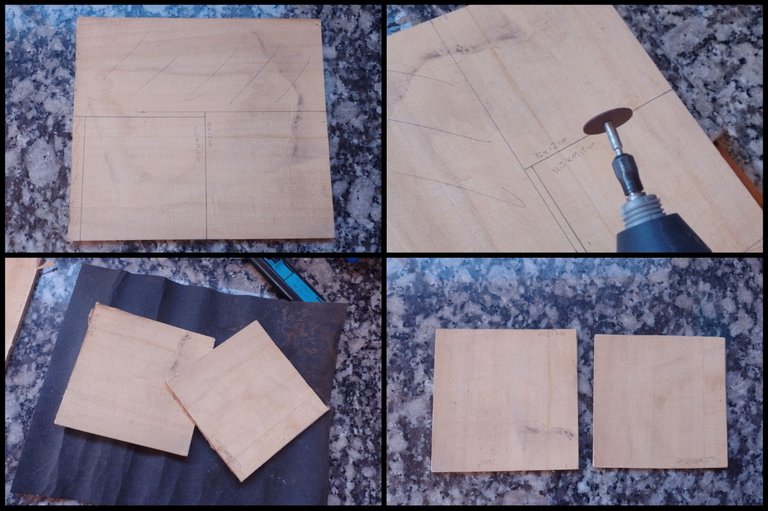
I started by cutting 2 squares of a material, which in my country is known as fibrofacil, it looks like wood but is actually super super pressed cardboard. That makes it hard and resistant.
With the help of a mini lathe, I cut 2 squares of that material. one measuring 12 x 12 centimeters, and the other measuring 11.5 x 11.5.
then I sanded all the sides and glued them on top of each other with glue. making sure that the smallest one is well centered on the largest one.
Comencé cortando 2 cuadrados de un material, que en mi país se lo conoce como fibrofacil, parece madera pero en realidad es cartón super super prensado. eso lo hace duro y resistente.Con la ayuda de un mini torno, corté 2 cuadrados de ese material. uno de 12 x 12 centímetros, y el otro de 11,5 x 11,5.
luego lijé todos los lados y los pegue uno sobre el otro con pegamento. procurando que el mas pequeño, quede bien centrado sobre el mas grande.
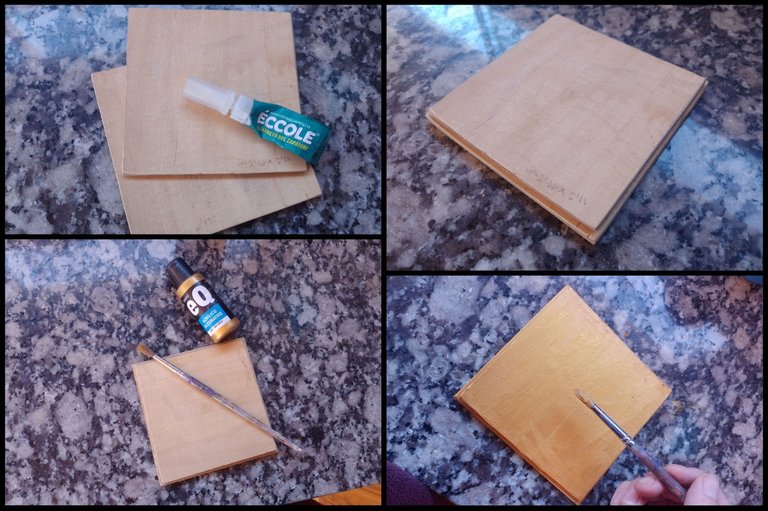
That will be the base of our candle lamp, so I painted the entire surface with gold acrylic paint.
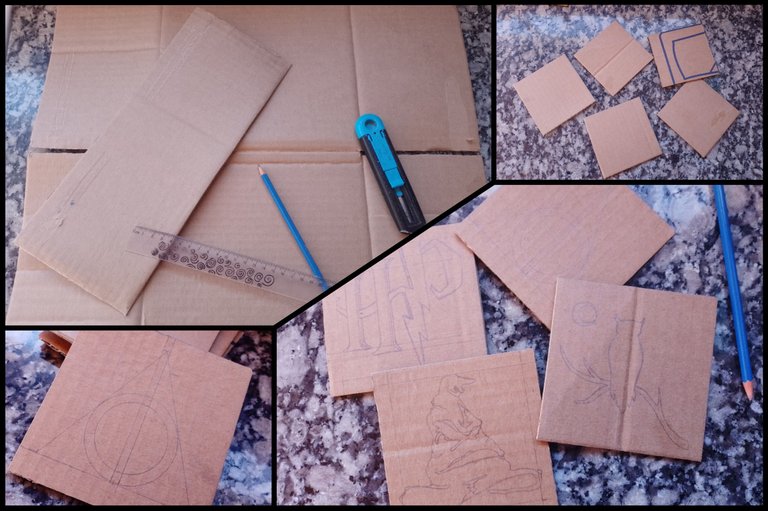
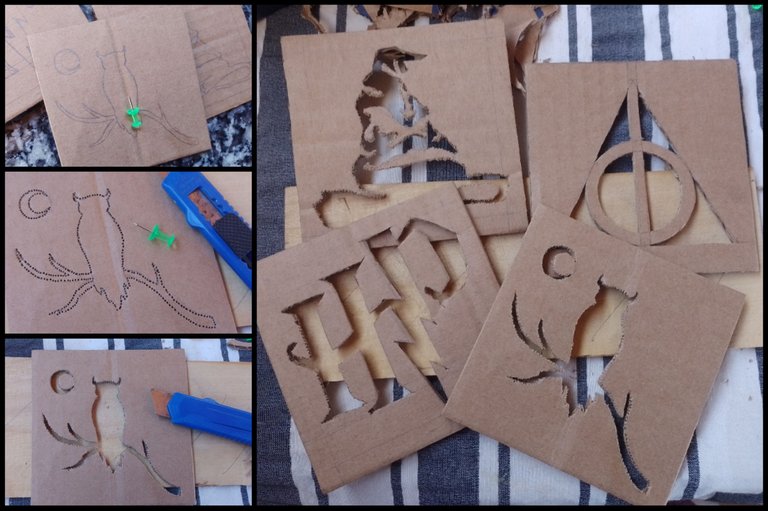
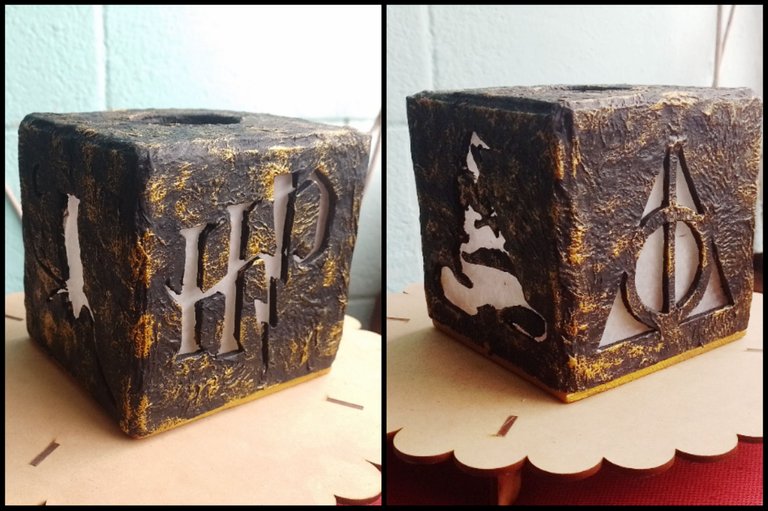
On the other hand, I continued with the walls and ceiling of the lamp. To do this, I cut out 5 squares measuring 11.5 centimeters high x 11.5 centimeters wide, from cardboard (which incidentally, I recycled a box that I had saved precisely to make a craft).
Then, I separated one of the squares that will be the ceiling of the lamp, and on the remaining 4 squares, I made representative drawings of the Harry Potter saga, such as the logo, the emblem, the hat and an owl.
Esa será la base de nuestra lampara de vela, por lo que pinté toda la superficie con pintura acrílica de color dorado.Por otro lado, continué con las paredes y el techo de la lampara. para ello, recorté 5 cuadrados de 11,5 centímetros de alto x 11,5 centímetros de ancho, de cartón (que de paso, reciclé una caja que había guardado justamente para hacer alguna manualidad).
Luego, separé uno de los cuadrados que será el techo de la lampara, y a los 4 cuadrados restantes, les realice dibujos representativos de la saga de Harry Potter, como el logo, el emblema, el sombrero y una lechuza.
Once the 4 sides of the lamp were drawn, I did the most tedious part of the work.
With a pin I began to go over the entire outline of the 4 figures. I did this, since we must remove those silhouettes, and since some of them have small details that the cutter cannot reach, then with this guide it becomes much easier.
So, as I mentioned just now, after going over the entire edge of the figures, we will finish cutting them out with a cutter or a scalpel.
Una vez dibujados los 4 lados de la lampara, realicé la parte mas tediosa del trabajo.Con un alfiler comencé a repasar todo el contorno de las 4 figuras. Esto lo hice, ya que debemos retirar esas siluetas, y como algunas de ellas tiene detalles pequeños a los que el cutter no alcanza, pues con esta guía luego se vuelve mucho mas fácil.
Asique, como mencioné recién, luego de repasar todo el borde de las figuras, terminaremos de recortarlas con un cutter o un bisturí.
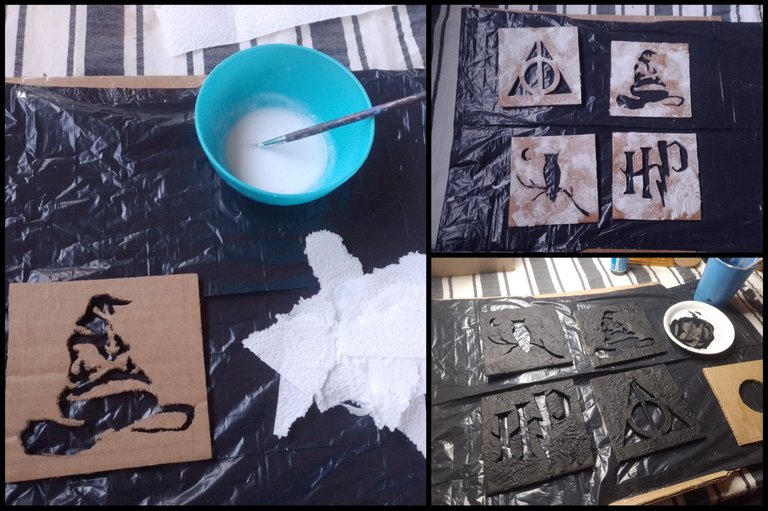
To define a little better all those edges that were untidy from the cuts, and also, to add a rustic texture to the lamp, I covered all the squares with a layer of pieces of paper napkin soaked in a mixture of water and white glue ( I make the mixture with one part white glue and half part water).
Also, this additional layer will add more rigidity to the lamp.
I let everything dry overnight (if you are anxious you can use a hair dryer) and painted all the pieces with black acrylic paint, trying to cover even the slightest wrinkles in the texture.
Para definir un poco mejor todos esos bordes que quedaron desprolijos de los cortes, y además, para agregarle una textura rustica a la lampara, cubrí todos los cuadrados con una capa de pedazos de servilleta de papel empapas en una mezcla de agua y cola blanca (la mezcla la realizo con una parte de cola blanca y media parte de agua).También, esta capa adicional, agregará mas rigidez a la lampara.
Dejé secar todo durante una noche entera (si son ansiosos pueden ayudarse con un secador de pelo) y pinté todas las piezas con pintura acrílica negra, procurando cubrir bien hasta la mas mínima arruga de la textura.
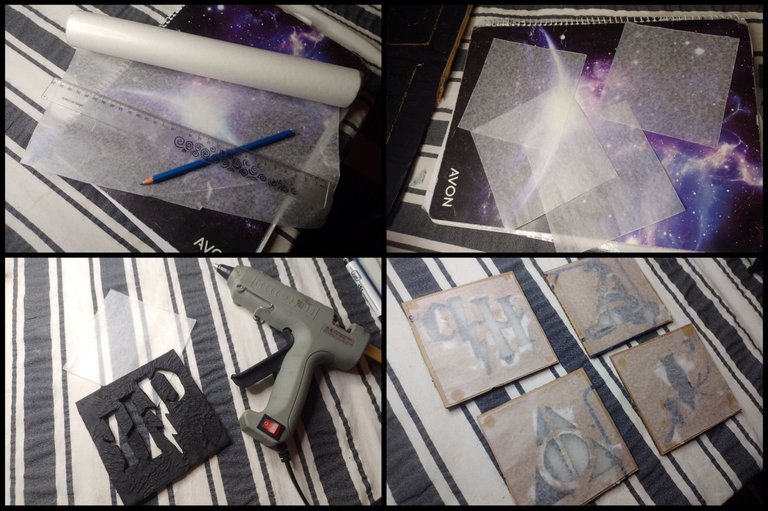
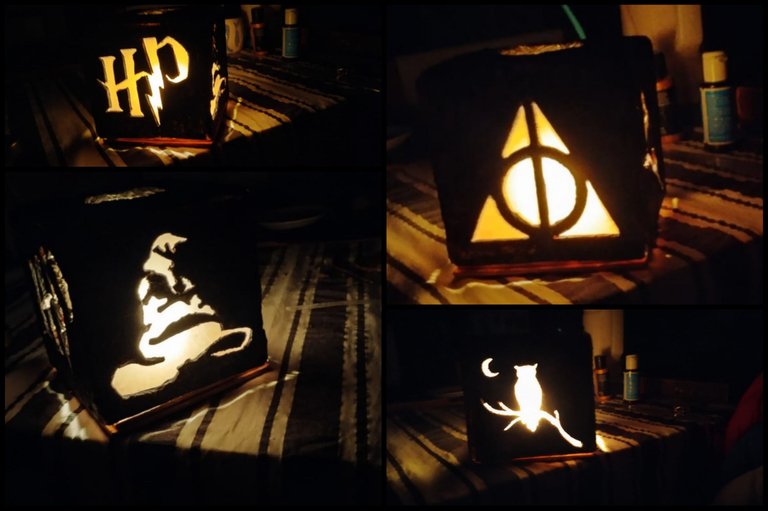
While the acrylic paint dries, continue cutting out 4 squares of parchment paper or wax paper (the kind used in the kitchen). Each square 11 x 11 centimeters.
And then I glued each square on the back side of each side of the lamp. That is, the wax paper should be on the inside of the lamp. This will generate a very beautiful effect when lighting the candle that goes inside the lamp and will highlight all the silhouettes with its light.
Mientras la pintura acrílica se seca, continué recortando 4 cuadrados de papel manteca o papel encerado (el que se utiliza para la cocina). Cada cuadrado de 11 x 11 centímetros.Y luego pegué cada cuadrado por el lado de atrás de cada lado de la lampara. Es decir, el papel encerado debe quedar del lado de adentro de la lampara. Esto generará un efecto muy bello a la hora de prender la velita que va dentro de la lampara y resaltará con su luz todas las siluetas.
It's time to put together our lamp.
We will place the 4 painted sides on the gold base, to use it as a guide. With a hot silicone gun, we will join all the sides on the inside, if we glue them to the base, we will only join the cardboards.
When we see that the walls of the lamp, already joined, fit perfectly with the base, we will proceed to glue the last square, which will be the ceiling. From this last square, we will cut out a circle (more or less the size of the candles that we will use. In my country they are called night candles, they are the ones usually used for aromatic essence stoves). We will center that circle in the center of the ceiling, just at the height of where we will place the candle at the base of the lamp.
When we have the cube completely assembled, we will cover all the corners with a layer of pieces of paper napkin with white glue. We will do this to neaten the corners so that the cardboard is not noticeable. We will let it dry again and finish painting the entire cube with black acrylic paint.
Once the paint is dry, we will take a piece of sponge (the one used to wash dishes), we will wet it with a little gold acrylic paint and we will dab it, without pressing too much, over the entire surface.
Llegó la hora de armar nuestra lampara.Ubicaremos los 4 lados de pintados sobre la base dorada, para usarla como guía. Con una pistola de silicona caliente, uniremos todos los lados por el lado de adentro, si pegarlos a la base, solo uniremos los cartones.
Cuando veamos que las paredes de la lampara, ya unidas, encastran a la perfección con la base, procederemos a pegar el ultimo cuadrada, que será el techo. A este último cuadrado, le recortaremos un circulo (mas o menos del tamaño de las velitas que usaremos. En mi país se llaman velas de noche, son las que se suelen utilizar para los hornillos de esencias aromáticas). Ese circulo lo centraremos en el centro del techo, justo a la altura de donde ubicaremos la vela en la base de la lampara.
Cuando tengamos el cubo completamente armado, cubriremos todas las esquinas con una capa de pedacitos de servilleta de papel con la cola blanca. Esto lo haremos para emprolijar las esquinas y que no se note el cartón. Dejaremos secar nuevamente y terminaremos de pintar todo el cubo con pintura acrílica negra.
Una vez seca la pintura, tomaremos un pedazo de esponja (la que se usa para lavar los trastes), la mojaremos con un poco de pintura acrílica dorada y daremos toquecitos, sin presionar demasiado, por toda la superficie.
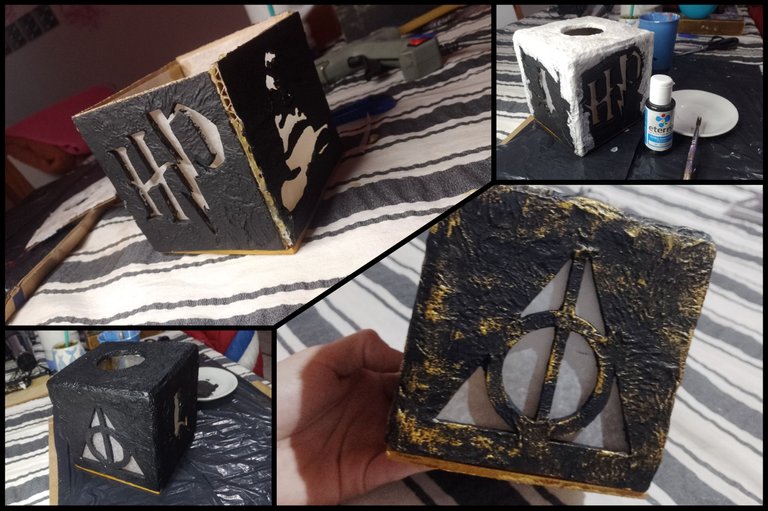
Finally, we are going to glue an aluminum candle holder in the center of the base of the lamp. and ready!! Tell me if the result of this lamp doesn't look great!! With few materials, and as economical or recyclable as cardboard, we can create very beautiful and even useful pieces.
Por ultimo, vamos a pegar en el centro de la base de la lampara un porta velas de aluminio. y listo!! díganme si el resultado de esta lampara no se ve genial!! con pocos materiales, y tan económicos o reciclables como lo es el cartón, podemos crear piezas muy bellas y hasta útiles.
Thank you for reading my content. a big hug for everyone
Gracias por leer mi contenido. Un abrazo grande para todos
Todas las fotografías y ediciones son de mi autoría. Realizado con la aplicación picsart y canva.

As hp lover I really appreciate this lamp and you did it using only quite cheap materials, good job ❤️
Hey @noemilunastorta Many times it happens to me that when I have various materials in my house, maybe I see a cardboard box and I automatically think of something to do with it, and then I have to take advantage of the inspiration 🤭. thanks for reading my post. greetings!
Hermoso trabajo, te felicito. Muy detallado. Saludos ☺️
Hey @irenenavarroart muchísimas gracias! Me alegro que haya gustado mi trabajo, me encantan las manualidades y aún más si es para hacer un regalo ❤️. Gracias por pasar. Saludos
Sencillamente hermosa y bastante real, me encanta esta lampara Harry Potter's.
Hey @alicargofer muchas gracias! Me encanta realizar este tipo de trabajos, te diría que es hasta terapéutico 🤭. Gracias por pasar. Saludos
Grandioso trabajo, me encanta Harry Potter a mi tambien, con una lampara asi hasta yo seria feliz jaja un regalo muy creativo y encantador 🦉
Hey @elbuhito me alegro mucho que haya gustado mi trabajo. Yo también soy fan de Harry, quizás eso hizo que le ponga aún más voluntad 🤭. Gracias por pasar, saludos.
Pero que genioo, jaja me encanta la verdad, muy creativo,seguro tu sobrina quedo fascinada, un hermoso regalo.
Hey @ikigaidesign por suerte le gustó muchísimo! El cariño por Harry es algo que nos une un poquito más 🤭 tambien a ella le encantan las manualidades, por lo que le dió un valor aún mas bonito al regalo. Gracias por pasar, saludos.
Por favor! Que arte llevas en las manos, te diría que me la quiero hacer, pero me da miedo estropearlo hahaha. Si me animo y lo hago te etiqueto.
Con permiso y me robo este blog✨❤️
Hey querida @virginianavas1 muchas gracias por tan bellas palabras!! esta actividad realmente me fascina! podría pasar horas y horas sumergido en este tipo de arte ya que en realidad, no hay reglas, es simplemente dejar volar la creatividad y cuando algo no está quedando del todo bien o no nos convence, nos da la oportunidad de improvisar, y por lo general, utilizo elementos reciclados o que fácilmente tenemos en nuestras casas. Me encantaría ver tu versión si es que te animas a jugar un rato ❤️.
En un rato subiré otro post sobre un cuadrito decorativo con efecto 3D hecho con cartón y goma eva (o foamy), si te interesa no te lo pierdas 😁. Un abrazo grande para ti!