Greetings to all of this wonderful community, Christmas is around the corner so it's time to be very active with preparations for the holidays, and of course, to decore. I've been having so much fun reading all of the ideas shared on this space and and now it's my turn to show you some crafting for this season.
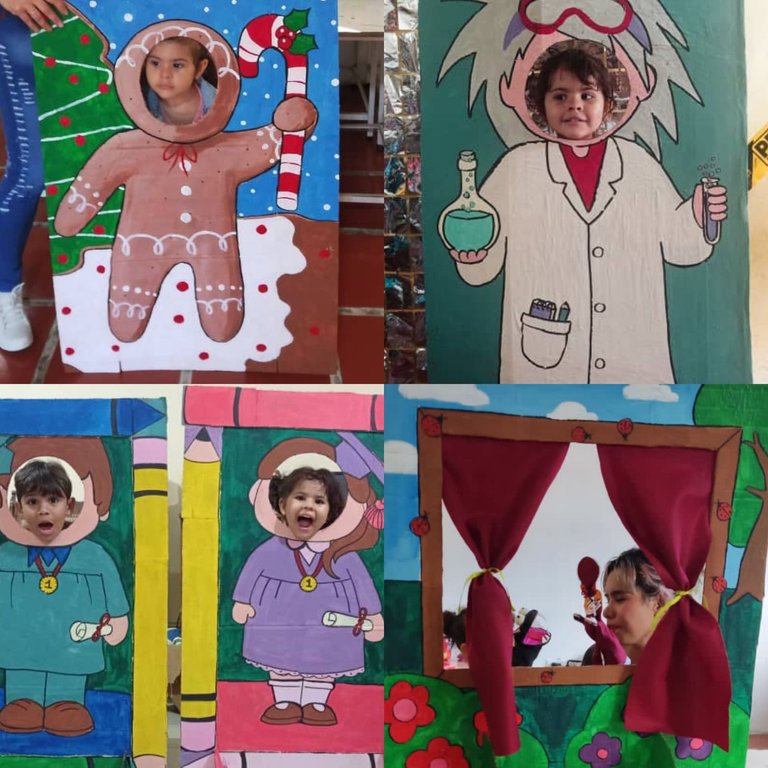
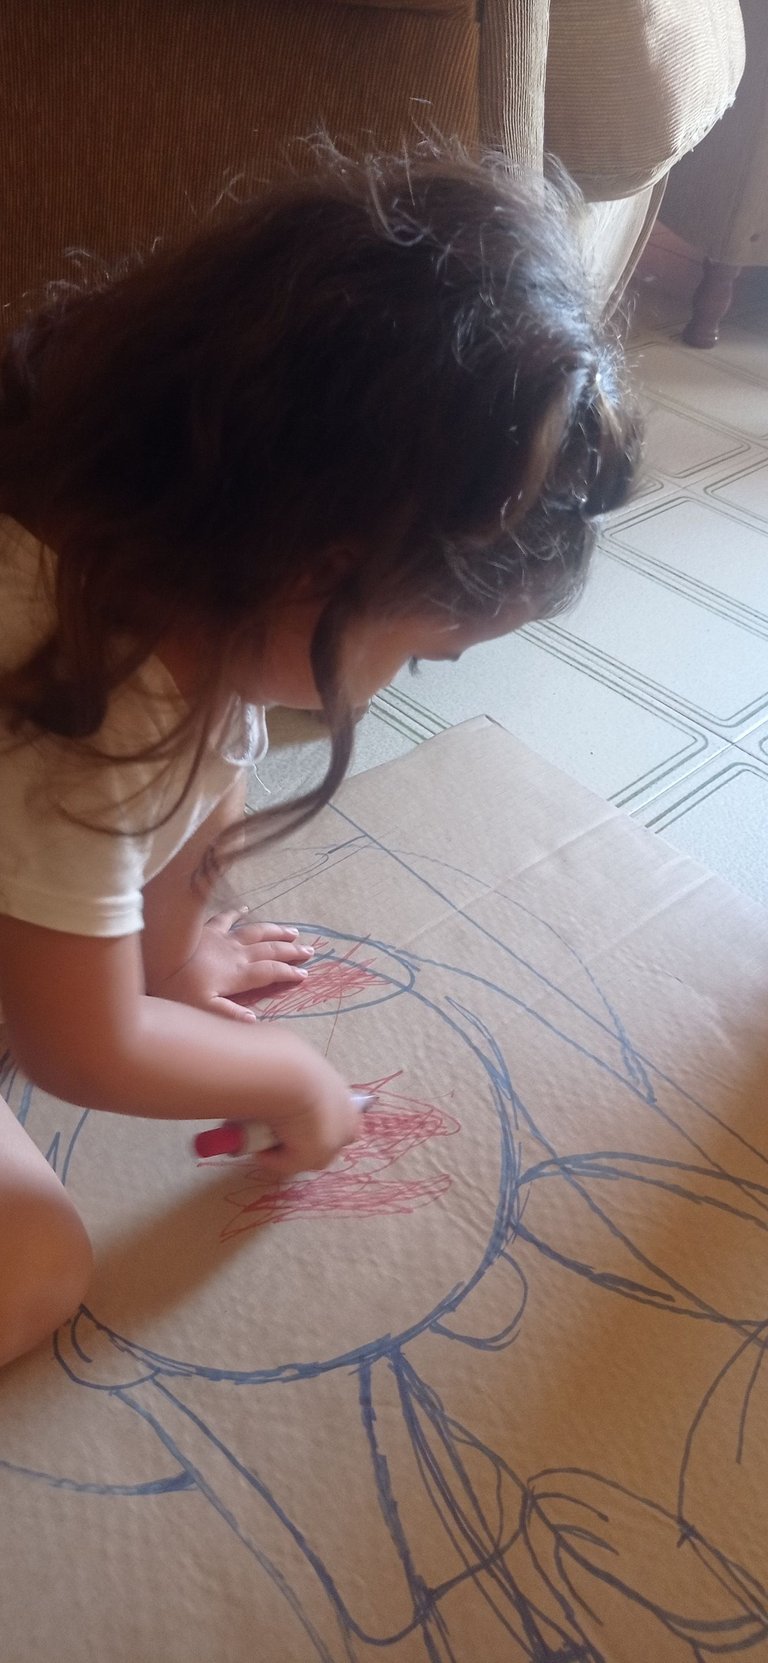
I am that mom that always gets called to school when it's time to decorate, and since my daughter was in nursery last year, I have been making photo booths. Everything started last Christmas when I made a gingerbread man, and from that moment I made a bunch more for every occasion,. including one that served as a puppet theater later.
Un saludo a ésta maravillosa comunidad, ya se avecina diciembre así que es hora de estar muy activos con los preparativos para celebraciones, y por supuesto, para decorar. Me he estado divirtiendo mucho viendo las ideas que han compartido por este espacio y ahora es mi turno de mostrarles una manualidad para éstas fiestas.
Yo soy esa mamá que siempre buscan en la escuela cuando es hora de decorar, y desde que mi pequeña estaba en maternal hace un año, he estado haciendo habladores para tomar fotografías. Todo empezó en navidad del año pasado cuando hice un muñeco de jengibre, y desde ese entonces he hecho con varias temáticas para cada ocasión, incluyendo uno que sirvió de teatro de títeres.
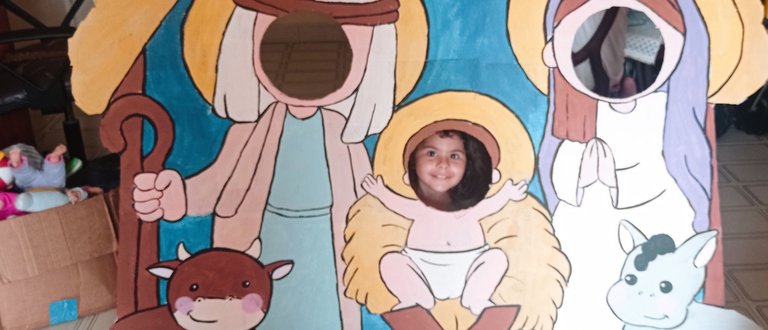
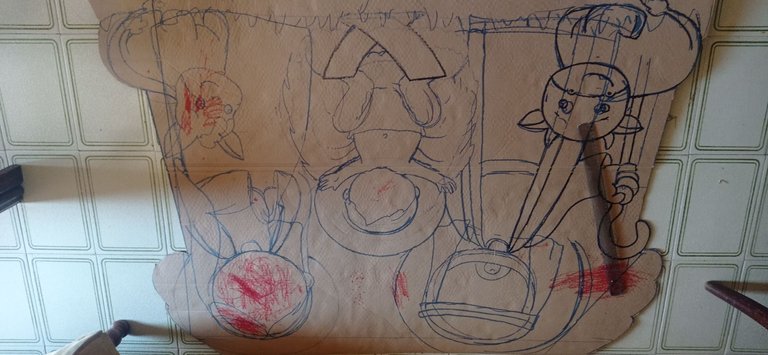
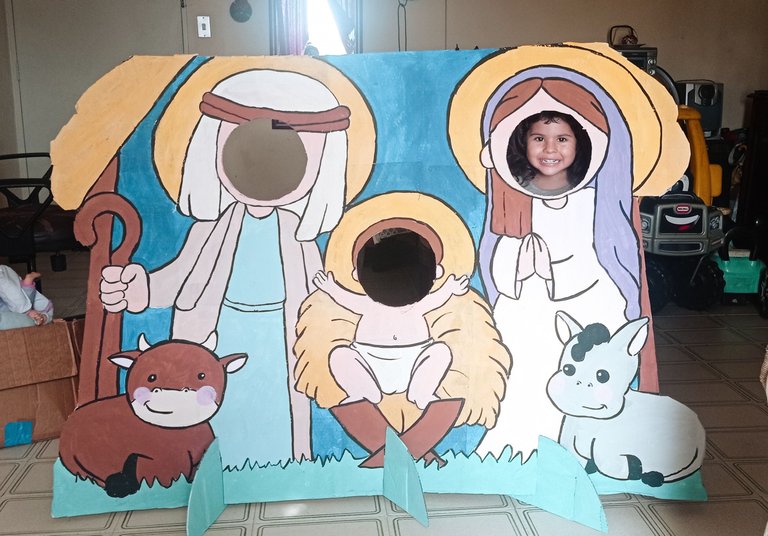
This time I will show you how I made the biggest so far, measuring one meter tall, and one meter and forty six centimeters wide, and the theme was baby Jesus' manger. The materials are:
- Big piece of cardboard.
- Acrylic paint, or any water based paint.
- Pencil and Markers.
- Paper
- Cutter.
- Scissors.
- White glue.
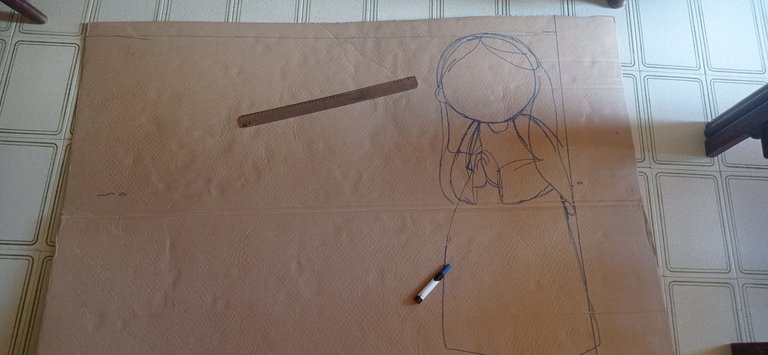
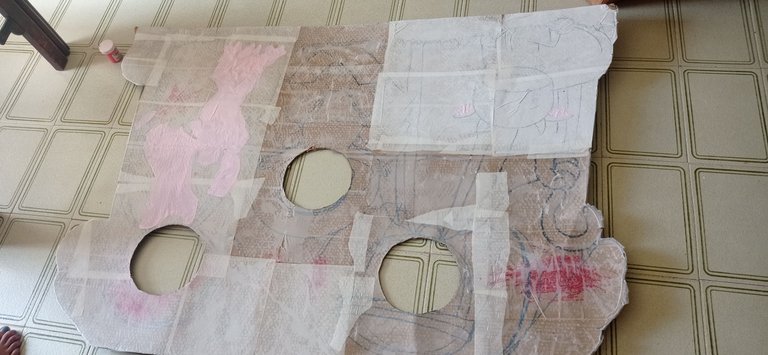
The first step was to place the cardboard on the floor and trace the measurements, on this case they're Three year old kids, so I decided it would be one meter tall. And to b able to fit the whole scenery I made it one hundred and forty six centimeters wide. Then I cut the excess using the cutter. Then I traced a rough sketch on the cardboard to have an estimate of where I would be placing each character, keeping in mind the heads had to be big enough for me to cut out the circles where the kids could place their faces for the pictures. For this I used markers since I would be puting paper on top and I wanted to be able to see through it so I could retrace it easily.
En esta ocasión les mostraré como elabore el mas grande hasta ahora, que mide un metro de alto y un metro cuarenta y seis centímetros de ancho, y la temática fue el nacimiento del niño Dios. Los materiales son:
- Cartón grande.
- Pinturas acrílica o pintura al frío.
- Lápiz y marcadores.
- Papel.
- Cuchilla o exacto.
- Tijeras.
- Pegamento blanco.
El primer paso fue colocar el cartón en el suelo y trazar las medidas necesarias, como se trata de niños de tres años de edad decidí que tendría un metro de alto. Y para que abarcará la escena completa lo hice de ciento cuarenta y seis centímetros de ancho. Luego corte el excedente usando la cuchilla. Luego trace un boceto del dibujo directamente sobre el cartón para tener una idea más concreta de dónde ubicaría cada personaje, asegurándome de que las cabezas fueran lo suficientemente grandes como para cortar el círculo donde los niños asomarán las caritas para tomarse fotos. Yo utilicé marcadores pues forrare con papel y quiero que se transparente el dibujo para facilitar a la hora de trazar nuevamente.
And, of course my daughter tried to help.
Y por supuesto que mi hija intento ayudar.
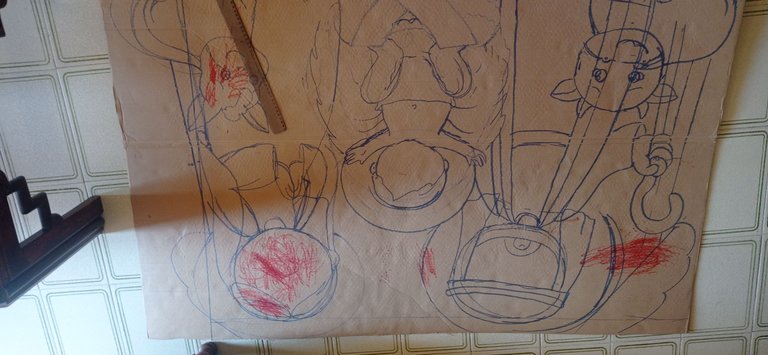
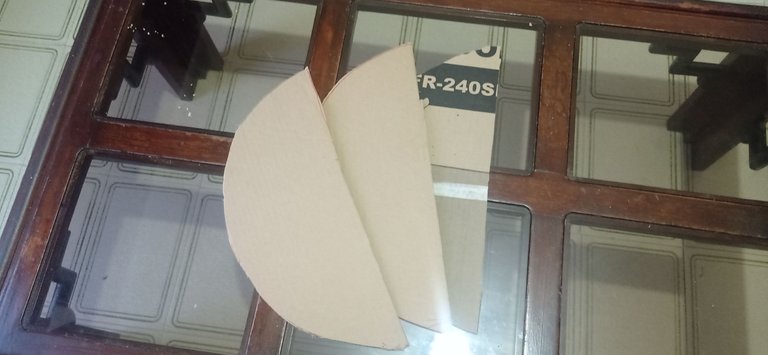
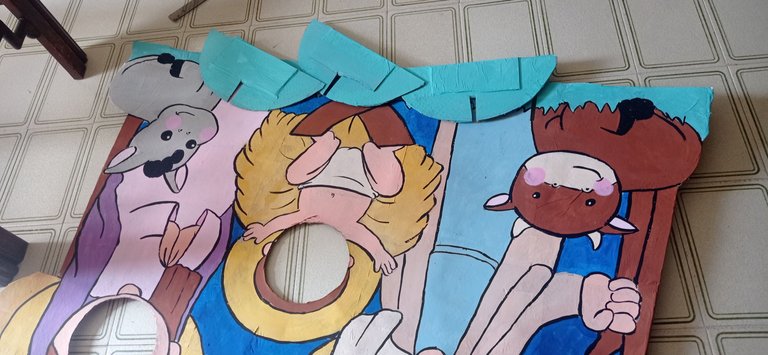
Then I cut out the shape because I didn't want it to be so rectangular, and with a piece of extra cardboard I traced three semicircles that are going to be the support for the structure. They are around sixteen centimeters tall and thirty of width, I usually make two of them, but this time I made one more considering the size.
Luego corte la forma pues no quería que fuera tan rectangular, y con un cartón restante trace tres semicírculos que servirán de soporte de la estructura. Estos tienen alrededor de dieciséis centímetros de alto y treinta de ancho, usualmente hago dos, pero al ser tan grande decidí hacer uno más.
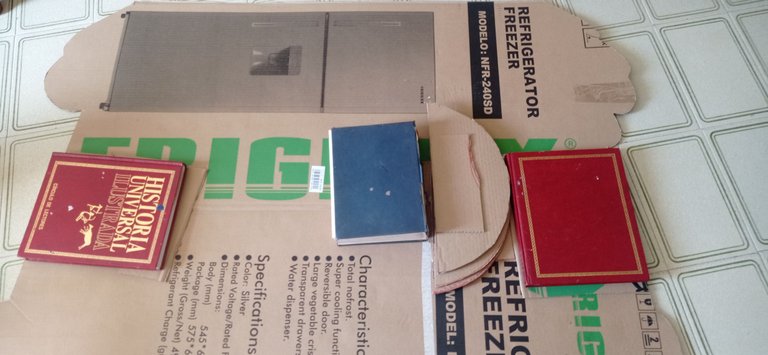
Now we turn it over and reinforce it by gluing pieces of cardboard on the places where it tends to collapse and fold, and we'll place some weight on them so they dry perfectly flat,. We will be reinforcing tht semicircles aswell.
Ahora volteamos y reforzamos pegando trozos de cartón en los lugares donde tiende a doblarse, y colocamos peso sobre ellos para que sequen bien unidos. También reforzamos los semicírculos.
Now we proceed to glue paper on it, this will be useful so the cardboard doesn't suck up too much paint, it will make a smooth surface to paint and it will be more sturdy. The trick is to moisten the paper and using a mixture of equal parts water and glue. We let it dry and we glue the back. We have to cut smaller bits around it so it's easier to glue when we turn it around.
A continuación procedemos a pegar papel, esto servirá para que el cartón no absorba tanta pintura, dará una superficie más lisa para pintar y quedará más sólido en general. El truco es humedecer el papel y utilizar una mezcla de agua y pega a partes iguales. Dejamos secar y pegamos por la parte posterior. Debemos cortar en las esquinas haciendo pestañas para que al voltear sea más fácil pegar.

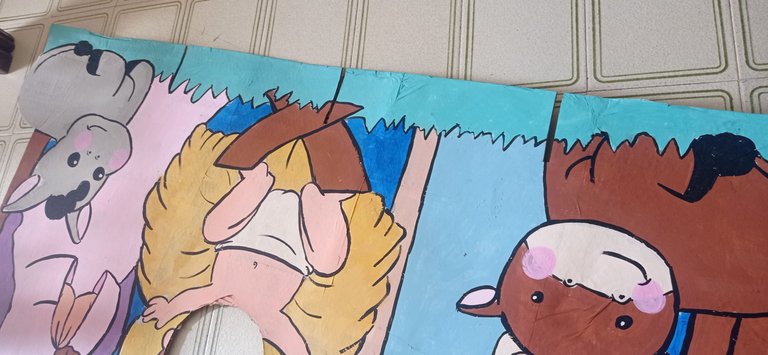
Once it's dry we cut out the circles on the faces of the characters. And now it's time to paint.
Al estar seco procedemos a cortar los círculos de las caras de los personajes. Y finalmente es hora de pintar.
After the paint is dry we measure the half on the bottom and we mark it, then we will find the half on each side and we'll have three marks, we will cut them about ten centimeters long to place the supports. On each semicircle we will cut right in the middle and they will be ready to slide in.
Luego de secar la pintura vamos a medir la mitad en la parte inferior y marcamos, luego en cada lado buscamos la mitad y tendremos tres marcas, en ellas vamos a cortar unos diez centímetros para ubicar los soportes. En cada media luna cortaremos justo a la mitad y estarán listos para encajar.
And it's done! Now I have to figure out how I'm going to take it to school 😅
¡Y ya está listo! Ahora solo queda ver cómo lo llevaré a la escuela 😅
Thank you for reading me, the pictures were taken by me with my Xiaomi Redmi Note 9.
Muchas gracias por leerme, las fotografías fueron tomadas por mi con mi teléfono Xiaomi Redmi Note 9.
You did such a good job with those! Bravo! 😃
Thank you very much!! ✨
Nice work
Thank you very much dear friend!
This post was shared and voted inside the discord by the curators team of discovery-it
Join our Community and follow our Curation Trail
Discovery-it is also a Witness, vote for us here
Delegate to us for passive income. Check our 80% fee-back Program
Congratulations @danigada18! You have completed the following achievement on the Hive blockchain And have been rewarded with New badge(s)
Your next target is to reach 2000 comments.
You can view your badges on your board and compare yourself to others in the Ranking
If you no longer want to receive notifications, reply to this comment with the word
STOPCheck out our last posts:
Me agrada está idea y a los niños les encanta.
Si, es increíble lo mucho que les gusta!
Quedo muy bonito amiga, excelente idea.
Muchas gracias!
!ALIVE | !BBH | !LADY
Thank you very much!!
View or trade
LOHtokens.@vocup, you successfully shared 0.1000 LOH with @danigada18 and you earned 0.1000 LOH as tips. (2/4 calls)
Use !LADY command to share LOH! More details available in this post.
@danigada18! You Are Alive so I just staked 0.1 $ALIVE to your account on behalf of @ vocup. (5/20)
The tip has been paid for by the We Are Alive Tribe through the earnings on @alive.chat, feel free to swing by our daily chat any time you want, plus you can win Hive Power (2x 50 HP) and Alive Power (2x 500 AP) delegations (4 weeks), and Ecency Points (4x 50 EP), in our chat every day.

@danigada18! Your Content Is Awesome so I just sent 1 $BBH (Bitcoin Backed Hive) to your account on behalf of @vocup. (1/20)
Oh wow! That's a fantastic and really creative work you did! The kids will surely love it!
thank you very much yes they do like it a lot it is insane how happy and excited they get!
Nice post conveys passion
!discovery 30
Thank you very much!!
Un trabajo bastante laborioso pero con resultados maravillosos en su aplicación, me gustó muchísimo entendible el tutorial gracias por mostrar algo diferente, saluditos 🌹
Gracias a ti por leerme!✨
Guao que increíble trabajo, te felicito hijita, realmente está hermoso, además de lo bien elaborado, me encantó, buen trabajo
Muchísimas gracias por el apoyo!
Que bonito quedó, gracias por compartir 🤗
That's fun. !LUV the how to. You did a nice job, and your kids seem to really enjoy the activity.